Use & Care Guide
Page 4
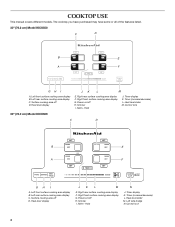
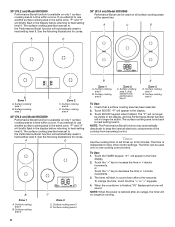
...Left side bridge N. The cooktop you have purchased may have some or all of the features listed. 30" (76.2 cm) Model KICU500 C D B E A F GH I . Left front surface cooking area display B. Heat level display JK L M E. Power on /off H. COOKTOP... USE This manual covers different models. Simmer I A. Surface cooking area off D. Right rear surface cooking area display F. Heat level slider M. Melt + Hold N J. Control lock 30" (76.2 cm) Model KICU509 C D B E A F GH I . Left rear surface cooking area...
...Left side bridge N. The cooktop you have purchased may have some or all of the features listed. 30" (76.2 cm) Model KICU500 C D B E A F GH I . Left front surface cooking area display B. Heat level display JK L M E. Power on /off H. COOKTOP... USE This manual covers different models. Simmer I A. Surface cooking area off D. Right rear surface cooking area display F. Heat level slider M. Melt + Hold N J. Control lock 30" (76.2 cm) Model KICU509 C D B E A F GH I . Left rear surface cooking area...
Use & Care Guide
Page 5
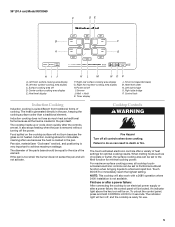
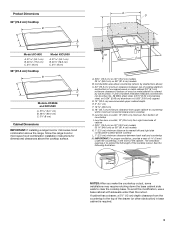
.... Cooktop Controls WARNING Fire Hazard Turn off I. Control lock Induction Cooking Induction cooking is very important to immediately reach the highest setting. 36" (91.4 cm) Model KICU569 C DE B F A G HI J A. Surface cooking area off D.
.... Cooktop Controls WARNING Fire Hazard Turn off I. Control lock Induction Cooking Induction cooking is very important to immediately reach the highest setting. 36" (91.4 cm) Model KICU569 C DE B F A G HI J A. Surface cooking area off D.

Use & Care Guide
Page 6
... or the power slider is selected, the timer will not turn on but remains active/ selected. Select a heat setting from 1 - 9 by touching/sliding on some models) The dual size surface cooking area offers flexibility to cook using different sizes of cookware. Dual surface cooking area ■ Home canning. ■ Large-diameter...
... or the power slider is selected, the timer will not turn on but remains active/ selected. Select a heat setting from 1 - 9 by touching/sliding on some models) The dual size surface cooking area offers flexibility to cook using different sizes of cookware. Dual surface cooking area ■ Home canning. ■ Large-diameter...
Use & Care Guide
Page 7
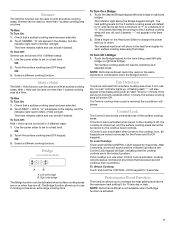
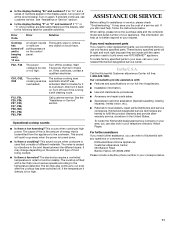
... setting 9 for 10 minutes or less. NOTE: Performance Boost is not available when the Bridge function is running for the zone being used on some models) A B A. Touch SIMMER. "A" will light. Bridge (on more than 1 surface cooking area at a time. Right side bridge The Bridge function can be turned on with an...
... setting 9 for 10 minutes or less. NOTE: Performance Boost is not available when the Bridge function is running for the zone being used on some models) A B A. Touch SIMMER. "A" will light. Bridge (on more than 1 surface cooking area at a time. Right side bridge The Bridge function can be turned on with an...
Use & Care Guide
Page 8
... too hot. "01" will briefly flash in the display before returning to heat setting level 9. A D 36" (91.4 cm) Model KICU569 Perfomance Boost can be used only on only 1 surface cooking area at a time within a zone. See the following illustrations for zones... cooking area 3, dual element with performance boost Zone 3 D. If you attempt to 90 minutes. Surface cooking area 1 B. 30" (76.2 cm) Model KICU500 Performance Boost function is available on one cooking zone at a time. See the following illustrations for zones. Surface cooking area 1 B. Surface cooking area...
... too hot. "01" will briefly flash in the display before returning to heat setting level 9. A D 36" (91.4 cm) Model KICU569 Perfomance Boost can be used only on only 1 surface cooking area at a time within a zone. See the following illustrations for zones... cooking area 3, dual element with performance boost Zone 3 D. If you attempt to 90 minutes. Surface cooking area 1 B. 30" (76.2 cm) Model KICU500 Performance Boost function is available on one cooking zone at a time. See the following illustrations for zones. Surface cooking area 1 B. Surface cooking area...
Use & Care Guide
Page 11
...; Features and specifications on the display, refer to the temperature detected. When calling, please know the purchase date and the complete model and serial number of energy that runs at the circuit breaker. To locate factory specified parts in your area, call us to ... or remove any questions or concerns at high power. The surface cooking area automatic shutoff was activated. This occurs when cooking at : KitchenAid Brand Home Appliances Customer eXperience Center 553 Benson Road Benton Harbor, MI 49022-2692 Please include a daytime phone number in your telephone directory...
...; Features and specifications on the display, refer to the temperature detected. When calling, please know the purchase date and the complete model and serial number of energy that runs at the circuit breaker. To locate factory specified parts in your area, call us to ... or remove any questions or concerns at high power. The surface cooking area automatic shutoff was activated. This occurs when cooking at : KitchenAid Brand Home Appliances Customer eXperience Center 553 Benson Road Benton Harbor, MI 49022-2692 Please include a daytime phone number in your telephone directory...
Use & Care Guide
Page 12
... countertop installations only) Order Part Number W10310006 Cooktop Cleaner (ceramic glass models) Order Part Number 31464 Cooktop Protectant (ceramic glass models) Order Part Number 31463 Cooktop Scraper (ceramic glass models) Order Part Number WA906B KitchenAid® Stainless Steel Cleaner and Polish (stainless steel models) Order Part Number 8171420 All-Purpose Appliance Cleaner Order Part Number...
... countertop installations only) Order Part Number W10310006 Cooktop Cleaner (ceramic glass models) Order Part Number 31464 Cooktop Protectant (ceramic glass models) Order Part Number 31463 Cooktop Scraper (ceramic glass models) Order Part Number WA906B KitchenAid® Stainless Steel Cleaner and Polish (stainless steel models) Order Part Number 8171420 All-Purpose Appliance Cleaner Order Part Number...
Use & Care Guide
Page 13
... it is used in the country in materials or workmanship and is reported to KitchenAid within 30 days from the date of purchase. 6. After checking "Troubleshooting," you need to know your complete model number and serial number. You must be repaired in the home and only in... a remote area where service by an authorized KitchenAid servicer is covered by this warranty. 7. You will pay for Factory Specified...
... it is used in the country in materials or workmanship and is reported to KitchenAid within 30 days from the date of purchase. 6. After checking "Troubleshooting," you need to know your complete model number and serial number. You must be repaired in the home and only in... a remote area where service by an authorized KitchenAid servicer is covered by this warranty. 7. You will pay for Factory Specified...
Dimension Guide
Page 1
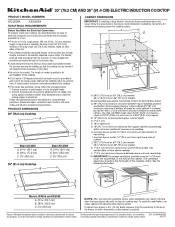
... conduit provided is already provided at the junction box). 30" (76.2 CM) AND 36" (91.4 CM) ELECTRIC INDUCTION COOKTOP PRODUCT MODEL NUMBERS KICU509X KICU569X ELECTRICAL REQUIREMENTS: Before You Make the Electrical Connection: To properly install your cooktop, you must determine the type of electrical ...moved if servicing becomes necessary in base cabinet is required on a separate, 50-amp circuit (36" [91.4 cm] models) or 40-amp circuit (30" [76.2 cm] models), fused on both sides of the line. q Do not cut the conduit. PRODUCT DIMENSIONS CABINET DIMENSIONS IMPORTANT: If installing...
... conduit provided is already provided at the junction box). 30" (76.2 CM) AND 36" (91.4 CM) ELECTRIC INDUCTION COOKTOP PRODUCT MODEL NUMBERS KICU509X KICU569X ELECTRICAL REQUIREMENTS: Before You Make the Electrical Connection: To properly install your cooktop, you must determine the type of electrical ...moved if servicing becomes necessary in base cabinet is required on a separate, 50-amp circuit (36" [91.4 cm] models) or 40-amp circuit (30" [76.2 cm] models), fused on both sides of the line. q Do not cut the conduit. PRODUCT DIMENSIONS CABINET DIMENSIONS IMPORTANT: If installing...
Installation Guide
Page 2
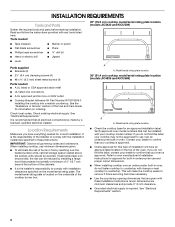
... Instructions. When installing cooktop, use minimum dimensions given. ■ To eliminate the risk of the oven. Verify approved oven model numbers that all governing codes and ordinances. See "Electrical Requirements" section. 2 IMPORTANT: Observe all electrical connections be avoided. ...be approved for an approved installation label. Refer to oven manufacturer's Installation Instructions for approval for information on the model/serial rating plate. INSTALLATION REQUIREMENTS Tools and Parts Gather the required tools and parts before starting installation. Read and ...
... Instructions. When installing cooktop, use minimum dimensions given. ■ To eliminate the risk of the oven. Verify approved oven model numbers that all governing codes and ordinances. See "Electrical Requirements" section. 2 IMPORTANT: Observe all electrical connections be avoided. ...be approved for an approved installation label. Refer to oven manufacturer's Installation Instructions for approval for information on the model/serial rating plate. INSTALLATION REQUIREMENTS Tools and Parts Gather the required tools and parts before starting installation. Read and ...
Installation Guide
Page 3
...;⁄₈" (13 cm) depth clearance from bottom of countertop I K J A. 29½" (75.0 cm) on 30" (76.2 cm) models 33 84.0 cm) on 36" (91.4 cm) models K. 1" (2.5 cm) minimum distance to nearest left and right side combustible surface above cooktop L. 1" (2.5 cm) minimum clearance between top of cooktop platform...(45.7 cm) minimum clearance from right-hand side of cabinet J. 29½" (75.0 cm) on 30" (76.2 cm) models 33 84.0 cm) on 36" (91.4 cm) models B. Junction box or outlet; 12" (30.5 cm) minimum from the countertop to extend the full length of the cabinet. The ...
...;⁄₈" (13 cm) depth clearance from bottom of countertop I K J A. 29½" (75.0 cm) on 30" (76.2 cm) models 33 84.0 cm) on 36" (91.4 cm) models K. 1" (2.5 cm) minimum distance to nearest left and right side combustible surface above cooktop L. 1" (2.5 cm) minimum clearance between top of cooktop platform...(45.7 cm) minimum clearance from right-hand side of cabinet J. 29½" (75.0 cm) on 30" (76.2 cm) models 33 84.0 cm) on 36" (91.4 cm) models B. Junction box or outlet; 12" (30.5 cm) minimum from the countertop to extend the full length of the cabinet. The ...
Installation Guide
Page 4
... properly grounded. Install Brackets NOTE: Cooktop Bracket Adhesive Kit Part Number W10310006 is required on a separate, 50-amp circuit (36" [91.4 cm] models) or 40-amp circuit (30" [76.2 cm] models), fused on ordering. Connect the aluminum wiring to aluminum. Use 8 gauge copper wire. A copy of the cooktop. ■ A UL listed or...
... properly grounded. Install Brackets NOTE: Cooktop Bracket Adhesive Kit Part Number W10310006 is required on a separate, 50-amp circuit (36" [91.4 cm] models) or 40-amp circuit (30" [76.2 cm] models), fused on ordering. Connect the aluminum wiring to aluminum. Use 8 gauge copper wire. A copy of the cooktop. ■ A UL listed or...

Instruction Sheet
Page 1
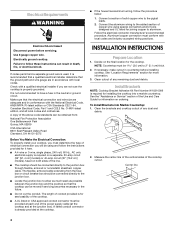
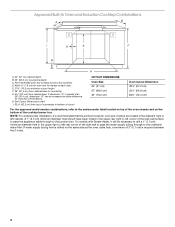
... for oven and cooktop be approved for cutout dimensions. I D E C F G H A. 24" (61 cm) cabinet depth B. 25" (63.5 cm) countertop depth C. On models with the maximum allowable wood cabinet temperatures of 194°F (90°C). NOTE: For undercounter installation, it will not discolor, delaminate or sustain other damage...) 25¹⁄₂" (64.8 cm) 28½" (72.4 cm) 34¹⁄₂" (87.6 cm) For the approved model number combinations, refer to the undercounter label located on top of the oven chassis and on each side. Center the cooktop cutout over an oven...
... for oven and cooktop be approved for cutout dimensions. I D E C F G H A. 24" (61 cm) cabinet depth B. 25" (63.5 cm) countertop depth C. On models with the maximum allowable wood cabinet temperatures of 194°F (90°C). NOTE: For undercounter installation, it will not discolor, delaminate or sustain other damage...) 25¹⁄₂" (64.8 cm) 28½" (72.4 cm) 34¹⁄₂" (87.6 cm) For the approved model number combinations, refer to the undercounter label located on top of the oven chassis and on each side. Center the cooktop cutout over an oven...
Instruction Sheet
Page 2
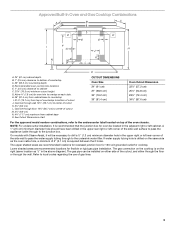
...) 30" (76.2 cm) Oven Cutout Dimension 22¹⁄₂" (57.2 cm) 25¹⁄₂" (64.8 cm) 28½" (72.4 cm) For the approved model number combinations, refer to the undercounter label located on top of the oven chassis and on the bottom of the side wall surface to pass... tubing through to overlap on each side. H. Approved Built-In Oven and Induction Cooktop Combinations A B C I . 32³⁄₈" (82.2 cm) from cabinet base. On models with Steam-Assist, it is required between the 2 holes. 2 Recommended oven and cooktop junction box locations D.
...) 30" (76.2 cm) Oven Cutout Dimension 22¹⁄₂" (57.2 cm) 25¹⁄₂" (64.8 cm) 28½" (72.4 cm) For the approved model number combinations, refer to the undercounter label located on top of the oven chassis and on the bottom of the side wall surface to pass... tubing through to overlap on each side. H. Approved Built-In Oven and Induction Cooktop Combinations A B C I . 32³⁄₈" (82.2 cm) from cabinet base. On models with Steam-Assist, it is required between the 2 holes. 2 Recommended oven and cooktop junction box locations D.
Instruction Sheet
Page 3
...installation, it will be installed on either side of the side wall surface to pass the appliance cable through to the junction box. On models with Steam-Assist, it is recommended that the junction box for cooktop. The upper shaded areas are recommended locations for oven trim to ...185;⁄₂" (57.2 cm) 25¹⁄₂" (64.8 cm) 28½" (72.4 cm) 34¹⁄₂" (87.6 cm) For the approved model number combinations, refer to cabinet F. 27¾" (70.5 cm) minimum cutout height G. A 1" (2.5 cm) minimum diameter hole should have been drilled in the above diagram...
...installation, it will be installed on either side of the side wall surface to pass the appliance cable through to the junction box. On models with Steam-Assist, it is recommended that the junction box for cooktop. The upper shaded areas are recommended locations for oven trim to ...185;⁄₂" (57.2 cm) 25¹⁄₂" (64.8 cm) 28½" (72.4 cm) 34¹⁄₂" (87.6 cm) For the approved model number combinations, refer to cabinet F. 27¾" (70.5 cm) minimum cutout height G. A 1" (2.5 cm) minimum diameter hole should have been drilled in the above diagram...


