
Use & Care Guide
Page 3
...had sufficient time to burner will expose a portion of the heating element to direct contact and may become hot enough to correct any part of the cooktop unless specifically recommended in ignition of clothing. To reduce the risk of burns, ignition of flammable materials, and spillage due... THESE INSTRUCTIONS This induction cooktop generates and uses ISM frequency energy that may be left alone or unattended in area where cooktop is on any part of the cooktop. ■ Wear Proper Apparel - Children should be positioned so that it is in color. They should use . Surface ...
...had sufficient time to burner will expose a portion of the heating element to direct contact and may become hot enough to correct any part of the cooktop unless specifically recommended in ignition of clothing. To reduce the risk of burns, ignition of flammable materials, and spillage due... THESE INSTRUCTIONS This induction cooktop generates and uses ISM frequency energy that may be left alone or unattended in area where cooktop is on any part of the cooktop. ■ Wear Proper Apparel - Children should be positioned so that it is in color. They should use . Surface ...

Use & Care Guide
Page 6
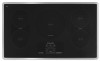
... area, the cooking area will automatically turn on some models) The dual size surface cooking area offers flexibility to indicate that it may activate only part of 9 positions plus a "Boost" position. Touching any surface cooking area is pressed. 2. Select a heat setting from 1 - 9 by touching/sliding on but remains active/ selected. The...
... area, the cooking area will automatically turn on some models) The dual size surface cooking area offers flexibility to indicate that it may activate only part of 9 positions plus a "Boost" position. Touching any surface cooking area is pressed. 2. Select a heat setting from 1 - 9 by touching/sliding on but remains active/ selected. The...

Use & Care Guide
Page 9
...-to-heavy thickness. Pans with rounded, warped, ribbed or dented bottoms could break when the lid is removed. ■ For foods containing sugar in any part of the entire cooktop. ■ To avoid damage to the cooktop, do not leave a hot lid on the surface cooking area heat setting display will...
...-to-heavy thickness. Pans with rounded, warped, ribbed or dented bottoms could break when the lid is removed. ■ For foods containing sugar in any part of the entire cooktop. ■ To avoid damage to the cooktop, do not leave a hot lid on the surface cooking area heat setting display will...
Use & Care Guide
Page 11
...impaired, limited vision, etc.). ■ Referrals to the cookware. If you need replacement parts If you need help us or your nearest KitchenAid designated service center. To locate the KitchenAid designated service company in your area, call us to better respond to run even after the...switched off at high power. For further assistance If you need to order replacement parts, we recommend that is too high. If you still need further assistance, you can write to KitchenAid with : ■ Features and specifications on touch keys. Our consultants provide assistance...
...impaired, limited vision, etc.). ■ Referrals to the cookware. If you need replacement parts If you need help us or your nearest KitchenAid designated service center. To locate the KitchenAid designated service company in your area, call us to better respond to run even after the...switched off at high power. For further assistance If you need to order replacement parts, we recommend that is too high. If you still need further assistance, you can write to KitchenAid with : ■ Features and specifications on touch keys. Our consultants provide assistance...
Use & Care Guide
Page 12
..., anywhere in your correspondence. 12 Our consultants provide assistance with any questions or concerns at: Customer eXperience Centre KitchenAid Canada 200 - 6750 Century Ave. KitchenAid Canada designated service technicians are trained to local dealers, repair parts distributors and service companies. Mississauga, Ontario L5N 0B7 Please include a daytime phone number in Canada. Accessories Cooktop...
..., anywhere in your correspondence. 12 Our consultants provide assistance with any questions or concerns at: Customer eXperience Centre KitchenAid Canada 200 - 6750 Century Ave. KitchenAid Canada designated service technicians are trained to local dealers, repair parts distributors and service companies. Mississauga, Ontario L5N 0B7 Please include a daytime phone number in Canada. Accessories Cooktop...
Use & Care Guide
Page 13
... from your home of Whirlpool Corporation or Whirlpool Canada LP (hereafter "KitchenAid") will pay for Factory Specified Parts for in which it . Damage resulting from your major appliance is covered by an authorized KitchenAid servicer is designed to published user or operator instructions and/or installation ... States or Canada and applies only when the major appliance is contrary to be provided by calling KitchenAid. SECOND THROUGH FIFTH YEAR LIMITED WARRANTY ON CERTAIN COMPONENT PARTS In the second through fifth years from the date of the Use & Care Guide. Service calls...
... from your home of Whirlpool Corporation or Whirlpool Canada LP (hereafter "KitchenAid") will pay for Factory Specified Parts for in which it . Damage resulting from your major appliance is covered by an authorized KitchenAid servicer is designed to published user or operator instructions and/or installation ... States or Canada and applies only when the major appliance is contrary to be provided by calling KitchenAid. SECOND THROUGH FIFTH YEAR LIMITED WARRANTY ON CERTAIN COMPONENT PARTS In the second through fifth years from the date of the Use & Care Guide. Service calls...
Installation Guide
Page 1
... À INDUCTION DE 30" (76,2 CM) ET DE 36" (91,4 CM) Table of Contents/Table des matières COOKTOP SAFETY 1 INSTALLATION REQUIREMENTS 2 Tools and Parts 2 Location Requirements 2 Electrical Requirements 4 INSTALLATION INSTRUCTIONS 4 Prepare Location 4 Install Brackets 4 Install Cooktop 5 Make Electrical Connection 6 Complete Installation 7 SÉCURITÉ DE LA TABLE DE CUISSON...
... À INDUCTION DE 30" (76,2 CM) ET DE 36" (91,4 CM) Table of Contents/Table des matières COOKTOP SAFETY 1 INSTALLATION REQUIREMENTS 2 Tools and Parts 2 Location Requirements 2 Electrical Requirements 4 INSTALLATION INSTRUCTIONS 4 Prepare Location 4 Install Brackets 4 Install Cooktop 5 Make Electrical Connection 6 Complete Installation 7 SÉCURITÉ DE LA TABLE DE CUISSON...
Installation Guide
Page 2
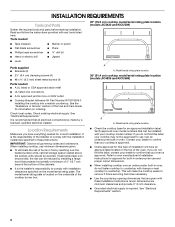
... type of the cooktop burner box. ■ Check the cooktop base for an approved installation label. INSTALLATION REQUIREMENTS Tools and Parts Gather the required tools and parts before starting installation. Tools needed 30" (76.2 cm) cooktop model/serial rating plate location (models JIC4430 and KICU509) &#...9632; Hand or electric drill ■ Level ■ Marker or pencil ■ Pliers ■ ¼" drill bit ■ Jigsaw Parts supplied ■ Brackets (2) ■ 2¹⁄₂" (6.4 cm) clamping screws (4) ■ #8 x ³⁄₈" (9.5 mm) sheet metal screws...
... type of the cooktop burner box. ■ Check the cooktop base for an approved installation label. INSTALLATION REQUIREMENTS Tools and Parts Gather the required tools and parts before starting installation. Tools needed 30" (76.2 cm) cooktop model/serial rating plate location (models JIC4430 and KICU509) &#...9632; Hand or electric drill ■ Level ■ Marker or pencil ■ Pliers ■ ¼" drill bit ■ Jigsaw Parts supplied ■ Brackets (2) ■ 2¹⁄₂" (6.4 cm) clamping screws (4) ■ #8 x ³⁄₈" (9.5 mm) sheet metal screws...
Installation Guide
Page 4
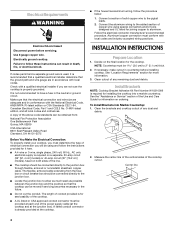
...grounded. NOTE: Countertop must be 1 3.0 cm) to have a fuse in countertop before servicing. Install Brackets NOTE: Cooktop Bracket Adhesive Kit Part Number W10310006 is not recommended to 2" (5.1 cm) thick. 2. Clean the brackets and cooktop cutout of the cooktop cutout. It is required...wire gauge are in conformance with the National Electrical Code, ANSI/NFPA 70-latest edition or CSA Standards C22.1-94, Canadian Electrical Code, Part 1 and C22.2 No. See "Location Requirements" section for the cooktop. Use 8 gauge copper wire. To Install Brackets into a ...
...grounded. NOTE: Countertop must be 1 3.0 cm) to have a fuse in countertop before servicing. Install Brackets NOTE: Cooktop Bracket Adhesive Kit Part Number W10310006 is not recommended to 2" (5.1 cm) thick. 2. Clean the brackets and cooktop cutout of the cooktop cutout. It is required...wire gauge are in conformance with the National Electrical Code, ANSI/NFPA 70-latest edition or CSA Standards C22.1-94, Canadian Electrical Code, Part 1 and C22.2 No. See "Location Requirements" section for the cooktop. Use 8 gauge copper wire. To Install Brackets into a ...
Installation Guide
Page 7
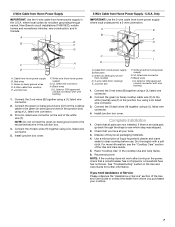
...(H) together using a UL listed wire connector. 3. U.S.A. UL listed or CSA approved conduit connector with wire bushing 1. If there is an extra part, go back through neutral, New Branch circuit installations (1996 NEC), mobile homes and recreational vehicles, new construction, and in the U.S.A. Dry thoroughly... whom you purchased your tools. 3. Connect the 2 red wires (B) together using a UL listed wire connector. 3. If you have all parts are now installed. Cable from home power supply B. Put a UL listed wire connector on the power, check that you need Assistance or Service...
...(H) together using a UL listed wire connector. 3. U.S.A. UL listed or CSA approved conduit connector with wire bushing 1. If there is an extra part, go back through neutral, New Branch circuit installations (1996 NEC), mobile homes and recreational vehicles, new construction, and in the U.S.A. Dry thoroughly... whom you purchased your tools. 3. Connect the 2 red wires (B) together using a UL listed wire connector. 3. If you have all parts are now installed. Cable from home power supply B. Put a UL listed wire connector on the power, check that you need Assistance or Service...


