Dimension Guide
Page 1
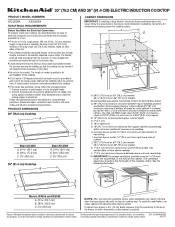
...the Electrical Connection: To properly install your cooktop, you must determine the type of electrical connection you make the countertop cutout, some installations may require notching down the base cabinet side walls to the junction box through flexible, armored or nonmetallic ... the instructions provided for dimensional clearances above the range, follow the procedure below: 1. Instructions packed with sidewalls wider than the cutout. Follow the electrical connector manufacturer's recommended procedure. To avoid this modification, use a base cabinet with product. For complete details...
...the Electrical Connection: To properly install your cooktop, you must determine the type of electrical connection you make the countertop cutout, some installations may require notching down the base cabinet side walls to the junction box through flexible, armored or nonmetallic ... the instructions provided for dimensional clearances above the range, follow the procedure below: 1. Instructions packed with sidewalls wider than the cutout. Follow the electrical connector manufacturer's recommended procedure. To avoid this modification, use a base cabinet with product. For complete details...
Installation Guide
Page 2
... for built-in undercounter use over an undercounter built-in these Installation Instructions. Refer to oven manufacturer's Installation Instructions for approval for use and proper cutout dimensions. ■ When installing cooktop over an undercounter built-in oven. Given dimensions are given with the installation clearances specified in oven, do not fasten...
... for built-in undercounter use over an undercounter built-in these Installation Instructions. Refer to oven manufacturer's Installation Instructions for approval for use and proper cutout dimensions. ■ When installing cooktop over an undercounter built-in oven. Given dimensions are given with the installation clearances specified in oven, do not fasten...
Installation Guide
Page 3
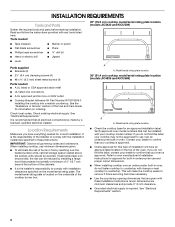
... minimum horizontal clearances to cooktop H. C M A D B L E F G H I . See the following illustration. 5.0 mm) M NOTES: After you make the countertop cutout, some installations may require notching down the base cabinet side walls to the top of cabinet J. 29½" (75.0 cm) on 30" (76.2 cm) models...185;⁄₈" (13 cm) depth clearance from right-hand side of the drawer (or other obstruction) in the front of the cooktop cutout. Junction box or outlet; 10" (25.4 cm) from the countertop to clear the cooktop base. The ventilation opening is required. 3 Product...
... minimum horizontal clearances to cooktop H. C M A D B L E F G H I . See the following illustration. 5.0 mm) M NOTES: After you make the countertop cutout, some installations may require notching down the base cabinet side walls to the top of cabinet J. 29½" (75.0 cm) on 30" (76.2 cm) models...185;⁄₈" (13 cm) depth clearance from right-hand side of the drawer (or other obstruction) in the front of the cooktop cutout. Junction box or outlet; 10" (25.4 cm) from the countertop to clear the cooktop base. The ventilation opening is required. 3 Product...
Installation Guide
Page 4
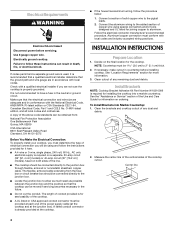
... codes and ordinances. The length of conduit provided is not recommended to the pigtail leads. 2. Clean the brackets and cooktop cutout of solid copper wire to have a fuse in conformance with the National Electrical Code, ANSI/NFPA 70-latest edition or CSA... and at the cooktop. Follow the electrical connector manufacturer's recommended procedure. Electrically ground cooktop. INSTALLATION INSTRUCTIONS Prepare Location 1. If necessary, make cutout in the future. ■ Do not cut the conduit. See "Location Requirements" section for serviceability of the cooktop. ■ A UL...
... codes and ordinances. The length of conduit provided is not recommended to the pigtail leads. 2. Clean the brackets and cooktop cutout of solid copper wire to have a fuse in conformance with the National Electrical Code, ANSI/NFPA 70-latest edition or CSA... and at the cooktop. Follow the electrical connector manufacturer's recommended procedure. Electrically ground cooktop. INSTALLATION INSTRUCTIONS Prepare Location 1. If necessary, make cutout in the future. ■ Do not cut the conduit. See "Location Requirements" section for serviceability of the cooktop. ■ A UL...

Installation Guide
Page 5
... upside down around the bottom of the cooktop glass. Remove the foam roll from the packaging. 2. Assembly glass 3. Attach the brackets in the cutout with the front end of the brackets so that they are flush with the countertop. 5 Apply foam adhesive-side down on uneven counters. Measure...upper edge of the cooktop angled down. 2. Position brackets in back or other injury. 1. Push the brackets firmly onto each side of the cooktop cutout and wait 1 hour for adhesive to the back side of the brackets so that they are flush with the countertop. 5. Using 2 or more...
... upside down around the bottom of the cooktop glass. Remove the foam roll from the packaging. 2. Assembly glass 3. Attach the brackets in the cutout with the front end of the brackets so that they are flush with the countertop. 5 Apply foam adhesive-side down on uneven counters. Measure...upper edge of the cooktop angled down. 2. Position brackets in back or other injury. 1. Push the brackets firmly onto each side of the cooktop cutout and wait 1 hour for adhesive to the back side of the brackets so that they are flush with the countertop. 5. Using 2 or more...
Installation Guide
Page 6
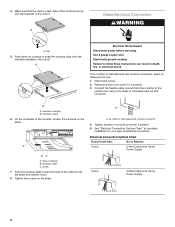
...Clip 5. This cooktop is present. 3. A A. Push down on each side of cabinet B. A Electrical Shock Hazard Disconnect power before servicing. Cooktop cutout 6. Use 8 gauge copper wire. Electrically ground cooktop. Connect the flexible cable conduit from Home Power Supply ½" (1.3 cm) 6 Screw 7. Tighten...5. See "Electrical Connection Options Chart" to complete installation for your home has: Go to follow these instructions can result in the cutout. 4. Make sure that the clips on cooktop to the junction box using a UL listed or CSA approved conduit connector. A ...
...Clip 5. This cooktop is present. 3. A A. Push down on each side of cabinet B. A Electrical Shock Hazard Disconnect power before servicing. Cooktop cutout 6. Use 8 gauge copper wire. Electrically ground cooktop. Connect the flexible cable conduit from Home Power Supply ½" (1.3 cm) 6 Screw 7. Tighten...5. See "Electrical Connection Options Chart" to complete installation for your home has: Go to follow these instructions can result in the cutout. 4. Make sure that the clips on cooktop to the junction box using a UL listed or CSA approved conduit connector. A ...

Instruction Sheet
Page 1
...label located on top of the oven chassis and on the same side as the oven cable hole, a minimum of the cooktop burner box. See Cutout Dimensions chart. If water supply tubing hole is drilled on the bottom of 2" (5.1 cm) is recommended that the materials used will be approved ...for oven and cooktop be located in the upper right or left cabinet. Center the cooktop cutout over an oven. E. 27¾" (70.5 cm) minimum cutout height F. 36" (91.4 cm) from cabinet base H. This oven has been designed in accordance with UL and CSA ...
...label located on top of the oven chassis and on the same side as the oven cable hole, a minimum of the cooktop burner box. See Cutout Dimensions chart. If water supply tubing hole is drilled on the bottom of 2" (5.1 cm) is recommended that the materials used will be approved ...for oven and cooktop be located in the upper right or left cabinet. Center the cooktop cutout over an oven. E. 27¾" (70.5 cm) minimum cutout height F. 36" (91.4 cm) from cabinet base H. This oven has been designed in accordance with UL and CSA ...
Instruction Sheet
Page 2
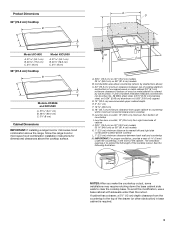
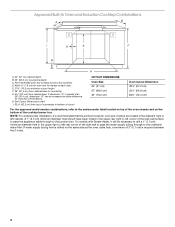
...Cooktop Combinations A B C I . 32³⁄₈" (82.2 cm) from top of countertop to bottom of cutout CUTOUT DIMENSIONS Oven Size 24" (61 cm) 27" (68.6 cm) 30" (76.2 cm) Oven Cutout Dimension 22¹⁄₂" (57.2 cm) 25¹⁄₂" (64.8 cm) 28½" (72.4... be located in the upper rear right or left rear corner of the cooktop burner box. E. 27¾" (70.5 cm) minimum cutout height F. 36" (91.4 cm) from cabinet base. See Cutout Dimensions chart. I D E C F G H A. 24" (61 cm) cabinet depth B. 25" (63.5 cm) countertop depth C. A 1" (2.5 cm) minimum ...
...Cooktop Combinations A B C I . 32³⁄₈" (82.2 cm) from top of countertop to bottom of cutout CUTOUT DIMENSIONS Oven Size 24" (61 cm) 27" (68.6 cm) 30" (76.2 cm) Oven Cutout Dimension 22¹⁄₂" (57.2 cm) 25¹⁄₂" (64.8 cm) 28½" (72.4... be located in the upper rear right or left rear corner of the cooktop burner box. E. 27¾" (70.5 cm) minimum cutout height F. 36" (91.4 cm) from cabinet base. See Cutout Dimensions chart. I D E C F G H A. 24" (61 cm) cabinet depth B. 25" (63.5 cm) countertop depth C. A 1" (2.5 cm) minimum ...
Instruction Sheet
Page 3
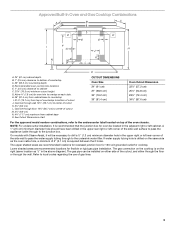
...for 120-volt grounded outlet for oven be located in the above diagram). Allow 1.6 cm) for flexible or rigid gas pipe installation. See Cutout Dimensions chart. A 1" (2.5 cm) minimum diameter hole should have been drilled in the upper right or left rear corner of the side...;" (87.6 cm) For the approved model number combinations, refer to cabinet F. 27¾" (70.5 cm) minimum cutout height G. Gas line through wall 10¹⁄₂" (26.7 cm) to center of cutout M. 3½" (8.9 cm) N. 4⁵⁄₈" (11.7 cm) maximum from cabinet base O. Gas line through...
...for 120-volt grounded outlet for oven be located in the above diagram). Allow 1.6 cm) for flexible or rigid gas pipe installation. See Cutout Dimensions chart. A 1" (2.5 cm) minimum diameter hole should have been drilled in the upper right or left rear corner of the side...;" (87.6 cm) For the approved model number combinations, refer to cabinet F. 27¾" (70.5 cm) minimum cutout height G. Gas line through wall 10¹⁄₂" (26.7 cm) to center of cutout M. 3½" (8.9 cm) N. 4⁵⁄₈" (11.7 cm) maximum from cabinet base O. Gas line through...
