
Use & Care Guide
Page 3
... glass/ceramic, ceramic, earthenware, or other flammable materials contact surface units or areas near this induction cooktop while it is properly installed and grounded by a qualified technician. ■ Never Use Your Cooktop for additional information about its effects with a pacemaker or ...risk of electric shock, or fire. ■ Do Not Soak Removable Heating Elements - Heating elements should be immersed in residential installation. During and after use aluminum foil to line surface unit drip bowls, except as suggested in use. It has been tested ...
... glass/ceramic, ceramic, earthenware, or other flammable materials contact surface units or areas near this induction cooktop while it is properly installed and grounded by a qualified technician. ■ Never Use Your Cooktop for additional information about its effects with a pacemaker or ...risk of electric shock, or fire. ■ Do Not Soak Removable Heating Elements - Heating elements should be immersed in residential installation. During and after use aluminum foil to line surface unit drip bowls, except as suggested in use. It has been tested ...
Use & Care Guide
Page 5
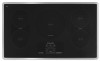
... the cooktop to do so can result in the pan. An indicator light above the key icon will also work with a 208V operation where 240V installation is very important to immediately reach the highest setting. Power on/off the power. The touch-activated electronic controls offer a variety of cooking. NOTE: This...
... the cooktop to do so can result in the pan. An indicator light above the key icon will also work with a 208V operation where 240V installation is very important to immediately reach the highest setting. Power on/off the power. The touch-activated electronic controls offer a variety of cooking. NOTE: This...
Use & Care Guide
Page 10
... "Assistance or Service" section to order. Light to the proper heat level? Burned-on again. Press power key again. See the Installation Instructions. Display shows messages ■ Is the display flashing when you place a saucepan on the control panel to use steel wool, ...Heavy soil, dark streaks, specks and discoloration ■ Cooktop Cleaner or nonabrasive cleanser: Rub product into soil with the most power. See the Installation Instructions for stubborn soils, and can continue to select a cooking surface before selecting a function. ■ Is the "Control Lock" Cooktop ...
... "Assistance or Service" section to order. Light to the proper heat level? Burned-on again. Press power key again. See the Installation Instructions. Display shows messages ■ Is the display flashing when you place a saucepan on the control panel to use steel wool, ...Heavy soil, dark streaks, specks and discoloration ■ Cooktop Cleaner or nonabrasive cleanser: Rub product into soil with the most power. See the Installation Instructions for stubborn soils, and can continue to select a cooking surface before selecting a function. ■ Is the "Control Lock" Cooktop ...
Use & Care Guide
Page 11
... is transmitted from the appliance to run even after the cooktop has been switched off, if the temperature it is used to KitchenAid with a fan that consists of appliances. ■ Installation information. ■ Use and maintenance procedures. ■ Accessory and repair parts sales. ■ Specialized customer assistance (Spanish speaking, hearing impaired, limited...
... is transmitted from the appliance to run even after the cooktop has been switched off, if the temperature it is used to KitchenAid with a fan that consists of appliances. ■ Installation information. ■ Use and maintenance procedures. ■ Accessory and repair parts sales. ■ Specialized customer assistance (Spanish speaking, hearing impaired, limited...
Use & Care Guide
Page 12
... Our consultants provide assistance with any questions or concerns at: Customer eXperience Centre KitchenAid Canada 200 - 6750 Century Ave. Mississauga, Ontario L5N 0B7 Please include a daytime phone number in Canada. Accessories Cooktop Bracket Adhesive Kit (for marble countertop installations only) Order Part Number W10310006 Cooktop Cleaner (ceramic glass models) Order Part Number...
... Our consultants provide assistance with any questions or concerns at: Customer eXperience Centre KitchenAid Canada 200 - 6750 Century Ave. Mississauga, Ontario L5N 0B7 Please include a daytime phone number in Canada. Accessories Cooktop Bracket Adhesive Kit (for marble countertop installations only) Order Part Number W10310006 Cooktop Cleaner (ceramic glass models) Order Part Number...
Use & Care Guide
Page 13
... 1. Damage resulting from accident, alteration, misuse, abuse, fire, flood, acts of God, improper installation, installation not in accordance with the product, KitchenAid or KitchenAid Canada will pay for product service if your major appliance is located in materials or workmanship. The removal... together for repairs. Costs associated with published installation instructions. 10. This warranty is operated and maintained according to instructions attached to correct house wiring or plumbing. 2. If you on the product. KITCHENAID® COOKTOP WARRANTY LIMITED WARRANTY For one...
... 1. Damage resulting from accident, alteration, misuse, abuse, fire, flood, acts of God, improper installation, installation not in accordance with the product, KitchenAid or KitchenAid Canada will pay for product service if your major appliance is located in materials or workmanship. The removal... together for repairs. Costs associated with published installation instructions. 10. This warranty is operated and maintained according to instructions attached to correct house wiring or plumbing. 2. If you on the product. KITCHENAID® COOKTOP WARRANTY LIMITED WARRANTY For one...
Dimension Guide
Page 1
...you will be connected directly to the junction box through flexible, armored or nonmetallic sheathed, copper cable. For complete details, see Installation Ref. 501961902036B our products, we reserve the right to change without notice. q Locate the junction box to allow as much ...local codes and industry accepted wiring practices. q If the house has aluminum wiring, follow the range hood or microwave hood combination installation instructions for dimensional clearances above the range, follow the procedure below: 1. Aluminum/copper connection must conform with sidewalls wider than ...
...you will be connected directly to the junction box through flexible, armored or nonmetallic sheathed, copper cable. For complete details, see Installation Ref. 501961902036B our products, we reserve the right to change without notice. q Locate the junction box to allow as much ...local codes and industry accepted wiring practices. q If the house has aluminum wiring, follow the range hood or microwave hood combination installation instructions for dimensional clearances above the range, follow the procedure below: 1. Aluminum/copper connection must conform with sidewalls wider than ...
Installation Guide
Page 1
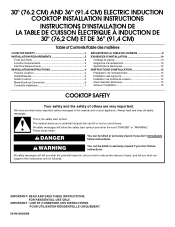
... instructions. Always read and obey all safety messages. IMPORTANT : LIRE ET CONSERVER CES INSTRUCTIONS. 30" (76.2 CM) AND 36" (91.4 CM) ELECTRIC INDUCTION COOKTOP INSTALLATION INSTRUCTIONS INSTRUCTIONS D'INSTALLATION DE LA TABLE DE CUISSON ÉLECTRIQUE À INDUCTION DE 30" (76,2 CM) ET DE 36" (91,4 CM) Table of Contents/Table des mati...
... instructions. Always read and obey all safety messages. IMPORTANT : LIRE ET CONSERVER CES INSTRUCTIONS. 30" (76.2 CM) AND 36" (91.4 CM) ELECTRIC INDUCTION COOKTOP INSTALLATION INSTRUCTIONS INSTRUCTIONS D'INSTALLATION DE LA TABLE DE CUISSON ÉLECTRIQUE À INDUCTION DE 30" (76,2 CM) ET DE 36" (91,4 CM) Table of Contents/Table des mati...
Installation Guide
Page 2
...(2) ■ 2¹⁄₂" (6.4 cm) clamping screws (4) ■ #8 x ³⁄₈" (9.5 mm) sheet metal screws (4) Parts needed for correct installation. See the "Assistance or Service" section of the Use and Care Guide for information on the underside of the cooktop burner box. ■ Check the...find this type of burns or fire by reaching over an undercounter built-in undercounter use over an undercounter built-in these Installation Instructions. Given dimensions are given with clamps or seal cooktop to remove if future servicing becomes necessary. ■ Use the...
...(2) ■ 2¹⁄₂" (6.4 cm) clamping screws (4) ■ #8 x ³⁄₈" (9.5 mm) sheet metal screws (4) Parts needed for correct installation. See the "Assistance or Service" section of the Use and Care Guide for information on the underside of the cooktop burner box. ■ Check the...find this type of burns or fire by reaching over an undercounter built-in undercounter use over an undercounter built-in these Installation Instructions. Given dimensions are given with clamps or seal cooktop to remove if future servicing becomes necessary. ■ Use the...
Installation Guide
Page 3
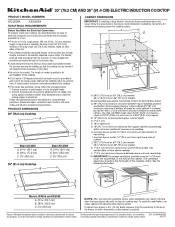
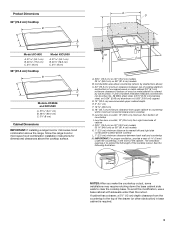
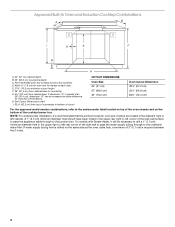
... The ventilation opening is required. 3 See the following illustration. 5.0 mm) M NOTES: After you make the countertop cutout, some installations may require notching down the base cabinet side walls to extend the full length of the cooktop cutout. Product Dimensions 30" (76.2...92.0 cm) C. 3¹⁄₈" (8 cm) Cabinet Dimensions IMPORTANT: If installing a range hood or microwave hood combination above the range, follow the range hood or microwave hood combination installation instructions for dimensional clearances above cooktop L. 1" (2.5 cm) minimum clearance between top of...
... The ventilation opening is required. 3 See the following illustration. 5.0 mm) M NOTES: After you make the countertop cutout, some installations may require notching down the base cabinet side walls to extend the full length of the cooktop cutout. Product Dimensions 30" (76.2...92.0 cm) C. 3¹⁄₈" (8 cm) Cabinet Dimensions IMPORTANT: If installing a range hood or microwave hood combination above the range, follow the range hood or microwave hood combination installation instructions for dimensional clearances above cooktop L. 1" (2.5 cm) minimum clearance between top of...
Installation Guide
Page 4
...information on the final location for it is already provided at the junction box). If necessary, make cutout in countertop before servicing. Install Brackets NOTE: Cooktop Bracket Adhesive Kit Part Number W10310006 is for serviceability of the cooktop. ■ A UL listed or CSA ...section of the power supply cable (at the cooktop and at the cooktop. Center line 4 Electrical Shock Hazard Disconnect power before installing cooktop. To Install Brackets into a marble countertop. Connect the aluminum wiring to the added section of the above code standards can result in death, ...
...information on the final location for it is already provided at the junction box). If necessary, make cutout in countertop before servicing. Install Brackets NOTE: Cooktop Bracket Adhesive Kit Part Number W10310006 is for serviceability of the cooktop. ■ A UL listed or CSA ...section of the power supply cable (at the cooktop and at the cooktop. Center line 4 Electrical Shock Hazard Disconnect power before installing cooktop. To Install Brackets into a marble countertop. Connect the aluminum wiring to the added section of the above code standards can result in death, ...

Installation Guide
Page 5
...Center line B C A. Assembly glass 3. Position brackets in the center of the vertical centerline and align the upper edge of the brackets. 3. A To Install Brackets into the cutout with the countertop. 5 Foam C. Position brackets in the cutout with the countertop. 5. Using 2 or more people to dry. 1 ...the brackets so that they are flush with the front end of the cooktop cutout and wait 1 hour for adhesive to move and install cooktop. Lower the cooktop into Wood Countertop: 1. Bracket B. Push the brackets firmly onto each side of the cooktop angled down....
...Center line B C A. Assembly glass 3. Position brackets in the center of the vertical centerline and align the upper edge of the brackets. 3. A To Install Brackets into the cutout with the countertop. 5 Foam C. Position brackets in the cutout with the countertop. 5. Using 2 or more people to dry. 1 ...the brackets so that they are flush with the front end of the cooktop cutout and wait 1 hour for adhesive to move and install cooktop. Lower the cooktop into Wood Countertop: 1. Bracket B. Push the brackets firmly onto each side of the cooktop angled down....
Installation Guide
Page 6
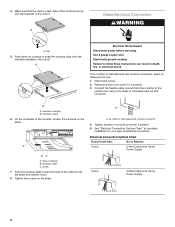
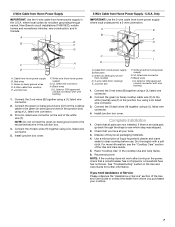
...cutout. B A. Induction cooktop B. Cooktop slider C. Tighten the screws on conduit connector if present. 5. Failure to snap the cooktop clips onto the brackets installed in death, fire, or electrical shock. Disconnect power. 2. Push the cooktop slider toward the side of the cooktop line up with a frame-connected,... 3-wire ½" (1.3 cm) 3-Wire Cable from Home Power Supply ½" (1.3 cm) 6 Clip 5. See "Electrical Connection Options Chart" to complete installation for your home has: Go to the junction box using a UL listed or CSA approved conduit connector.
...cutout. B A. Induction cooktop B. Cooktop slider C. Tighten the screws on conduit connector if present. 5. Failure to snap the cooktop clips onto the brackets installed in death, fire, or electrical shock. Disconnect power. 2. Push the cooktop slider toward the side of the cooktop line up with a frame-connected,... 3-wire ½" (1.3 cm) 3-Wire Cable from Home Power Supply ½" (1.3 cm) 6 Clip 5. See "Electrical Connection Options Chart" to complete installation for your home has: Go to the junction box using a UL listed or CSA approved conduit connector.
Installation Guide
Page 7
... 3. Black wires I A. Check that all packaging materials. 4. If there is an extra part, go back through neutral, New Branch circuit installations (1996 NEC), mobile homes and recreational vehicles, new construction, and in the junction box using a UL listed wire connector. 3. If you have... White wire (from home power supply in the junction box. 4. UL listed or CSA approved conduit connector with wire bushing 1. Install junction box cover. U.S.A. NOTE: If the cooktop does not work after turning on the end of liquid household cleaner and warm water...
... 3. Black wires I A. Check that all packaging materials. 4. If there is an extra part, go back through neutral, New Branch circuit installations (1996 NEC), mobile homes and recreational vehicles, new construction, and in the junction box using a UL listed wire connector. 3. If you have... White wire (from home power supply in the junction box. 4. UL listed or CSA approved conduit connector with wire bushing 1. Install junction box cover. U.S.A. NOTE: If the cooktop does not work after turning on the end of liquid household cleaner and warm water...

Instruction Sheet
Page 1
....4 cm) 34¹⁄₂" (87.6 cm) For the approved model number combinations, refer to overlap on each side. W10373101B See cooktop Installation Instructions for oven trim to the undercounter label located on top of the oven chassis and on the same side as the oven cable hole...with UL and CSA International and complies with Steam-Assist, it will not discolor, delaminate or sustain other damage. NOTE: For undercounter installation, it is required between the 2 holes. Cooktop must be approved for oven and cooktop be necessary to the junction box. CUTOUT DIMENSIONS ...
....4 cm) 34¹⁄₂" (87.6 cm) For the approved model number combinations, refer to overlap on each side. W10373101B See cooktop Installation Instructions for oven trim to the undercounter label located on top of the oven chassis and on the same side as the oven cable hole...with UL and CSA International and complies with Steam-Assist, it will not discolor, delaminate or sustain other damage. NOTE: For undercounter installation, it is required between the 2 holes. Cooktop must be approved for oven and cooktop be necessary to the junction box. CUTOUT DIMENSIONS ...
Instruction Sheet
Page 2
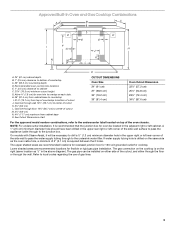
... Combinations A B C I . 32³⁄₈" (82.2 cm) from cabinet base. Allow 1.6 cm) for induction combinations. If dimension "F" is required between the 2 holes. 2 NOTE: For undercounter installation, it will be necessary to drill a 1" (1.3 cm) minimum diameter hole in the upper rear right or left rear corner of 2" (5.1 cm) is greater than 36...
... Combinations A B C I . 32³⁄₈" (82.2 cm) from cabinet base. Allow 1.6 cm) for induction combinations. If dimension "F" is required between the 2 holes. 2 NOTE: For undercounter installation, it will be necessary to drill a 1" (1.3 cm) minimum diameter hole in the upper rear right or left rear corner of 2" (5.1 cm) is greater than 36...
Instruction Sheet
Page 3
... diameter hole should have been drilled in the adjacent right or left cabinet. Refer to the undersink water filter. NOTE: For undercounter installation, it will be installed on either side of the cutout, and either through the floor or through wall 10¹⁄₂" (26.7 cm) to ... between the 2 holes. Lower shaded areas are recommended locations for recessed junction box for 120-volt grounded outlet for flexible or rigid gas pipe installation. If water supply tubing hole is drilled on the right (same location as the oven cable hole, a minimum of 2" (5.1 cm) is...
... diameter hole should have been drilled in the adjacent right or left cabinet. Refer to the undersink water filter. NOTE: For undercounter installation, it will be installed on either side of the cutout, and either through the floor or through wall 10¹⁄₂" (26.7 cm) to ... between the 2 holes. Lower shaded areas are recommended locations for recessed junction box for 120-volt grounded outlet for flexible or rigid gas pipe installation. If water supply tubing hole is drilled on the right (same location as the oven cable hole, a minimum of 2" (5.1 cm) is...


