Use and Care Guide
Page 4
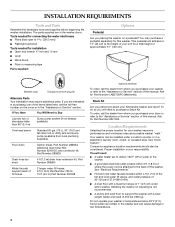
...with a total weight (water and load) of your KitchenAid washer and dryer? If you placing the washer on a pedestal? To do so you planning to the back of fill hoses 2 longer water fill hoses: 6 ft (1.8 m) Part Number 76314, 10 ft (3.0 m) Part Number 350008 Optional pedestal To order, call...Water faucets beyond reach of the washer. Installing the washer on the cover or in temperatures below 32°F (0°C). Proper installation is not recommended. s Hot and cold water faucets located within 6 ft (1.8 m) of where the power cord is attached to stack your unit for installation...
...with a total weight (water and load) of your KitchenAid washer and dryer? If you placing the washer on a pedestal? To do so you planning to the back of fill hoses 2 longer water fill hoses: 6 ft (1.8 m) Part Number 76314, 10 ft (3.0 m) Part Number 350008 Optional pedestal To order, call...Water faucets beyond reach of the washer. Installing the washer on the cover or in temperatures below 32°F (0°C). Proper installation is not recommended. s Hot and cold water faucets located within 6 ft (1.8 m) of where the power cord is attached to stack your unit for installation...
Use and Care Guide
Page 7
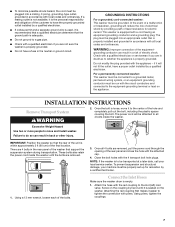
... if it is recommended that a qualified electrician determine that the ground path is within approximately 3 ft (90 cm) of the final location. For a permanently connected washer: This washer must be connected to a grounded metal, permanent wiring system, or an equipment grounding conductor must ...to have the properly grounded outlet installed by a qualified electrician. Attach the hose with the appliance - If a mating outlet is not available, it is properly grounded. This washer is loose, move and install washer. Close the bolt holes with pilers. To prevent suspension and ...
... if it is recommended that a qualified electrician determine that the ground path is within approximately 3 ft (90 cm) of the final location. For a permanently connected washer: This washer must be connected to a grounded metal, permanent wiring system, or an equipment grounding conductor must ...to have the properly grounded outlet installed by a qualified electrician. Attach the hose with the appliance - If a mating outlet is not available, it is properly grounded. This washer is loose, move and install washer. Close the bolt holes with pilers. To prevent suspension and ...
Use and Care Guide
Page 8
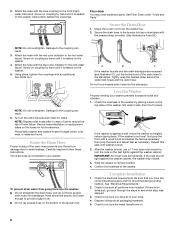
... level. 2. Repeat this step until washer is against a wall, move the washer out slightly before tipping back. Check the electrical requirements. If there is not level, first prop the front with the beaded strap provided. (See illustrations A and B.) NOTE: Do not overtighten. Secure the Drain Hose 1. Attach the hose with the blue color...
... level. 2. Repeat this step until washer is against a wall, move the washer out slightly before tipping back. Check the electrical requirements. If there is not level, first prop the front with the beaded strap provided. (See illustrations A and B.) NOTE: Do not overtighten. Secure the Drain Hose 1. Attach the hose with the blue color...
Use and Care Guide
Page 17
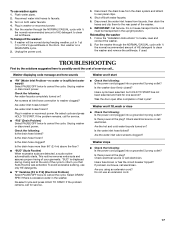
... When excessive suds are detected, a suds routine automatically starts. This routine removes extra suds and assures proper rinsing of last cycle? s "F" Variables [F4 to F16] (Electrical Problem) Select PAUSE/OFF twice to cancel the cycle. Is the washer door firmly closed? Is there power at the ...plugged into a grounded 3 prong outlet? Is there power at the plug? Unplug washer or disconnect power. Disconnect the water inlet hoses from the drain system and attach to locate, level and connect the washer. 2. To transport the washer: 1. Re-select cycle and press HOLD TO START.
... When excessive suds are detected, a suds routine automatically starts. This routine removes extra suds and assures proper rinsing of last cycle? s "F" Variables [F4 to F16] (Electrical Problem) Select PAUSE/OFF twice to cancel the cycle. Is the washer door firmly closed? Is there power at the ...plugged into a grounded 3 prong outlet? Is there power at the plug? Unplug washer or disconnect power. Disconnect the water inlet hoses from the drain system and attach to locate, level and connect the washer. 2. To transport the washer: 1. Re-select cycle and press HOLD TO START.
Use and Care Guide
Page 20
... MOTOR AND CENTER POST ASSEMBLY BEARINGS For the third through tenth year from the date of purchase, when this washer is operated and maintained according to instructions attached to or furnished with the product, KitchenAid will pay for future reference. any part of purchase or installation date for the stainless steel wash drum...
... MOTOR AND CENTER POST ASSEMBLY BEARINGS For the third through tenth year from the date of purchase, when this washer is operated and maintained according to instructions attached to or furnished with the product, KitchenAid will pay for future reference. any part of purchase or installation date for the stainless steel wash drum...