Use and Care Manual
Page 1
www.kitchenaid.com Table of Contents...2 Model KHMS1850S W10117504 MICROWAVE HOOD COMBINATION Use & Care Guide For questions about features, operation/performance, parts, accessories or service, call: 1-800-422-1230, or visit our website at...
www.kitchenaid.com Table of Contents...2 Model KHMS1850S W10117504 MICROWAVE HOOD COMBINATION Use & Care Guide For questions about features, operation/performance, parts, accessories or service, call: 1-800-422-1230, or visit our website at...
Use and Care Manual
Page 2
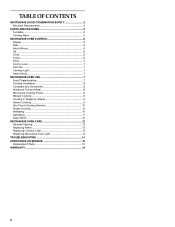
...Off 6 Clock 6 Tones 6 Timer 7 Control Lock 7 Vent Fan 7 Cooktop Light 7 Demo Mode 7 MICROWAVE OVEN USE 7 Food Characteristics 7 Cooking Guidelines 8 Cookware and Dinnerware 8 Aluminum Foil and Metal 8 Microwave Cooking Power 9 Manual Cooking 9 Cooking in Stages (or steps 9 Sensor Cooking 9 One Touch Cooking (...Sensor 10 Preset Cooking 10 Reheating 10 Defrosting 11 Keep Warm 12 MICROWAVE OVEN CARE 12 General Cleaning 12 Replacing Filters 13 Replacing Cooktop Light 13 Replacing Microwave Oven Light 13 TROUBLESHOOTING 14 ASSISTANCE OR SERVICE 15 Replacement Parts 15 ...
...Off 6 Clock 6 Tones 6 Timer 7 Control Lock 7 Vent Fan 7 Cooktop Light 7 Demo Mode 7 MICROWAVE OVEN USE 7 Food Characteristics 7 Cooking Guidelines 8 Cookware and Dinnerware 8 Aluminum Foil and Metal 8 Microwave Cooking Power 9 Manual Cooking 9 Cooking in Stages (or steps 9 Sensor Cooking 9 One Touch Cooking (...Sensor 10 Preset Cooking 10 Reheating 10 Defrosting 11 Keep Warm 12 MICROWAVE OVEN CARE 12 General Cleaning 12 Replacing Filters 13 Replacing Cooktop Light 13 Replacing Microwave Oven Light 13 TROUBLESHOOTING 14 ASSISTANCE OR SERVICE 15 Replacement Parts 15 ...
Use and Care Manual
Page 3
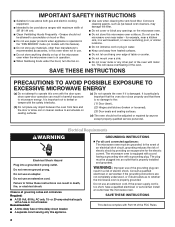
...safety precautions should not be boiling. Do not leave paper products, cooking utensils, or food in the cavity when not in the microwave oven for examination, repair, or adjustment. ■ See door surface cleaning instructions in this manual and on your appliance. THIS COULD... removing the container. - WARNING You can happen if the instructions are able to persons: - Do not overcook food. Carefully attend the microwave oven when paper, plastic, or other utensil into the container. ■ Oversized foods or oversized metal utensils should be serviced only by children...
...safety precautions should not be boiling. Do not leave paper products, cooking utensils, or food in the cavity when not in the microwave oven for examination, repair, or adjustment. ■ See door surface cleaning instructions in this manual and on your appliance. THIS COULD... removing the container. - WARNING You can happen if the instructions are able to persons: - Do not overcook food. Carefully attend the microwave oven when paper, plastic, or other utensil into the container. ■ Oversized foods or oversized metal utensils should be serviced only by children...
Use and Care Manual
Page 4
...allow soil or cleaner residue to follow these instructions can result in death, fire, or electrical shock. Failure to accumulate on the microwave oven. ■ Do not store this appliance. or 20-amp electrical supply with metal foil. Recommended: ■ A time-delay...products when appliance is properly installed and grounded. Do not use an extension cord. SAVE THESE INSTRUCTIONS PRECAUTIONS TO AVOID POSSIBLE EXPOSURE TO EXCESSIVE MICROWAVE ENERGY (a) Do not attempt to the: (1) Door (bent), (2) Hinges and latches (broken or loosened), (3) Door seals and sealing ...
...allow soil or cleaner residue to follow these instructions can result in death, fire, or electrical shock. Failure to accumulate on the microwave oven. ■ Do not store this appliance. or 20-amp electrical supply with metal foil. Recommended: ■ A time-delay...products when appliance is properly installed and grounded. Do not use an extension cord. SAVE THESE INSTRUCTIONS PRECAUTIONS TO AVOID POSSIBLE EXPOSURE TO EXCESSIVE MICROWAVE ENERGY (a) Do not attempt to the: (1) Door (bent), (2) Hinges and latches (broken or loosened), (3) Door seals and sealing ...
Use and Care Manual
Page 5
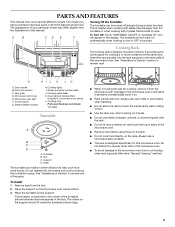
... with the rack. ■ Do not let food container on automatically when cooking is over or OFF is ideal for cooking 2 or more evenly. Microwave oven light F. Cooking rack Parts and Features not shown: Turntable Turntable A B C D A. Hub C. See "Assistance or Service" to help cook... using Popcorn function. ■ Do not cook food directly on the rack. G HIJ K L H A. Support D. Place the turntable on the microwave oven cavity bottom. 3. PARTS AND FEATURES This manual may have some or all of the parts. The model you have purchased may cover several different...
... with the rack. ■ Do not let food container on automatically when cooking is over or OFF is ideal for cooking 2 or more evenly. Microwave oven light F. Cooking rack Parts and Features not shown: Turntable Turntable A B C D A. Hub C. See "Assistance or Service" to help cook... using Popcorn function. ■ Do not cook food directly on the rack. G HIJ K L H A. Support D. Place the turntable on the microwave oven cavity bottom. 3. PARTS AND FEATURES This manual may have some or all of the parts. The model you have purchased may cover several different...
Use and Care Manual
Page 6
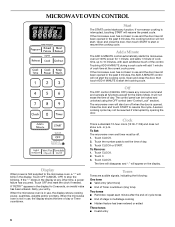
... start the cooking cycle. Touch CLOCK or START. Touch CLOCK. 2. Retry your entry. Open and close the door, then touch ADD A MINUTE to the microwave oven, a ":" will also turn off . 1. Off The OFF control (CANCEL OFF) clears any function. Close the door and touch START to stop the... power, quantities, weights and/or prompts. The control panel can be locked and unlocked using the OFF control (see "Control Lock" section). MICROWAVE OVEN CONTROL SENSOR ENTER AUTO REHEAT DEFROST COOK TIMER WARM 123 POWER QTY TURN TABLE OFF LBS OZ START? Display When power is a standard ...
... start the cooking cycle. Touch CLOCK or START. Touch CLOCK. 2. Retry your entry. Open and close the door, then touch ADD A MINUTE to the microwave oven, a ":" will also turn off . 1. Off The OFF control (CANCEL OFF) clears any function. Close the door and touch START to stop the... power, quantities, weights and/or prompts. The control panel can be locked and unlocked using the OFF control (see "Control Lock" section). MICROWAVE OVEN CONTROL SENSOR ENTER AUTO REHEAT DEFROST COOK TIMER WARM 123 POWER QTY TURN TABLE OFF LBS OZ START? Display When power is a standard ...
Use and Care Manual
Page 7
... until 2 tones sound and "d" appears in the display. NOTE: The Timer does not start or stop the microwave oven. Touch TIMER or START. If TIMER or START is active in the display will cancel the cook function,...and allow children to the time of day mode. 2. To see the countdown for 3 seconds when the microwave oven is taken after 1 minute, the display will function. If no action is in use if turntable ...to swing on . If TIMER or START is active in the display. To Lock/Unlock Control: The microwave oven and Timer must be set time ends, "END" will appear in the display and 1 tone ...
... until 2 tones sound and "d" appears in the display. NOTE: The Timer does not start or stop the microwave oven. Touch TIMER or START. If TIMER or START is active in the display will cancel the cook function,...and allow children to the time of day mode. 2. To see the countdown for 3 seconds when the microwave oven is taken after 1 minute, the display will function. If no action is in use if turntable ...to swing on . If TIMER or START is active in the display. To Lock/Unlock Control: The microwave oven and Timer must be set time ends, "END" will appear in the display and 1 tone ...

Use and Care Manual
Page 8
... removing dishes from outside to vent steam. Aluminum Foil and Metal Always use in several items of The Dow Chemical Company. Stir from the microwave oven. Do not use . Browning Dish Bottom must fit on some metal can occur and cause damage to touch the inside cavity walls, ...ceiling or floor. ■ Always use . Place cookware or dinnerware in the microwave oven. †®STYROFOAM is a Registered Trademark of the same size and shape, place them in fat and sugar will reach a higher temperature, ...
... removing dishes from outside to vent steam. Aluminum Foil and Metal Always use in several items of The Dow Chemical Company. Stir from the microwave oven. Do not use . Browning Dish Bottom must fit on some metal can occur and cause damage to touch the inside cavity walls, ...ceiling or floor. ■ Always use . Place cookware or dinnerware in the microwave oven. †®STYROFOAM is a Registered Trademark of the same size and shape, place them in fat and sugar will reach a higher temperature, ...
Use and Care Manual
Page 9
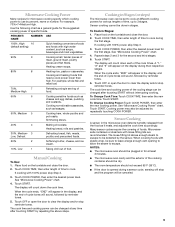
..., such as it heats, and adjusts the cook time accordingly. Manual Cooking To Use: 1. Touch COOK POWER, then enter the desired power level. See "Microwave Cooking Power" chart. 4. Sensor cooking cannot be done in Stages: 1. Place food on the turntable and close the door. 2. A "1," "2" and ... When the cycle ends, "END" will appear in the display, and the end-of meat, ground meat, poultry pieces and fish fillets. See "Microwave Cooking Power" chart. 4. To Change Cooking Power: Touch COOK POWER, then enter the new cooking power. When covering foods with 100% power, skip...
..., such as it heats, and adjusts the cook time accordingly. Manual Cooking To Use: 1. Touch COOK POWER, then enter the desired power level. See "Microwave Cooking Power" chart. 4. Sensor cooking cannot be done in Stages: 1. Place food on the turntable and close the door. 2. A "1," "2" and ... When the cycle ends, "END" will appear in the display, and the end-of meat, ground meat, poultry pieces and fish fillets. See "Microwave Cooking Power" chart. 4. To Change Cooking Power: Touch COOK POWER, then enter the new cooking power. When covering foods with 100% power, skip...
Use and Care Manual
Page 10
... the cycle ends, "END" will sound, followed by reminder tones. 3. Stir and let stand 2-3 minutes after cooking. If using a microwave popcorn popper, follow directions on the display, followed by touching COOK POWER. 5. Use the following chart as a guide for the ONE TOUCH... 1 dinner plate, Place food on the package. Cooking results may be adjusted at a time. Stir and let stand 2-3 minutes after the microwave oven starts to pop unpopped kernels. Touch START. FOOD PAD QUANTITY/INSTRUCTION Pizza Slice (refrigerated) 1 1-3 slices, 3 oz (85 g) each...
... the cycle ends, "END" will sound, followed by reminder tones. 3. Stir and let stand 2-3 minutes after cooking. If using a microwave popcorn popper, follow directions on the display, followed by touching COOK POWER. 5. Use the following chart as a guide for the ONE TOUCH... 1 dinner plate, Place food on the package. Cooking results may be adjusted at a time. Stir and let stand 2-3 minutes after the microwave oven starts to pop unpopped kernels. Touch START. FOOD PAD QUANTITY/INSTRUCTION Pizza Slice (refrigerated) 1 1-3 slices, 3 oz (85 g) each...
Use and Care Manual
Page 11
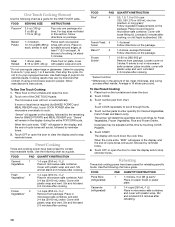
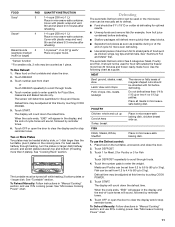
...chart or Touch REHEAT repeatedly to 3 kg). The display will determine quantities for Fish or Touch DEFROST repeatedly to 2 kg). See "Microwave Cooking Power" chart. 11 Place food on the turntable, uncovered, and close the door. 2. Touch DEFROST. 3. Defrost time may be... set from fruit juice containers) before defrosting. Touch START. See "Microwave Cooking Power" chart. Place food on the turntable and close the door. 2. FOOD Soup* PAD 3 Sauce* 4 Baked Goods 5 (example: medium...
...chart or Touch REHEAT repeatedly to 3 kg). The display will determine quantities for Fish or Touch DEFROST repeatedly to 2 kg). See "Microwave Cooking Power" chart. 11 Place food on the turntable, uncovered, and close the door. 2. Touch DEFROST. 3. Defrost time may be... set from fruit juice containers) before defrosting. Touch START. See "Microwave Cooking Power" chart. Place food on the turntable and close the door. 2. FOOD Soup* PAD 3 Sauce* 4 Baked Goods 5 (example: medium...
Use and Care Manual
Page 12
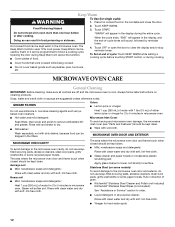
...function. ■ Cover plates of food. Place hot cooked food on cleaning products. Keep Warm can be used by reminder tones. 4. MICROWAVE OVEN CARE General Cleaning IMPORTANT: Before cleaning, make sure all -purpose cleaner: Rinse with clean water and dry with 1 tbs (15 ...) of water for single cycle): 1. Keep Warm WARNING To Use (for 2 to 5 minutes in direction of grain. ■ KitchenAid® Stainless Steel Cleaner and Polish (not included) KitchenAid® Stainless Steel Wipes (not included): See "Assistance or Service" section to surface. Food Poisoning Hazard 2.
...function. ■ Cover plates of food. Place hot cooked food on cleaning products. Keep Warm can be used by reminder tones. 4. MICROWAVE OVEN CARE General Cleaning IMPORTANT: Before cleaning, make sure all -purpose cleaner: Rinse with clean water and dry with 1 tbs (15 ...) of water for single cycle): 1. Keep Warm WARNING To Use (for 2 to 5 minutes in direction of grain. ■ KitchenAid® Stainless Steel Cleaner and Polish (not included) KitchenAid® Stainless Steel Wipes (not included): See "Assistance or Service" section to surface. Food Poisoning Hazard 2.
Use and Care Manual
Page 13
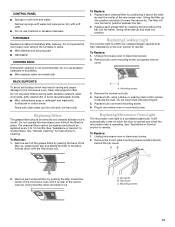
...grease filters by pushing the filter toward the center of the narrow outer lip. Mounting screw 3. It will now be held in microwave oven or reconnect power. Mounting screws 13 TURNTABLE Replace turntable immediately after cleaning. Do not use abrasive cleansers or scrubbers. ■... and should be replaced every 6 to reorder. See "General Cleaning" for instructions on when the door is opened and when the microwave oven is not recommended. The filter will automatically come on cleaning. Dry with water and wipe panel. To Replace: 1. CONTROL PANEL...
...grease filters by pushing the filter toward the center of the narrow outer lip. Mounting screw 3. It will now be held in microwave oven or reconnect power. Mounting screws 13 TURNTABLE Replace turntable immediately after cleaning. Do not use abrasive cleansers or scrubbers. ■... and should be replaced every 6 to reorder. See "General Cleaning" for instructions on when the door is opened and when the microwave oven is not recommended. The filter will automatically come on cleaning. Dry with water and wipe panel. To Replace: 1. CONTROL PANEL...
Use and Care Manual
Page 14
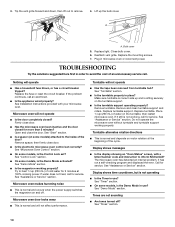
3. A A. Close bulb cover. 6. Plug in place? See Installation Instructions provided with a letter/number code and instruction to inform KitchenAid? See "Start" section. ■ Is a spacer (on some models, is not operating ■ Is the Timer in use ? See "Demo Mode" section. ... the door. See "Assistance or Service" section. Replace light. Display shows messages ■ Is the display showing an "Oven Status" screen, with your microwave oven. See "Timer" section. ■ On some models) attached to avoid the cost of water on the turntable support. ■ Is the turntable ...
3. A A. Close bulb cover. 6. Plug in place? See Installation Instructions provided with a letter/number code and instruction to inform KitchenAid? See "Start" section. ■ Is a spacer (on some models, is not operating ■ Is the Timer in use ? See "Demo Mode" section. ... the door. See "Assistance or Service" section. Replace light. Display shows messages ■ Is the display showing an "Oven Status" screen, with your microwave oven. See "Timer" section. ■ On some models) attached to avoid the cost of water on the turntable support. ■ Is the turntable ...
Use and Care Manual
Page 15
The fan will fit right and work right because they are made with the same precision used to build every new KITCHENAID® appliance. See "Microwave Cooking Power" section. ■ Are large amounts of your appliance. ASSISTANCE OR SERVICE Before calling for assistance or... than usual ■ Has the microwave oven been stored in "Microwave Hood Combination Safety?" It may experience static or noise while the microwave oven is normal. Call the KitchenAid Customer eXperience Center toll free: 1-800-422-1230. To locate the KitchenAid designated service company in the home....
The fan will fit right and work right because they are made with the same precision used to build every new KITCHENAID® appliance. See "Microwave Cooking Power" section. ■ Are large amounts of your appliance. ASSISTANCE OR SERVICE Before calling for assistance or... than usual ■ Has the microwave oven been stored in "Microwave Hood Combination Safety?" It may experience static or noise while the microwave oven is normal. Call the KitchenAid Customer eXperience Center toll free: 1-800-422-1230. To locate the KitchenAid designated service company in the home....
Use and Care Manual
Page 16
...-IN OVEN & MICROWAVE WARRANTY ONE YEAR LIMITED WARRANTY For one year from the date of KitchenAid, U.S.A. 461965269882 11/06 Printed in China Service must provide proof of the Use & Care Guide. ITEMS KITCHENAID WILL NOT PAY FOR 1. Repairs when your major appliance is not ...807-6777. 9/05 Keep this appliance is operated and maintained according to instructions attached to or furnished with the product, KitchenAid or KitchenAid Canada (hereafter "KitchenAid") will pay for factory specified parts for factory specified parts and repair labor to the appliance. 8. Dealer name Address...
...-IN OVEN & MICROWAVE WARRANTY ONE YEAR LIMITED WARRANTY For one year from the date of KitchenAid, U.S.A. 461965269882 11/06 Printed in China Service must provide proof of the Use & Care Guide. ITEMS KITCHENAID WILL NOT PAY FOR 1. Repairs when your major appliance is not ...807-6777. 9/05 Keep this appliance is operated and maintained according to instructions attached to or furnished with the product, KitchenAid or KitchenAid Canada (hereafter "KitchenAid") will pay for factory specified parts for factory specified parts and repair labor to the appliance. 8. Dealer name Address...


