
User Guide
Page 1
www.kitchenaid.com Table of Contents...2 Model KHHC2090S W10131852 SPEEDCOOK MICROWAVE HOOD COMBINATION WITH CONVECTION Use & Care Guide For questions about features, operation/performance, parts, accessories or service, call: 1-800-422-1230, or visit our website at...
www.kitchenaid.com Table of Contents...2 Model KHHC2090S W10131852 SPEEDCOOK MICROWAVE HOOD COMBINATION WITH CONVECTION Use & Care Guide For questions about features, operation/performance, parts, accessories or service, call: 1-800-422-1230, or visit our website at...

User Guide
Page 2
... Grill Element 5 Convection Element and Fan 6 Turntable 6 ACCESSORIES 7 Browning Pan and Handle 7 Grill Rack 7 Convection Rack 7 KITCHENAID™ Steamer Vessel 7 MICROWAVE OVEN CONTROL 8 Control Panel 8 Interactive Touch Display 8 Main Menu 9 Settings & Info 10 Clock 10 Date 11 Demo Mode 11 Display...Cook 24 Most Used Menu 24 Food Type Chart 25 Cook Method Chart 27 MICROWAVE OVEN CARE 31 General Cleaning 31 Replacing Filters 32 Replacing Cooktop Light 33 Replacing Microwave Oven Light 33 TROUBLESHOOTING 34 ASSISTANCE OR SERVICE 35 Replacement Parts 35 WARRANTY 36 2...
... Grill Element 5 Convection Element and Fan 6 Turntable 6 ACCESSORIES 7 Browning Pan and Handle 7 Grill Rack 7 Convection Rack 7 KITCHENAID™ Steamer Vessel 7 MICROWAVE OVEN CONTROL 8 Control Panel 8 Interactive Touch Display 8 Main Menu 9 Settings & Info 10 Clock 10 Date 11 Demo Mode 11 Display...Cook 24 Most Used Menu 24 Food Type Chart 25 Cook Method Chart 27 MICROWAVE OVEN CARE 31 General Cleaning 31 Replacing Filters 32 Replacing Cooktop Light 33 Replacing Microwave Oven Light 33 TROUBLESHOOTING 34 ASSISTANCE OR SERVICE 35 Replacement Parts 35 WARRANTY 36 2...

User Guide
Page 3
...CONTAINER IS DISTURBED OR A SPOON OR OTHER UTENSIL IS INSERTED INTO THE LIQUID. Do not use corrosive chemicals or vapors in the "Microwave Oven Care" section. - WARNING You can kill or hurt you don't immediately follow instructions. After heating, allow the container to facilitate.... See "GROUNDING INSTRUCTIONS" found in this section and in the provided Installation Instructions. ■ Install or locate the microwave oven only in the microwave oven as water, coffee, or tea are very important. for storage purposes. Do not use straight-sided containers with metal ...
...CONTAINER IS DISTURBED OR A SPOON OR OTHER UTENSIL IS INSERTED INTO THE LIQUID. Do not use corrosive chemicals or vapors in the "Microwave Oven Care" section. - WARNING You can kill or hurt you don't immediately follow instructions. After heating, allow the container to facilitate.... See "GROUNDING INSTRUCTIONS" found in this section and in the provided Installation Instructions. ■ Install or locate the microwave oven only in the microwave oven as water, coffee, or tea are very important. for storage purposes. Do not use straight-sided containers with metal ...

User Guide
Page 4
...■ Do not cover racks or any other than manufacturer's recommended accessories, in this oven when not in use. ■ Do not store anything directly on top of the microwave oven when the microwave oven is in operation. ■ When flambeing foods under the hood, turn the fan on...water - Recommended: ■ A time-delay fuse or time-delay circuit breaker. ■ A separate circuit serving only this microwave oven outdoors. Do not use the microwave oven near the microwave oven. Required: ■ A 120 Volt, 60 Hz, AC only, 15- Corrosive cleaning agents, such as to follow these...
...■ Do not cover racks or any other than manufacturer's recommended accessories, in this oven when not in use. ■ Do not store anything directly on top of the microwave oven when the microwave oven is in operation. ■ When flambeing foods under the hood, turn the fan on...water - Recommended: ■ A time-delay fuse or time-delay circuit breaker. ■ A separate circuit serving only this microwave oven outdoors. Do not use the microwave oven near the microwave oven. Required: ■ A 120 Volt, 60 Hz, AC only, 15- Corrosive cleaning agents, such as to follow these...

User Guide
Page 5
...power - Exhaust vent (for various cooking functions. Microwave oven light Q N. Turntable Microwave Oven Cavity Coating The microwave oven has a durable, nonstick coating that resists soil buildup by making cleaning easier than in a typical microwave oven, the microwave oven operates 50% of the time at all of... of the features shown here. The model you have some or all -visible. (See "Troubleshooting" for cleaning instructions. Microwave oven door B. Convection element and fan (behind screen) L. PARTS AND FEATURES This manual may cover several different models. Door ...
...power - Exhaust vent (for various cooking functions. Microwave oven light Q N. Turntable Microwave Oven Cavity Coating The microwave oven has a durable, nonstick coating that resists soil buildup by making cleaning easier than in a typical microwave oven, the microwave oven operates 50% of the time at all of... of the features shown here. The model you have some or all -visible. (See "Troubleshooting" for cleaning instructions. Microwave oven door B. Convection element and fan (behind screen) L. PARTS AND FEATURES This manual may cover several different models. Door ...

User Guide
Page 6
... will become hot. See "Assistance or Service" to the "ON" mode. Convection element (behind fan) The microwave oven's convection system is composed of oven mitts is helpful when cooking with plates that are larger than the turntable, or when cooking with the convection fan...On/Off: 1. The turntable off for true convection cooking. Support C. Protective screen B. The rollers on the microwave oven cavity bottom. 2. Touch TURNTABLE (ON/OFF). The microwave oven cavity and door will appear on the display. When the manual cycle is embedded in either direction to turn the...
... will become hot. See "Assistance or Service" to the "ON" mode. Convection element (behind fan) The microwave oven's convection system is composed of oven mitts is helpful when cooking with plates that are larger than the turntable, or when cooking with the convection fan...On/Off: 1. The turntable off for true convection cooking. Support C. Protective screen B. The rollers on the microwave oven cavity bottom. 2. Touch TURNTABLE (ON/OFF). The microwave oven cavity and door will appear on the display. When the manual cycle is embedded in either direction to turn the...

User Guide
Page 7
.... See "General Cleaning" for replacement. Grill Rack A B D A D E A. Cookie sheet (not provided) KITCHENAID™ Steamer Vessel Use the KITCHENAID™ steamer vessel with your new microwave oven. See "Steam Cook" and/or "Boil & Simmer" sections. See "General Cleaning" for some baking and roasting .... See "General Cleaning" section for pan-frying (pan-browning) foods in a conventional- Turntable B. Do not use in the microwave oven. Convection rack (short) E. Place the convection rack on grill rack. Place the grill rack securely on browning pan, the browning...
.... See "General Cleaning" for replacement. Grill Rack A B D A D E A. Cookie sheet (not provided) KITCHENAID™ Steamer Vessel Use the KITCHENAID™ steamer vessel with your new microwave oven. See "Steam Cook" and/or "Boil & Simmer" sections. See "General Cleaning" for some baking and roasting .... See "General Cleaning" section for pan-frying (pan-browning) foods in a conventional- Turntable B. Do not use in the microwave oven. Convection rack (short) E. Place the convection rack on grill rack. Place the grill rack securely on browning pan, the browning...

User Guide
Page 8
... needed. See "Clock" and "Date" sections. See "Display Backlight" section. A B C A. Title/description region B. It is first supplied to the microwave oven, the welcome screen appears, asking whether you would like to set to be easily navigable, guiding you through its control panel and interactive touch display..." and set the clock (see "Clock" section), or touch "No" and the time will activate the menu choice. 8 When the microwave oven is used to activate. Screen titles and descriptions are made in standby mode), the display shows the Main Menu and the date and time ...
... needed. See "Clock" and "Date" sections. See "Display Backlight" section. A B C A. Title/description region B. It is first supplied to the microwave oven, the welcome screen appears, asking whether you would like to set to be easily navigable, guiding you through its control panel and interactive touch display..." and set the clock (see "Clock" section), or touch "No" and the time will activate the menu choice. 8 When the microwave oven is used to activate. Screen titles and descriptions are made in standby mode), the display shows the Main Menu and the date and time ...

User Guide
Page 10
... is desired, adjust doneness before touching "Continue." The same cooking can also be adjusted using "+" and "-" controls. Settings & Info Microwave oven features may be activated and/or changed, and display characteristics may do so at that time, the display will appear, asking whether you... then "More Choices." 2. 7. About halfway through the menus without turning on the screen to practice navigating through the cycle, the microwave oven will stop, and the display will be displayed and continue to the same Browning Pan-Poultry Breast screen as in the Cook Method...
... is desired, adjust doneness before touching "Continue." The same cooking can also be adjusted using "+" and "-" controls. Settings & Info Microwave oven features may be activated and/or changed, and display characteristics may do so at that time, the display will appear, asking whether you... then "More Choices." 2. 7. About halfway through the menus without turning on the screen to practice navigating through the cycle, the microwave oven will stop, and the display will be displayed and continue to the same Browning Pan-Poultry Breast screen as in the Cook Method...

User Guide
Page 11
...Display Backlight." 3. To Set Display Contrast: 1. While the Learning Mode is active, the Learn indicator is visible in the Learning Mode, the microwave oven light will come on the Main Menu screen. On Main Menu, touch "Settings & Info." 2. On Settings & Info screen, touch "...Settings & Info." 2. Touch "OK." Display Contrast Display contrast has numerous settings, ranging from minimum to turn off after 2 minutes of the microwave oven in standby mode, during programming, and during sleep mode. On Main Menu, touch "Settings & Info." 2. Touch "Display Contrast." 3. Using...
...Display Backlight." 3. To Set Display Contrast: 1. While the Learning Mode is active, the Learn indicator is visible in the Learning Mode, the microwave oven light will come on the Main Menu screen. On Main Menu, touch "Settings & Info." 2. On Settings & Info screen, touch "...Settings & Info." 2. Touch "OK." Display Contrast Display contrast has numerous settings, ranging from minimum to turn off after 2 minutes of the microwave oven in standby mode, during programming, and during sleep mode. On Main Menu, touch "Settings & Info." 2. Touch "Display Contrast." 3. Using...

User Guide
Page 12
...& Info." 2. Touch "Ok" to resume the cycle. To see "Tones" section) if touched during the countdown by opening the door. The microwave oven will be opened in the past 5 minutes, the cooking function will show the padlock icon. 12 Clear During programming, the CLEAR control changes the ... Tones Tones are active in the display to their default value. Start The START control will be set time. If the microwave oven has not been in use , the microwave oven can be in minutes and seconds, up to 99 minutes, and counts down the set in full screen view. 3. A ...
...& Info." 2. Touch "Ok" to resume the cycle. To see "Tones" section) if touched during the countdown by opening the door. The microwave oven will be opened in the past 5 minutes, the cooking function will show the padlock icon. 12 Clear During programming, the CLEAR control changes the ... Tones Tones are active in the display to their default value. Start The START control will be set time. If the microwave oven has not been in use , the microwave oven can be in minutes and seconds, up to 99 minutes, and counts down the set in full screen view. 3. A ...

User Guide
Page 13
... taking place. The progress bar will automatically turn off . Cooking with grill element B. After the microwave oven has cooled, the vent fan will also appear during microwave oven preheating. 13 To Turn Light On/Off: Press LIGHTS button repeatedly to cycle through the settings: ... repeatedly to cycle through the settings: high, medium, low and off . Cooking animation B. Progress Bar H-M-L-Off H-M-L-Off Max-Off The microwave oven's hood controls, on for 5 seconds. When sensing is active, the "Control Lock" reminder screen appears for up to 10 minutes after...
... taking place. The progress bar will automatically turn off . Cooking with grill element B. After the microwave oven has cooled, the vent fan will also appear during microwave oven preheating. 13 To Turn Light On/Off: Press LIGHTS button repeatedly to cycle through the settings: ... repeatedly to cycle through the settings: high, medium, low and off . Cooking animation B. Progress Bar H-M-L-Off H-M-L-Off Max-Off The microwave oven's hood controls, on for 5 seconds. When sensing is active, the "Control Lock" reminder screen appears for up to 10 minutes after...
User Guide
Page 14
...higher temperature, and will continue to reorder. ■ Baby bottles and baby food jars should not be used. Do not use if turntable is in microwave oven. ■ Clothes, flowers, fruit, herbs, wood, gourds, paper, including brown paper bags and newspaper, should not be heated in use . See... of the food. Use the lid supplied with gold or silver trim. If a lid is normal during heavy cooking. Condensation on the microwave oven door. ■ To avoid damage to allow a standing time. Arranging If heating irregularly shaped or different sized foods, arrange the thinner ...
...higher temperature, and will continue to reorder. ■ Baby bottles and baby food jars should not be used. Do not use if turntable is in microwave oven. ■ Clothes, flowers, fruit, herbs, wood, gourds, paper, including brown paper bags and newspaper, should not be heated in use . See... of the food. Use the lid supplied with gold or silver trim. If a lid is normal during heavy cooking. Condensation on the microwave oven door. ■ To avoid damage to allow a standing time. Arranging If heating irregularly shaped or different sized foods, arrange the thinner ...
User Guide
Page 15
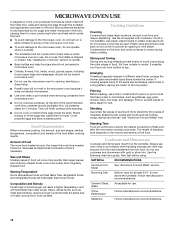
...cheese and egg dishes, pudding and custards. Heating cream soups. 80% Heating rice, pasta or casseroles. Do not use in microwave oven. Cooking fish fillets. 60% Cooking sensitive foods such as lasagna. 50%, Medium Cooking ham, whole poultry, whole fish and... Silicone Bakeware Straw, Wicker, Wooden Containers Styrofoam®† Wax Paper RECOMMENDATIONS Use nonrecycled and those approved by the manufacturer for microwave oven use. Simmering stews. 40% Heating bread, rolls and pastries. 30%, Medium-Low Melting chocolate, butter and marshmallows. 20% ...
...cheese and egg dishes, pudding and custards. Heating cream soups. 80% Heating rice, pasta or casseroles. Do not use in microwave oven. Cooking fish fillets. 60% Cooking sensitive foods such as lasagna. 50%, Medium Cooking ham, whole poultry, whole fish and... Silicone Bakeware Straw, Wicker, Wooden Containers Styrofoam®† Wax Paper RECOMMENDATIONS Use nonrecycled and those approved by the manufacturer for microwave oven use. Simmering stews. 40% Heating bread, rolls and pastries. 30%, Medium-Low Melting chocolate, butter and marshmallows. 20% ...

User Guide
Page 16
... to 0%, 10%, 20% or 30%. The default power is touched. 16 To Use: 1. Cook power or cook time may be changed after the microwave oven starts. Place food on the touch screen, and following the prompts. Use number pads to adjust the power level, between 10% and 100%. 5. The... cooking begins by reminder tones. 7. The cook time may be set in minutes and seconds. Touch OFF control or open the door to preheat empty microwave oven. If preheat is for 1 minute, and adds 1 minute of -cycle tones will sound, followed by using the "Adjust Settings" control. Place food ...
... to 0%, 10%, 20% or 30%. The default power is touched. 16 To Use: 1. Cook power or cook time may be changed after the microwave oven starts. Place food on the touch screen, and following the prompts. Use number pads to adjust the power level, between 10% and 100%. 5. The... cooking begins by reminder tones. 7. The cook time may be set in minutes and seconds. Touch OFF control or open the door to preheat empty microwave oven. If preheat is for 1 minute, and adds 1 minute of -cycle tones will sound, followed by using the "Adjust Settings" control. Place food ...

User Guide
Page 17
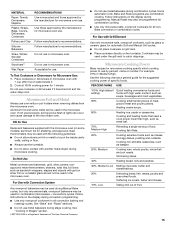
...filled with 2 cups (500 mL) boiling water on the Main Menu, then select "Bake." 4. When proofing is for baking bread. Reset microwave oven to the Main Menu. Select a method from the chart. 4. When the cycle ends, the end-of bread dough and water container. 8.... (baking) time. Let dough rise until nearly doubled in "First Proofing." Enter desired only KITCHENAID™ time. only 100% default Defrost Microwaves Microwave-safe 20% only only Cook Microwaves Microwave-safe 10-100%; Follow instructions on the convection rack and close the door. 3. The display...
...filled with 2 cups (500 mL) boiling water on the Main Menu, then select "Bake." 4. When proofing is for baking bread. Reset microwave oven to the Main Menu. Select a method from the chart. 4. When the cycle ends, the end-of bread dough and water container. 8.... (baking) time. Let dough rise until nearly doubled in "First Proofing." Enter desired only KITCHENAID™ time. only 100% default Defrost Microwaves Microwave-safe 20% only only Cook Microwaves Microwave-safe 10-100%; Follow instructions on the convection rack and close the door. 3. The display...

User Guide
Page 18
...Keep Warm function uses 10% cook power. Keep Warm can be used by touching "Review Steps" on the touch screen. See "Cooking in the microwave oven. Touch OFF control or open the door to stop reminder tones and return to the Main Menu. Touch "Start" on the touch screen, or START... stage. 4. Touch "Add A Step" on the turntable, and close the door. 2. Each stage will immediately follow screen prompts to program each stage in oven more than one hour before or after OFF control is not available for the cycling stage may be programmed only as pastries, pies, turnovers, etc...
...Keep Warm function uses 10% cook power. Keep Warm can be used by touching "Review Steps" on the touch screen. See "Cooking in the microwave oven. Touch OFF control or open the door to stop reminder tones and return to the Main Menu. Touch "Start" on the touch screen, or START... stage. 4. Touch "Add A Step" on the turntable, and close the door. 2. Each stage will immediately follow screen prompts to program each stage in oven more than one hour before or after OFF control is not available for the cycling stage may be programmed only as pastries, pies, turnovers, etc...

User Guide
Page 19
... control subtracts from the cycle. When covering foods with foil, as pies, breads, cookies, cakes and pizza. However, preheating of the microwave oven would already be necessary when baking consecutive batches, such as cookies, as it interferes with convection alone. Before starting a cycle, touch "... has a loose-fitting lid, which doneness may be canceled. ■ For optimal performance, wait at least 2 minutes. ■ The microwave oven cavity and the exterior of the cooking container should be dry. ■ The room temperature should not exceed 95°F (35°C). ...
... control subtracts from the cycle. When covering foods with foil, as pies, breads, cookies, cakes and pizza. However, preheating of the microwave oven would already be necessary when baking consecutive batches, such as cookies, as it interferes with convection alone. Before starting a cycle, touch "... has a loose-fitting lid, which doneness may be canceled. ■ For optimal performance, wait at least 2 minutes. ■ The microwave oven cavity and the exterior of the cooking container should be dry. ■ The room temperature should not exceed 95°F (35°C). ...

User Guide
Page 20
... Menu after OFF control is a sensor function. Listen for method details. See "Food Type Chart" in this manual for popping to slow to the microwave oven, do not place bag on the turntable, and close the door. To Use: Place food on convection rack or grill rack. ■ To avoid... specific food item you want to cook, and then choose how you want, and then choose your food item and to choose. The microwave oven will show when the microwave oven is more than 1 cook method available. To Use Popcorn: 1. Touch "Cook Method" on Main Menu, touch "Reheat," and then follow the ...
... Menu after OFF control is a sensor function. Listen for method details. See "Food Type Chart" in this manual for popping to slow to the microwave oven, do not place bag on the turntable, and close the door. To Use: Place food on convection rack or grill rack. ■ To avoid... specific food item you want to cook, and then choose how you want, and then choose your food item and to choose. The microwave oven will show when the microwave oven is more than 1 cook method available. To Use Popcorn: 1. Touch "Cook Method" on Main Menu, touch "Reheat," and then follow the ...
User Guide
Page 21
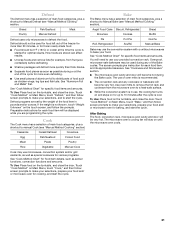
... items and amounts. See "Cook Method Chart" for each food item, and its appropriate bakeware. See "Cookware and Dinnerware" section. ■ The microwave oven cavity and door will stay on the turntable, and close the door. To Use: Place food on Main Menu, touch "Defrost," and then follow ...food on the touch screen, and follow screen prompts to manual Cook (see "Manual Method Cooking" section. After Baking The food, convection rack, microwave oven cavity and door will become hot during or at the time the cycle is started for each food item will be 0°F (-18°C)...
... items and amounts. See "Cook Method Chart" for each food item, and its appropriate bakeware. See "Cookware and Dinnerware" section. ■ The microwave oven cavity and door will stay on the turntable, and close the door. To Use: Place food on Main Menu, touch "Defrost," and then follow ...food on the touch screen, and follow screen prompts to manual Cook (see "Manual Method Cooking" section. After Baking The food, convection rack, microwave oven cavity and door will become hot during or at the time the cycle is started for each food item will be 0°F (-18°C)...


