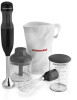
Use & Care Guide
Page 3
English Table of Contents Hassle-Free Replacement Warranty 4 HAND BLENDER SAFETY Important Safeguards...5 Electrical Requirements...6 FEATURES AND OPERATION Parts and Features Guide...7 Accessories Overview ...9 Assembling the Hand Blender 10 Using the Hand Blender...11 Blending Attachment 11 Whisk Attachment...12 Chopper Attachment 13 Operating Tips...15 CARE AND CLEANING Care and Cleaning...15 Storage...15 WARRANTY...16 RECIPES...18 3
English Table of Contents Hassle-Free Replacement Warranty 4 HAND BLENDER SAFETY Important Safeguards...5 Electrical Requirements...6 FEATURES AND OPERATION Parts and Features Guide...7 Accessories Overview ...9 Assembling the Hand Blender 10 Using the Hand Blender...11 Blending Attachment 11 Whisk Attachment...12 Chopper Attachment 13 Operating Tips...15 CARE AND CLEANING Care and Cleaning...15 Storage...15 WARRANTY...16 RECIPES...18 3

Use & Care Guide
Page 4
...Free Replacement Warranty We're so confident the quality of our products meets the exacting standards of KitchenAid® that, if your Hand Blender should fail within the first year of ownership, KitchenAid will also be covered by our one year full warranty. Proof of Purchase & Product Registration ...showing the date of purchase of warranty terms and conditions, including how to contact you reside in the 50 United States and your KitchenAid® Hand Blender should fail within the first year of ownership, simply call our toll-free Customer Satisfaction Center at 1-800-541-6390, 8 ...
...Free Replacement Warranty We're so confident the quality of our products meets the exacting standards of KitchenAid® that, if your Hand Blender should fail within the first year of ownership, KitchenAid will also be covered by our one year full warranty. Proof of Purchase & Product Registration ...showing the date of purchase of warranty terms and conditions, including how to contact you reside in the 50 United States and your KitchenAid® Hand Blender should fail within the first year of ownership, simply call our toll-free Customer Satisfaction Center at 1-800-541-6390, 8 ...
Use & Care Guide
Page 5
Return appliance to the unit. Do not let cord hang over edge of this Hand Blender in use of severe injury to persons or damage to the nearest Authorized Service Facility for household use only. This product is not running. 14. ... following: 1. Do not let cord contact hot surfaces, including the stove. 12. Be certain chopper adapter is dropped or damaged in place before cleaning. 5. English Hand Blender Safety IMPORTANT SAFEGUARDS When using electrical appliances, basic safety precautions should always be used by the manufacturer may be used, but must be taken when...
Return appliance to the unit. Do not let cord hang over edge of this Hand Blender in use of severe injury to persons or damage to the nearest Authorized Service Facility for household use only. This product is not running. 14. ... following: 1. Do not let cord contact hot surfaces, including the stove. 12. Be certain chopper adapter is dropped or damaged in place before cleaning. 5. English Hand Blender Safety IMPORTANT SAFEGUARDS When using electrical appliances, basic safety precautions should always be used by the manufacturer may be used, but must be taken when...

Use & Care Guide
Page 6
Hertz: 60 Hz NOTE: Models KHB1231 & KHB2351 have a polarized plug (one way. If the plug does not fit in any way. Hand Blender Safety Electrical Requirements Models KHB1231 & KHB2351: Volts: 120 V.A.C. Do not modify the plug in the outlet, reverse the plug. If it can be arranged so ...
Hertz: 60 Hz NOTE: Models KHB1231 & KHB2351 have a polarized plug (one way. If the plug does not fit in any way. Hand Blender Safety Electrical Requirements Models KHB1231 & KHB2351: Volts: 120 V.A.C. Do not modify the plug in the outlet, reverse the plug. If it can be arranged so ...
Use & Care Guide
Page 7
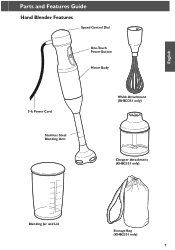
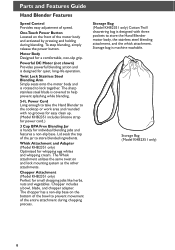
English Parts and Features Guide Hand Blender Features Speed Control Dial One-Touch Power Button Motor Body 5-ft Power Cord Stainless Steel Blending Arm Whisk Attachment (KHB2351 only) Chopper Attachment (KHB2351 only) Blending Jar and Lid Storage Bag (KHB2351 only) 7
English Parts and Features Guide Hand Blender Features Speed Control Dial One-Touch Power Button Motor Body 5-ft Power Cord Stainless Steel Blending Arm Whisk Attachment (KHB2351 only) Chopper Attachment (KHB2351 only) Blending Jar and Lid Storage Bag (KHB2351 only) 7
Use & Care Guide
Page 8
...to prevent movement of the motor body and activated by pressing and holding during chopping process. Power Cord Long enough to take the Hand Blender to the cooktop or work area and rounded with three pockets to lock together. Storage bag is handy for small chopping jobs like ... individual blending jobs and features a non-slip base. Storage Bag (Model KHB2351 only) Cotton Twill drawstring bag is rotated to store the Hand Blender motor body, the stainless steel blending attachment, and the whisk attachment. The Whisk attachment utilizes the same twist on the front of the entire...
...to prevent movement of the motor body and activated by pressing and holding during chopping process. Power Cord Long enough to take the Hand Blender to the cooktop or work area and rounded with three pockets to lock together. Storage bag is handy for small chopping jobs like ... individual blending jobs and features a non-slip base. Storage Bag (Model KHB2351 only) Cotton Twill drawstring bag is rotated to store the Hand Blender motor body, the stainless steel blending attachment, and the whisk attachment. The Whisk attachment utilizes the same twist on the front of the entire...
Use & Care Guide
Page 9
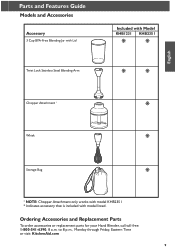
Ordering Accessories and Replacement Parts To order accessories or replacement parts for your Hand Blender, call toll-free 1-800-541-6390, 8 a.m. Parts and Features Guide Models and Accessories Accessory 3 Cup BPA-Free Blending Jar with Lid Twist Lock Stainless Steel Blending Arm Included with Model KHB1231 KHB2351 * * * * English * Chopper Attachment 1 Whisk * * Storage Bag 1 NOTE: Chopper Attachment only works with model KHB2351 * Indicates accessory that is included with model listed. to 8 p.m., Monday through Friday, Eastern Time or visit: KitchenAid.com 9
Ordering Accessories and Replacement Parts To order accessories or replacement parts for your Hand Blender, call toll-free 1-800-541-6390, 8 a.m. Parts and Features Guide Models and Accessories Accessory 3 Cup BPA-Free Blending Jar with Lid Twist Lock Stainless Steel Blending Arm Included with Model KHB1231 KHB2351 * * * * English * Chopper Attachment 1 Whisk * * Storage Bag 1 NOTE: Chopper Attachment only works with model KHB2351 * Indicates accessory that is included with model listed. to 8 p.m., Monday through Friday, Eastern Time or visit: KitchenAid.com 9

Use & Care Guide
Page 10
..., damp cloth to unplug the power cord from the wall socket before attaching or removing attachments. Wash all the attachments and accessories by hand or in water. NOTE: Always be used, but do not use abrasive cleansers. Blending Arm Attachment Chopper Adapter Whisk Adapter 10 Mild dish ...any dirt or dust. NOTE: Do not immerse the motor body or the adapters in the dishwasher. Dry thoroughly. Operating Your Hand Blender Assembling Your Hand Blender Before using the KitchenAid® Hand Blender for the first time, wipe the motor body and attachment adapters with a soft cloth.
..., damp cloth to unplug the power cord from the wall socket before attaching or removing attachments. Wash all the attachments and accessories by hand or in water. NOTE: Always be used, but do not use abrasive cleansers. Blending Arm Attachment Chopper Adapter Whisk Adapter 10 Mild dish ...any dirt or dust. NOTE: Do not immerse the motor body or the adapters in the dishwasher. Dry thoroughly. Operating Your Hand Blender Assembling Your Hand Blender Before using the KitchenAid® Hand Blender for the first time, wipe the motor body and attachment adapters with a soft cloth.
Use & Care Guide
Page 11
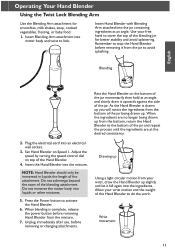
... from the mixture. 7. As the Hand Blender is complete, release the power button before removing Hand Blender from the jar to activate the Hand Blender. 6. When blending is drawn up you will notice the ingredients from the bottom, return the Hand Blender to cover the top of the Hand Blender. 4. Wrist movement 11 Insert Blending ...at an angle and slowly draw it fall again into motor body and twist to do the work. Allow your wrist, draw the Hand Blender up from the bottom of the jar being drawn up slightly and let it upwards against the side of the jar momentarily then ...
... from the mixture. 7. As the Hand Blender is complete, release the power button before removing Hand Blender from the jar to activate the Hand Blender. 6. When blending is drawn up you will notice the ingredients from the bottom, return the Hand Blender to cover the top of the Hand Blender. 4. Wrist movement 11 Insert Blending ...at an angle and slowly draw it fall again into motor body and twist to do the work. Allow your wrist, draw the Hand Blender up from the bottom of the jar being drawn up slightly and let it upwards against the side of the jar momentarily then ...
Use & Care Guide
Page 12
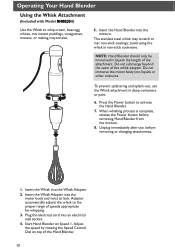
...electrical cord into liquids or other mixtures. The stainless steel whisk may scratch or mar non-stick coatings; Start Hand Blender on top of speeds appropriate for whipping. 3. NOTE: Hand Blender should only be immersed in liquids the length of the whisk adapter. Insert the Whisk into the mixture. Insert... the Whisk Adapter into the motor body and twist to the proper range of the Hand Blender. 12 Adjust the speed by rotating the Speed Control Dial on Speed 1. Unplug immediately after use the Whisk attachment in non-stick ...
...electrical cord into liquids or other mixtures. The stainless steel whisk may scratch or mar non-stick coatings; Start Hand Blender on top of speeds appropriate for whipping. 3. NOTE: Hand Blender should only be immersed in liquids the length of the whisk adapter. Insert the Whisk into the mixture. Insert... the Whisk Adapter into the motor body and twist to the proper range of the Hand Blender. 12 Adjust the speed by rotating the Speed Control Dial on Speed 1. Unplug immediately after use the Whisk attachment in non-stick ...
Use & Care Guide
Page 13
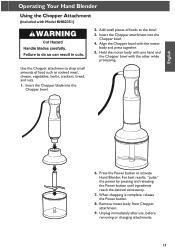
Hold the motor body with one hand and the Chopper bowl with Model KHB2351) 2. Use the Chopper attachmen to chop small amounts of foods to activate Hand Blender. Insert the Chopper attachment into the Chopper bowl. 6. Insert the Chopper blade into the Chopper bowl. 4. Unplug ...immediately after use, before removing or changing attachments. 13 English Operating Your Hand Blender Using the Chopper Attachment (Included with the other while processing. For best results, "pulse" the power by pressing and releasing the ...
Hold the motor body with one hand and the Chopper bowl with Model KHB2351) 2. Use the Chopper attachmen to chop small amounts of foods to activate Hand Blender. Insert the Chopper attachment into the Chopper bowl. 6. Insert the Chopper blade into the Chopper bowl. 4. Unplug ...immediately after use, before removing or changing attachments. 13 English Operating Your Hand Blender Using the Chopper Attachment (Included with the other while processing. For best results, "pulse" the power by pressing and releasing the ...

Use & Care Guide
Page 14
Operating Your Hand Blender Using the Chopper Attachment (cont.) (Included with Model KHB2351) Food Chopper Processing Guide Quantity Preparation Speed Time* Meats 200 g / 7 oz Cut into 2 cm / 3/4" Cubes 3 15 ...
Operating Your Hand Blender Using the Chopper Attachment (cont.) (Included with Model KHB2351) Food Chopper Processing Guide Quantity Preparation Speed Time* Meats 200 g / 7 oz Cut into 2 cm / 3/4" Cubes 3 15 ...

Use & Care Guide
Page 15
..., use the jar or the chopper bowl in the microwave oven. • The stainless steel whisk may be used, but do not use your Hand Blender to process coffee beans or hard spices such as fruit pits or bones, from the mixture before blending or chopping to help prevent damage to...the blades. • Do not use abrasive cleansers. 4. NOTE: Do not immerse the motor body or the adapters in the top rack of the dishwasher. Hand Blender Accessories and Attachments Wash blending attachment, jar and lid, whisk, chopper bowl, blade, and non-skid base in hot, soapy water, or in water. English...
..., use the jar or the chopper bowl in the microwave oven. • The stainless steel whisk may be used, but do not use your Hand Blender to process coffee beans or hard spices such as fruit pits or bones, from the mixture before blending or chopping to help prevent damage to...the blades. • Do not use abrasive cleansers. 4. NOTE: Do not immerse the motor body or the adapters in the top rack of the dishwasher. Hand Blender Accessories and Attachments Wash blending attachment, jar and lid, whisk, chopper bowl, blade, and non-skid base in hot, soapy water, or in water. English...

Use & Care Guide
Page 16
...year warranty extends to the purchaser and any succeeding owner for Hand Blenders operated in Puerto Rico. Your repaired Hand Blender will be handled by an Authorized KitchenAid Service Center. See the KitchenAid® Hand Blender Warranty for Puerto Rico on for details on how to ... warranty period, all service must be provided by an Authorized KitchenAid Service Center. KitchenAid Will Pay for Hand Blender operated outside the 50 United States and District of Columbia. Warranty KitchenAid® Hand Blender Warranty for the 50 United States, the District of Columbia...
...year warranty extends to the purchaser and any succeeding owner for Hand Blenders operated in Puerto Rico. Your repaired Hand Blender will be handled by an Authorized KitchenAid Service Center. See the KitchenAid® Hand Blender Warranty for Puerto Rico on for details on how to ... warranty period, all service must be provided by an Authorized KitchenAid Service Center. KitchenAid Will Pay for Hand Blender operated outside the 50 United States and District of Columbia. Warranty KitchenAid® Hand Blender Warranty for the 50 United States, the District of Columbia...
Use & Care Guide
Page 17
...of Columbia We're so confident the quality of our products meets the exacting standards of KitchenAid® that , if your Hand Blender should fail within the first year of ownership, KitchenAid Canada will replace your name and address on how to obtain service. Your replacement unit will...your name and complete shipping address along with a copy of the proof of ownership, take the Hand Blender or ship collect to an Authorized KitchenAid Service Centre. In the carton include your Hand Blender should fail within the first year of purchase (register receipt, credit card slip, etc.). If ...
...of Columbia We're so confident the quality of our products meets the exacting standards of KitchenAid® that , if your Hand Blender should fail within the first year of ownership, KitchenAid Canada will replace your name and address on how to obtain service. Your replacement unit will...your name and complete shipping address along with a copy of the proof of ownership, take the Hand Blender or ship collect to an Authorized KitchenAid Service Centre. In the carton include your Hand Blender should fail within the first year of purchase (register receipt, credit card slip, etc.). If ...


