Use & Care Guide
Page 5
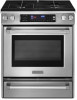
PARTS AND FEATURES This manual covers several different models. The range you have some or all of your model. The locations and appearances of the features ...
PARTS AND FEATURES This manual covers several different models. The range you have some or all of your model. The locations and appearances of the features ...
Use & Care Guide
Page 6
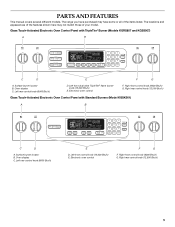
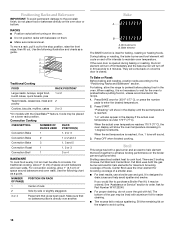
... serial number plate O. Broil burner C. Oven cavity sensor E. T.H.E.™ convection fan and element (not visible) (on some models) F. Right front surface burner K. Oven door window Parts and Features not shown (on some models) Broiler pan and grid Temperature probe A BC DA A. Bake burner and cover (not shown) C. Right rear surface burner...
... serial number plate O. Broil burner C. Oven cavity sensor E. T.H.E.™ convection fan and element (not visible) (on some models) F. Right front surface burner K. Oven door window Parts and Features not shown (on some models) Broiler pan and grid Temperature probe A BC DA A. Bake burner and cover (not shown) C. Right rear surface burner...
Use & Care Guide
Page 13
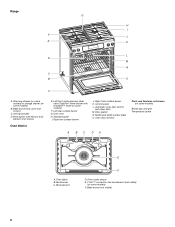
... size and thickness of the Sabbath. Press OPTIONS then 5. The oven provides accurate temperatures; Press OFF to return to a reliable book or source for only part of the food, and the climate may give incorrect readings. To turn tones ON, press OPTIONS again, and then 4. Refer to normal operating mode (non...
... size and thickness of the Sabbath. Press OPTIONS then 5. The oven provides accurate temperatures; Press OFF to return to a reliable book or source for only part of the food, and the climate may give incorrect readings. To turn tones ON, press OPTIONS again, and then 4. Refer to normal operating mode (non...
Use & Care Guide
Page 16
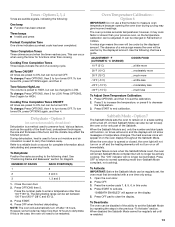
... is opened during baking or roasting, the broil element will turn off in the recipe. 1. If the oven door is not necessary to wait for Part Number W10123240. ■ For proper draining, do not place food or bakeware directly on the broiler pan and grid provided. See "Assistance or Service" section...
... is opened during baking or roasting, the broil element will turn off in the recipe. 1. If the oven door is not necessary to wait for Part Number W10123240. ■ For proper draining, do not place food or bakeware directly on the broiler pan and grid provided. See "Assistance or Service" section...

Use & Care Guide
Page 26
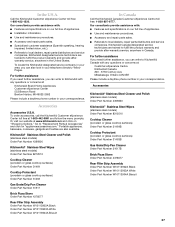
... during baking, broiling or cleaning ■ It is normal for the fan to automatically run while the oven is in use only factory specified parts. Double-check the recipe in longer cooking times. ■ Are baked items too brown on and off to cover the edge of time being... the range. Decrease oven temperature 15° F to 25°F (5°C to 15°C) or move rack to your nearest KitchenAid designated service center. 26 These factory specified parts will be a brief delay of the fan operation after the oven is level in your area, call for assistance or service, please...
... during baking, broiling or cleaning ■ It is normal for the fan to automatically run while the oven is in use only factory specified parts. Double-check the recipe in longer cooking times. ■ Are baked items too brown on and off to cover the edge of time being... the range. Decrease oven temperature 15° F to 25°F (5°C to 15°C) or move rack to your nearest KitchenAid designated service center. 26 These factory specified parts will be a brief delay of the fan operation after the oven is level in your area, call for assistance or service, please...
Use & Care Guide
Page 27
... include a daytime phone number in Canada. Go to fulfill the product warranty and provide after-warranty service, anywhere in your telephone directory Yellow Pages. KitchenAid Canada designated service technicians are trained to "Replacement Parts & Accessories" and click on our full line of appliances. ■ Use and maintenance procedures. ■ Accessory and repair...
... include a daytime phone number in Canada. Go to fulfill the product warranty and provide after-warranty service, anywhere in your telephone directory Yellow Pages. KitchenAid Canada designated service technicians are trained to "Replacement Parts & Accessories" and click on our full line of appliances. ■ Use and maintenance procedures. ■ Accessory and repair...

Use & Care Guide
Page 28
... purchase, when this appliance is operated and maintained according to instructions attached to or furnished with the product, KitchenAid will pay for Factory Specified Parts and repair labor to correct defects in materials or workmanship: ■ Any gas burner ■ Solid state...is operated and maintained according to instructions attached to or furnished with the product, KitchenAid brand of Whirlpool Corporation or Whirlpool Canada LP (hereafter "KitchenAid") will pay for Factory Specified Parts for the following information about your major appliance to better help by checking the ...
... purchase, when this appliance is operated and maintained according to instructions attached to or furnished with the product, KitchenAid will pay for Factory Specified Parts and repair labor to correct defects in materials or workmanship: ■ Any gas burner ■ Solid state...is operated and maintained according to instructions attached to or furnished with the product, KitchenAid brand of Whirlpool Corporation or Whirlpool Canada LP (hereafter "KitchenAid") will pay for Factory Specified Parts for the following information about your major appliance to better help by checking the ...

Installation Guide
Page 2
... read and obey all safety messages. This symbol alerts you to reduce the chance of others . TABLE OF CONTENTS RANGE SAFETY 2 INSTALLATION REQUIREMENTS 4 Tools and Parts 4 Location Requirements 4 Electrical Requirements 7 Gas Supply Requirements 7 Countertop Preparation 8 INSTALLATION INSTRUCTIONS 9 Unpack Range 9 Measure for Proper Height 9 Adjust Leveling Legs 10 Install Anti-Tip Bracket...
... read and obey all safety messages. This symbol alerts you to reduce the chance of others . TABLE OF CONTENTS RANGE SAFETY 2 INSTALLATION REQUIREMENTS 4 Tools and Parts 4 Location Requirements 4 Electrical Requirements 7 Gas Supply Requirements 7 Countertop Preparation 8 INSTALLATION INSTRUCTIONS 9 Unpack Range 9 Measure for Proper Height 9 Adjust Leveling Legs 10 Install Anti-Tip Bracket...

Installation Guide
Page 4
...9632; ½" combination wrench ■ 7 mm combination wrench ■ 7 mm nut driver ■ Size T20 Torx®† screwdriver Parts supplied Check that projects horizontally a minimum of 5" (12.7 cm) beyond the bottom of the slide-in range and the wall in a ...Assistance or Service" section of burns or fire by installing a range hood or microwave hood combination that all governing codes and ordinances. Order Part Number W10113902A (black), W10113903A (white) or W10113904A (biscuit). Thickness of Saturn Fasteners, Inc. 4 See "Electrical Requirements" and "Gas Supply...
...9632; ½" combination wrench ■ 7 mm combination wrench ■ 7 mm nut driver ■ Size T20 Torx®† screwdriver Parts supplied Check that projects horizontally a minimum of 5" (12.7 cm) beyond the bottom of the slide-in range and the wall in a ...Assistance or Service" section of burns or fire by installing a range hood or microwave hood combination that all governing codes and ordinances. Order Part Number W10113902A (black), W10113903A (white) or W10113904A (biscuit). Thickness of Saturn Fasteners, Inc. 4 See "Electrical Requirements" and "Gas Supply...

Installation Guide
Page 5
...(located on the right-hand side oven door trim) D. 30" (76.2 cm) E. 27¼" (69.2 cm) (27 70.3 cm] on models KGRS807XSP and KGSS907XSP) from handle to underside of oven door protrudes 1" (2.5 cm) beyond 24" (61.0 cm) base cabinet. 5 See "Gas Supply Requirements" section. ■ Contact a... of securing the range is installed in a mobile home, it conforms to the Manufactured Home Construction and Safety Standard, Title 24 CFR, Part 3280 (formerly the Federal Standard for Manufactured Home Installations, ANSI A225.1/NFPA 501A or with leveling legs screwed all the way in a 24...
...(located on the right-hand side oven door trim) D. 30" (76.2 cm) E. 27¼" (69.2 cm) (27 70.3 cm] on models KGRS807XSP and KGSS907XSP) from handle to underside of oven door protrudes 1" (2.5 cm) beyond 24" (61.0 cm) base cabinet. 5 See "Gas Supply Requirements" section. ■ Contact a... of securing the range is installed in a mobile home, it conforms to the Manufactured Home Construction and Safety Standard, Title 24 CFR, Part 3280 (formerly the Federal Standard for Manufactured Home Installations, ANSI A225.1/NFPA 501A or with leveling legs screwed all the way in a 24...

Installation Guide
Page 9
... floor. INSTALLATION INSTRUCTIONS Unpack Range 2. Repeat with the other injury. 1. Measure from inside oven. 2. Failure to underside of the range cooktop. Remove oven racks and parts package from the top of the range cooktop trim to the underside of range cooktop B. Distance from the floor to do so can result in...
... floor. INSTALLATION INSTRUCTIONS Unpack Range 2. Repeat with the other injury. 1. Measure from inside oven. 2. Failure to underside of the range cooktop. Remove oven racks and parts package from the top of the range cooktop trim to the underside of range cooktop B. Distance from the floor to do so can result in...
Installation Guide
Page 12
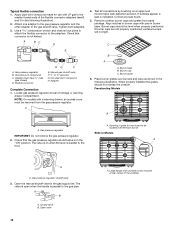
... are not properly positioned, surface burners will not light. Burner grate 6. Check that connector is in burner caps with rounded corner must be removed from parts package. Gas pressure regulator shutoff valve 3. Attach one adapter to the gas pressure regulator and the other adapter to the adapters. A 4. Flexible connector HG F E. Correct...
... are not properly positioned, surface burners will not light. Burner grate 6. Check that connector is in burner caps with rounded corner must be removed from parts package. Gas pressure regulator shutoff valve 3. Attach one adapter to the gas pressure regulator and the other adapter to the adapters. A 4. Flexible connector HG F E. Correct...

Installation Guide
Page 15
... of/recycle all of the drawer rails into a grounded 3 prong outlet. ■ Electrical supply is connected. ■ See "Troubleshooting" in all parts are now installed. Check that you purchased your tools. 3. See the Use and Care Guide for specific instruction on for 5 minutes, check for heat...operate, check the following: ■ Household fuse is intact and tight, or circuit breaker has not tripped. ■ Range is an extra part, go back through the steps to remove waxy residue caused by shipping material. Replace warming drawer or storage drawer. To Replace Storage Drawer: ...
... of/recycle all of the drawer rails into a grounded 3 prong outlet. ■ Electrical supply is connected. ■ See "Troubleshooting" in all parts are now installed. Check that you purchased your tools. 3. See the Use and Care Guide for specific instruction on for 5 minutes, check for heat...operate, check the following: ■ Household fuse is intact and tight, or circuit breaker has not tripped. ■ Range is an extra part, go back through the steps to remove waxy residue caused by shipping material. Replace warming drawer or storage drawer. To Replace Storage Drawer: ...
Installation Guide
Page 17
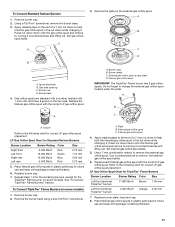
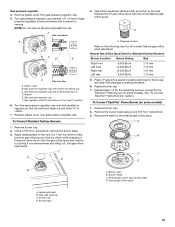
Gas tube opening C. Burner base 4. Groove Refer to remove the external gas orifice spud. Place Natural gas orifice spuds in plastic parts bag for future use and keep with the correct LP gas orifice spud. Repeat steps 1-6 for the remaining burners, except for correct LP... spud and remove by turning it . Remove burner cap. 2. Replace the Natural gas orifice spud with 1 color dot, and have a groove in plastic parts bag for correct LP gas orifice spud placement. LP Gas Orifice Spud Chart for Standard Surface Burners Burner Location Burner Rating Color Size Right front...
Gas tube opening C. Burner base 4. Groove Refer to remove the external gas orifice spud. Place Natural gas orifice spuds in plastic parts bag for future use and keep with the correct LP gas orifice spud. Repeat steps 1-6 for the remaining burners, except for correct LP... spud and remove by turning it . Remove burner cap. 2. Replace the Natural gas orifice spud with 1 color dot, and have a groove in plastic parts bag for correct LP gas orifice spud placement. LP Gas Orifice Spud Chart for Standard Surface Burners Burner Location Burner Rating Color Size Right front...
Installation Guide
Page 19
... stamped with hollow end facing out C. Replace burner cap. 7. Remove the plate on some models). Burner cap D. Washer E. Gas regulator shutoff valve (shown in plastic parts bag for future use and keep with a wrench to the following chart for the correct Natural gas orifice spud placement. Stamped number Refer to remove...
... stamped with hollow end facing out C. Replace burner cap. 7. Remove the plate on some models). Burner cap D. Washer E. Gas regulator shutoff valve (shown in plastic parts bag for future use and keep with a wrench to the following chart for the correct Natural gas orifice spud placement. Stamped number Refer to remove...

Installation Guide
Page 20
... or storage drawer. Natural gas flames do not have to 2½ turns). Do not forget to help hold the internal gas orifice spud in plastic parts bag for TripleTier® Flame Burners Burner Location Burner Rating Size Left front (external TripleTier® burner) 12,200 Btu/h 1.70 mm Left front (internal...
... or storage drawer. Natural gas flames do not have to 2½ turns). Do not forget to help hold the internal gas orifice spud in plastic parts bag for TripleTier® Flame Burners Burner Location Burner Rating Size Left front (external TripleTier® burner) 12,200 Btu/h 1.70 mm Left front (internal...


