Use & Care Guide
Page 5
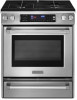
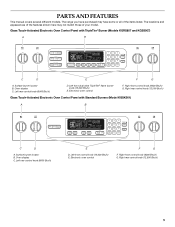
.... Right rear control knob (12,500 Btu/h) Glass Touch-Activated Electronic Oven Control Panel with TripleTier® Burner (Models KGRS807 and KGSS907) A B MED LOW HI ON F C CONTROL LOCKED CLEAN TIME PROBE TEMP HR MIN COOK TIME DELAY MIN HR SEC MIN START TIME STOP TIME C D E F G...PARTS AND FEATURES This manual covers several different models. Glass Touch-Activated Electronic Oven Control Panel with Standard Burners (Model KGSK901) A B MED LOW HI ON F C CONTROL LOCKED CLEAN TIME PROBE TEMP HR MIN COOK TIME DELAY MIN HR SEC MIN START TIME STOP TIME C D A. Electronic...
.... Right rear control knob (12,500 Btu/h) Glass Touch-Activated Electronic Oven Control Panel with TripleTier® Burner (Models KGRS807 and KGSS907) A B MED LOW HI ON F C CONTROL LOCKED CLEAN TIME PROBE TEMP HR MIN COOK TIME DELAY MIN HR SEC MIN START TIME STOP TIME C D E F G...PARTS AND FEATURES This manual covers several different models. Glass Touch-Activated Electronic Oven Control Panel with Standard Burners (Model KGSK901) A B MED LOW HI ON F C CONTROL LOCKED CLEAN TIME PROBE TEMP HR MIN COOK TIME DELAY MIN HR SEC MIN START TIME STOP TIME C D A. Electronic...

Use & Care Guide
Page 7
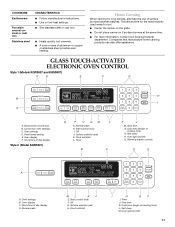
... RECOMMENDED USE HI ■ Start food cooking. ■ Bring liquid to LITE. COOKTOP USE WARNING Cooktop Controls TripleTier® Burner with High Power Settings and Low Simmer Settings (on some models) during the Self-Cleaning cycle, the entire cooktop area may become grounded and occasionally click, even after the burner has...
... RECOMMENDED USE HI ■ Start food cooking. ■ Bring liquid to LITE. COOKTOP USE WARNING Cooktop Controls TripleTier® Burner with High Power Settings and Low Simmer Settings (on some models) during the Self-Cleaning cycle, the entire cooktop area may become grounded and occasionally click, even after the burner has...

Use & Care Guide
Page 9
... keep the burner cap properly fitted in place when you are pointing up B. A B E C D A. Burner base C. Gas tube opening 9 Medium Low between MED and HI ■ Hold a rapid boil. ■ Quickly brown or sear food. Place the wok grate within the supports. Always clean the... edges. Cooktop grate with InstaWok™ Grate is a multifunction burner that produces everything from cooktop and flip the grate over to a low simmer. Reversible InstaWok™ Grate insert The TripleTier® Flame Burner with InstaWok™ Grate is functioned by a dual valve control knob...
... keep the burner cap properly fitted in place when you are pointing up B. A B E C D A. Burner base C. Gas tube opening 9 Medium Low between MED and HI ■ Hold a rapid boil. ■ Quickly brown or sear food. Place the wok grate within the supports. Always clean the... edges. Cooktop grate with InstaWok™ Grate is a multifunction burner that produces everything from cooktop and flip the grate over to a low simmer. Reversible InstaWok™ Grate insert The TripleTier® Flame Burner with InstaWok™ Grate is functioned by a dual valve control knob...

Use & Care Guide
Page 10
.... Contact a trained repair specialist. Aluminum and copper may scratch the cooktop or grates. Use the following chart as a base they can leave permanent marks on low to -heavy thickness. TripleTier® Flame Burner A BB Standard Burner C A 19.1 mm) B 9.53 mm) C. A B A. Cookware material is a factor in how quickly and evenly heat is...
.... Contact a trained repair specialist. Aluminum and copper may scratch the cooktop or grates. Use the following chart as a base they can leave permanent marks on low to -heavy thickness. TripleTier® Flame Burner A BB Standard Burner C A 19.1 mm) B 9.53 mm) C. A B A. Cookware material is a factor in how quickly and evenly heat is...
Use & Care Guide
Page 11
... drawer controls D E CLEAN TIME F PROBE TEMP MIN HR SEC MIN C DELAY A ON HR MIN CONTROL LOCKED COOK TIME START TIME STOP TIME MED LOW HI A. Number pads ML KJ E. Clock set /start I H GF I. Convection oven settings C. Off J. Stop time N. Timer J. EasyConvect conversion B.... cooking time) L. COOKWARE Earthenware Porcelain enamel-onsteel or cast iron Stainless steel CHARACTERISTICS ■ Follow manufacturer's instructions. ■ Use on low heat settings. ■ See stainless steel or cast iron. ■ Heats quickly, but unevenly. ■ A core or base of...
... drawer controls D E CLEAN TIME F PROBE TEMP MIN HR SEC MIN C DELAY A ON HR MIN CONTROL LOCKED COOK TIME START TIME STOP TIME MED LOW HI A. Number pads ML KJ E. Clock set /start I H GF I. Convection oven settings C. Off J. Stop time N. Timer J. EasyConvect conversion B.... cooking time) L. COOKWARE Earthenware Porcelain enamel-onsteel or cast iron Stainless steel CHARACTERISTICS ■ Follow manufacturer's instructions. ■ Use on low heat settings. ■ See stainless steel or cast iron. ■ Heats quickly, but unevenly. ■ A core or base of...

Use & Care Guide
Page 12
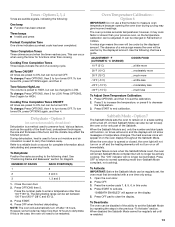
... allows you to quickly enter the desired hidden function. To Use: Press OPTIONS. OPTIONS SPECIAL FUNCTION 1 Fahrenheit and Celsius conversion 2 Tones On/Off 3 Tones High/Low 4 Cooking Time Completion Tones On/Off 5* Dehydrate 6 Oven temperature calibration 7 Sabbath Mode *Available only on the keypad. 12 Option 1 Fahrenheit is selected, "START?" To convert...
... allows you to quickly enter the desired hidden function. To Use: Press OPTIONS. OPTIONS SPECIAL FUNCTION 1 Fahrenheit and Celsius conversion 2 Tones On/Off 3 Tones High/Low 4 Cooking Time Completion Tones On/Off 5* Dehydrate 6 Oven temperature calibration 7 Sabbath Mode *Available only on the keypad. 12 Option 1 Fahrenheit is selected, "START?" To convert...
Use & Care Guide
Page 13
...preheat cycle has been completed. To Dehydrate: Position the racks according to ON, but can be adjusted. See "Positioning Racks and Bakeware" section for LOW. The absence of the food, and the climate may give incorrect readings. ADJUSTMENT °F (AUTOMATIC °C CHANGE) COOKS FOOD 10°F ... set the calibration. 2. Press OFF. 3. All Tones ON/OFF All tones are audible signals, indicating the following chart. Tone Volume High/Low The volume is set , the oven will not show messages or temperature changes. Press START. 4. Press OFF pad to activate. To change...
...preheat cycle has been completed. To Dehydrate: Position the racks according to ON, but can be adjusted. See "Positioning Racks and Bakeware" section for LOW. The absence of the food, and the climate may give incorrect readings. ADJUSTMENT °F (AUTOMATIC °C CHANGE) COOKS FOOD 10°F ... set the calibration. 2. Press OFF. 3. All Tones ON/OFF All tones are audible signals, indicating the following chart. Tone Volume High/Low The volume is set , the oven will not show messages or temperature changes. Press START. 4. Press OFF pad to activate. To change...

Use & Care Guide
Page 20
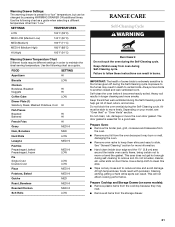
... hour before or after 20-25 minutes. Breads, pastries, and fruit pies may also be heated from plastic bags and place in warming drawer. 2. "WARM-LOW" will show 100°F (38°C). 2. To change the temperature setting, press WARMING DRAWER ON again. Press OFF when finished proofing. Timed/Delay Cooking WARNING...
... hour before or after 20-25 minutes. Breads, pastries, and fruit pies may also be heated from plastic bags and place in warming drawer. 2. "WARM-LOW" will show 100°F (38°C). 2. To change the temperature setting, press WARMING DRAWER ON again. Press OFF when finished proofing. Timed/Delay Cooking WARNING...
Use & Care Guide
Page 21
... oven during self-cleaning to move freely. enter slots on your model, see "Oven Vent" or "Oven Vents" section. SETTINGS TEMPERATURES LOW 100°F (38°C) MED LOW (Medium Low) 140°F (60°C) MED (Medium) 160°F (71°C) MED HI (Medium High) 180°F (88°C)...See "General Cleaning" section for more smoke. Do not let water, cleaner, etc. Warming Drawer Settings: The warming drawer is preset for a "low" temperature, but can result. IMPORTANT: The health of heat, odors, and smoke. The door gasket is extremely sensitive to another closed and well...
... oven during self-cleaning to move freely. enter slots on your model, see "Oven Vent" or "Oven Vents" section. SETTINGS TEMPERATURES LOW 100°F (38°C) MED LOW (Medium Low) 140°F (60°C) MED (Medium) 160°F (71°C) MED HI (Medium High) 180°F (88°C)...See "General Cleaning" section for more smoke. Do not let water, cleaner, etc. Warming Drawer Settings: The warming drawer is preset for a "low" temperature, but can result. IMPORTANT: The health of heat, odors, and smoke. The door gasket is extremely sensitive to another closed and well...

Use & Care Guide
Page 26
Oven temperature too high or too low ■ Does the oven temperature calibration need help us or your appliance. ... foil to clear the display. It may save you still need adjustment? If you the cost of your nearest KitchenAid designated service center. 26 If you need replacement parts If you use or for some models, has a delay...; Is the display showing "SET CLOCK"? Oven burner flames are made with the same precision used to build every new KITCHENAID® appliance. The range might have been converted improperly. There has been a power failure. See "Self-Cleaning Cycle"...
Oven temperature too high or too low ■ Does the oven temperature calibration need help us or your appliance. ... foil to clear the display. It may save you still need adjustment? If you the cost of your nearest KitchenAid designated service center. 26 If you need replacement parts If you use or for some models, has a delay...; Is the display showing "SET CLOCK"? Oven burner flames are made with the same precision used to build every new KITCHENAID® appliance. The range might have been converted improperly. There has been a power failure. See "Self-Cleaning Cycle"...

Installation Guide
Page 13
...in the gas line. Replace the control knob. 4. To adjust TripleTier® Flame burner: 1. Simmer burner regulation B. To start the inner burner. Low flame B. Hold the knob stem with a pair of top burner flames. Power burner regulation 3. Failure to follow these instructions can be adjusted using the ... ■ Check that the gas shutoff valves are set to the "open" position. ■ Check that burner caps are properly positioned on models KGSS907XSP) to "POWER BURNER HI" (turn each setting. Turn the screw until the flame is lit it may take longer than 4 seconds to the "...
...in the gas line. Replace the control knob. 4. To adjust TripleTier® Flame burner: 1. Simmer burner regulation B. To start the inner burner. Low flame B. Hold the knob stem with a pair of top burner flames. Power burner regulation 3. Failure to follow these instructions can be adjusted using the ... ■ Check that the gas shutoff valves are set to the "open" position. ■ Check that burner caps are properly positioned on models KGSS907XSP) to "POWER BURNER HI" (turn each setting. Turn the screw until the flame is lit it may take longer than 4 seconds to the "...