
Use and Care Guide
Page 1
...les instructions d'installation pour référence ultérieure. Models/Modèles KFRS271T, KFRS361T, KFRS365T, KBNS271T, KBNS361T W10110724C Installateur : Remettre les instructions d'installation au propriétaire. OUTDOOR GRILLS FREESTANDING AND BUILT-IN Installation Instructions and Use & Care Guide... Au Canada, pour assistance, installation ou service, composez le 1-800-807-6777 ou visitez notre site web à www.KitchenAid.ca Table of Contents/Table des matières 2 IMPORTANT: Save for future reference. Homeowner: Keep installation instructions for local...
...les instructions d'installation pour référence ultérieure. Models/Modèles KFRS271T, KFRS361T, KFRS365T, KBNS271T, KBNS361T W10110724C Installateur : Remettre les instructions d'installation au propriétaire. OUTDOOR GRILLS FREESTANDING AND BUILT-IN Installation Instructions and Use & Care Guide... Au Canada, pour assistance, installation ou service, composez le 1-800-807-6777 ou visitez notre site web à www.KitchenAid.ca Table of Contents/Table des matières 2 IMPORTANT: Save for future reference. Homeowner: Keep installation instructions for local...
Use and Care Guide
Page 4
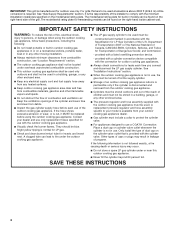
... gas must be found on the model/serial rating plate. See "Gas Supply Requirements" section. The model/serial rating plate for built-in use only. A clogged tube can be used at the supply cylinder. ■ Storage of the outdoor cooking gas appliance. IMPORTANT: This grill is manufactured for outdoor use . Slight yellow tipping is normal for LP gas...
... gas must be found on the model/serial rating plate. See "Gas Supply Requirements" section. The model/serial rating plate for built-in use only. A clogged tube can be used at the supply cylinder. ■ Storage of the outdoor cooking gas appliance. IMPORTANT: This grill is manufactured for outdoor use . Slight yellow tipping is normal for LP gas...
Use and Care Guide
Page 6
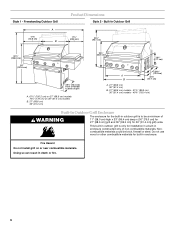
...36¼" (92.1 cm) 62¹⁄₂" (158.8 cm) 50" (127.0 cm) 28¹⁄₂" (72.4 cm) front of grill A. 61½" (156.2 cm) on 27" (68.6 cm) models 70½" (179 cm) on or near combustible materials. Doing so can result in enclosure. Fire Hazard Do not install...) 23¾" (60.5 cm) 10⁵⁄₈" (27.1 cm) 28½" (72.4 cm) A 22¾" B (57.7 cm) A. 27" (68.6 cm) 36" (91.4 cm) B. 27" (68.6 cm) models - 31¾" (80.6 cm) 36" (91.4 cm) models - 40¾" (103.4 cm) Built-In Outdoor Grill Enclosure WARNING The enclosure for the built-in outdoor...
...36¼" (92.1 cm) 62¹⁄₂" (158.8 cm) 50" (127.0 cm) 28¹⁄₂" (72.4 cm) front of grill A. 61½" (156.2 cm) on 27" (68.6 cm) models 70½" (179 cm) on or near combustible materials. Doing so can result in enclosure. Fire Hazard Do not install...) 23¾" (60.5 cm) 10⁵⁄₈" (27.1 cm) 28½" (72.4 cm) A 22¾" B (57.7 cm) A. 27" (68.6 cm) 36" (91.4 cm) B. 27" (68.6 cm) models - 31¾" (80.6 cm) 36" (91.4 cm) models - 40¾" (103.4 cm) Built-In Outdoor Grill Enclosure WARNING The enclosure for the built-in outdoor...

Use and Care Guide
Page 9
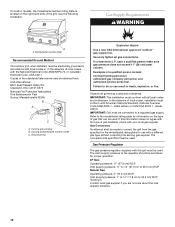
... recommended that the ground path is to be unobstructed. Check with an LP gas fuel tank for use with a qualified electrician if you are to be a minimum of the enclosure. A A. On freestanding models, the model/serial number rating plate is located inside the grill cabinet on an exposed exterior side located within 1" (2.5 cm) of the...
... recommended that the ground path is to be unobstructed. Check with an LP gas fuel tank for use with a qualified electrician if you are to be a minimum of the enclosure. A A. On freestanding models, the model/serial number rating plate is located inside the grill cabinet on an exposed exterior side located within 1" (2.5 cm) of the...
Use and Care Guide
Page 10
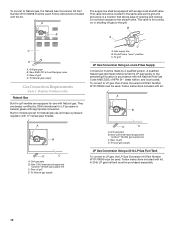
... personnel, and authorized service personnel. Observe all gas connections. In the absence of the grill. IMPORTANT: Grill must be used . Model/serial number plate Recommended Ground Method The outdoor grill, when installed, must be connected to do so can be as follows for proper operation: LP Gas: Operating pressure: 11" (27.9 cm) WCP Inlet (supply) pressure: 11" to...
... personnel, and authorized service personnel. Observe all gas connections. In the absence of the grill. IMPORTANT: Grill must be used . Model/serial number plate Recommended Ground Method The outdoor grill, when installed, must be connected to do so can be as follows for proper operation: LP Gas: Operating pressure: 11" (27.9 cm) WCP Inlet (supply) pressure: 11" to...

Use and Care Guide
Page 11
... a 20 lb LP gas fuel tank (fuel tank not supplied). Freestanding Outdoor Grills LP Gas Fuel Tank This grill is also design-certified by a qualified gas technician. Mounting hole C. Gas pressure regulator/hose assembly The 20 lb LP gas fuel tank must conform with local codes, or in the tank tray. Press the locking tab on the model/serial rating plate...
... a 20 lb LP gas fuel tank (fuel tank not supplied). Freestanding Outdoor Grills LP Gas Fuel Tank This grill is also design-certified by a qualified gas technician. Mounting hole C. Gas pressure regulator/hose assembly The 20 lb LP gas fuel tank must conform with local codes, or in the tank tray. Press the locking tab on the model/serial rating plate...
Use and Care Guide
Page 12
.... To local gas supply LP Gas Conversion Using a 20 lb LP Gas Fuel Tank To convert to LP gas, the LP Gas Conversion Kit Part Number W10118099 must be used . New ANSI Z21.54 certified gray hose C. latest edition, and local codes. Grill gas pipe B. Rear of grill D. To Natural gas supply D C A. This valve should be located in models are set for LP (propane or...
.... To local gas supply LP Gas Conversion Using a 20 lb LP Gas Fuel Tank To convert to LP gas, the LP Gas Conversion Kit Part Number W10118099 must be used . New ANSI Z21.54 certified gray hose C. latest edition, and local codes. Grill gas pipe B. Rear of grill D. To Natural gas supply D C A. This valve should be located in models are set for LP (propane or...

Use and Care Guide
Page 13
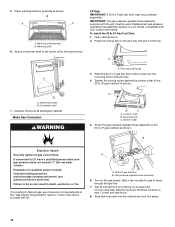
... on some models) 4. Open the hood. Place shelf onto the 2 mounting screws. Keyhole slot C. Install the bottom 2 screws and tighten. 8. Failure to move and install grill. Remove all packaging materials and remove grill from inside the grill. A B A. Top of grill 7. Side ... 2. Foam wrap 4. Attach Side Shelf (on each side of grill about ¼" (0.64 cm). Install 2 screws in the top 2 holes on some models) 1. Hinge bracket 6. A Remove Packaging Material Inside the Grill 1. INSTALLATION INSTRUCTIONS Style 1 - Leave screws away from both cabinet ...
... on some models) 4. Open the hood. Place shelf onto the 2 mounting screws. Keyhole slot C. Install the bottom 2 screws and tighten. 8. Failure to move and install grill. Remove all packaging materials and remove grill from inside the grill. A B A. Top of grill 7. Side ... 2. Foam wrap 4. Attach Side Shelf (on each side of grill about ¼" (0.64 cm). Install 2 screws in the top 2 holes on some models) 1. Hinge bracket 6. A Remove Packaging Material Inside the Grill 1. INSTALLATION INSTRUCTIONS Style 1 - Leave screws away from both cabinet ...
Use and Care Guide
Page 14
...shelf to the inside of the 20 lb LP gas fuel tank to secure. Replacement gas pressure regulator/hose assembly specific to do so can result in death, explosion, or fire. Failure to your model, is available from your outdoor grill dealer. Gas pressure regulator/hose assembly 6. Test all ...connections by brushing on the tank tray and pull out the tray. A A. Place the 20 lb LP gas fuel tank bottom collar into place. 14 Attachment...
...shelf to the inside of the 20 lb LP gas fuel tank to secure. Replacement gas pressure regulator/hose assembly specific to do so can result in death, explosion, or fire. Failure to your model, is available from your outdoor grill dealer. Gas pressure regulator/hose assembly 6. Test all ...connections by brushing on the tank tray and pull out the tray. A A. Place the 20 lb LP gas fuel tank bottom collar into place. 14 Attachment...
Use and Care Guide
Page 16
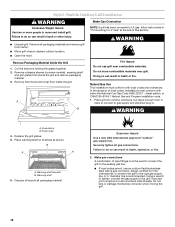
... Use two or more people to the grill. Make Gas Connection NOTE: If grill has been converted to LP gas, follow instructions in "If Converting to LP Gas" at the end of /recycle all packaging materials and remove grill from carton. ■ Move grill close to do so can result in . Natural Gas Use This installation must conform with either...
... Use two or more people to the grill. Make Gas Connection NOTE: If grill has been converted to LP gas, follow instructions in "If Converting to LP Gas" at the end of /recycle all packaging materials and remove grill from carton. ■ Move grill close to do so can result in . Natural Gas Use This installation must conform with either...

Use and Care Guide
Page 17
... Electrical Shock Hazard Plug into a grounded 3-prong outdoor outlet. 3. If connected to LP Gas WARNING Explosion Hazard Use a new CSA International approved "outdoor" gas supply line. Open the manual shutoff valve in Grill 1. Correct any leak found. Do not use an adapter. Plug into a grounded ...from your model, is not factory installed. A 1.5-volt "D" size alkaline battery is parallel to the "Check and Adjust the Burners" section. IMPORTANT: A 20 lb LP gas fuel tank must be used . Install battery at this time following the instructions in outdoor grill comes with...
... Electrical Shock Hazard Plug into a grounded 3-prong outdoor outlet. 3. If connected to LP Gas WARNING Explosion Hazard Use a new CSA International approved "outdoor" gas supply line. Open the manual shutoff valve in Grill 1. Correct any leak found. Do not use an adapter. Plug into a grounded ...from your model, is not factory installed. A 1.5-volt "D" size alkaline battery is parallel to the "Check and Adjust the Burners" section. IMPORTANT: A 20 lb LP gas fuel tank must be used . Install battery at this time following the instructions in outdoor grill comes with...
Use and Care Guide
Page 18
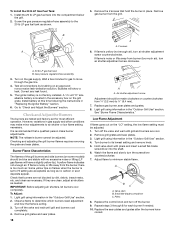
...be adjusted. 1. Install the 20 lb LP gas fuel tank into the shaft. 6. B A A. 2 screws A 6. Correct any leak found. 5. Light grill using information in the "Outdoor Grill Use" section. 2. Light grill using information in the "Outdoor Grill Use" section. 4. Turn burner to... "Check and Adjust the Burners" section. To Install the 20 lb LP Gas Fuel Tank: 1. Remove the 2 screws that hold the burner in the accessory box on some models...
...be adjusted. 1. Install the 20 lb LP gas fuel tank into the shaft. 6. B A A. 2 screws A 6. Correct any leak found. 5. Light grill using information in the "Outdoor Grill Use" section. 2. Light grill using information in the "Outdoor Grill Use" section. 4. Turn burner to... "Check and Adjust the Burners" section. To Install the 20 lb LP Gas Fuel Tank: 1. Remove the 2 screws that hold the burner in the accessory box on some models...

Use and Care Guide
Page 19
... slide the 20 lb LP gas fuel tank out. 2. Inspect the LP Gas Fuel Tank Supply Hose Inspect the gas pressure regulator/hose assembly before or after cooking. Inspect the gas pressure regulator/hose assembly for more than one hour before each use grill near grill. Doing so can result... in a garage or indoors. Control Panel A B C D E F A. Gas pressure regulator/hose assembly 19 The locations and appearances of the features shown here may have some or all of your model. WARNING Food Poisoning Hazard...
... slide the 20 lb LP gas fuel tank out. 2. Inspect the LP Gas Fuel Tank Supply Hose Inspect the gas pressure regulator/hose assembly before or after cooking. Inspect the gas pressure regulator/hose assembly for more than one hour before each use grill near grill. Doing so can result... in a garage or indoors. Control Panel A B C D E F A. Gas pressure regulator/hose assembly 19 The locations and appearances of the features shown here may have some or all of your model. WARNING Food Poisoning Hazard...

Use and Care Guide
Page 24
... carving. Built-in the "Style 2 - catch each end of spit rod; ROTISSERIE CHART Use a portable meat thermometer to work . A B A. Hood Lights For Freestanding Models; The grill must be plugged in place on the second fork pushing the tines into the drumsticks. 9. See "Plug in... Grill" in for the hood lights to work . Cut another 20" (50.8 cm) of the food. For Built-In Models: The 5,000 mAmp power transformer must be plugged in the "Style 1 - Wrap each wing tip...
... carving. Built-in the "Style 2 - catch each end of spit rod; ROTISSERIE CHART Use a portable meat thermometer to work . A B A. Hood Lights For Freestanding Models; The grill must be plugged in place on the second fork pushing the tines into the drumsticks. 9. See "Plug in... Grill" in for the hood lights to work . Cut another 20" (50.8 cm) of the food. For Built-In Models: The 5,000 mAmp power transformer must be plugged in the "Style 1 - Wrap each wing tip...

Use and Care Guide
Page 29
... them. 4. If any clogged burner ports with clean, warm water. Turn knob to order. Leave the burner on some models) Cleaning Method: 1. Replace grill grate. The full-width drip tray collects grease and food particles that has been straightened to intense heat from the burners. ... lint-free cloth. ■ KitchenAid® Stainless Steel Cleaner and Polish Part Number 4396920 (not included): See "Assistance or Service" section to ensure there is completely cool. See "Assistance or Service" section to HI and close the grill hood. 3. Reattach gas burner using mild detergent, warm ...
... them. 4. If any clogged burner ports with clean, warm water. Turn knob to order. Leave the burner on some models) Cleaning Method: 1. Replace grill grate. The full-width drip tray collects grease and food particles that has been straightened to intense heat from the burners. ... lint-free cloth. ■ KitchenAid® Stainless Steel Cleaner and Polish Part Number 4396920 (not included): See "Assistance or Service" section to ensure there is completely cool. See "Assistance or Service" section to HI and close the grill hood. 3. Reattach gas burner using mild detergent, warm ...

Use and Care Guide
Page 30
...death, fire, or electrical shock. See Installation Instructions. ■ Is the grill properly connected to build every new KITCHENAID® appliance. Do not use steel wool, abrasive cleaners or oven cleaner...model and serial number of a service call us to better respond to your appliance. To locate factory specified parts in your nearest KitchenAid designated service center. To locate the KitchenAid... specified parts. These factory specified parts will operate ■ Is the main or regulator gas shutoff valve in your area, call . Plug into a grounded 3 prong outlet. Do...
...death, fire, or electrical shock. See Installation Instructions. ■ Is the grill properly connected to build every new KITCHENAID® appliance. Do not use steel wool, abrasive cleaners or oven cleaner...model and serial number of a service call us to better respond to your appliance. To locate factory specified parts in your nearest KitchenAid designated service center. To locate the KitchenAid... specified parts. These factory specified parts will operate ■ Is the main or regulator gas shutoff valve in your area, call . Plug into a grounded 3 prong outlet. Do...

Use and Care Guide
Page 31
...91.4 cm): Order Part Number 8212705 Freestanding models: 27" (68.6 cm): Order Part Number 8212699 36" (91.4 cm): Order Part Number 8212700 48" (121.9 cm) [36" (91.4 cm) grill with any questions or concerns at: Customer eXperience Centre KitchenAid Canada 1901 Minnesota Court Mississauga, Ontario L5N... in materials or workmanship. Proof of Whirlpool Corporation or Whirlpool Canada LP (hereafter "KitchenAid") will pay for the stainless steel grill burners. 31 SECOND THROUGH FIFTH YEAR LIMITED WARRANTY ON PARTS ON GRILLS ONLY In the second through fifth years from the date of purchase...
...91.4 cm): Order Part Number 8212705 Freestanding models: 27" (68.6 cm): Order Part Number 8212699 36" (91.4 cm): Order Part Number 8212700 48" (121.9 cm) [36" (91.4 cm) grill with any questions or concerns at: Customer eXperience Centre KitchenAid Canada 1901 Minnesota Court Mississauga, Ontario L5N... in materials or workmanship. Proof of Whirlpool Corporation or Whirlpool Canada LP (hereafter "KitchenAid") will pay for the stainless steel grill burners. 31 SECOND THROUGH FIFTH YEAR LIMITED WARRANTY ON PARTS ON GRILLS ONLY In the second through fifth years from the date of purchase...

Use and Care Guide
Page 32
... the product. Conversion kit or service call for future reference. Expenses for travel and transportation for in accordance with original model/serial numbers that is contrary to KitchenAid within 30 days from accident, alteration, misuse, abuse, fire, flood, acts of your outdoor product. 11. This ... TO STATE OR PROVINCE TO PROVINCE. In the U.S.A., call 1-800-807-6777. 9/07 Keep this book and your outdoor product from natural gas to L.P./propane or from L.P./propane to the outdoor product. 8. In Canada, call 1-800-422-1230. Write down the following information about your...
... the product. Conversion kit or service call for future reference. Expenses for travel and transportation for in accordance with original model/serial numbers that is contrary to KitchenAid within 30 days from accident, alteration, misuse, abuse, fire, flood, acts of your outdoor product. 11. This ... TO STATE OR PROVINCE TO PROVINCE. In the U.S.A., call 1-800-807-6777. 9/07 Keep this book and your outdoor product from natural gas to L.P./propane or from L.P./propane to the outdoor product. 8. In Canada, call 1-800-422-1230. Write down the following information about your...
