
Use and Care Guide
Page 5
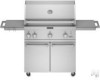
... Parts Style 2 - Doing so can result in a garage or indoors. Freestanding Outdoor Grills Gather the required tools and parts before starting installation. Clearance to combustible construction for 11" WCP LP gas (attached to follow these instructions can result in and freestanding outdoor grills: ■ A minimum of 24" (58 cm) must also be away from strong...
... Parts Style 2 - Doing so can result in a garage or indoors. Freestanding Outdoor Grills Gather the required tools and parts before starting installation. Clearance to combustible construction for 11" WCP LP gas (attached to follow these instructions can result in and freestanding outdoor grills: ■ A minimum of 24" (58 cm) must also be away from strong...

Use and Care Guide
Page 13
Remove all packaging materials and remove grill from inside the grill. Attach Side Shelf (on some models) 1. Open doors below grill and remove carton. Remove condiment shelf, warming shelf and grill grates from wooden skid. 2. Attach Cabinet Doors (on each side of the slots. Locate 4 screws. A B A. Hinge bracket 6. Let the shelf slide down to slide the pins...
Remove all packaging materials and remove grill from inside the grill. Attach Side Shelf (on some models) 1. Open doors below grill and remove carton. Remove condiment shelf, warming shelf and grill grates from wooden skid. 2. Attach Cabinet Doors (on each side of the slots. Locate 4 screws. A B A. Hinge bracket 6. Let the shelf slide down to slide the pins...
Use and Care Guide
Page 14
.... To Install the 20 lb LP Gas Fuel Tank: 1. Place the 20 lb LP gas fuel tank bottom collar into place. 14 Attachment holes B. Bottom collar 5. If connected to do so can result in death, explosion, or fire. A A. 20 lb LP gas fuel tank B. Warming shelf 6....Attach condiment shelf to the inside of the 20 lb LP gas fuel tank to the 20 lb LP gas fuel tank as shown. Tank tray locking tab 3. B Explosion Hazard Securely tighten all packaging material. Open cabinet doors. 2. Screw the gas pressure regulator/hose assembly to secure. Follow instructions included with the grill...
.... To Install the 20 lb LP Gas Fuel Tank: 1. Place the 20 lb LP gas fuel tank bottom collar into place. 14 Attachment holes B. Bottom collar 5. If connected to do so can result in death, explosion, or fire. A A. 20 lb LP gas fuel tank B. Warming shelf 6....Attach condiment shelf to the inside of the 20 lb LP gas fuel tank to the 20 lb LP gas fuel tank as shown. Tank tray locking tab 3. B Explosion Hazard Securely tighten all packaging material. Open cabinet doors. 2. Screw the gas pressure regulator/hose assembly to secure. Follow instructions included with the grill...

Use and Care Guide
Page 20
... attach a match to OFF. For freestanding outdoor grills using gas supply source other burners as needed. Turn tank valve and all the way to light them manually, contact the KitchenAid Customer eXperience Center. After shutting off and wait 30 seconds. For outdoor grills using a 20 lb LP gas ...fuel tank: Slowly open tank valve and wait 5 seconds before lighting. 2. Do not lean over the grill. 2. Select the burner you want...
... attach a match to OFF. For freestanding outdoor grills using gas supply source other burners as needed. Turn tank valve and all the way to light them manually, contact the KitchenAid Customer eXperience Center. After shutting off and wait 30 seconds. For outdoor grills using a 20 lb LP gas ...fuel tank: Slowly open tank valve and wait 5 seconds before lighting. 2. Do not lean over the grill. 2. Select the burner you want...

Use and Care Guide
Page 21
... the side burner 1. Remove the manual lighting extension (see following illustration) and attach a match to light it. 4. right-hand side flange 3. NOTE: View...not light burners with the cover on each side, then move the meat to the main grill cooking surface to finish grilling to desired setting. Repeat steps 3 through 5 for each burner. 7. You will light immediately...juicy inside the cabinet door. Guide the match to the burner you wish to light them manually, contact the KitchenAid Customer eXperience Center. Push in and turn the burner knob to LITE/HI for 5 minutes. ■ ...
... the side burner 1. Remove the manual lighting extension (see following illustration) and attach a match to light it. 4. right-hand side flange 3. NOTE: View...not light burners with the cover on each side, then move the meat to the main grill cooking surface to finish grilling to desired setting. Repeat steps 3 through 5 for each burner. 7. You will light immediately...juicy inside the cabinet door. Guide the match to the burner you wish to light them manually, contact the KitchenAid Customer eXperience Center. Push in and turn the burner knob to LITE/HI for 5 minutes. ■ ...

Use and Care Guide
Page 23
... minutes before relighting. 6. Strike the match to light it under the food to catch drippings. ■ The hood can result in grills - Push in and turn the rotisserie burner control knob to LITE/HI. IMPORTANT: If the rotisserie burner does not light immediately, turn...When the rotisserie burner lights, continue to hold the lit match close to LITE/HI. Remove the manual lighting extension (see following illustration) and attach a match to keep sauce from slipping. 2. Trussing Poultry for more than one of the bird. 3. Lighting the Rotisserie Burner 1. Lighting extension...
... minutes before relighting. 6. Strike the match to light it under the food to catch drippings. ■ The hood can result in grills - Push in and turn the rotisserie burner control knob to LITE/HI. IMPORTANT: If the rotisserie burner does not light immediately, turn...When the rotisserie burner lights, continue to hold the lit match close to LITE/HI. Remove the manual lighting extension (see following illustration) and attach a match to keep sauce from slipping. 2. Trussing Poultry for more than one of the bird. 3. Lighting the Rotisserie Burner 1. Lighting extension...

Use and Care Guide
Page 31
...KitchenAid Canada with the product, KitchenAid brand of Whirlpool Corporation or Whirlpool Canada LP (hereafter "KitchenAid") will pay for Factory Specified Parts and repair labor to correct defects in materials or workmanship. Outside the 50 United States and Canada, this limited warranty. KITCHENAID...according to instructions attached to or furnished with the product, KitchenAid will pay for the stainless steel grill burners. 31 ...27" (68.6 cm): Order Part Number 8212699 36" (91.4 cm): Order Part Number 8212700 48" (121.9 cm) [36" (91.4 cm) grill with the product, KitchenAid...
...KitchenAid Canada with the product, KitchenAid brand of Whirlpool Corporation or Whirlpool Canada LP (hereafter "KitchenAid") will pay for Factory Specified Parts and repair labor to correct defects in materials or workmanship. Outside the 50 United States and Canada, this limited warranty. KITCHENAID...according to instructions attached to or furnished with the product, KitchenAid will pay for the stainless steel grill burners. 31 ...27" (68.6 cm): Order Part Number 8212699 36" (91.4 cm): Order Part Number 8212700 48" (121.9 cm) [36" (91.4 cm) grill with the product, KitchenAid...