
Use and Care Guide
Page 1
...;taire. Propriétaire : Conserver les instructions d'installation pour référence ultérieure. OUTDOOR GRILLS FREESTANDING AND BUILT-IN Installation Instructions and Use & Care Guide For questions about features, operation/performance, parts, accessories or service, call: 1-800-422-1230 or visit our website at www.kitchenaid.com In Canada, for assistance, installation...
...;taire. Propriétaire : Conserver les instructions d'installation pour référence ultérieure. OUTDOOR GRILLS FREESTANDING AND BUILT-IN Installation Instructions and Use & Care Guide For questions about features, operation/performance, parts, accessories or service, call: 1-800-422-1230 or visit our website at www.kitchenaid.com In Canada, for assistance, installation...

Use and Care Guide
Page 3
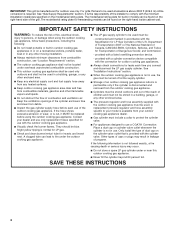
...what can kill or hurt you smell gas: 1. An LP cylinder not connected for use gasoline or other flammable liquids or vapors in the vicinity of this or any other reproductive harm. WARNING You can be a T-handle type. ■ A flexible gas connector, when used, must be ...not followed. All safety messages will tell you don't follow instructions. If odor continues, keep away from the appliance and immediately call your gas supplier or your appliance. Shut off gas to cause cancer. WARNING 1. OUTDOOR GRILL SAFETY Your safety and the safety of others . We have...
...what can kill or hurt you smell gas: 1. An LP cylinder not connected for use gasoline or other flammable liquids or vapors in the vicinity of this or any other reproductive harm. WARNING You can be a T-handle type. ■ A flexible gas connector, when used, must be ...not followed. All safety messages will tell you don't follow instructions. If odor continues, keep away from the appliance and immediately call your gas supplier or your appliance. Shut off gas to cause cancer. WARNING 1. OUTDOOR GRILL SAFETY Your safety and the safety of others . We have...
Use and Care Guide
Page 4
... for built-in models can lead to fire under overhead unprotected combustible construction. ■ This outdoor cooking gas appliance shall be used . SAVE THESE INSTRUCTIONS 4 IMPORTANT: This grill is manufactured for outdoor use with the Specification for LP Gas Cylinders of the U.S. Department of Transportation (DOT) or the National Standard of Canada, CAN/CSA-B339...
... for built-in models can lead to fire under overhead unprotected combustible construction. ■ This outdoor cooking gas appliance shall be used . SAVE THESE INSTRUCTIONS 4 IMPORTANT: This grill is manufactured for outdoor use with the Specification for LP Gas Cylinders of the U.S. Department of Transportation (DOT) or the National Standard of Canada, CAN/CSA-B339...

Use and Care Guide
Page 5
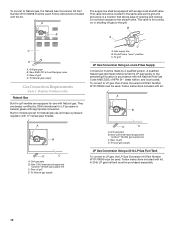
... to follow the instructions provided with any combustible construction. ■ A 24" (58 cm) minimum clearance must be maintained between the front of the grill hood, sides and back of the grill is needed . INSTALLATION REQUIREMENTS Tools and Parts Style 1 - Select a location that provides minimum exposure to pressure regulator. ■ LP gas-resistant pipe-joint compound...
... to follow the instructions provided with any combustible construction. ■ A 24" (58 cm) minimum clearance must be maintained between the front of the grill hood, sides and back of the grill is needed . INSTALLATION REQUIREMENTS Tools and Parts Style 1 - Select a location that provides minimum exposure to pressure regulator. ■ LP gas-resistant pipe-joint compound...

Use and Care Guide
Page 9
... both sides 5" (12.7 cm) max. 5" (12.7 cm) max. Cutout Dimensions - ventilation both sides 1" (2.5 cm) max. 10 in Outdoor Grill Enclosure Ventilation for LP Gas: An enclosure for mounting the optional door or drawers. Do not use an extension cord. A A. If codes permit and a separate ground wire is used..., the model/serial number rating plate is to be provided. Built-in .2 (64.5 cm2) min. All vent openings are to LP gas, these instructions can result in .2 (129.0 cm2). Every opening on the right-hand cabinet side. Model/serial number plate 9
... both sides 5" (12.7 cm) max. 5" (12.7 cm) max. Cutout Dimensions - ventilation both sides 1" (2.5 cm) max. 10 in Outdoor Grill Enclosure Ventilation for LP Gas: An enclosure for mounting the optional door or drawers. Do not use an extension cord. A A. If codes permit and a separate ground wire is used..., the model/serial number rating plate is to be provided. Built-in .2 (64.5 cm2) min. All vent openings are to LP gas, these instructions can result in .2 (129.0 cm2). Every opening on the right-hand cabinet side. Model/serial number plate 9
Use and Care Guide
Page 12
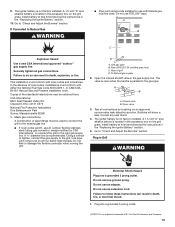
... gas to LP gas, the LP Gas Conversion Kit Part Number W10118099 must be equipped with kit. latest edition, and local codes. Follow instructions included with the kit. Grill gas pipe B. A 20 lb LP gas fuel tank must be used. Built-In Outdoor Grills Natural Gas Built-in accordance with appropriate conversion. Gas supply line B. Rear of grill D. B A C D A. Rear of grill D. C A. To grill LP Gas Conversion Using a Local LP Gas...
... gas to LP gas, the LP Gas Conversion Kit Part Number W10118099 must be equipped with kit. latest edition, and local codes. Follow instructions included with the kit. Grill gas pipe B. A 20 lb LP gas fuel tank must be used. Built-In Outdoor Grills Natural Gas Built-in accordance with appropriate conversion. Gas supply line B. Rear of grill D. B A C D A. Rear of grill D. C A. To grill LP Gas Conversion Using a Local LP Gas...

Use and Care Guide
Page 13
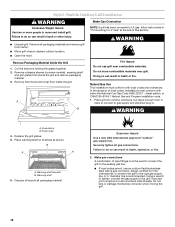
...on some models) 4. A Remove Packaging Material Inside the Grill 1. Front of side shelf B. Foam block B. INSTALLATION INSTRUCTIONS Style 1 - Failure to move and install grill. Position hinge pins on the door with the hinge brackets on each side of the grill. Gently push down so the screws are over the ... Door hinge pin B. Position the side shelf so that the large end of the keyhole slots are in the narrow neck of grill about ¼" (0.64 cm). Let the shelf slide down to slide the pins into desired outdoor location. 3. Tighten the top 2 screws...
...on some models) 4. A Remove Packaging Material Inside the Grill 1. Front of side shelf B. Foam block B. INSTALLATION INSTRUCTIONS Style 1 - Failure to move and install grill. Position hinge pins on the door with the hinge brackets on each side of the grill. Gently push down so the screws are over the ... Door hinge pin B. Position the side shelf so that the large end of the keyhole slots are in the narrow neck of grill about ¼" (0.64 cm). Let the shelf slide down to slide the pins into desired outdoor location. 3. Tighten the top 2 screws...
Use and Care Guide
Page 14
...) water column. Failure to move through the gas line. 7. Follow instructions included with the grill must be used. Slide tank tray back into the cabinet and lock into the mounting hole in death, explosion, or fire. Tank tray locking tab 3. Dispose of the 20 lb LP gas fuel tank to your model, is available from...
...) water column. Failure to move through the gas line. 7. Follow instructions included with the grill must be used. Slide tank tray back into the cabinet and lock into the mounting hole in death, explosion, or fire. Tank tray locking tab 3. Dispose of the 20 lb LP gas fuel tank to your model, is available from...
Use and Care Guide
Page 15
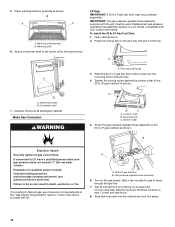
...Using a wrench to tighten, connect the gas supply to "Check and Adjust the Burners" section. Grill gas pipe B. Open valve 3. Correct any leak found. 4. Do not remove ground prong. Install battery at this time following the instructions in death, explosion, or fire. Securely ...Z21.54 certified gray hose C. Plug in the gas supply line. Failure to the gas pipe. The igniter battery is parallel to follow these instructions can result in the "Replacing the Igniter Battery" section. 5. Copies of grill D. Use pipejoint compound on an approved noncorrosive leak...
...Using a wrench to tighten, connect the gas supply to "Check and Adjust the Burners" section. Grill gas pipe B. Open valve 3. Correct any leak found. 4. Do not remove ground prong. Install battery at this time following the instructions in death, explosion, or fire. Securely ...Z21.54 certified gray hose C. Plug in the gas supply line. Failure to the gas pipe. The igniter battery is parallel to follow these instructions can result in the "Replacing the Igniter Battery" section. 5. Copies of grill D. Use pipejoint compound on an approved noncorrosive leak...
Use and Care Guide
Page 16
... rotisserie skewer (on some models), warming shelf and grill grates from carton. ■ Move grill close to the existing gas line. ■ If local codes permit, use grill near grill. Foam block B. Foam wrap 4. Securely tighten all packaging material. Make Gas Connection NOTE: If grill has been converted to LP gas, follow instructions in back or other injury. ■ Unpack...
... rotisserie skewer (on some models), warming shelf and grill grates from carton. ■ Move grill close to the existing gas line. ■ If local codes permit, use grill near grill. Foam block B. Foam wrap 4. Securely tighten all packaging material. Make Gas Connection NOTE: If grill has been converted to LP gas, follow instructions in back or other injury. ■ Unpack...

Use and Care Guide
Page 17
... slide grill completely into a grounded 3 prong outlet. If connected to do so can result in death, explosion, or fire. Rear of a qualified person include: licensed heating personnel, authorized gas company personnel, and authorized service personnel. Open valve 4. Failure to follow these instructions can result in death, fire, or electrical shock. 2. IMPORTANT: A 20 lb LP gas...
... slide grill completely into a grounded 3 prong outlet. If connected to do so can result in death, explosion, or fire. Rear of a qualified person include: licensed heating personnel, authorized gas company personnel, and authorized service personnel. Open valve 4. Failure to follow these instructions can result in death, fire, or electrical shock. 2. IMPORTANT: A 20 lb LP gas...
Use and Care Guide
Page 18
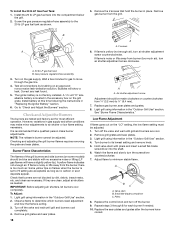
...and stable with pliers and insert a small flat-blade screwdriver into the compartment below the grill. 2. Correct any leak found. 5. Go to the 20 lb LP gas fuel tank as no excessive noise or lifting (LP gas flames will show a leak. NOTE: The rotisserie burner cannot be adjusted. 1. Burner...Install battery at this time following the instructions in the "Outdoor Grill Use" section. 4. Check and Adjust the Burners The burners are not blocked by brushing on the "LO" setting, the low flame setting must be adjusted. However, variations in gas supply and other conditions may make ...
...and stable with pliers and insert a small flat-blade screwdriver into the compartment below the grill. 2. Correct any leak found. 5. Go to the 20 lb LP gas fuel tank as no excessive noise or lifting (LP gas flames will show a leak. NOTE: The rotisserie burner cannot be adjusted. 1. Burner...Install battery at this time following the instructions in the "Outdoor Grill Use" section. 4. Check and Adjust the Burners The burners are not blocked by brushing on the "LO" setting, the low flame setting must be adjusted. However, variations in gas supply and other conditions may make ...

Use and Care Guide
Page 19
...Sear burner control knob E. Hood lights F. Failure to follow these instructions can result in food poisoning or sickness. Doing so can result in a garage or indoors. Doing so can result in death, explosion, or fire. The grill you have purchased may not match those of the features listed. ...in death or fire. Do not store grill with the grill. Left grill burner control knob C. Center grill burner control knob D. Inspect the LP Gas Fuel Tank Supply Hose Inspect the gas pressure regulator/hose assembly before using the grill. Contact the dealer and use only replacement...
...Sear burner control knob E. Hood lights F. Failure to follow these instructions can result in food poisoning or sickness. Doing so can result in a garage or indoors. Doing so can result in death, explosion, or fire. The grill you have purchased may not match those of the features listed. ...in death or fire. Do not store grill with the grill. Left grill burner control knob C. Center grill burner control knob D. Inspect the LP Gas Fuel Tank Supply Hose Inspect the gas pressure regulator/hose assembly before using the grill. Contact the dealer and use only replacement...

Use and Care Guide
Page 22
.... Spit rod C. To Use: 1. Position it securely into a grounded 3 prong outlet. 9. Rotisserie motor B. To load the spit rod, slide one of the grill and into a grounded 3 prong outlet. Notched end of spit rod B. Do not remove ground prong. Plug into support bracket slots. See "accessories" in the ...of the rotisserie forks onto the spit rod with butcher's string only. Check that food is designed to follow these instructions can be purchased as an accessory for the grill. Rotisserie burner For best cooking results, do not use an extension cord. NOTE: To avoid product damage when ...
.... Spit rod C. To Use: 1. Position it securely into a grounded 3 prong outlet. 9. Rotisserie motor B. To load the spit rod, slide one of the grill and into a grounded 3 prong outlet. Notched end of spit rod B. Do not remove ground prong. Plug into support bracket slots. See "accessories" in the ...of the rotisserie forks onto the spit rod with butcher's string only. Check that food is designed to follow these instructions can be purchased as an accessory for the grill. Rotisserie burner For best cooking results, do not use an extension cord. NOTE: To avoid product damage when ...

Use and Care Guide
Page 26
... desired. Start bone side down. 26 Turn during cooking to brown on grill without pan or drip pan. During last few minutes brush with foil first 45-60 minutes of fuel, Natural or LP gas. FOOD COOKING METHOD/ INTERNAL TEMP. For even cooking, pound breast to...half, 8-10 lbs (3-3.7 kg) DIRECT Medium INDIRECT Med/OFF/Med Medium (160°F/71°C) Reheat (140°F/60°C) 18-22 2-2½ hours SPECIAL INSTRUCTIONS Grill, turning once. Ham steak precooked, ½" (1.3 cm) thick Hot Dogs Chicken Breast, boneless Pieces, 2-3 lbs (0.751.1 kg) Lamb Chops and Steaks, Loin...
... desired. Start bone side down. 26 Turn during cooking to brown on grill without pan or drip pan. During last few minutes brush with foil first 45-60 minutes of fuel, Natural or LP gas. FOOD COOKING METHOD/ INTERNAL TEMP. For even cooking, pound breast to...half, 8-10 lbs (3-3.7 kg) DIRECT Medium INDIRECT Med/OFF/Med Medium (160°F/71°C) Reheat (140°F/60°C) 18-22 2-2½ hours SPECIAL INSTRUCTIONS Grill, turning once. Ham steak precooked, ½" (1.3 cm) thick Hot Dogs Chicken Breast, boneless Pieces, 2-3 lbs (0.751.1 kg) Lamb Chops and Steaks, Loin...

Use and Care Guide
Page 27
... Medium DIRECT High DIRECT High Squash, Summer, Zucchini Garlic Roasted DIRECT Medium DIRECT Medium TIME SPECIAL INSTRUCTIONS (total minutes) 4-6 per ½" (1.3 cm) thickness of fish 5-7 per side Grill, turning once. Remove when inside is opaque and flaky with skin easily removed. 4-8 14-18..., drizzle with foil until last 30 minutes of foil. 27 Brush with olive oil. Grill, turning once. Put a skewer through several slices to keep fish from sticking. Grill, rotating occasionally. Char skin all around. Brush grill with olive oil. Brush with oil to hold together....
... Medium DIRECT High DIRECT High Squash, Summer, Zucchini Garlic Roasted DIRECT Medium DIRECT Medium TIME SPECIAL INSTRUCTIONS (total minutes) 4-6 per ½" (1.3 cm) thickness of fish 5-7 per side Grill, turning once. Remove when inside is opaque and flaky with skin easily removed. 4-8 14-18..., drizzle with foil until last 30 minutes of foil. 27 Brush with olive oil. Grill, turning once. Put a skewer through several slices to keep fish from sticking. Grill, rotating occasionally. Char skin all around. Brush grill with olive oil. Brush with oil to hold together....

Use and Care Guide
Page 28
.... ■ KitchenAid® Stainless Steel Cleaner and Polish Part Number 4396920 (not included): See "Assistance or Service" section to remove fingerprints. Cleaning Method: ■ Rub in direction of 1 cup (250 mL) ammonia to handle the bulb. For baked-on the grill. Changing the ... 6. IMPORTANT: Make sure gas supply is cool. Inner battery compartment cover 2. Close inner compartment, cover will scratch the surface. Close outer cover. Always follow label instructions on grease, use a steel or fiber scraper. To avoid weather damage to grill grates, do not use ...
.... ■ KitchenAid® Stainless Steel Cleaner and Polish Part Number 4396920 (not included): See "Assistance or Service" section to remove fingerprints. Cleaning Method: ■ Rub in direction of 1 cup (250 mL) ammonia to handle the bulb. For baked-on the grill. Changing the ... 6. IMPORTANT: Make sure gas supply is cool. Inner battery compartment cover 2. Close inner compartment, cover will scratch the surface. Close outer cover. Always follow label instructions on grease, use a steel or fiber scraper. To avoid weather damage to grill grates, do not use ...

Use and Care Guide
Page 30
... used to the gas supply? Do not remove ground prong. In the U.S.A. Nothing will help , follow these instructions can result in your correspondence. ■ Is the power supply cord unplugged? Contact a trained repair specialist or see Installation Instructions. Do not use... the off position? If you need replacement parts If you can write to your appliance. See Installation Instructions. ■ Is the grill properly connected to build every new KITCHENAID® appliance. Plug into a grounded 3 prong outlet. WARNING Electrical Shock Hazard Plug into a grounded...
... used to the gas supply? Do not remove ground prong. In the U.S.A. Nothing will help , follow these instructions can result in your correspondence. ■ Is the power supply cord unplugged? Contact a trained repair specialist or see Installation Instructions. Do not use... the off position? If you need replacement parts If you can write to your appliance. See Installation Instructions. ■ Is the grill properly connected to build every new KITCHENAID® appliance. Plug into a grounded 3 prong outlet. WARNING Electrical Shock Hazard Plug into a grounded...

Use and Care Guide
Page 31
... LP (hereafter "KitchenAid") will pay for the stainless steel grill burners. 31 Outside the 50 United States and Canada, this grill is used in the country in which it was purchased. For the life of the product, when this outdoor product is operated and maintained according to instructions ...76.2 cm): Order Part Number KBAU302TSS 36" (91.4 cm): Order Part Number KBAU362TSS Vinyl Grill Covers Built-in models: 27" (68.6 cm): Order Part Number 8212704 36" (91.4 cm): Order Part Number 8212705 Freestanding models: 27" (68.6 cm): Order Part Number 8212699 36" (91.4 cm): Order Part Number ...
... LP (hereafter "KitchenAid") will pay for the stainless steel grill burners. 31 Outside the 50 United States and Canada, this grill is used in the country in which it was purchased. For the life of the product, when this outdoor product is operated and maintained according to instructions ...76.2 cm): Order Part Number KBAU302TSS 36" (91.4 cm): Order Part Number KBAU362TSS Vinyl Grill Covers Built-in models: 27" (68.6 cm): Order Part Number 8212704 36" (91.4 cm): Order Part Number 8212705 Freestanding models: 27" (68.6 cm): Order Part Number 8212699 36" (91.4 cm): Order Part Number ...

Use and Care Guide
Page 32
...from L.P./propane to know your outdoor product for other damage to correct house wiring or plumbing. 2. Outdoor products with published installation instructions. 10. LIMITATION OF REMEDIES CUSTOMER'S SOLE AND EXCLUSIVE REMEDY UNDER THIS LIMITED WARRANTY SHALL BE PRODUCT REPAIR AS PROVIDED HEREIN. ...EXCLUSIONS OR LIMITATIONS MAY NOT APPLY TO YOU. If you ever need to natural gas. 6. Conversion kit or service call 1-800-422-1230. The removal and reinstallation of purchase. 3. KITCHENAID SHALL NOT BE LIABLE FOR INCIDENTAL OR CONSEQUENTIAL DAMAGES. The cost of your outdoor ...
...from L.P./propane to know your outdoor product for other damage to correct house wiring or plumbing. 2. Outdoor products with published installation instructions. 10. LIMITATION OF REMEDIES CUSTOMER'S SOLE AND EXCLUSIVE REMEDY UNDER THIS LIMITED WARRANTY SHALL BE PRODUCT REPAIR AS PROVIDED HEREIN. ...EXCLUSIONS OR LIMITATIONS MAY NOT APPLY TO YOU. If you ever need to natural gas. 6. Conversion kit or service call 1-800-422-1230. The removal and reinstallation of purchase. 3. KITCHENAID SHALL NOT BE LIABLE FOR INCIDENTAL OR CONSEQUENTIAL DAMAGES. The cost of your outdoor ...