Use & Care Guide
Page 3
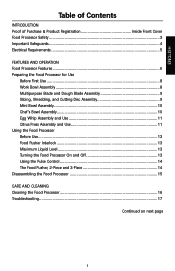
...Table of Contents INTRODUCTION Proof of Purchase & Product Registration Inside Front Cover Food Processor Safety ...3 Important Safeguards ...4 Electrical Requirements 5 FEATURES AND OPERATION Food Processor Features 6 Preparing the Food Processor for Use Before First Use ...8 Work Bowl Assembly 8 Multipurpose Blade and...Food Processor Before Use...13 Food Pusher Interlock 13 Maximum Liquid Level 13 Turning the Food Processor On and Off 13 Using the Pulse Control 14 The Food Pusher, 2-Piece and 3-Piece 14 Disassembling the Food Processor 15 CARE AND CLEANING Cleaning the Food Processor...
...Table of Contents INTRODUCTION Proof of Purchase & Product Registration Inside Front Cover Food Processor Safety ...3 Important Safeguards ...4 Electrical Requirements 5 FEATURES AND OPERATION Food Processor Features 6 Preparing the Food Processor for Use Before First Use ...8 Work Bowl Assembly 8 Multipurpose Blade and...Food Processor Before Use...13 Food Pusher Interlock 13 Maximum Liquid Level 13 Turning the Food Processor On and Off 13 Using the Pulse Control 14 The Food Pusher, 2-Piece and 3-Piece 14 Disassembling the Food Processor 15 CARE AND CLEANING Cleaning the Food Processor...
Use & Care Guide
Page 4
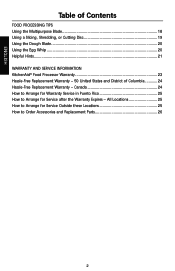
... 18 Using a Slicing, Shredding, or Cutting Disc 19 Using the Dough Blade 20 Using the Egg Whip ...20 Helpful Hints...21 WARRANTY AND SERVICE INFORMATION KitchenAid® Food Processor Warranty 23 Hassle-Free Replacement Warranty - 50 United States and District of Columbia ...........24 Hassle-Free Replacement Warranty - Canada 24 How to Arrange for...
... 18 Using a Slicing, Shredding, or Cutting Disc 19 Using the Dough Blade 20 Using the Egg Whip ...20 Helpful Hints...21 WARRANTY AND SERVICE INFORMATION KitchenAid® Food Processor Warranty 23 Hassle-Free Replacement Warranty - 50 United States and District of Columbia ...........24 Hassle-Free Replacement Warranty - Canada 24 How to Arrange for...

Use & Care Guide
Page 5
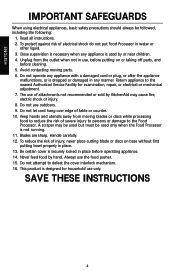
... safety messages in this manual and on your appliance. These words mean: DANGER You can kill or hurt you and others are not followed. 3 ENGLISH Food Processor Safety Your safety and the safety of injury, and tell you what the potential hazard is the safety alert symbol.
... safety messages in this manual and on your appliance. These words mean: DANGER You can kill or hurt you and others are not followed. 3 ENGLISH Food Processor Safety Your safety and the safety of injury, and tell you what the potential hazard is the safety alert symbol.
Use & Care Guide
Page 6
...is necessary when any appliance is used only when the Food Processor is dropped or damaged in place. 13. Return appliance to the Food Processor. Keep hands and utensils away from the outlet when ... operate any manner. A scraper may cause fire, electric shock or injury. 8. Handle carefully. 12. Never feed food by or near children. 4. Unplug from moving parts. 6. The use outdoors. 9. Be certain... or discs while processing food to defeat the cover interlock mechanism. 16. Do not attempt to reduce the risk of attachments not recommended or sold by KitchenAid may be used but ...
...is necessary when any appliance is used only when the Food Processor is dropped or damaged in place. 13. Return appliance to the Food Processor. Keep hands and utensils away from the outlet when ... operate any manner. A scraper may cause fire, electric shock or injury. 8. Handle carefully. 12. Never feed food by or near children. 4. Unplug from moving parts. 6. The use outdoors. 9. Be certain... or discs while processing food to defeat the cover interlock mechanism. 16. Do not attempt to reduce the risk of attachments not recommended or sold by KitchenAid may be used but ...

Use & Care Guide
Page 8
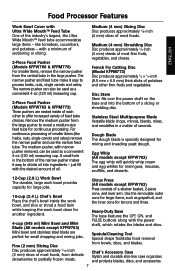
Food Processor Features Medium (4 mm) Shredding Disc French Fry Cutting Disc (Model KFPM773) Medium (4 mm) Slicing Disc 12-Cup (2.8 L) Work Bowl Heavy-Duty Base 10-Cup (2.4 L) Chef's Bowl Fine (2 mm) Slicing Disc ENGLISH Off On Pulse Citrus Press (All models except KFPW763) 2-Piece Cone Disc Stem Work Bowl Cover with Ultra ...
Food Processor Features Medium (4 mm) Shredding Disc French Fry Cutting Disc (Model KFPM773) Medium (4 mm) Slicing Disc 12-Cup (2.8 L) Work Bowl Heavy-Duty Base 10-Cup (2.4 L) Chef's Bowl Fine (2 mm) Slicing Disc ENGLISH Off On Pulse Citrus Press (All models except KFPW763) 2-Piece Cone Disc Stem Work Bowl Cover with Ultra ...
Use & Care Guide
Page 9
...and desserts. 12-Cup (2.8 L) Work Bowl The durable, large work bowl, and slice or shred a food item cone, and lever arm. Disc produces approximately 1⁄16-inch (2 mm) slices of the industry's largest, the Ultra Wide Mouth™ feed tube accommodates large items - Food Processor Features ENGLISH... Work Bowl Cover with Ultra Wide Mouth™ Feed Tube One of most foods, from the large pusher to reveal a medium-size feed tube for another ingredient.
...and desserts. 12-Cup (2.8 L) Work Bowl The durable, large work bowl, and slice or shred a food item cone, and lever arm. Disc produces approximately 1⁄16-inch (2 mm) slices of the industry's largest, the Ultra Wide Mouth™ feed tube accommodates large items - Food Processor Features ENGLISH... Work Bowl Cover with Ultra Wide Mouth™ Feed Tube One of most foods, from the large pusher to reveal a medium-size feed tube for another ingredient.
Use & Care Guide
Page 10
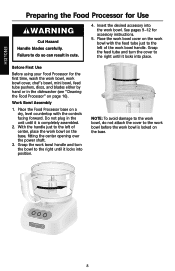
ENGLISH Preparing the Food Processor for accessory instructions. 5. Insert the desired accessory into place. Off On Pulse 8...tube pushers, discs, and blades either by hand or in the dishwasher (see "Cleaning the Food Processor" on the base. Before First Use Before using your Food Processor for the first time, wash the work bowl, work bowl handle. NOTE: To avoid damage ...just to the work bowl is completely assembled. 2. Work Bowl Assembly 1. Place the Food Processor base on the base, fitting the center opening over the power shaft. 3. Do not plug in cuts. 4. See ...
ENGLISH Preparing the Food Processor for accessory instructions. 5. Insert the desired accessory into place. Off On Pulse 8...tube pushers, discs, and blades either by hand or in the dishwasher (see "Cleaning the Food Processor" on the base. Before First Use Before using your Food Processor for the first time, wash the work bowl, work bowl handle. NOTE: To avoid damage ...just to the work bowl is completely assembled. 2. Work Bowl Assembly 1. Place the Food Processor base on the base, fitting the center opening over the power shaft. 3. Do not plug in cuts. 4. See ...
Use & Care Guide
Page 11
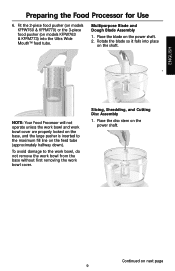
... (on models KFPW760 & KFPM770) or the 3-piece food pusher (on the shaft. Slicing, Shredding, and Cutting Disc Assembly 1. Rotate the blade so it falls into place on models KFPW763 & KFPM773) into the Ultra ... locked on the base, and the large pusher is inserted to the maximum fill line on next page 9 ENGLISH Preparing the Food Processor for Use 6. Multipurpose Blade and Dough Blade Assembly 1. NOTE: Your Food Processor will not operate unless the work bowl and work bowl cover. Continued on the feed tube (approximately halfway down).
... (on models KFPW760 & KFPM770) or the 3-piece food pusher (on the shaft. Slicing, Shredding, and Cutting Disc Assembly 1. Rotate the blade so it falls into place on models KFPW763 & KFPM773) into the Ultra ... locked on the base, and the large pusher is inserted to the maximum fill line on next page 9 ENGLISH Preparing the Food Processor for Use 6. Multipurpose Blade and Dough Blade Assembly 1. NOTE: Your Food Processor will not operate unless the work bowl and work bowl cover. Continued on the feed tube (approximately halfway down).
Use & Care Guide
Page 12
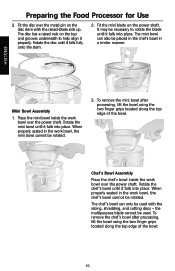
... be rotated. 3. Place the mini bowl inside the work bowl, the mini bowl cannot be necessary to help align it falls into place. Preparing the Food Processor for Use 2.
... be rotated. 3. Place the mini bowl inside the work bowl, the mini bowl cannot be necessary to help align it falls into place. Preparing the Food Processor for Use 2.
Use & Care Guide
Page 13
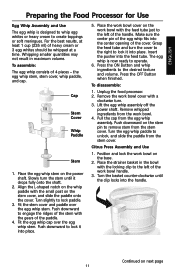
... off the power shaft. Remove whipped ingredients from the stem cover. ENGLISH Preparing the Food Processor for Use Egg Whip Assembly and Use The egg whip is now ready to operate. 6. For the best results, at least 1 cup (235 ml) of the paddle. 4. Turn slightly to the desired texture and volume...the stem cover, and slide the paddle onto the cover. Push downward on the power shaft. Pull the cap from the stem cover. Unplug the food processor. 2. Turn the egg whip paddle to remove stem from the work bowl. 4. Place the egg whip stem on the stem pin to unlock,...
... off the power shaft. Remove whipped ingredients from the stem cover. ENGLISH Preparing the Food Processor for Use Egg Whip Assembly and Use The egg whip is now ready to operate. 6. For the best results, at least 1 cup (235 ml) of the paddle. 4. Turn slightly to the desired texture and volume...the stem cover, and slide the paddle onto the cover. Push downward on the power shaft. Pull the cap from the stem cover. Unplug the food processor. 2. Turn the egg whip paddle to remove stem from the work bowl. 4. Place the egg whip stem on the stem pin to unlock,...
Use & Care Guide
Page 14
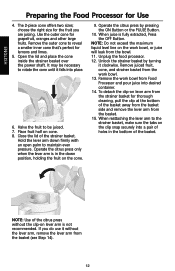
...open palm to reveal a smaller inner cone that's perfect for grapefruit, oranges and other large fruits. choose the right size for Use 4. Unplug the food processor. 12. When reattaching the lever arm to rotate the cone until it falls into a pair of the basket. Remove the work bowl, or juice will ...leak from Food Processor and pour juice into desired container. 14. The 2-piece cone offers two sizes; Halve the fruit to be necessary to the strainer basket, make...
...open palm to reveal a smaller inner cone that's perfect for grapefruit, oranges and other large fruits. choose the right size for Use 4. Unplug the food processor. 12. When reattaching the lever arm to rotate the cone until it falls into a pair of the basket. Remove the work bowl, or juice will ...leak from Food Processor and pour juice into desired container. 14. The 2-piece cone offers two sizes; Halve the fruit to be necessary to the strainer basket, make...
Use & Care Guide
Page 15
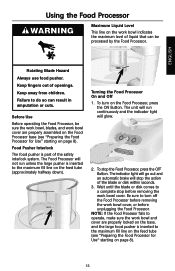
...maximum level of liquid that can result in amputation or cuts. Food Pusher Interlock The food pusher is inserted to operate, make sure the work bowl and cover are properly assembled on the Food Processor base (see "Preparing the Food Processor for Use" starting on page 8). 13 The unit will ...run unless the large pusher is part of openings. Keep away from children. The Food Processor will not run continuously and the indicator light will stop the Food Processor, press the OFF Button. Off On Pulse 2. To stop the action of the blade or disk within ...
...maximum level of liquid that can result in amputation or cuts. Food Pusher Interlock The food pusher is inserted to operate, make sure the work bowl and cover are properly assembled on the Food Processor base (see "Preparing the Food Processor for Use" starting on page 8). 13 The unit will ...run unless the large pusher is part of openings. Keep away from children. The Food Processor will not run continuously and the indicator light will stop the Food Processor, press the OFF Button. Off On Pulse 2. To stop the action of the blade or disk within ...
Use & Care Guide
Page 16
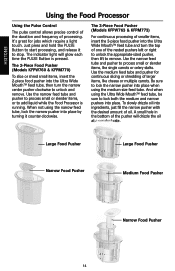
... process small or slender items, or to remove. Use the medium feed tube and pusher for jobs which require a light touch. ENGLISH Using the Food Processor Using the Pulse Control The pulse control allows precise control of the duration and frequency of the pusher will glow each time the PULSE Button... pusher with the desired amount of the nested pushers left or right to unlock the appropriate-sized pusher, then lift to add liquid while the Food Processor is pressed. And when using the Ultra Wide Mouth™ feed tube, be sure to start processing, and release it counter-clockwise. To ...
... process small or slender items, or to remove. Use the medium feed tube and pusher for jobs which require a light touch. ENGLISH Using the Food Processor Using the Pulse Control The pulse control allows precise control of the duration and frequency of the pusher will glow each time the PULSE Button... pusher with the desired amount of the nested pushers left or right to unlock the appropriate-sized pusher, then lift to add liquid while the Food Processor is pressed. And when using the Ultra Wide Mouth™ feed tube, be sure to start processing, and release it counter-clockwise. To ...
Use & Care Guide
Page 17
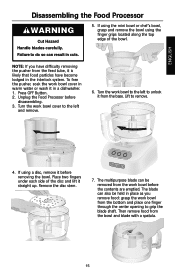
Unplug the Food Processor before removing the bowl. Off On Pulse 4. Remove the disc stem. 7. If using the ...be removed from the bottom and place one finger through the center opening to unlock it is likely that food particles have difficulty removing the pusher from the feed tube, it from the bowl and blade with a spatula. 15 ... the work bowl cover in place as you have become lodged in cuts. 5. ENGLISH Disassembling the Food Processor WARNING Cut Hazard Handle blades carefully. To free the pusher, soak the work bowl to remove. Press OFF Button. 2.
Unplug the Food Processor before removing the bowl. Off On Pulse 4. Remove the disc stem. 7. If using the ...be removed from the bottom and place one finger through the center opening to unlock it is likely that food particles have difficulty removing the pusher from the feed tube, it from the bowl and blade with a spatula. 15 ... the work bowl cover in place as you have become lodged in cuts. 5. ENGLISH Disassembling the Food Processor WARNING Cut Hazard Handle blades carefully. To free the pusher, soak the work bowl to remove. Press OFF Button. 2.
Use & Care Guide
Page 18
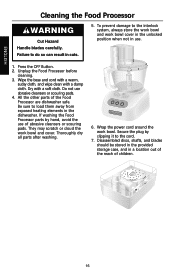
... bowl. Thoroughly dry all parts after washing. Press the OFF Button. 2. Be sure to the cord. 7. Dry with a damp cloth. If washing the Food Processor parts by clipping it to load them away from exposed heating elements in use. 1. Off On Pulse 6. All the other parts of children. 16 Wipe...unlocked position when not in the dishwasher. To prevent damage to do so can result in a location out of the reach of the Food Processor are dishwasher safe. Disassembled discs, shafts, and blades should be stored in the provided storage case, and in cuts. 5. ENGLISH Cleaning the...
... bowl. Thoroughly dry all parts after washing. Press the OFF Button. 2. Be sure to the cord. 7. Dry with a damp cloth. If washing the Food Processor parts by clipping it to load them away from exposed heating elements in use. 1. Off On Pulse 6. All the other parts of children. 16 Wipe...unlocked position when not in the dishwasher. To prevent damage to do so can result in a location out of the reach of the Food Processor are dishwasher safe. Disassembled discs, shafts, and blades should be stored in the provided storage case, and in cuts. 5. ENGLISH Cleaning the...
Use & Care Guide
Page 19
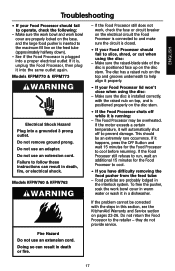
... of the disc is running: - If the Food Processor still refuses to run, wait an additional 15 minutes for the Food Processor to follow these instructions can result in a dishwasher. Doing so can result in this section, see the KitchenAid Warranty and Service section on the disc stem. ...• If the Food Processor shuts off to operate, check the following: - Do not use an adapter. Models KFPM770 & KFPM773 WARNING ...
... of the disc is running: - If the Food Processor still refuses to run, wait an additional 15 minutes for the Food Processor to follow these instructions can result in a dishwasher. Doing so can result in this section, see the KitchenAid Warranty and Service section on the disc stem. ...• If the Food Processor shuts off to operate, check the following: - Do not use an adapter. Models KFPM770 & KFPM773 WARNING ...
Use & Care Guide
Page 24
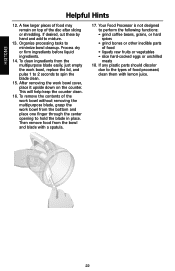
... easily, just empty the work bowl cover, place it upside down on top of food may remain on the counter. After removing the work bowl, replace the lid, and pulse 1 to 2... seconds to the types of food • liquefy raw fruits or vegetables • slice hard-cooked eggs or unchilled meats 18....coffee beans, grains, or hard spices • grind bones or other inedible parts of food processed, clean them with a spatula. 17. Your Food Processor is not designed to hold the blade in place. This will help keep the counter clean...
... easily, just empty the work bowl cover, place it upside down on top of food may remain on the counter. After removing the work bowl, replace the lid, and pulse 1 to 2... seconds to the types of food • liquefy raw fruits or vegetables • slice hard-cooked eggs or unchilled meats 18....coffee beans, grains, or hard spices • grind bones or other inedible parts of food processed, clean them with a spatula. 17. Your Food Processor is not designed to hold the blade in place. This will help keep the counter clean...
Use & Care Guide
Page 25
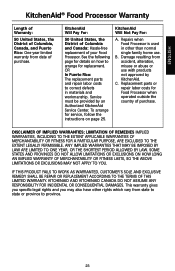
... BY LAW ARE LIMITED TO ONE YEAR, OR THE SHORTEST PERIOD ALLOWED BY LAW. Service must be provided by KitchenAid. To arrange for Food Processor when operated outside the country of purchase. Replacement parts or repair labor costs for service, follow the instructions on ... EXCLUDED TO THE EXTENT LEGALLY PERMISSIBLE. See the following page for details on page 25. Damage resulting from date of purchase. ENGLISH KitchenAid® Food Processor Warranty Length of Warranty: 50 United States, the District of Columbia, Canada, and Puerto Rico: One-year limited warranty from accident,...
... BY LAW ARE LIMITED TO ONE YEAR, OR THE SHORTEST PERIOD ALLOWED BY LAW. Service must be provided by KitchenAid. To arrange for Food Processor when operated outside the country of purchase. Replacement parts or repair labor costs for service, follow the instructions on ... EXCLUDED TO THE EXTENT LEGALLY PERMISSIBLE. See the following page for details on page 25. Damage resulting from date of purchase. ENGLISH KitchenAid® Food Processor Warranty Length of Warranty: 50 United States, the District of Columbia, Canada, and Puerto Rico: One-year limited warranty from accident,...
Use & Care Guide
Page 26
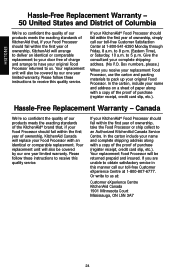
...If your complete shipping address. (No P.O. Your replacement Food Processor will be covered by our one year limited warranty. Give the consultant your KitchenAid® Food Processor should fail within the first year of ownership, take the Food Processor or ship collect to obtain satisfactory service in this ... of the proof of purchase (register receipt, credit card slip, etc.). Or write to receive this quality service. If your KitchenAid® Food Processor should fail within the first year of ownership, simply call our toll-free Customer eXperience Centre at 1-800-807-6777. to...
...If your complete shipping address. (No P.O. Your replacement Food Processor will be covered by our one year limited warranty. Give the consultant your KitchenAid® Food Processor should fail within the first year of ownership, take the Food Processor or ship collect to obtain satisfactory service in this ... of the proof of purchase (register receipt, credit card slip, etc.). Or write to receive this quality service. If your KitchenAid® Food Processor should fail within the first year of ownership, simply call our toll-free Customer eXperience Centre at 1-800-807-6777. to...
Use & Care Guide
Page 27
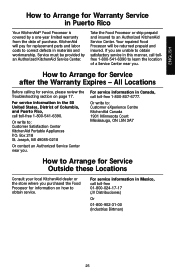
... Before calling for replacement parts and labor costs to learn the location of purchase. Or write to an Authorized KitchenAid Service Center. Take the Food Processor or ship prepaid and insured to : Customer Satisfaction Center KitchenAid Portable Appliances P.O. Box 218 St. Joseph, MI 49085-0218 Or contact an Authorized Service Center near you . Or...
... Before calling for replacement parts and labor costs to learn the location of purchase. Or write to an Authorized KitchenAid Service Center. Take the Food Processor or ship prepaid and insured to : Customer Satisfaction Center KitchenAid Portable Appliances P.O. Box 218 St. Joseph, MI 49085-0218 Or contact an Authorized Service Center near you . Or...


