Use & Care Guide
Page 3
...Selection Guide 8 PREPARING THE FOOD PROCESSOR FOR FIRST USE 9 SETTING UP YOUR FOOD PROCESSOR Attaching the Work Bowl 10 Attaching the Work Bowl Cover 10 Installing the Adjustable Slicing Disc 11 Installing the Reversible Shredding Disc 11 Installing the Multipurpose ...FOOD PROCESSOR Before Use...13 Maximum Liquid Level 13 Using the Low/High Speed Control 13 Using the Pulse Control 13 Removing Processed Foods 14 CLEANING THE FOOD PROCESSOR 15 FOOD PROCESSING TIPS Tips for Great Results 16 Helpful Hints...18 TROUBLESHOOTING 19 WARRANTY...20 Find recipes and more at www.kitchenaid...
...Selection Guide 8 PREPARING THE FOOD PROCESSOR FOR FIRST USE 9 SETTING UP YOUR FOOD PROCESSOR Attaching the Work Bowl 10 Attaching the Work Bowl Cover 10 Installing the Adjustable Slicing Disc 11 Installing the Reversible Shredding Disc 11 Installing the Multipurpose ...FOOD PROCESSOR Before Use...13 Maximum Liquid Level 13 Using the Low/High Speed Control 13 Using the Pulse Control 13 Removing Processed Foods 14 CLEANING THE FOOD PROCESSOR 15 FOOD PROCESSING TIPS Tips for Great Results 16 Helpful Hints...18 TROUBLESHOOTING 19 WARRANTY...20 Find recipes and more at www.kitchenaid...
Use & Care Guide
Page 4
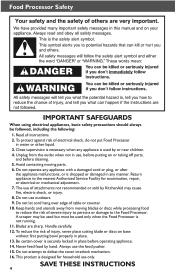
... securely locked in place. 13. Read all instructions. 2. Avoid contacting moving blades or discs while processing food to reduce the risk of injury, never place cutting blade or discs on or taking off parts, and before operating appliance. 14. Do not let cord hang... defeat the cover interlock mechanism. 16. Never feed food by KitchenAid may be used but must be followed, including the following: 1. Do not attempt to the Food Processor. A scraper may cause fire, electric shock, or injury. 8. Food Processor Safety IMPORTANT SAFEGUARDS When using electrical appliances, basic safety...
... securely locked in place. 13. Read all instructions. 2. Avoid contacting moving blades or discs while processing food to reduce the risk of injury, never place cutting blade or discs on or taking off parts, and before operating appliance. 14. Do not let cord hang... defeat the cover interlock mechanism. 16. Never feed food by KitchenAid may be used but must be followed, including the following: 1. Do not attempt to the Food Processor. A scraper may cause fire, electric shock, or injury. 8. Food Processor Safety IMPORTANT SAFEGUARDS When using electrical appliances, basic safety...

Use & Care Guide
Page 7
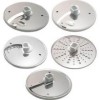
... Parts and Features Important parts and accessories included with your Food Processor. Refer to the power shaft on the task. Adjustable Slicing KitchenAid's® adjustable slicing disc allows you to drizzle oil into ingredients - Reversible Shredding Disc (KFP07RD) Shredding disc is used to connect the slicing/shredding disc to the following pages for continuous processing, or a smaller...
... Parts and Features Important parts and accessories included with your Food Processor. Refer to the power shaft on the task. Adjustable Slicing KitchenAid's® adjustable slicing disc allows you to drizzle oil into ingredients - Reversible Shredding Disc (KFP07RD) Shredding disc is used to connect the slicing/shredding disc to the following pages for continuous processing, or a smaller...
Use & Care Guide
Page 11
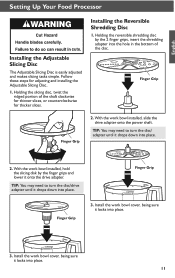
English Setting Up Your Food Processor Installing the Adjustable Slicing Disc The Adjustable Slicing Disc is easily adjusted and makes slicing tasks simple. TIP: You may need to turn the disc/ adapter until it drops down into place. 3. Install the work bowl cover, being sure it onto the drive adapter. Follow ... in the bottom of the shaft clockwise for thinner slices, or counterclockwise for adjusting and installing the Adjustable Slicing Disc. 1. Finger Grip Finger Grip 3. Install the work bowl cover, being sure it drops down into place. 11 Holding the slicing...
English Setting Up Your Food Processor Installing the Adjustable Slicing Disc The Adjustable Slicing Disc is easily adjusted and makes slicing tasks simple. TIP: You may need to turn the disc/ adapter until it drops down into place. 3. Install the work bowl cover, being sure it onto the drive adapter. Follow ... in the bottom of the shaft clockwise for thinner slices, or counterclockwise for adjusting and installing the Adjustable Slicing Disc. 1. Finger Grip Finger Grip 3. Install the work bowl cover, being sure it drops down into place. 11 Holding the slicing...

Use & Care Guide
Page 13
... blade or disc comes to operate, make sure the work bowl and cover are properly assembled on the Food Processor base (see "Setting Up Your Food Processor"). Just press and hold the PULSE Button to start processing at high speed, and release it to turn on the Food Processor, press the Low or High button. The Food Processor will run...
... blade or disc comes to operate, make sure the work bowl and cover are properly assembled on the Food Processor base (see "Setting Up Your Food Processor"). Just press and hold the PULSE Button to start processing at high speed, and release it to turn on the Food Processor, press the Low or High button. The Food Processor will run...
Use & Care Guide
Page 14
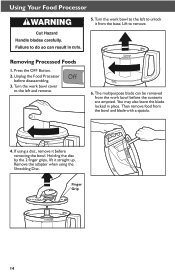
... bowl before disassembling. 3. Remove the adapter when using a disc, remove it straight up. Removing Processed Foods 1. Unplug the Food Processor before the contents are emptied. If using the Shredding Disc. Lift to the left and remove. 6. Press the OFF Button. 2. Then remove food from the base. Holding the disc by the 2 finger grips, lift it before removing...
... bowl before disassembling. 3. Remove the adapter when using a disc, remove it straight up. Removing Processed Foods 1. Unplug the Food Processor before the contents are emptied. If using the Shredding Disc. Lift to the left and remove. 6. Press the OFF Button. 2. Then remove food from the base. Holding the disc by the 2 finger grips, lift it before removing...

Use & Care Guide
Page 16
... For nut butters, process continuously until fine. Process until smooth. Process until smooth. Process until finely chopped. Pieces of vegetables: With processor running, add food through the feed tube. Add softened butter, milk, and seasonings. Pulse more often for finer texture. Store in 1-inch (2.5 cm) ... 1 to 2 seconds each time. Add 1/4 cup (60 ml) flour from recipe per 1/2 cup (120 ml) dried fruit. Process food, using the shredding disc. Then process until chopped. You can also be pierced with the tip of the bowl. Cut cheese in 1-inch (2.5 cm) pieces....
... For nut butters, process continuously until fine. Process until smooth. Process until smooth. Process until finely chopped. Pieces of vegetables: With processor running, add food through the feed tube. Add softened butter, milk, and seasonings. Pulse more often for finer texture. Store in 1-inch (2.5 cm) ... 1 to 2 seconds each time. Add 1/4 cup (60 ml) flour from recipe per 1/2 cup (120 ml) dried fruit. Process food, using the shredding disc. Then process until chopped. You can also be pierced with the tip of the bowl. Cut cheese in 1-inch (2.5 cm) pieces....
Use & Care Guide
Page 18
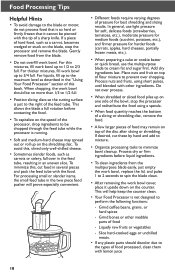
... disc, remove the food. • A few larger pieces of food may spread out or roll up on the shredding disc. Grind bones or other ingredients. For liquids, fill up on the counter. To avoid this, shred only well-chilled cheese. • Sometimes slender foods, such as described in the "Using Your Food Processor"...the counter clean. • Your Food Processor is just to the right of this , cut these by hand and add to mixture. • Organize processing tasks to the types of the disc after slicing or shredding. Place nuts and fruit on top of food processed, clean them with the tip...
... disc, remove the food. • A few larger pieces of food may spread out or roll up on the shredding disc. Grind bones or other ingredients. For liquids, fill up on the counter. To avoid this, shred only well-chilled cheese. • Sometimes slender foods, such as described in the "Using Your Food Processor"...the counter clean. • Your Food Processor is just to the right of this , cut these by hand and add to mixture. • Organize processing tasks to the types of the disc after slicing or shredding. Place nuts and fruit on top of food processed, clean them with the tip...
Use & Care Guide
Page 19
... at the same time. • Is the Food Processor plugged in? • Is the fuse in the circuit to the Food Processor in place. • Press only one of the disc is not due to one button at a time. The Food Processor will not operate if more than one button is set to the correct thickness. • Make...
... at the same time. • Is the Food Processor plugged in? • Is the fuse in the circuit to the Food Processor in place. • Press only one of the disc is not due to one button at a time. The Food Processor will not operate if more than one button is set to the correct thickness. • Make...


