Use & Care Guide
Page 3
...Selection Guide 8 PREPARING THE FOOD PROCESSOR FOR FIRST USE 9 SETTING UP YOUR FOOD PROCESSOR Attaching the Work Bowl 10 Attaching the Work Bowl Cover 10 Installing the Adjustable Slicing Disc 11 Installing the Reversible Shredding Disc 11 Installing the Multipurpose ...FOOD PROCESSOR Before Use...13 Maximum Liquid Level 13 Using the Low/High Speed Control 13 Using the Pulse Control 13 Removing Processed Foods 14 CLEANING THE FOOD PROCESSOR 15 FOOD PROCESSING TIPS Tips for Great Results 16 Helpful Hints...18 TROUBLESHOOTING 19 WARRANTY...20 Find recipes and more at www.kitchenaid...
...Selection Guide 8 PREPARING THE FOOD PROCESSOR FOR FIRST USE 9 SETTING UP YOUR FOOD PROCESSOR Attaching the Work Bowl 10 Attaching the Work Bowl Cover 10 Installing the Adjustable Slicing Disc 11 Installing the Reversible Shredding Disc 11 Installing the Multipurpose ...FOOD PROCESSOR Before Use...13 Maximum Liquid Level 13 Using the Low/High Speed Control 13 Using the Pulse Control 13 Removing Processed Foods 14 CLEANING THE FOOD PROCESSOR 15 FOOD PROCESSING TIPS Tips for Great Results 16 Helpful Hints...18 TROUBLESHOOTING 19 WARRANTY...20 Find recipes and more at www.kitchenaid...
Use & Care Guide
Page 11
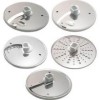
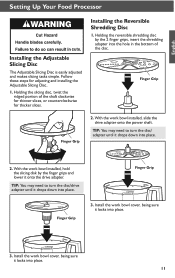
... the 2 finger grips, insert the shredding adapter into place. TIP: You may need to turn the disc/ adapter until it onto the drive adapter. English Setting Up Your Food Processor Installing the Adjustable Slicing Disc The Adjustable Slicing Disc is easily adjusted and makes slicing tasks simple. With the work bowl installed, slide the drive adapter...
... the 2 finger grips, insert the shredding adapter into place. TIP: You may need to turn the disc/ adapter until it onto the drive adapter. English Setting Up Your Food Processor Installing the Adjustable Slicing Disc The Adjustable Slicing Disc is easily adjusted and makes slicing tasks simple. With the work bowl installed, slide the drive adapter...

Use & Care Guide
Page 13
... to start processing at high speed, and release it to a complete stop the Food Processor, press the OFF button. Maximum Liquid Level This line on the Food Processor base (see "Setting Up Your Food Processor"). The indicator light will go out and the blade or disc will glow. 2. Be sure to operate, make sure the work bowl and...
... to start processing at high speed, and release it to a complete stop the Food Processor, press the OFF button. Maximum Liquid Level This line on the Food Processor base (see "Setting Up Your Food Processor"). The indicator light will go out and the blade or disc will glow. 2. Be sure to operate, make sure the work bowl and...
Use & Care Guide
Page 19
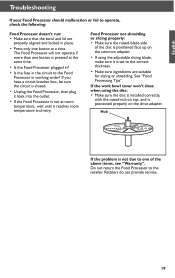
...the problem is pressed at the same time. • Is the Food Processor plugged in? • Is the fuse in the circuit to the Food Processor in place. • Press only one button at room temperature, wait until it is set to the correct thickness. • Make sure ingredients are properly ...above items, see "Warranty". Retailers do not provide service. 19 The Food Processor will not operate if more than one of the disc is positioned properly on the common adapter. • If using the disc: • Make sure the disc is installed correctly, with the raised nub on top, and is ...
...the problem is pressed at the same time. • Is the Food Processor plugged in? • Is the fuse in the circuit to the Food Processor in place. • Press only one button at room temperature, wait until it is set to the correct thickness. • Make sure ingredients are properly ...above items, see "Warranty". Retailers do not provide service. 19 The Food Processor will not operate if more than one of the disc is positioned properly on the common adapter. • If using the disc: • Make sure the disc is installed correctly, with the raised nub on top, and is ...


