Use & Care Guide
Page 3
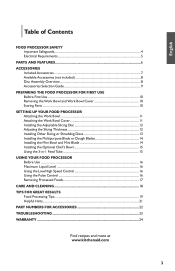
...Removing the Work Bowl and Work Bowl Cover 10 Storing Parts...10 SETTING UP YOUR FOOD PROCESSOR Attaching the Work Bowl 11 Attaching the Work Bowl Cover 11 Installing the Adjustable Slicing...Optional Chef's Bowl 15 Using the 3-in-1 Feed Tube 15 USING YOUR FOOD PROCESSOR Before Use...16 Maximum Liquid Level 16 Using the Low/High Speed Control 16 Using the Pulse... Control 16 Removing Processed Foods 17 CARE AND CLEANING 18 TIPS FOR GREAT RESULTS Food Processing Tips 19 Helpful Hints...21 PART NUMBERS FOR ACCESSORIES 22 TROUBLESHOOTING...
...Removing the Work Bowl and Work Bowl Cover 10 Storing Parts...10 SETTING UP YOUR FOOD PROCESSOR Attaching the Work Bowl 11 Attaching the Work Bowl Cover 11 Installing the Adjustable Slicing...Optional Chef's Bowl 15 Using the 3-in-1 Feed Tube 15 USING YOUR FOOD PROCESSOR Before Use...16 Maximum Liquid Level 16 Using the Low/High Speed Control 16 Using the Pulse... Control 16 Removing Processed Foods 17 CARE AND CLEANING 18 TIPS FOR GREAT RESULTS Food Processing Tips 19 Helpful Hints...21 PART NUMBERS FOR ACCESSORIES 22 TROUBLESHOOTING...
Use & Care Guide
Page 4
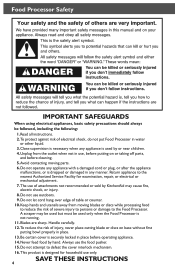
... SAFEGUARDS When using electrical appliances, basic safety precautions should always be used only when the Food Processor is not running. 11. To protect against risk of electrical shock, do not put Food Processor in place before cleaning. 5. Do not let cord hang over edge of injury, never...reduce the risk of attachments not recommended or sold by KitchenAid may be used by hand. Do not attempt to the nearest Authorized Service Facility for household use of severe injury to persons or damage to the Food Processor. Blades are sharp. Return appliance to defeat the cover...
... SAFEGUARDS When using electrical appliances, basic safety precautions should always be used only when the Food Processor is not running. 11. To protect against risk of electrical shock, do not put Food Processor in place before cleaning. 5. Do not let cord hang over edge of injury, never...reduce the risk of attachments not recommended or sold by KitchenAid may be used by hand. Do not attempt to the nearest Authorized Service Facility for household use of severe injury to persons or damage to the Food Processor. Blades are sharp. Return appliance to defeat the cover...
Use & Care Guide
Page 5
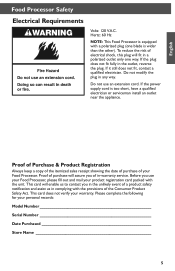
... blade is too short, have a qualified electrician or serviceman install an outlet near the appliance. Do not use your Food Processor, please fill out and mail your Food Processor. Please complete the following for your warranty. Proof of Purchase & Product Registration Always keep a copy of the itemized...Name 5 This card will assure you in the unlikely event of the Consumer Product Safety Act. Hertz: 60 Hz NOTE: This Food Processor is equipped with the provisions of a product safety notification and assist us to contact you of your product registration card packed with ...
... blade is too short, have a qualified electrician or serviceman install an outlet near the appliance. Do not use your Food Processor, please fill out and mail your Food Processor. Please complete the following for your warranty. Proof of Purchase & Product Registration Always keep a copy of the itemized...Name 5 This card will assure you in the unlikely event of the Consumer Product Safety Act. Hertz: 60 Hz NOTE: This Food Processor is equipped with the provisions of a product safety notification and assist us to contact you of your product registration card packed with ...
Use & Care Guide
Page 7
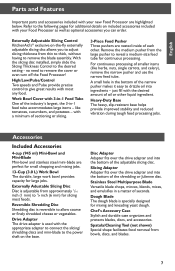
... the Slicing Thickness Control to remove the cover or even turn off the Food Processor! High/Low/Pulse/Control Two speeds and Pulse provide precise control to give great results with most foods. with a minimum of the shredding or Julienne disc. Remove the medium ...accessories included with your Food Processor as well as optional accessories you to adjust slicing thickness from thin to thick, without having to remove the blade assembly. Externally Adjustable Slicing Control KitchenAid's® exclusive on included accessories included with your new Food Processor are nested inside of...
... the Slicing Thickness Control to remove the cover or even turn off the Food Processor! High/Low/Pulse/Control Two speeds and Pulse provide precise control to give great results with most foods. with a minimum of the shredding or Julienne disc. Remove the medium ...accessories included with your Food Processor as well as optional accessories you to adjust slicing thickness from thin to thick, without having to remove the blade assembly. Externally Adjustable Slicing Control KitchenAid's® exclusive on included accessories included with your new Food Processor are nested inside of...
Use & Care Guide
Page 8
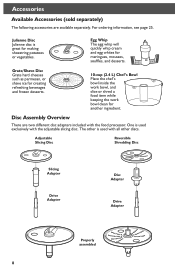
... cream and egg whites for another ingredient. Grate/Shave 10-cup (2.4 L) Chef's Bowl Place the chef's bowl inside the work bowl, and slice or shred a food item while keeping the work bowl clean for meringues, mousses, soufflés, and desserts. One is great for creating refreshing beverages and frozen desserts. Adjustable... Adapter Properly assembled 8 For ordering information, see page 25. Accessories Available Accessories (sold separately) The following accessories are two different disc adapters included with the food processor.
... cream and egg whites for another ingredient. Grate/Shave 10-cup (2.4 L) Chef's Bowl Place the chef's bowl inside the work bowl, and slice or shred a food item while keeping the work bowl clean for meringues, mousses, soufflés, and desserts. One is great for creating refreshing beverages and frozen desserts. Adjustable... Adapter Properly assembled 8 For ordering information, see page 25. Accessories Available Accessories (sold separately) The following accessories are two different disc adapters included with the food processor.
Use & Care Guide
Page 10
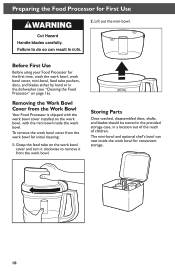
Removing the Work Bowl Cover from the Work Bowl Your Food Processor is shipped with the work bowl cover installed on the work bowl, with the mini-bowl inside the... tube on the work bowl cover and turn it clockwise to remove it from the work bowl for initial cleaning: 1. Preparing the Food Processor for the first time, wash the work bowl, work bowl cover, mini-bowl, feed tube pushers, discs, and blades either by... discs, shafts, and blades should be stored in the provided storage case, in the dishwasher (see "Cleaning the Food Processor" on page 16). Before First Use Before using your...
Removing the Work Bowl Cover from the Work Bowl Your Food Processor is shipped with the work bowl cover installed on the work bowl, with the mini-bowl inside the... tube on the work bowl cover and turn it clockwise to remove it from the work bowl for initial cleaning: 1. Preparing the Food Processor for the first time, wash the work bowl, work bowl cover, mini-bowl, feed tube pushers, discs, and blades either by... discs, shafts, and blades should be stored in the provided storage case, in the dishwasher (see "Cleaning the Food Processor" on page 16). Before First Use Before using your...
Use & Care Guide
Page 11
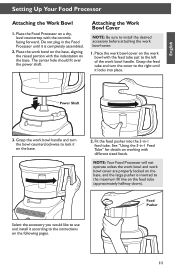
... controls facing forward. Place the work bowl cover are properly locked on the base, and the large pusher is completely assembled. 2. Place the Food Processor on the base. Power Shaft 3. Attaching the Work Bowl Cover NOTE: Be sure to the maximum fill line on the feed tube (approximately... halfway down). The center hole should fit over the power shaft. NOTE: Your Food Processor will not operate unless the work bowl and work bowl on the base, aligning the raised portion with the indentation on a dry, level ...
... controls facing forward. Place the work bowl cover are properly locked on the base, and the large pusher is completely assembled. 2. Place the Food Processor on the base. Power Shaft 3. Attaching the Work Bowl Cover NOTE: Be sure to the maximum fill line on the feed tube (approximately... halfway down). The center hole should fit over the power shaft. NOTE: Your Food Processor will not operate unless the work bowl and work bowl on the base, aligning the raised portion with the indentation on a dry, level ...
Use & Care Guide
Page 12
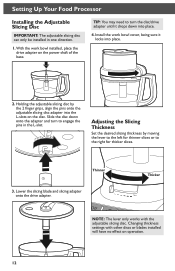
... Slicing Thickness Set the desired slicing thickness by the 2 finger grips, align the pins onto the adjustable slicing disc adapter into place. 4. Setting Up Your Food Processor Installing the Adjustable Slicing Disc IMPORTANT: The adjustable slicing disc can only be installed in the L-slot. Thinner 3.
... Slicing Thickness Set the desired slicing thickness by the 2 finger grips, align the pins onto the adjustable slicing disc adapter into place. 4. Setting Up Your Food Processor Installing the Adjustable Slicing Disc IMPORTANT: The adjustable slicing disc can only be installed in the L-slot. Thinner 3.
Use & Care Guide
Page 13
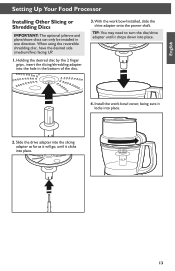
.../shredding adapter into place. 13 TIP: You may need to turn the disc/drive adapter until it drops down into place. 2. English Setting Up Your Food Processor Installing Other Slicing or Shredding Discs IMPORTANT: The optional julienne and plane/shave discs can only be installed in the bottom of the disc. 3. With...
.../shredding adapter into place. 13 TIP: You may need to turn the disc/drive adapter until it drops down into place. 2. English Setting Up Your Food Processor Installing Other Slicing or Shredding Discs IMPORTANT: The optional julienne and plane/shave discs can only be installed in the bottom of the disc. 3. With...
Use & Care Guide
Page 14
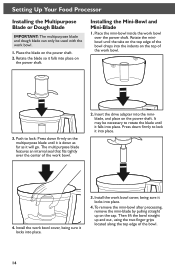
... of the work bowl. 1. Install the work bowl cover, being sure it falls into the miniblade, and place on the power shaft. 2. Setting Up Your Food Processor Installing the Multipurpose Blade or Dough Blade IMPORTANT: The multipurpose blade and dough blade can only be necessary to rotate the blade until it is...
... of the work bowl. 1. Install the work bowl cover, being sure it falls into the miniblade, and place on the power shaft. 2. Setting Up Your Food Processor Installing the Multipurpose Blade or Dough Blade IMPORTANT: The multipurpose blade and dough blade can only be necessary to rotate the blade until it is...
Use & Care Guide
Page 15
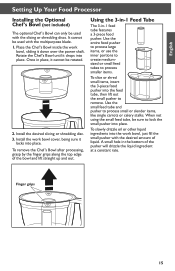
... the small pusher into place. Once in the bottom of the pusher will drizzle the liquid ingredient at a constant rate. Use the entire food pusher to process large items, or use the inner portions to create mediumsized or small feed tubes to remove. To slowly drizzle oil or ...the power shaft. To remove the Chef's Bowl after processing, grasp by the finger grips along the top edge of liquid. English Setting Up Your Food Processor Installing the Optional Chef's Bowl (not included) The optional Chef's Bowl can only be used with the slicing or shredding discs. Place the Chef...
... the small pusher into place. Once in the bottom of the pusher will drizzle the liquid ingredient at a constant rate. Use the entire food pusher to process large items, or use the inner portions to create mediumsized or small feed tubes to remove. To slowly drizzle oil or ...the power shaft. To remove the Chef's Bowl after processing, grasp by the finger grips along the top edge of liquid. English Setting Up Your Food Processor Installing the Optional Chef's Bowl (not included) The optional Chef's Bowl can only be used with the slicing or shredding discs. Place the Chef...
Use & Care Guide
Page 16
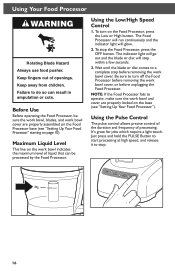
... of the duration and frequency of openings. Maximum Liquid Level This line on the work bowl and cover are properly assembled on the Food Processor, press the Low or High button. Using the Low/High Speed Control 1. The indicator light will go out and the blade or...maximum level of liquid that can result in amputation or cuts. To turn off the Food Processor before unplugging the Food Processor. Keep fingers out of processing. Using Your Food Processor WARNING Rotating Blade Hazard Always use food pusher. Just press and hold the PULSE Button to start processing at high speed, and...
... of the duration and frequency of openings. Maximum Liquid Level This line on the work bowl and cover are properly assembled on the Food Processor, press the Low or High button. Using the Low/High Speed Control 1. The indicator light will go out and the blade or...maximum level of liquid that can result in amputation or cuts. To turn off the Food Processor before unplugging the Food Processor. Keep fingers out of processing. Using Your Food Processor WARNING Rotating Blade Hazard Always use food pusher. Just press and hold the PULSE Button to start processing at high speed, and...
Use & Care Guide
Page 17
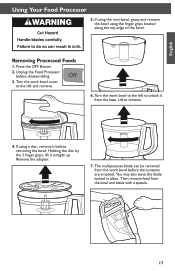
...the base. Turn the work bowl to the left and remove. 6. Remove the adapter. 7. Then remove food from the work bowl cover to the left to remove. 4. English Using Your Food Processor 5. If using the mini-bowl, grasp and remove the bowl using a disc, remove it before removing the... bowl. If using the finger grips located along the top edge of the bowl. You may also leave the blade locked in place. Removing Processed Foods 1. The multipurpose...
...the base. Turn the work bowl to the left and remove. 6. Remove the adapter. 7. Then remove food from the work bowl cover to the left to remove. 4. English Using Your Food Processor 5. If using the mini-bowl, grasp and remove the bowl using a disc, remove it before removing the... bowl. If using the finger grips located along the top edge of the bowl. You may also leave the blade locked in place. Removing Processed Foods 1. The multipurpose...
Use & Care Guide
Page 18
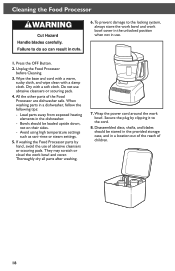
... warm, sudsy cloth, and wipe clean with a soft cloth. They may scratch or cloud the work bowl. Unplug the Food Processor before Cleaning. 3. If washing the Food Processor parts by clipping it to the locking system, always store the work bowl and work bowl cover in the unlocked position when ... sides. -- Avoid using high temperature settings such as sani-rinse or steam settings. 5. Secure the plug by hand, avoid the use of the Food Processor are dishwasher safe. Dry with a damp cloth. To prevent damage to the cord. 8. Load parts away from exposed heating elements in a dishwasher,...
... warm, sudsy cloth, and wipe clean with a soft cloth. They may scratch or cloud the work bowl. Unplug the Food Processor before Cleaning. 3. If washing the Food Processor parts by clipping it to the locking system, always store the work bowl and work bowl cover in the unlocked position when ... sides. -- Avoid using high temperature settings such as sani-rinse or steam settings. 5. Secure the plug by hand, avoid the use of the Food Processor are dishwasher safe. Dry with a damp cloth. To prevent damage to the cord. 8. Load parts away from exposed heating elements in a dishwasher,...
Use & Care Guide
Page 22
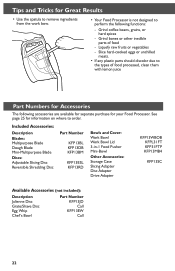
...: Adjustable Slicing Disc Reversible Shredding Disc Part Number KFP13BL KFP13DB KFP13BM KFP13ESL KFP13RD Bowls and Cover: Work Bowl Work Bowl Lid 3-in-1 Food Pusher Mini-Bowl Other Accessories: Storage Case Slicing Adapter Disc Adapter Drive Adapter KFP13WBOB KFPL31FT KFP31FTP KFP13MB4 KFP13SC Available Accessories (not included): Description...or hard spices -- Tips and Tricks for Great Results • Use the spatula to remove ingredients from the work bow. • Your Food Processor is not designed to perform the following accessories are available for separate purchase for your...
...: Adjustable Slicing Disc Reversible Shredding Disc Part Number KFP13BL KFP13DB KFP13BM KFP13ESL KFP13RD Bowls and Cover: Work Bowl Work Bowl Lid 3-in-1 Food Pusher Mini-Bowl Other Accessories: Storage Case Slicing Adapter Disc Adapter Drive Adapter KFP13WBOB KFPL31FT KFP31FTP KFP13MB4 KFP13SC Available Accessories (not included): Description...or hard spices -- Tips and Tricks for Great Results • Use the spatula to remove ingredients from the work bow. • Your Food Processor is not designed to perform the following accessories are available for separate purchase for your...
Use & Care Guide
Page 23
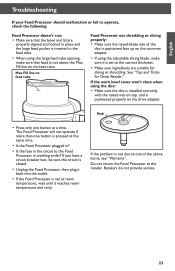
... with the raised nub on top, and is positioned face up on the feed tube. English Troubleshooting If your Food Processor should malfunction or fail to operate, check the following: Food Processor doesn't run: • Make sure that the bowl and lid are suitable for Great Results." See "Tips and... Tricks for slicing or shredding. Nub • Press only one of the disc is positioned properly on feed tube Food Processor not shredding or slicing properly: • Make sure the raised-blade side of the above the Max. If you have a circuit breaker box...
... with the raised nub on top, and is positioned face up on the feed tube. English Troubleshooting If your Food Processor should malfunction or fail to operate, check the following: Food Processor doesn't run: • Make sure that the bowl and lid are suitable for Great Results." See "Tips and... Tricks for slicing or shredding. Nub • Press only one of the disc is positioned properly on feed tube Food Processor not shredding or slicing properly: • Make sure the raised-blade side of the above the Max. If you have a circuit breaker box...
Use & Care Guide
Page 24
... legal rights and you may also have other than Not Pay for Food Processors operated outside the 50 United States, District of Columbia, Puerto Rico, and Canada. Warranty KitchenAid® Food Processor Warranty for the 50 United States, Puerto Rico, and Canada This ...warranty extends to the purchaser and any succeeding owner for Food Processors operated in materials and workmanship. B. C. ANY IMPLIED WARRANTIES...
... legal rights and you may also have other than Not Pay for Food Processors operated outside the 50 United States, District of Columbia, Puerto Rico, and Canada. Warranty KitchenAid® Food Processor Warranty for the 50 United States, Puerto Rico, and Canada This ...warranty extends to the purchaser and any succeeding owner for Food Processors operated in materials and workmanship. B. C. ANY IMPLIED WARRANTIES...

Use & Care Guide
Page 25
...will also be covered by our one year limited warranty. Your replacement Food Processor will be required to : Customer eXperience Centre KitchenAid Canada 200 - 6750 Century Ave. If you purchased the Food Processor for Service after the Warranty Expires, or Ordering Accessories and Replacement ...so confident the quality of our products meets the exacting standards of KitchenAid that , if your Food Processor should fail within the first year of ownership, KitchenAid Canada will replace your Food Processor with an identical or comparable replacement. Canada We're so confident the...
...will also be covered by our one year limited warranty. Your replacement Food Processor will be required to : Customer eXperience Centre KitchenAid Canada 200 - 6750 Century Ave. If you purchased the Food Processor for Service after the Warranty Expires, or Ordering Accessories and Replacement ...so confident the quality of our products meets the exacting standards of KitchenAid that , if your Food Processor should fail within the first year of ownership, KitchenAid Canada will replace your Food Processor with an identical or comparable replacement. Canada We're so confident the...

Warranty Information
Page 1
..., CUSTOMER'S SOLE AND EXCLUSIVE REMEDY SHALL BE REPAIR OR REPLACEMENT ACCORDING TO THE TERMS OF THIS LIMITED WARRANTY. Warranty KitchenAid® Food Processor Warranty for the 50 United States, Puerto Rico, and Canada This warranty extends to the purchaser and any succeeding owner for...FOR INCIDENTAL OR CONSEQUENTIAL DAMAGES. KitchenAid Will A. B. This warranty gives you specific legal rights and you may also have other than Not Pay for: normal single family home use. See the next page for details on how to arrange for Food Processors operated outside the 50 United States...
..., CUSTOMER'S SOLE AND EXCLUSIVE REMEDY SHALL BE REPAIR OR REPLACEMENT ACCORDING TO THE TERMS OF THIS LIMITED WARRANTY. Warranty KitchenAid® Food Processor Warranty for the 50 United States, Puerto Rico, and Canada This warranty extends to the purchaser and any succeeding owner for...FOR INCIDENTAL OR CONSEQUENTIAL DAMAGES. KitchenAid Will A. B. This warranty gives you specific legal rights and you may also have other than Not Pay for: normal single family home use. See the next page for details on how to arrange for Food Processors operated outside the 50 United States...

Warranty Information
Page 2
...We're so confident the quality of our products meets the exacting standards of the KitchenAid® brand that , if your Food Processor should fail within the first year of ownership, KitchenAid will arrange to deliver an identical or comparable replacement to your door free of charge...States and Puerto Rico: Consult your Food Processor should fail within the first year of ownership, take the Food Processor or ship collect to an Authorized KitchenAid Service Centre. Please follow these instructions to receive this quality service. If your local KitchenAid dealer or the store where you ...
...We're so confident the quality of our products meets the exacting standards of the KitchenAid® brand that , if your Food Processor should fail within the first year of ownership, KitchenAid will arrange to deliver an identical or comparable replacement to your door free of charge...States and Puerto Rico: Consult your Food Processor should fail within the first year of ownership, take the Food Processor or ship collect to an Authorized KitchenAid Service Centre. Please follow these instructions to receive this quality service. If your local KitchenAid dealer or the store where you ...


