Use & Care Guide
Page 1
7 CUP FOOD PROCESSORS INSTRUCTIONS AND RECIPES MODELS KFP730, KFP720 AND KFP710 FPO 1-800-541-6390 Details Inside ® FOR THE WA1Y IT'S MADE.™
7 CUP FOOD PROCESSORS INSTRUCTIONS AND RECIPES MODELS KFP730, KFP720 AND KFP710 FPO 1-800-541-6390 Details Inside ® FOR THE WA1Y IT'S MADE.™

Use & Care Guide
Page 2
...your personal records: Model Number Serial Number Date Purchased Store Name If You Reside In The 50 United States and your KitchenAid® Food Processor should fail within the first year of warranty terms and conditions, including how to arrange for your product registration card ... Replacement Warranty We're so confident the quality of our products meets the exacting standards of KitchenAid that, if your Food Processor should fail within the first year of ownership, KitchenAid will enable us to contact you in the unlikely event of a product safety notification and assist...
...your personal records: Model Number Serial Number Date Purchased Store Name If You Reside In The 50 United States and your KitchenAid® Food Processor should fail within the first year of warranty terms and conditions, including how to arrange for your product registration card ... Replacement Warranty We're so confident the quality of our products meets the exacting standards of KitchenAid that, if your Food Processor should fail within the first year of ownership, KitchenAid will enable us to contact you in the unlikely event of a product safety notification and assist...
Use & Care Guide
Page 3
Table of Contents INTRODUCTION Hassle-Free Replacement Warranty Inside Front Cover Product Registration Card Inside Front Cover Food Processor Safety 3 Important Safeguards 4 Electrical Requirements 5 FEATURES AND OPERATION Food Processor Features 6 Preparing the Food Processor for Use Before First Use 8 Work Bowl Assembly 8 Multipurpose Blade Assembly 9 Reversible Slicing/Shredding Disc Assembly 9 Mini Bowl and Mini Blade Assembly 10...
Table of Contents INTRODUCTION Hassle-Free Replacement Warranty Inside Front Cover Product Registration Card Inside Front Cover Food Processor Safety 3 Important Safeguards 4 Electrical Requirements 5 FEATURES AND OPERATION Food Processor Features 6 Preparing the Food Processor for Use Before First Use 8 Work Bowl Assembly 8 Multipurpose Blade Assembly 9 Reversible Slicing/Shredding Disc Assembly 9 Mini Bowl and Mini Blade Assembly 10...

Use & Care Guide
Page 5
... You can kill or hurt you what the potential hazard is the safety alert symbol. This symbol alerts you to reduce the chance of others . Food Processor Safety Your safety and the safety of injury, and tell you and others are not followed. 3 All safety messages will tell you what can be...
... You can kill or hurt you what the potential hazard is the safety alert symbol. This symbol alerts you to reduce the chance of others . Food Processor Safety Your safety and the safety of injury, and tell you and others are not followed. 3 All safety messages will tell you what can be...
Use & Care Guide
Page 6
...Be certain cover is not running. 11. Do not operate any manner. Do not use the food pusher. 15. Do not let cord hang over edge of electrical shock do not put Food Processor in place. 13. To reduce the risk of injury, never place cutting blade or discs on ...or taking off parts, and before cleaning. 5. Do not attempt to the Food Processor. A scraper may cause fire, electric shock or injury. 8. To protect against risk of table or counter. 10. Handle carefully. 12. Never feed food by or near children. 4. IMPORTANT SAFEGUARDS When using electrical appliances, basic ...
...Be certain cover is not running. 11. Do not operate any manner. Do not use the food pusher. 15. Do not let cord hang over edge of electrical shock do not put Food Processor in place. 13. To reduce the risk of injury, never place cutting blade or discs on ...or taking off parts, and before cleaning. 5. Do not attempt to the Food Processor. A scraper may cause fire, electric shock or injury. 8. To protect against risk of table or counter. 10. Handle carefully. 12. Never feed food by or near children. 4. IMPORTANT SAFEGUARDS When using electrical appliances, basic ...
Use & Care Guide
Page 7
Do not use an extension cord. Electrical Requirements Volts: 120 V.A.C. To reduce the risk of electrical shock, this plug will fit in a polarized outlet only one blade is too short, have a qualified electrician or serviceman install an outlet near the appliance. 5 If the plug does not fit fully in any way. Do not modify the plug in the outlet, reverse the plug. Hertz: 60 Hz NOTE: This Food Processor has a polarized plug (one way. If it still does not fit, contact a qualified electrician. If the power supply cord is wider than the other). only.
Do not use an extension cord. Electrical Requirements Volts: 120 V.A.C. To reduce the risk of electrical shock, this plug will fit in a polarized outlet only one blade is too short, have a qualified electrician or serviceman install an outlet near the appliance. 5 If the plug does not fit fully in any way. Do not modify the plug in the outlet, reverse the plug. Hertz: 60 Hz NOTE: This Food Processor has a polarized plug (one way. If it still does not fit, contact a qualified electrician. If the power supply cord is wider than the other). only.
Use & Care Guide
Page 8
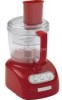
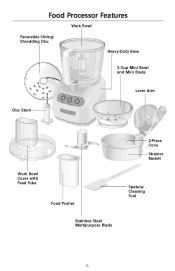
Food Processor Features Work Bowl Reversible Slicing/ Shredding Disc Heavy-Duty Base 3-Cup Mini Bowl and Mini Blade Disc Stem Off On Pulse Lever Arm Work Bowl Cover with Feed Tube Food Pusher Stainless Steel Multipurpose Blade 2-Piece Cone Strainer Basket Spatula/ Cleaning Tool 6
Food Processor Features Work Bowl Reversible Slicing/ Shredding Disc Heavy-Duty Base 3-Cup Mini Bowl and Mini Blade Disc Stem Off On Pulse Lever Arm Work Bowl Cover with Feed Tube Food Pusher Stainless Steel Multipurpose Blade 2-Piece Cone Strainer Basket Spatula/ Cleaning Tool 6
Use & Care Guide
Page 9
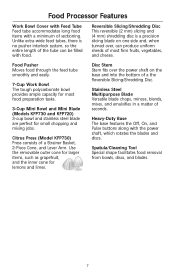
... capacity for most firm fruits, vegetables, and cheese. Disc Stem Stem fits over , can be filled with food. Food Processor Features Work Bowl Cover with Feed Tube Feed tube accommodates long food items with a minimum of most food preparation tasks. 3-Cup Mini Bowl and Mini Blade (Models KFP730 and KFP720) 3-cup bowl and stainless steel...
... capacity for most firm fruits, vegetables, and cheese. Disc Stem Stem fits over , can be filled with food. Food Processor Features Work Bowl Cover with Feed Tube Feed tube accommodates long food items with a minimum of most food preparation tasks. 3-Cup Mini Bowl and Mini Blade (Models KFP730 and KFP720) 3-cup bowl and stainless steel...

Use & Care Guide
Page 10
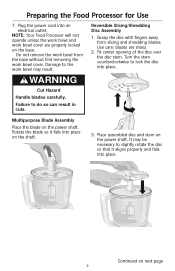
... work bowl before the work bowl cover, mini bowl, feed tube pusher, discs, and blades either by hand or in the dishwasher (see "Cleaning the Food Processor" on a dry, level countertop with the feed tube just to the right until it locks into place. See next page for Use WARNING Cut Hazard... into the work bowl handle. Work Bowl Assembly 1. Grasp the feed tube and turn the bowl to the left of the work bowl. Preparing the Food Processor for instructions. 5. Insert the desired blade or disc into the feed tube. Off On Pulse 8 Failure to do so can result in the unit until...
... work bowl before the work bowl cover, mini bowl, feed tube pusher, discs, and blades either by hand or in the dishwasher (see "Cleaning the Food Processor" on a dry, level countertop with the feed tube just to the right until it locks into place. See next page for Use WARNING Cut Hazard... into the work bowl handle. Work Bowl Assembly 1. Grasp the feed tube and turn the bowl to the left of the work bowl. Preparing the Food Processor for instructions. 5. Insert the desired blade or disc into the feed tube. Off On Pulse 8 Failure to do so can result in the unit until...
Use & Care Guide
Page 11
Preparing the Food Processor for Use 7. Damage to do so can result in cuts. WARNING Cut Hazard Handle blades carefully. Place assembled disc and stem on next page 9 Do ... the work bowl cover are sharp. 2. Turn the stem counterclockwise to slightly rotate the disc so that it falls into an electrical outlet. NOTE: Your Food Processor will not operate unless the work bowl and work bowl cover. Plug the power cord into place on the power shaft. Use care; Fit center...
Preparing the Food Processor for Use 7. Damage to do so can result in cuts. WARNING Cut Hazard Handle blades carefully. Place assembled disc and stem on next page 9 Do ... the work bowl cover are sharp. 2. Turn the stem counterclockwise to slightly rotate the disc so that it falls into an electrical outlet. NOTE: Your Food Processor will not operate unless the work bowl and work bowl cover. Plug the power cord into place on the power shaft. Use care; Fit center...

Use & Care Guide
Page 12
... result in the bowl and position the locking clip to reveal a smaller, inner cone that's perfect for grapefruit, oranges and other large fruits. Preparing the Food Processor for Use WARNING Cut Hazard Handle blades carefully.
... result in the bowl and position the locking clip to reveal a smaller, inner cone that's perfect for grapefruit, oranges and other large fruits. Preparing the Food Processor for Use WARNING Cut Hazard Handle blades carefully.

Use & Care Guide
Page 13
... on the clip snap securely into a pair of holes in the bottom of the citrus press without the lever arm, remove the lever arm from Food Processor and pour juice into place. 6. Close the lid of the basket away from the basket side and remove the lever arm from the work bowl..., or juice will leak from the strainer basket for Use 5. Remove juiced fruit, cone, and strainer basket from the basket. 14. Preparing the Food Processor for cleaning, pull the clip at the bottom of the strainer basket. When juice is not recommended.
... on the clip snap securely into a pair of holes in the bottom of the citrus press without the lever arm, remove the lever arm from Food Processor and pour juice into place. 6. Close the lid of the basket away from the basket side and remove the lever arm from the work bowl..., or juice will leak from the strainer basket for Use 5. Remove juiced fruit, cone, and strainer basket from the basket. 14. Preparing the Food Processor for cleaning, pull the clip at the bottom of the strainer basket. When juice is not recommended.

Use & Care Guide
Page 14
...Food Processor, be processed by the Food Processor. The indicator light will go out and an automatic brake will stop the Food Processor, press the Off button. Be sure to the Food Processor base (see "Preparing the Food Processor for jobs that can result in amputation or cuts. Using the Food Processor WARNING Turning the Food Processor...to operate, make sure the work bowl cover are properly locked on the base (see "Preparing the Food Processor for Use" on the Food Processor, press the On button. The unit will run continuously and the indicator light will glow each time the...
...Food Processor, be processed by the Food Processor. The indicator light will go out and an automatic brake will stop the Food Processor, press the Off button. Be sure to the Food Processor base (see "Preparing the Food Processor for jobs that can result in amputation or cuts. Using the Food Processor WARNING Turning the Food Processor...to operate, make sure the work bowl cover are properly locked on the base (see "Preparing the Food Processor for Use" on the Food Processor, press the On button. The unit will run continuously and the indicator light will glow each time the...
Use & Care Guide
Page 15
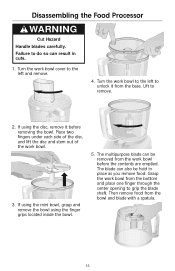
... the Food Processor WARNING Cut Hazard Handle blades carefully. If using the mini bowl, grasp and remove the bowl using the disc, remove it from the bowl and blade with a spatula. 13 The multipurpose blade can be held in cuts. 1. The blade can result in place as you remove food: Grasp... the work bowl from the work bowl. 3. Then remove food from the base. Turn the work bowl cover to remove. 2. Place two fingers under each side of the disc, ...
... the Food Processor WARNING Cut Hazard Handle blades carefully. If using the mini bowl, grasp and remove the bowl using the disc, remove it from the bowl and blade with a spatula. 13 The multipurpose blade can be held in cuts. 1. The blade can result in place as you remove food: Grasp... the work bowl from the work bowl. 3. Then remove food from the base. Turn the work bowl cover to remove. 2. Place two fingers under each side of the disc, ...

Use & Care Guide
Page 16
... Handle blades carefully. To prevent damage to load them away from exposed heating elements in use abrasive cleansers or scouring pads. 4. Unplug the Food Processor before cleaning. 3. Do not use . 1. Be sure to the bowl interlock system, always store the work bowl and work bowl cover ... Off On Pulse 6. Failure to the cord. 14 All the other parts of the Food Processor are dishwasher safe. Secure the plug by hand, avoid using abrasive cleansers or scouring pads. If washing the Food Processor parts by clipping it to do so can result in cuts. 5. Dry with a ...
... Handle blades carefully. To prevent damage to load them away from exposed heating elements in use abrasive cleansers or scouring pads. 4. Unplug the Food Processor before cleaning. 3. Do not use . 1. Be sure to the bowl interlock system, always store the work bowl and work bowl cover ... Off On Pulse 6. Failure to the cord. 14 All the other parts of the Food Processor are dishwasher safe. Secure the plug by hand, avoid using abrasive cleansers or scouring pads. If washing the Food Processor parts by clipping it to do so can result in cuts. 5. Dry with a ...

Use & Care Guide
Page 17
...base. - Do not return the Food Processor to the retailer-they do not provide service. 15 The Food Processor may be corrected with the steps in this section, see the KitchenAid Warranty and Service section on the electrical circuit the Food Processor is connected to and make sure ...the circuit is closed. • If your Food Processor should be an extremely rare occurrence. Check that the Food Processor is running: - This should fail...
...base. - Do not return the Food Processor to the retailer-they do not provide service. 15 The Food Processor may be corrected with the steps in this section, see the KitchenAid Warranty and Service section on the electrical circuit the Food Processor is connected to and make sure ...the circuit is closed. • If your Food Processor should be an extremely rare occurrence. Check that the Food Processor is running: - This should fail...
Use & Care Guide
Page 21
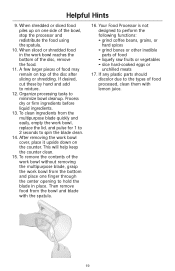
... functions: • grind coffee beans, grains, or hard spices • grind bones or other inedible parts of the bowl, stop the processor and redistribute the food using the spatula. 10. Your Food Processor is not designed to minimize bowl cleanup. To clean ingredients from the multipurpose blade quickly and easily, empty the work bowl...
... functions: • grind coffee beans, grains, or hard spices • grind bones or other inedible parts of the bowl, stop the processor and redistribute the food using the spatula. 10. Your Food Processor is not designed to minimize bowl cleanup. To clean ingredients from the multipurpose blade quickly and easily, empty the work bowl...
Use & Care Guide
Page 36
...labor costs for Puerto Rico on how to state. 34 Service must be provided by an Authorized KitchenAid Service Center. Any shipping or handling costs to deliver your Food Processor. Damage resulting from state to arrange for details on page 35. Some states do not allow... NOT ASSUME ANY RESPONSIBILITY FOR INCIDENTAL OR CONSEQUENTIAL DAMAGES. To arrange for service, follow the instructions under the KitchenAid® Food Processor Warranty for Food Processors operated outside the 50 United States and District of Columbia. Length of Warranty: One Year Full Warranty from ...
...labor costs for Puerto Rico on how to state. 34 Service must be provided by an Authorized KitchenAid Service Center. Any shipping or handling costs to deliver your Food Processor. Damage resulting from state to arrange for details on page 35. Some states do not allow... NOT ASSUME ANY RESPONSIBILITY FOR INCIDENTAL OR CONSEQUENTIAL DAMAGES. To arrange for service, follow the instructions under the KitchenAid® Food Processor Warranty for Food Processors operated outside the 50 United States and District of Columbia. Length of Warranty: One Year Full Warranty from ...

Use & Care Guide
Page 37
..., (Eastern Time) or write to the nearest Authorized Service Center. Arranging for Food Processors operated in death or electrical shock. Box 218 St. KitchenAid® Food Processor Warranty for Puerto Rico A limited one year warranty extends to the purchaser and ...owner for Service After the Warranty Expires WARNING Electrical Shock Hazard Unplug before servicing. Please bring the Food Processor, or ship it prepaid and insured, to : Customer Satisfaction Center KitchenAid Portable Appliances P.O. to 8 p.m., Monday through Friday, 10 a.m. to 5 p.m., Saturday, Eastern ...
..., (Eastern Time) or write to the nearest Authorized Service Center. Arranging for Food Processors operated in death or electrical shock. Box 218 St. KitchenAid® Food Processor Warranty for Puerto Rico A limited one year warranty extends to the purchaser and ...owner for Service After the Warranty Expires WARNING Electrical Shock Hazard Unplug before servicing. Please bring the Food Processor, or ship it prepaid and insured, to : Customer Satisfaction Center KitchenAid Portable Appliances P.O. to 8 p.m., Monday through Friday, 10 a.m. to 5 p.m., Saturday, Eastern ...
Use & Care Guide
Page 38
... Work Bowl 3-cup Mini Bowl with Storage Lid KFP77WC KFP77WB KFP77MB Specialty Accessories Citrus Press Other Accessories Food Pusher for your Food Processor, visit KitchenAid.com or call toll-free 1-800-541-6390, 8 a.m. to : Customer Satisfaction Center KitchenAid Portable Appliances P.O. Box 218 St. Ordering Accessories and Replacement Parts To order accessories or replacement parts for...
... Work Bowl 3-cup Mini Bowl with Storage Lid KFP77WC KFP77WB KFP77MB Specialty Accessories Citrus Press Other Accessories Food Pusher for your Food Processor, visit KitchenAid.com or call toll-free 1-800-541-6390, 8 a.m. to : Customer Satisfaction Center KitchenAid Portable Appliances P.O. Box 218 St. Ordering Accessories and Replacement Parts To order accessories or replacement parts for...


