
Instruction Manual
Page 4
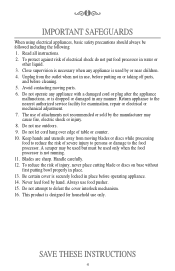
... utensils away from the outlet when not in use only. Do not attempt to the food processor. Return appliance to reduce the risk of table or counter. 10. Blades are sharp. This product is designed for examination, repair or electrical or mechanical adjustment. ...IMPORTANT SAFEGUARDS When using electrical appliances, basic safety precautions should always be used only when the food processor is not running. 11. Avoid contacting moving blades or discs while processing food to the nearest authorized service facility for household use , before operating appliance. 14. Be ...
... utensils away from the outlet when not in use only. Do not attempt to the food processor. Return appliance to reduce the risk of table or counter. 10. Blades are sharp. This product is designed for examination, repair or electrical or mechanical adjustment. ...IMPORTANT SAFEGUARDS When using electrical appliances, basic safety precautions should always be used only when the food processor is not running. 11. Avoid contacting moving blades or discs while processing food to the nearest authorized service facility for household use , before operating appliance. 14. Be ...

Instruction Manual
Page 8
...retailer as they do not provide service. DO NOT return the food processor to operate, check the following: - This appliance has a polarized plug (one of electrical shock, this plug will fit in the circuit to one blade is based on page 7 . - ķ℀ĸ...-WARRANTY SERVICE. Other attachments might draw significantly less power or current. Try unplugging and waiting 15-20 minutes before re-plugging the food processor. - Electrical Requirements Volts: 120 A.C. Hertz: 60 15-amp branch circuit. Is the food processor plugged in working order? If the problem is closed...
...retailer as they do not provide service. DO NOT return the food processor to operate, check the following: - This appliance has a polarized plug (one of electrical shock, this plug will fit in the circuit to one blade is based on page 7 . - ķ℀ĸ...-WARRANTY SERVICE. Other attachments might draw significantly less power or current. Try unplugging and waiting 15-20 minutes before re-plugging the food processor. - Electrical Requirements Volts: 120 A.C. Hertz: 60 15-amp branch circuit. Is the food processor plugged in working order? If the problem is closed...
Instruction Manual
Page 10
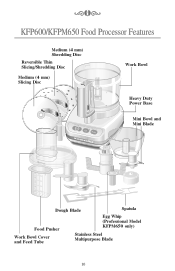
ķ℀ĸ KFP600/KFPM650 Food Processor Features Medium (4 mm) Shredding Disc Reversible Thin Slicing/Shredding Disc Medium (4 mm) Slicing Disc Work Bowl Off CAUTION: READ INSTRUCTIONS BEFORE USING On Pulse Ultra Power Electronic Control Heavy Duty Power Base Mini Bowl and Mini Blade 250 8 0.4 200 150 6 0.3 4 100 0.2 50 2 0.1 ml oz pts Dough Blade Spatula Food Pusher Work Bowl Cover and Feed Tube Egg Whip (Professional Model KFPM650 only) Stainless Steel Multipurpose Blade 10
ķ℀ĸ KFP600/KFPM650 Food Processor Features Medium (4 mm) Shredding Disc Reversible Thin Slicing/Shredding Disc Medium (4 mm) Slicing Disc Work Bowl Off CAUTION: READ INSTRUCTIONS BEFORE USING On Pulse Ultra Power Electronic Control Heavy Duty Power Base Mini Bowl and Mini Blade 250 8 0.4 200 150 6 0.3 4 100 0.2 50 2 0.1 ml oz pts Dough Blade Spatula Food Pusher Work Bowl Cover and Feed Tube Egg Whip (Professional Model KFPM650 only) Stainless Steel Multipurpose Blade 10

Instruction Manual
Page 11
...thicker, more substantial slices of seconds. Heavy Duty Power Base with KFPM650. It chops, minces, blends, mixes and emulsifies in cord storage. Optional Egg Whip is the work bowl. Stainless Steel Multipurpose Blade is designed to whip cream and egg whites for ... blade on one side and when turned over can shred most anything from delicate strawberries to partially frozen meat for meringues, mousses, souffles and desserts. ķ℀ĸ KFP600/KFPM650 Food Processor Features KitchenAid quality means this food processor was built and tested to meet high KitchenAid ...
...thicker, more substantial slices of seconds. Heavy Duty Power Base with KFPM650. It chops, minces, blends, mixes and emulsifies in cord storage. Optional Egg Whip is the work bowl. Stainless Steel Multipurpose Blade is designed to whip cream and egg whites for ... blade on one side and when turned over can shred most anything from delicate strawberries to partially frozen meat for meringues, mousses, souffles and desserts. ķ℀ĸ KFP600/KFPM650 Food Processor Features KitchenAid quality means this food processor was built and tested to meet high KitchenAid ...

Instruction Manual
Page 12
... Uncoil needed length of center. 4. Electronic Control Off CAUTION: READ INSTRUCTIONS BEFORE USING On Pulse Ultra Power 3. Place power base on power base, fitting the center opening over the power base shaft, making sure the handle is just to the right until completely assembled. Do not ... Place work bowl cover, mini bowl, feed tube pusher and blades either by hand or in until it locks into position. Electronic Control Off CAUTION: READ INSTRUCTIONS BEFORE USING On Pulse Ultra Power 12 Before using your food processor for the first time, wash the work bowl, work bowl...
... Uncoil needed length of center. 4. Electronic Control Off CAUTION: READ INSTRUCTIONS BEFORE USING On Pulse Ultra Power 3. Place power base on power base, fitting the center opening over the power base shaft, making sure the handle is just to the right until completely assembled. Do not ... Place work bowl cover, mini bowl, feed tube pusher and blades either by hand or in until it locks into position. Electronic Control Off CAUTION: READ INSTRUCTIONS BEFORE USING On Pulse Ultra Power 12 Before using your food processor for the first time, wash the work bowl, work bowl...
Instruction Manual
Page 13
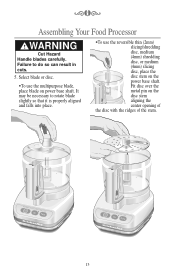
.... Fit disc over the metal pin on power base shaft. ķ℀ĸ Assembling Your Food Processor ! Electronic Control Electronic Control Off CAUTION: READ INSTRUCTIONS BEFORE USING On Pulse Ultra Power Off CAUTION: READ INSTRUCTIONS BEFORE USING On Pulse Ultra Power 13 Select blade or disc. •To use the reversible thin (2mm) slicing/shredding disc, medium (4mm...
.... Fit disc over the metal pin on power base shaft. ķ℀ĸ Assembling Your Food Processor ! Electronic Control Electronic Control Off CAUTION: READ INSTRUCTIONS BEFORE USING On Pulse Ultra Power Off CAUTION: READ INSTRUCTIONS BEFORE USING On Pulse Ultra Power 13 Select blade or disc. •To use the reversible thin (2mm) slicing/shredding disc, medium (4mm...

Instruction Manual
Page 14
... left ). ķ℀ĸ Assembling Your Food Processor •To use the Mini Bowl, place the Mini Bowl over the power base shaft. Fit the mini blade on the power base. Off CAUTION: READ INSTRUCTIONS BEFORE USING On Pulse Ultra Power Electronic Control NOTE: Never try to the right...cover are properly aligned and fall into place. 6. NOTE: Your KitchenAid® Food Processor features a double interlock safety system to the work bowl handle. Damage to insure that they are properly aligned on the power base shaft. Fit the pusher into the feed tube and plug unit...
... left ). ķ℀ĸ Assembling Your Food Processor •To use the Mini Bowl, place the Mini Bowl over the power base shaft. Fit the mini blade on the power base. Off CAUTION: READ INSTRUCTIONS BEFORE USING On Pulse Ultra Power Electronic Control NOTE: Never try to the right...cover are properly aligned and fall into place. 6. NOTE: Your KitchenAid® Food Processor features a double interlock safety system to the work bowl handle. Damage to insure that they are properly aligned on the power base shaft. Fit the pusher into the feed tube and plug unit...
Instruction Manual
Page 16
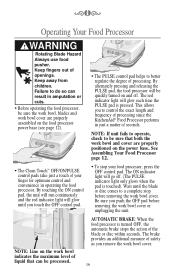
...BEFORE USING On Pulse Ultra Power • The PULSE control pad helps to be sure that both the work bowl indicates the maximum level of liquid that can result in amputation or cuts. • Before operating the food processor, be sure the work bowl, blades and work bowl cover ...or unplugging the unit. The red indicator light will glow until the blade or disc comes to control the exact length and frequency of processing since the KitchenAid® Food Processor performs in operating the food processor. Wait until you to a complete stop your finger for optimum control and...
...BEFORE USING On Pulse Ultra Power • The PULSE control pad helps to be sure that both the work bowl indicates the maximum level of liquid that can result in amputation or cuts. • Before operating the food processor, be sure the work bowl, blades and work bowl cover ...or unplugging the unit. The red indicator light will glow until the blade or disc comes to control the exact length and frequency of processing since the KitchenAid® Food Processor performs in operating the food processor. Wait until you to a complete stop your finger for optimum control and...
Instruction Manual
Page 17
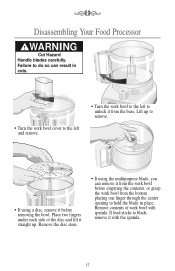
If food sticks to the left and remove. Remove contents of the disc and lift it straight up to hold the blade in cuts. • Turn the work bowl to blade, remove it from the bottom placing one finger through the center opening to remove. WARNING Cut Hazard Handle blades carefully. Place two fingers under.... Lift up . Remove the disc stem. • If using a disc, remove it from the work bowl from the base. Control • If using the multipurpose blade, you can result in place. ķ℀ĸ Disassembling Your Food Processor !
If food sticks to the left and remove. Remove contents of the disc and lift it straight up to hold the blade in cuts. • Turn the work bowl to blade, remove it from the bottom placing one finger through the center opening to remove. WARNING Cut Hazard Handle blades carefully. Place two fingers under.... Lift up . Remove the disc stem. • If using a disc, remove it from the work bowl from the base. Control • If using the multipurpose blade, you can result in place. ķ℀ĸ Disassembling Your Food Processor !
Instruction Manual
Page 18
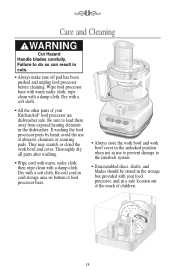
...avoid the use to prevent damage to the interlock system. • Disassembled discs, shafts, and blades should be stored in the storage box provided with your KitchenAid® food processor are dishwasher safe. Thoroughly dry all parts after washing. • Wipe cord with warm sudsy cloth... food processor, and in use of children. 18 WARNING Cut Hazard Handle blades carefully. Re-coil cord in cord storage area on bottom of food processor base. 250 8 0.4 200 150 6 0.3 100 4 0.2 50 2 0.1 ml oz pts Electronic Control Off CAUTION: READ INSTRUCTIONS BEFORE USING On Pulse Ultra Power...
...avoid the use to prevent damage to the interlock system. • Disassembled discs, shafts, and blades should be stored in the storage box provided with your KitchenAid® food processor are dishwasher safe. Thoroughly dry all parts after washing. • Wipe cord with warm sudsy cloth... food processor, and in use of children. 18 WARNING Cut Hazard Handle blades carefully. Re-coil cord in cord storage area on bottom of food processor base. 250 8 0.4 200 150 6 0.3 100 4 0.2 50 2 0.1 ml oz pts Electronic Control Off CAUTION: READ INSTRUCTIONS BEFORE USING On Pulse Ultra Power...
Instruction Manual
Page 19
...pulses, 1 to 3 cups of food. Scrape sides of bowl, if necessary. To puree cooked fruits and vegetables (except potatoes): Add 1⁄4 cup liquid from recipe in work bowl is absorbed. Then process continuously until smooth. Scrape sides of vegetables: With processor running , pour hot liquid through...fresh herbs. To mince garlic or to 2 seconds each time. Process until fine. Pulse more often for multipurpose blade. To chop cooked or raw meat, poultry or seafood: The food should be very cold. Cut in small strips. Process until chopped. For larger pieces, pulse 2 to 3 ...
...pulses, 1 to 3 cups of food. Scrape sides of bowl, if necessary. To puree cooked fruits and vegetables (except potatoes): Add 1⁄4 cup liquid from recipe in work bowl is absorbed. Then process continuously until smooth. Scrape sides of vegetables: With processor running , pour hot liquid through...fresh herbs. To mince garlic or to 2 seconds each time. Process until fine. Pulse more often for multipurpose blade. To chop cooked or raw meat, poultry or seafood: The food should be very cold. Cut in small strips. Process until chopped. For larger pieces, pulse 2 to 3 ...
Instruction Manual
Page 20
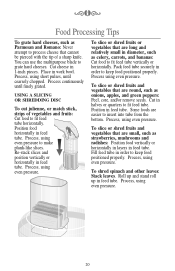
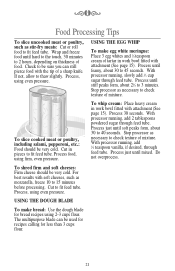
...To slice or shred fruits or vegetables that are long and relatively small in diameter, such as celery, carrots, and bananas: Cut food to keep food positioned properly. Cut in work bowl. Position in feed tube. To shred spinach and other leaves: Stack leaves. Process, using ... or horizontally in layers in order to fit feed tube vertically or horizontally. Process, using even pressure. You can use the multipurpose blade to keep food positioned properly. To slice or shred fruits and vegetables that are easier to make 200 150 6 0.3 plank-like slices. 100 4 0.2 ...
...To slice or shred fruits or vegetables that are long and relatively small in diameter, such as celery, carrots, and bananas: Cut food to keep food positioned properly. Cut in work bowl. Position in feed tube. To shred spinach and other leaves: Stack leaves. Process, using ... or horizontally in layers in order to fit feed tube vertically or horizontally. Process, using even pressure. You can use the multipurpose blade to keep food positioned properly. To slice or shred fruits and vegetables that are easier to make 200 150 6 0.3 plank-like slices. 100 4 0.2 ...
Instruction Manual
Page 21
...slightly. The multipurpose blade can still pierce food with soft cheeses, such as stir-fry meats: Cut or roll food to fit feed tube. Wrap and freeze food until mixed. USING THE EGG WHIP To make bread: Use the dough blade for less than 3 cups flour. 21 Stop processor as necessary to ...check texture of mixture. With processor running , add 2 tablespoons powdered sugar through...
...slightly. The multipurpose blade can still pierce food with soft cheeses, such as stir-fry meats: Cut or roll food to fit feed tube. Wrap and freeze food until mixed. USING THE EGG WHIP To make bread: Use the dough blade for less than 3 cups flour. 21 Stop processor as necessary to ...check texture of mixture. With processor running , add 2 tablespoons powdered sugar through...
Instruction Manual
Page 22
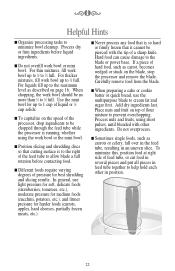
... described on page 16. Process dry or firm ingredients before contacting food. Carefully remove food from the blade. s Sometimes single foods, such as carrot, becomes wedged or stuck on the blade, stop the processor and remove the blade. s To capitalize on top of pressure for up to minimize ... overchopping. For liquids fill up to the blade or power base. When chopping, the work bowl or mini bowl. Do not overprocess. s Different foods require varying degrees of flour mixture to 1⁄2 full. In general, use the multipurpose blade to 3⁄4 full. s Do not ...
... described on page 16. Process dry or firm ingredients before contacting food. Carefully remove food from the blade. s Sometimes single foods, such as carrot, becomes wedged or stuck on the blade, stop the processor and remove the blade. s To capitalize on top of pressure for up to minimize ... overchopping. For liquids fill up to the blade or power base. When chopping, the work bowl or mini bowl. Do not overprocess. s Different foods require varying degrees of flour mixture to 1⁄2 full. In general, use the multipurpose blade to 3⁄4 full. s Do not ...
Instruction Manual
Page 25
... soft. In large skillet over medium-low heat. Set aside. Melt margarine in work bowl. Sprinkle with sausage mixture. With processor running, add shallot and garlic through feed tube. Add mushroom caps. Bake at 350˚F for 10 minutes, until no longer...sausage 1/2 teaspoon dry mustard 1 teaspoon Worcestershire sauce 1-2 tablespoons margarine or butter 1/2 cup freshly grated Parmesan cheese (see TIPS) Position multipurpose blade in skillet over medium heat, cook sausage until hot and bubbly. Add bread. Process until finely crumbled, about 1 second each side, until...
... soft. In large skillet over medium-low heat. Set aside. Melt margarine in work bowl. Sprinkle with sausage mixture. With processor running, add shallot and garlic through feed tube. Add mushroom caps. Bake at 350˚F for 10 minutes, until no longer...sausage 1/2 teaspoon dry mustard 1 teaspoon Worcestershire sauce 1-2 tablespoons margarine or butter 1/2 cup freshly grated Parmesan cheese (see TIPS) Position multipurpose blade in skillet over medium heat, cook sausage until hot and bubbly. Add bread. Process until finely crumbled, about 1 second each side, until...

Instruction Manual
Page 26
...cooked egg yolks 2 tablespoons brandy 1/2 teaspoon ground coriander 1/4 teaspoon ground cloves 1/4 cup margarine or butter, softened Position mini bowl and mini blade in 1-inch pieces. Process until finely chopped, about 10 seconds. Set aside. Add to bacon drippings. Process until finely chopped, about 10...to 6 minutes. Remove bacon. Add all other ingredients to work bowl. Yield: 31/2 cups (32 2-tablespoon servings). With processor running, add rosemary through feed tube. Add onion. Cut chicken livers in skillet. In large skillet over low heat, cook bacon for multipurpose...
...cooked egg yolks 2 tablespoons brandy 1/2 teaspoon ground coriander 1/4 teaspoon ground cloves 1/4 cup margarine or butter, softened Position mini bowl and mini blade in 1-inch pieces. Process until finely chopped, about 10 seconds. Set aside. Add to bacon drippings. Process until finely chopped, about 10...to 6 minutes. Remove bacon. Add all other ingredients to work bowl. Yield: 31/2 cups (32 2-tablespoon servings). With processor running, add rosemary through feed tube. Add onion. Cut chicken livers in skillet. In large skillet over low heat, cook bacon for multipurpose...

Instruction Manual
Page 27
... powder 1/4 teaspoon salt 1/8 teaspoon crushed red pepper 1 tablespoon milk or cream 1 teaspoon Worcestershire sauce 1 cup all ingredients except flour. Add all -purpose flour Position multipurpose blade in work bowl. Process until flour is mixed. Add flour. Pipe 3-inch strips onto ungreased cookie sheet, 1 inch apart. Do not overmix. Scrape sides of...
... powder 1/4 teaspoon salt 1/8 teaspoon crushed red pepper 1 tablespoon milk or cream 1 teaspoon Worcestershire sauce 1 cup all ingredients except flour. Add all -purpose flour Position multipurpose blade in work bowl. Process until flour is mixed. Add flour. Pipe 3-inch strips onto ungreased cookie sheet, 1 inch apart. Do not overmix. Scrape sides of...
Instruction Manual
Page 28
...inch pieces, reserving liquid. Add peppers and onion to 15 seconds. Spoon or pipe into egg white halves. Position mini bowl and mini blade in work bowl. Process until finely chopped, about 10 to work bowl. ķĸ SሑPIሑCሑ Y ሑ... small onion, cut in 1-inch pieces 6 hard-cooked eggs, peeled, cut in half lengthwise 2 tablespoons reduced-calorie mayonnaise 1/4 teaspoon salt Soak peppers for multipurpose blade. With processor running, add cilantro through feed tube. Per serving: About 97 cal, 7 g pro, 3 g car, 6 g fat, 214 mg chol, 182 mg ...
...inch pieces, reserving liquid. Add peppers and onion to 15 seconds. Spoon or pipe into egg white halves. Position mini bowl and mini blade in work bowl. Process until finely chopped, about 10 to work bowl. ķĸ SሑPIሑCሑ Y ሑ... small onion, cut in 1-inch pieces 6 hard-cooked eggs, peeled, cut in half lengthwise 2 tablespoons reduced-calorie mayonnaise 1/4 teaspoon salt Soak peppers for multipurpose blade. With processor running, add cilantro through feed tube. Per serving: About 97 cal, 7 g pro, 3 g car, 6 g fat, 214 mg chol, 182 mg ...

Instruction Manual
Page 30
...onion, cut into 1-inch pieces 1 cup fresh, frozen, or canned pineapple chunks 3 tablespoons lime juice 2 tablespoons sugar Position multipurpose blade in work bowl. Process until smooth and creamy, about 5 seconds. sauce 1 cup (4 oz.) small fully cooked shrimp SALSA VERDE...bowl. Process until finely chopped, about 1 second each time, until coarsely chopped. Add in work bowl. Add all remaining ingredients, except shrimp. With processor running, add chili peppers, garlic, and cilantro through feed tube. Remove to 7 seconds. Per serving: About 32 cal, 1 g pro, 8 ...
...onion, cut into 1-inch pieces 1 cup fresh, frozen, or canned pineapple chunks 3 tablespoons lime juice 2 tablespoons sugar Position multipurpose blade in work bowl. Process until smooth and creamy, about 5 seconds. sauce 1 cup (4 oz.) small fully cooked shrimp SALSA VERDE...bowl. Process until finely chopped, about 1 second each time, until coarsely chopped. Add in work bowl. Add all remaining ingredients, except shrimp. With processor running, add chili peppers, garlic, and cilantro through feed tube. Remove to 7 seconds. Per serving: About 32 cal, 1 g pro, 8 ...
Instruction Manual
Page 31
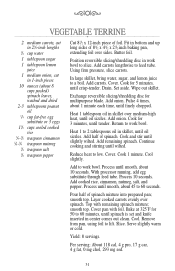
...heat to lift. Cool slightly. Process 10 seconds. Pour half of spinach. Slice. Add carrots. Cover. Wipe out skillet. Cook for multipurpose blade. Cook and stir until wilted. Cover. Process until smooth, about 10 seconds. Layer cooked carrots evenly over spinach. smooth top. Remove from ...g pro, 17 g car, 4 g fat, 0 mg chol, 293 mg sod. 31 Return to work bowl to 60 minutes, until finely chopped. With processor running, add egg substitute through feed tube. Bake at 325˚F for 5 minutes, until crisp-tender. Serve slightly warm or cold. Fit in center comes...
...heat to lift. Cool slightly. Process 10 seconds. Pour half of spinach. Slice. Add carrots. Cover. Wipe out skillet. Cook for multipurpose blade. Cook and stir until wilted. Cover. Process until smooth, about 10 seconds. Layer cooked carrots evenly over spinach. smooth top. Remove from ...g pro, 17 g car, 4 g fat, 0 mg chol, 293 mg sod. 31 Return to work bowl to 60 minutes, until finely chopped. With processor running, add egg substitute through feed tube. Bake at 325˚F for 5 minutes, until crisp-tender. Serve slightly warm or cold. Fit in center comes...


