Use & Care Guide
Page 3
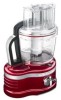
...the 3-in-1 feed tube 13 Using the speed controls 14 Using YOUR Accessories Preparing the dicing kit for first use your Food Processor, please fill out and mail your product registration card packed with the provisions of the Consumer Product Safety Act. Proof ... unit, or register on-line at www.kitchenaid.com. Before you of in-warranty service. This card does not verify your personal records: Model Number Serial Number Date Purchased Store Name 3 English Food Processor Instructions Table of Contents FOOD PROCESSOR SAFETY Important safeguards 4 Electrical requirements 5 PARTS...
...the 3-in-1 feed tube 13 Using the speed controls 14 Using YOUR Accessories Preparing the dicing kit for first use your Food Processor, please fill out and mail your product registration card packed with the provisions of the Consumer Product Safety Act. Proof ... unit, or register on-line at www.kitchenaid.com. Before you of in-warranty service. This card does not verify your personal records: Model Number Serial Number Date Purchased Store Name 3 English Food Processor Instructions Table of Contents FOOD PROCESSOR SAFETY Important safeguards 4 Electrical requirements 5 PARTS...

Use & Care Guide
Page 4
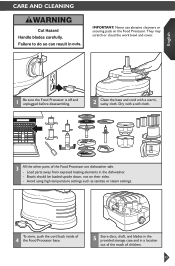
This symbol alerts you to potential hazards that can be used only when the Food Processor is not running. 11. Return appliance to the Food Processor. Food Processor Safety Your safety and the safety of others . We have provided many important safety messages in any appliance is used but ...operating appliance. 14. Do not let cord hang over edge of attachments not recommended or sold by KitchenAid may be used by hand. To reduce the risk of electrical shock, do not put Food Processor in place before cleaning. 5. Be certain cover is , tell you don't follow the safety ...
This symbol alerts you to potential hazards that can be used only when the Food Processor is not running. 11. Return appliance to the Food Processor. Food Processor Safety Your safety and the safety of others . We have provided many important safety messages in any appliance is used but ...operating appliance. 14. Do not let cord hang over edge of attachments not recommended or sold by KitchenAid may be used by hand. To reduce the risk of electrical shock, do not put Food Processor in place before cleaning. 5. Be certain cover is , tell you don't follow the safety ...
Use & Care Guide
Page 5
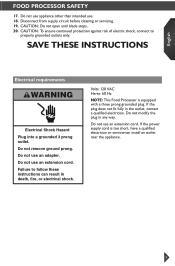
... continued protection against risk of electric shock, connect to follow these instructions can result in death, fire, or electrical shock. Do not use . 18. English Food Processor Safety 17. SAVE THESE INSTRUCTIONS Electrical requirements WARNING Electrical Shock Hazard Plug into a grounded 3 prong outlet. Volts: 120 VAC Hertz: 60 Hz NOTE: This...
... continued protection against risk of electric shock, connect to follow these instructions can result in death, fire, or electrical shock. Do not use . 18. English Food Processor Safety 17. SAVE THESE INSTRUCTIONS Electrical requirements WARNING Electrical Shock Hazard Plug into a grounded 3 prong outlet. Volts: 120 VAC Hertz: 60 Hz NOTE: This...
Use & Care Guide
Page 12
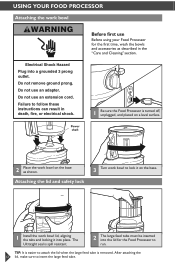
.... Power shaft 2 Place the work bowl on the base as described in death, fire, or electrical shock. 1 Be sure the Food Processor is removed. Using Your Food Processor Attaching the work bowl WARNING Before first use Before using your Food Processor for the Food Processor to run. Do not use an extension cord. Do not use an adapter.
.... Power shaft 2 Place the work bowl on the base as described in death, fire, or electrical shock. 1 Be sure the Food Processor is removed. Using Your Food Processor Attaching the work bowl WARNING Before first use Before using your Food Processor for the Food Processor to run. Do not use an extension cord. Do not use an adapter.

Use & Care Guide
Page 13
...use Before operating the Food Processor, be sure the work bowl, blades and work bowl. 13 Max Fill line Large food pusher Medium food pusher 1 Use entire feed tube and the large food pusher to process large items. Small food pusher 2 Use the medium food pusher in the small food pusher to slice or... rate is ideal for making mayonnaise. Drizzle hole 4 Use the drizzle hole in the feed tube to process smaller items. Small food pusher 3 Use the small food pusher to slowly drizzle oil or other liquid ingredients into the work bowl cover are properly assembled on the Food Processor base.
...use Before operating the Food Processor, be sure the work bowl, blades and work bowl. 13 Max Fill line Large food pusher Medium food pusher 1 Use entire feed tube and the large food pusher to process large items. Small food pusher 2 Use the medium food pusher in the small food pusher to slice or... rate is ideal for making mayonnaise. Drizzle hole 4 Use the drizzle hole in the feed tube to process smaller items. Small food pusher 3 Use the small food pusher to slowly drizzle oil or other liquid ingredients into the work bowl cover are properly assembled on the Food Processor base.

Use & Care Guide
Page 14
... is fully in order to change speeds. 14 NOTE: The speed lever must be in the OFF position in place. Using Your Food Processor Using the speed controls NOTE: If the Food Processor fails to operate, make sure the work bowl and cover are properly locked on , flip the speed lever to High or...
... is fully in order to change speeds. 14 NOTE: The speed lever must be in the OFF position in place. Using Your Food Processor Using the speed controls NOTE: If the Food Processor fails to operate, make sure the work bowl and cover are properly locked on , flip the speed lever to High or...
Use & Care Guide
Page 16
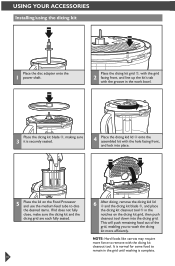
...the grid 2 facing front, and line up the kit's tab with the groove in the notches on the Food Processor and use the medium feed tube to remove with the hole facing front, and lock into place. 5 ... dicing kit grid, then push cleanout tool down into the dicing grid. It is normal for some food to wash the dicing kit more force to dice the desired items. If lid does not fully close... ➂, and place the dicing kit cleanout tool ➄ in the work bowl. This will push remaining food out of the grid, enabling you to remain in the grid until washing is securely seated. 4 Place the...
...the grid 2 facing front, and line up the kit's tab with the groove in the notches on the Food Processor and use the medium feed tube to remove with the hole facing front, and lock into place. 5 ... dicing kit grid, then push cleanout tool down into the dicing grid. It is normal for some food to wash the dicing kit more force to dice the desired items. If lid does not fully close... ➂, and place the dicing kit cleanout tool ➄ in the work bowl. This will push remaining food out of the grid, enabling you to remain in the grid until washing is securely seated. 4 Place the...

Use & Care Guide
Page 17
... firmly on the blade. Liquid level graphics on the side of the bowl indicate the maximum recommended levels for thick and thin liquids in the Food Processor. 3 The multipurpose blade has a leak resistant seal, so you may leave the blade in work bowl with one hand, using the handle, not the rim...
... firmly on the blade. Liquid level graphics on the side of the bowl indicate the maximum recommended levels for thick and thin liquids in the Food Processor. 3 The multipurpose blade has a leak resistant seal, so you may leave the blade in work bowl with one hand, using the handle, not the rim...

Use & Care Guide
Page 24
Using Your Accessories Removing accessories and work bowl IMPORTANT: Be sure the Food Processor is still attached to 4 Food Processor: Turn the work bowl and lift to Food Processor. To remove accessories before removing accessories: Turn the work bowl cover to unlock, as shown, and lift the lid to remove... bowl still attached to remove. 24 If work bowl is off and unplugged before disassembling. 1 To remove work bowl from Food Processor before removing work bowl from Food Processor: Turn the work bowl and lift to remove, and then turn and lift the lid. Finger grip hole Finger grip hole...
Using Your Accessories Removing accessories and work bowl IMPORTANT: Be sure the Food Processor is still attached to 4 Food Processor: Turn the work bowl and lift to Food Processor. To remove accessories before removing accessories: Turn the work bowl cover to unlock, as shown, and lift the lid to remove... bowl still attached to remove. 24 If work bowl is off and unplugged before disassembling. 1 To remove work bowl from Food Processor before removing work bowl from Food Processor: Turn the work bowl and lift to remove, and then turn and lift the lid. Finger grip hole Finger grip hole...
Use & Care Guide
Page 25
Load parts away from exposed heating elements in a location out of the reach of the Food Processor are dishwasher safe. -- To store, push the cord back inside of 4 the Food Processor base. 5 Store discs, shaft, and blades in the provided storage case and in the dishwasher. -- Avoid using ...high temperature settings such as sanitize or steam settings. English 1 Be sure the Food Processor is off and unplugged before disassembling. 2 Clean the base and cord with a soft cloth. 3 All the other parts of children. 25...
Load parts away from exposed heating elements in a location out of the reach of the Food Processor are dishwasher safe. -- To store, push the cord back inside of 4 the Food Processor base. 5 Store discs, shaft, and blades in the provided storage case and in the dishwasher. -- Avoid using ...high temperature settings such as sanitize or steam settings. English 1 Be sure the Food Processor is off and unplugged before disassembling. 2 Clean the base and cord with a soft cloth. 3 All the other parts of children. 25...
Use & Care Guide
Page 26
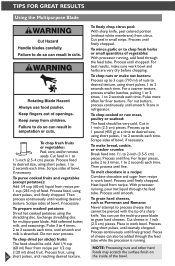
...GREAT RESULTS Using the Multipurpose Blade To chop fresh fruits or vegetables: Peel, core, and/or remove seeds. Scrape sides of vegetables: With processor running, add food through the feed tube. Exchange shredding disc for finer texture. Do not over process. To mince garlic or to 2 seconds each time. ... using short pulses, 1 to 2 seconds each time, until smooth and milk is running , pour hot liquid through the feed tube while the processor is absorbed. Process food to desired size, using short pulses, 1 to chop fresh herbs or small quantities of bowl, if necessary. Process...
...GREAT RESULTS Using the Multipurpose Blade To chop fresh fruits or vegetables: Peel, core, and/or remove seeds. Scrape sides of vegetables: With processor running, add food through the feed tube. Exchange shredding disc for finer texture. Do not over process. To mince garlic or to 2 seconds each time. ... using short pulses, 1 to 2 seconds each time, until smooth and milk is running , pour hot liquid through the feed tube while the processor is absorbed. Process food to desired size, using short pulses, 1 to chop fresh herbs or small quantities of bowl, if necessary. Process...
Use & Care Guide
Page 28
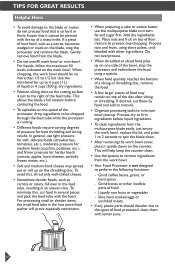
... the small feed tube in the two piece food pusher will help keep the counter clean. • Use the spatula to remove ingredients from the work bowl. • Your Food Processor is running. • Different foods require varying degrees of food may spread out or roll up on the... shredding disc. Process nuts and fruits, using a spatula. • When food quantity reaches the bottom of a slicing or shredding disc, remove...
... the small feed tube in the two piece food pusher will help keep the counter clean. • Use the spatula to remove ingredients from the work bowl. • Your Food Processor is running. • Different foods require varying degrees of food may spread out or roll up on the... shredding disc. Process nuts and fruits, using a spatula. • When food quantity reaches the bottom of a slicing or shredding disc, remove...

Use & Care Guide
Page 29
...• Try to the seal. If you have a circuit breaker box, be sure the circuit is closed. • Unplug the Food Processor, then plug it back into the outlet. • If the Food Processor is not at room temperature, wait until it reaches room temperature and retry. • If the speed lever does not... move, make sure the Food Processor is plugged in. • Is the fuse in the circuit to the Food Processor in the Off position. • For easy lid rotation, it is possible to remove the seal, or just ...
...• Try to the seal. If you have a circuit breaker box, be sure the circuit is closed. • Unplug the Food Processor, then plug it back into the outlet. • If the Food Processor is not at room temperature, wait until it reaches room temperature and retry. • If the speed lever does not... move, make sure the Food Processor is plugged in. • Is the fuse in the circuit to the Food Processor in the Off position. • For easy lid rotation, it is possible to remove the seal, or just ...


