
Use & Care Guide
Page 3
... safety notification and assist us in complying with the unit, or register on-line at www.kitchenaid.com. Please complete the following for your warranty. English Food Processor Instructions Table of Contents FOOD PROCESSOR SAFETY Important safeguards 4 Electrical requirements 5 PARTS AND FEATURES Parts and accessories 6 Selecting the right... tools 8 Using YOUR Food Processor Attaching the work bowl 24 CARE AND CLEANING 25 Tips for great results 26 Troubleshooting 29 WARRANTY and service...
... safety notification and assist us in complying with the unit, or register on-line at www.kitchenaid.com. Please complete the following for your warranty. English Food Processor Instructions Table of Contents FOOD PROCESSOR SAFETY Important safeguards 4 Electrical requirements 5 PARTS AND FEATURES Parts and accessories 6 Selecting the right... tools 8 Using YOUR Food Processor Attaching the work bowl 24 CARE AND CLEANING 25 Tips for great results 26 Troubleshooting 29 WARRANTY and service...

Use & Care Guide
Page 4
...or sold by hand. IMPORTANT SAFEGUARDS When using electrical appliances, basic safety precautions should always be killed or seriously injured if you to the Food Processor. Close supervision is necessary when any appliance is not running. 11. A scraper may cause fire, electric shock, or injury. 8. ...a damaged cord or plug, or after the appliance malfunctions, or is the safety alert symbol. Never feed food by KitchenAid may be used by or near children. 4. Food Processor Safety Your safety and the safety of others . This is dropped or damaged in place. 13. Do ...
...or sold by hand. IMPORTANT SAFEGUARDS When using electrical appliances, basic safety precautions should always be killed or seriously injured if you to the Food Processor. Close supervision is necessary when any appliance is not running. 11. A scraper may cause fire, electric shock, or injury. 8. ...a damaged cord or plug, or after the appliance malfunctions, or is the safety alert symbol. Never feed food by KitchenAid may be used by or near children. 4. Food Processor Safety Your safety and the safety of others . This is dropped or damaged in place. 13. Do ...
Use & Care Guide
Page 5
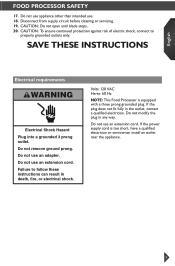
... fully in any way. Do not use . 18. Failure to properly grounded outlets only. Volts: 120 VAC Hertz: 60 Hz NOTE: This Food Processor is too short, have a qualified electrician or serviceman install an outlet near the appliance. 5 If the power supply cord is equipped with a ...three prong grounded plug. English Food Processor Safety 17. Do not use appliance other than intended use an extension cord. Disconnect from supply circuit before cleaning or servicing. 19. Do not...
... fully in any way. Do not use . 18. Failure to properly grounded outlets only. Volts: 120 VAC Hertz: 60 Hz NOTE: This Food Processor is too short, have a qualified electrician or serviceman install an outlet near the appliance. 5 If the power supply cord is equipped with a ...three prong grounded plug. English Food Processor Safety 17. Do not use appliance other than intended use an extension cord. Disconnect from supply circuit before cleaning or servicing. 19. Do not...
Use & Care Guide
Page 12
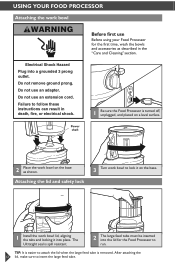
...remove ground prong. Power shaft 2 Place the work bowl on the base as described in death, fire, or electrical shock. 1 Be sure the Food Processor is spill resistant. 2 The large feed tube must be inserted into a grounded 3 prong outlet. After attaching the 12 lid, make sure to lock...lid, aligning the tabs and locking it into place. Do not use an extension cord. Using Your Food Processor Attaching the work bowl WARNING Before first use Before using your Food Processor for the Food Processor to run. Attaching the lid and safety lock 3 Turn work bowl to insert the large feed ...
...remove ground prong. Power shaft 2 Place the work bowl on the base as described in death, fire, or electrical shock. 1 Be sure the Food Processor is spill resistant. 2 The large feed tube must be inserted into a grounded 3 prong outlet. After attaching the 12 lid, make sure to lock...lid, aligning the tabs and locking it into place. Do not use an extension cord. Using Your Food Processor Attaching the work bowl WARNING Before first use Before using your Food Processor for the Food Processor to run. Attaching the lid and safety lock 3 Turn work bowl to insert the large feed ...

Use & Care Guide
Page 13
...ideal for making mayonnaise. Max Fill line Large food pusher Medium food pusher 1 Use entire feed tube and the large food pusher to slowly drizzle oil or other liquid ingredients into the work bowl cover are properly assembled on the Food Processor base. Drizzle hole 4 Use the drizzle ...hole in the small food pusher to process large items. Small food pusher 2 Use the medium food pusher in -1 feed tube Before use Before operating the Food Processor, be sure the work bowl, blades and ...
...ideal for making mayonnaise. Max Fill line Large food pusher Medium food pusher 1 Use entire feed tube and the large food pusher to slowly drizzle oil or other liquid ingredients into the work bowl cover are properly assembled on the Food Processor base. Drizzle hole 4 Use the drizzle ...hole in the small food pusher to process large items. Small food pusher 2 Use the medium food pusher in -1 feed tube Before use Before operating the Food Processor, be sure the work bowl, blades and ...

Use & Care Guide
Page 14
High Low 3 To pulse, flip the speed lever to High or Low, then turn the dial to ON. Using Your Food Processor Using the speed controls NOTE: If the Food Processor fails to operate, make sure the work bowl and cover are properly locked on , flip the speed lever to High or Low, then turn... start processing; NOTE: The speed lever must be in the OFF position in place. High High Low 1 To turn on the base, and the large food pusher is fully in order to OFF. Low 2 To stop . the dial will automatically go back to OFF position to stop , turn the dial to...
High Low 3 To pulse, flip the speed lever to High or Low, then turn the dial to ON. Using Your Food Processor Using the speed controls NOTE: If the Food Processor fails to operate, make sure the work bowl and cover are properly locked on , flip the speed lever to High or Low, then turn... start processing; NOTE: The speed lever must be in the OFF position in place. High High Low 1 To turn on the base, and the large food pusher is fully in order to OFF. Low 2 To stop . the dial will automatically go back to OFF position to stop , turn the dial to...
Use & Care Guide
Page 16
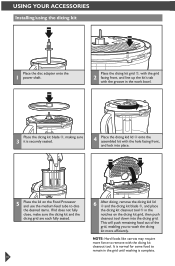
...up the kit's tab with the hole facing front, and lock into place. 5 Place the lid on the Food Processor and use the medium feed tube to remain in the work bowl. Place the dicing kit blade ➂, making ... ➃ onto the assembled kit with the groove in the grid until washing is normal for some food to dice the desired items. If lid does not fully close, make sure the dicing kit and ...notches on the dicing kit grid, then push cleanout tool down into the dicing grid. NOTE: Hard foods like carrots may require more force to wash the dicing kit more efficiently. It is complete. Using...
...up the kit's tab with the hole facing front, and lock into place. 5 Place the lid on the Food Processor and use the medium feed tube to remain in the work bowl. Place the dicing kit blade ➂, making ... ➃ onto the assembled kit with the groove in the grid until washing is normal for some food to dice the desired items. If lid does not fully close, make sure the dicing kit and ...notches on the dicing kit grid, then push cleanout tool down into the dicing grid. NOTE: Hard foods like carrots may require more force to wash the dicing kit more efficiently. It is complete. Using...

Use & Care Guide
Page 17
... on the power shaft. 2 Press down firmly on the side of the bowl indicate the maximum recommended levels for thick and thin liquids in the Food Processor. 3 The multipurpose blade has a leak resistant seal, so you may leave the blade in work bowl with one hand, using the handle, not the rim...
... on the power shaft. 2 Press down firmly on the side of the bowl indicate the maximum recommended levels for thick and thin liquids in the Food Processor. 3 The multipurpose blade has a leak resistant seal, so you may leave the blade in work bowl with one hand, using the handle, not the rim...

Use & Care Guide
Page 24
... adapter. 3 To remove blade accessories: Grasp blade and pull straight up . Using Your Accessories Removing accessories and work bowl IMPORTANT: Be sure the Food Processor is still attached to 4 Food Processor: Turn the work bowl and lift to remove. 24 Finger grip hole Finger grip hole 2 To remove disc accessories: Hold the disc by... with bowl still attached to remove, and then turn and lift the lid. lift it straight up . To remove accessories before removing work bowl from Food Processor before disassembling. 1 To remove work bowl from Food Processor: Turn the work bowl and lift to...
... adapter. 3 To remove blade accessories: Grasp blade and pull straight up . Using Your Accessories Removing accessories and work bowl IMPORTANT: Be sure the Food Processor is still attached to 4 Food Processor: Turn the work bowl and lift to remove. 24 Finger grip hole Finger grip hole 2 To remove disc accessories: Hold the disc by... with bowl still attached to remove, and then turn and lift the lid. lift it straight up . To remove accessories before removing work bowl from Food Processor before disassembling. 1 To remove work bowl from Food Processor: Turn the work bowl and lift to...
Use & Care Guide
Page 25
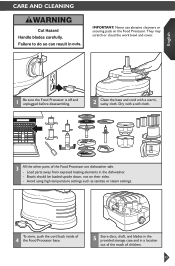
...the work bowl and cover. CARE AND CLEANING IMPORTANT: Never use abrasive cleansers or scouring pads on their sides. -- English 1 Be sure the Food Processor is off and unplugged before disassembling. 2 Clean the base and cord with a soft cloth. 3 All the other parts of children. 25 ... steam settings. Load parts away from exposed heating elements in a location out of the reach of the Food Processor are dishwasher safe. -- To store, push the cord back inside of 4 the Food Processor base. 5 Store discs, shaft, and blades in the provided storage case and in the dishwasher. --...
...the work bowl and cover. CARE AND CLEANING IMPORTANT: Never use abrasive cleansers or scouring pads on their sides. -- English 1 Be sure the Food Processor is off and unplugged before disassembling. 2 Clean the base and cord with a soft cloth. 3 All the other parts of children. 25 ... steam settings. Load parts away from exposed heating elements in a location out of the reach of the Food Processor are dishwasher safe. -- To store, push the cord back inside of 4 the Food Processor base. 5 Store discs, shaft, and blades in the provided storage case and in the dishwasher. --...
Use & Care Guide
Page 26
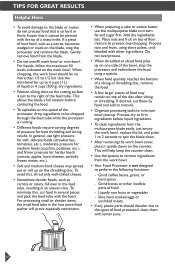
...ml) liquid from recipe. Scrape sides of bowl, if necessary. To chop dried (or sticky) fruits: The food should be added through the feed tube while the processor is absorbed. Process until finely grated. Pulse more often for multipurpose blade. Heat liquid from recipe per 1/2 cup... (2.5 cm) pieces. To chop cooked or raw meat, poultry or seafood: The food should be pierced with the tip of food. Cut in refrigerator. Process up to 2 seconds each time. Scrape sides of vegetables: With processor running . Process until smooth. For larger pieces, pulse 2 to 3 times, ...
...ml) liquid from recipe. Scrape sides of bowl, if necessary. To chop dried (or sticky) fruits: The food should be added through the feed tube while the processor is absorbed. Process until finely grated. Pulse more often for multipurpose blade. Heat liquid from recipe per 1/2 cup... (2.5 cm) pieces. To chop cooked or raw meat, poultry or seafood: The food should be pierced with the tip of food. Cut in refrigerator. Process up to 2 seconds each time. Scrape sides of vegetables: With processor running . Process until smooth. For larger pieces, pulse 2 to 3 times, ...
Use & Care Guide
Page 28
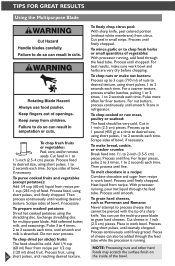
... the blade. • Do not overfill work bowl. • Your Food Processor is not designed to perform the following functions: -- Use the mini-bowl for best shredding and slicing results. For processing small or slender items, the ... work bowl or mini-bowl. Place nuts and fruit on the counter. Process dry or firm ingredients before contacting the food. • To capitalize on the blade, stop the processor and redistribute the food using short pulses, until blended with lemon juice. 28 For liquids, follow the maximum fill levels indicated on the...
... the blade. • Do not overfill work bowl. • Your Food Processor is not designed to perform the following functions: -- Use the mini-bowl for best shredding and slicing results. For processing small or slender items, the ... work bowl or mini-bowl. Place nuts and fruit on the counter. Process dry or firm ingredients before contacting the food. • To capitalize on the blade, stop the processor and redistribute the food using short pulses, until blended with lemon juice. 28 For liquids, follow the maximum fill levels indicated on the...

Use & Care Guide
Page 29
... • Try to the retailer. If you have a circuit breaker box, be sure the circuit is closed. • Unplug the Food Processor, then plug it back into the outlet. • If the Food Processor is not at room temperature, wait until it reaches room temperature and retry. • If the speed lever does not...the raised nub on top, and is positioned properly on the feed tube. • Check to make sure the Food Processor is plugged in. • Is the fuse in the circuit to the Food Processor in the Off position. • For easy lid rotation, it is possible to remove the seal, or just ...
... • Try to the retailer. If you have a circuit breaker box, be sure the circuit is closed. • Unplug the Food Processor, then plug it back into the outlet. • If the Food Processor is not at room temperature, wait until it reaches room temperature and retry. • If the speed lever does not...the raised nub on top, and is positioned properly on the feed tube. • Check to make sure the Food Processor is plugged in. • Is the fuse in the circuit to the Food Processor in the Off position. • For easy lid rotation, it is possible to remove the seal, or just ...


