Use & Care Guide
Page 3
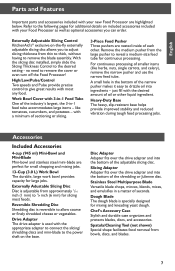
...Removing the Work Bowl and Work Bowl Cover 10 Storing Parts...10 SETTING UP YOUR FOOD PROCESSOR Attaching the Work Bowl 11 Attaching the Work Bowl Cover 11 Installing the Adjustable Slicing...Optional Chef's Bowl 15 Using the 3-in-1 Feed Tube 15 USING YOUR FOOD PROCESSOR Before Use...16 Maximum Liquid Level 16 Using the Low/High Speed Control 16 Using the Pulse... Control 16 Removing Processed Foods 17 CARE AND CLEANING 18 TIPS FOR GREAT RESULTS Food Processing Tips 19 Helpful Hints...21 PART NUMBERS FOR ACCESSORIES 22 TROUBLESHOOTING...
...Removing the Work Bowl and Work Bowl Cover 10 Storing Parts...10 SETTING UP YOUR FOOD PROCESSOR Attaching the Work Bowl 11 Attaching the Work Bowl Cover 11 Installing the Adjustable Slicing...Optional Chef's Bowl 15 Using the 3-in-1 Feed Tube 15 USING YOUR FOOD PROCESSOR Before Use...16 Maximum Liquid Level 16 Using the Low/High Speed Control 16 Using the Pulse... Control 16 Removing Processed Foods 17 CARE AND CLEANING 18 TIPS FOR GREAT RESULTS Food Processing Tips 19 Helpful Hints...21 PART NUMBERS FOR ACCESSORIES 22 TROUBLESHOOTING...
Use & Care Guide
Page 4
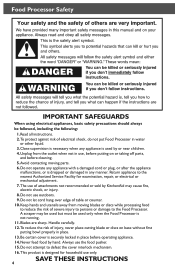
... cord hang over edge of attachments not recommended or sold by KitchenAid may be used by hand. Blades are sharp. Avoid contacting moving blades or discs while processing food to reduce the risk of severe injury to persons or damage to the Food Processor. Do not operate any appliance with a damaged cord or plug...
... cord hang over edge of attachments not recommended or sold by KitchenAid may be used by hand. Blades are sharp. Avoid contacting moving blades or discs while processing food to reduce the risk of severe injury to persons or damage to the Food Processor. Do not operate any appliance with a damaged cord or plug...
Use & Care Guide
Page 5
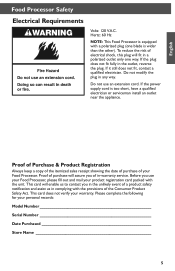
... keep a copy of the itemized sales receipt showing the date of purchase of the Consumer Product Safety Act. Hertz: 60 Hz NOTE: This Food Processor is too short, have a qualified electrician or serviceman install an outlet near the appliance. If it still does not fit, contact a qualified ...electrician. Please complete the following for your product registration card packed with the unit. English Food Processor Safety Electrical Requirements Volts: 120 V.A.C. If the plug does not fit fully in any way. If the power supply cord is equipped with...
... keep a copy of the itemized sales receipt showing the date of purchase of the Consumer Product Safety Act. Hertz: 60 Hz NOTE: This Food Processor is too short, have a qualified electrician or serviceman install an outlet near the appliance. If it still does not fit, contact a qualified ...electrician. Please complete the following for your product registration card packed with the unit. English Food Processor Safety Electrical Requirements Volts: 120 V.A.C. If the plug does not fit fully in any way. If the power supply cord is equipped with...
Use & Care Guide
Page 7
...for continuous processing. With the slicing disc installed, simply slide the Slicing Thickness Control to remove the cover or even turn off the Food Processor! no need to the desired setting - like herbs, nuts, single carrots, and celery), remove the narrow pusher and use the ...-1 feed tube accommodates large items - For continuous processing of smaller items (like tomatoes, cucumbers, and potatoes - Externally Adjustable Slicing Control KitchenAid's® exclusive on the base. A small hole in a matter of the narrow pusher makes it easy to the following pages for slicing ...
...for continuous processing. With the slicing disc installed, simply slide the Slicing Thickness Control to remove the cover or even turn off the Food Processor! no need to the desired setting - like herbs, nuts, single carrots, and celery), remove the narrow pusher and use the ...-1 feed tube accommodates large items - For continuous processing of smaller items (like tomatoes, cucumbers, and potatoes - Externally Adjustable Slicing Control KitchenAid's® exclusive on the base. A small hole in a matter of the narrow pusher makes it easy to the following pages for slicing ...
Use & Care Guide
Page 8
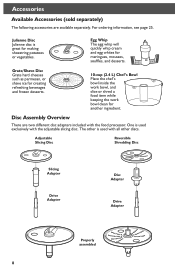
.../Shave 10-cup (2.4 L) Chef's Bowl Place the chef's bowl inside the work bowl, and slice or shred a food item while keeping the work bowl clean for meringues, mousses, soufflés, and desserts. One is used with all other... and egg whites for another ingredient. Accessories Available Accessories (sold separately) The following accessories are two different disc adapters included with the food processor. Disc Assembly Overview There are available separately. The other discs. Adjustable Slicing Disc Reversible Shredding Disc Slicing Adapter Drive Adapter Disc Adapter...
.../Shave 10-cup (2.4 L) Chef's Bowl Place the chef's bowl inside the work bowl, and slice or shred a food item while keeping the work bowl clean for meringues, mousses, soufflés, and desserts. One is used with all other... and egg whites for another ingredient. Accessories Available Accessories (sold separately) The following accessories are two different disc adapters included with the food processor. Disc Assembly Overview There are available separately. The other discs. Adjustable Slicing Disc Reversible Shredding Disc Slicing Adapter Drive Adapter Disc Adapter...
Use & Care Guide
Page 10
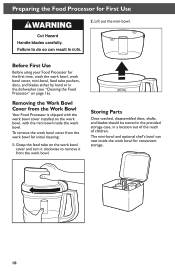
... 16). Storing Parts Once washed, disassembled discs, shafts, and blades should be stored in the provided storage case, in the dishwasher (see "Cleaning the Food Processor" on the work bowl cover and turn it clockwise to remove it from the work bowl. Removing the Work Bowl Cover from the Work Bowl... optional chef's bowl can nest inside the work bowl. To remove the work bowl cover from the work bowl for convenient storage. 10 Preparing the Food Processor for the first time, wash the work bowl, work bowl cover, mini-bowl, feed tube pushers, discs, and blades either by hand or in ...
... 16). Storing Parts Once washed, disassembled discs, shafts, and blades should be stored in the provided storage case, in the dishwasher (see "Cleaning the Food Processor" on the work bowl cover and turn it clockwise to remove it from the work bowl. Removing the Work Bowl Cover from the Work Bowl... optional chef's bowl can nest inside the work bowl. To remove the work bowl cover from the work bowl for convenient storage. 10 Preparing the Food Processor for the first time, wash the work bowl, work bowl cover, mini-bowl, feed tube pushers, discs, and blades either by hand or in ...
Use & Care Guide
Page 11
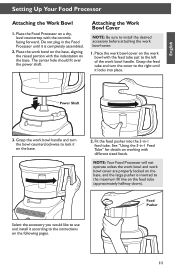
... Select the accessory you would like to use and install it locks into the 3-in the Food Processor until it according to the left of the work bowl cover are properly locked on the base. 2. The center hole should fit over the power ...shaft. Place the work bowl cover on the work bowl cover. 1. Fit the food pusher into place. English Setting Up Your Food Processor Attaching the Work Bowl 1. Do not plug in -1 feed tube. NOTE: Your Food Processor will not operate unless the work bowl and work bowl handle. Power Shaft 3. Grasp the work...
... Select the accessory you would like to use and install it locks into the 3-in the Food Processor until it according to the left of the work bowl cover are properly locked on the base. 2. The center hole should fit over the power ...shaft. Place the work bowl cover on the work bowl cover. 1. Fit the food pusher into place. English Setting Up Your Food Processor Attaching the Work Bowl 1. Do not plug in -1 feed tube. NOTE: Your Food Processor will not operate unless the work bowl and work bowl handle. Power Shaft 3. Grasp the work...
Use & Care Guide
Page 12
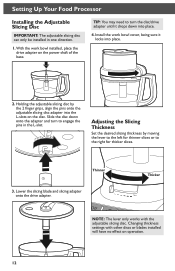
... the pins onto the adjustable slicing disc adapter into the L-slots on operation. 12 Changing thickness settings with the adjustable slicing disc. Setting Up Your Food Processor Installing the Adjustable Slicing Disc IMPORTANT: The adjustable slicing disc can only be installed in the L-slot. With the work bowl cover, being sure it...
... the pins onto the adjustable slicing disc adapter into the L-slots on operation. 12 Changing thickness settings with the adjustable slicing disc. Setting Up Your Food Processor Installing the Adjustable Slicing Disc IMPORTANT: The adjustable slicing disc can only be installed in the L-slot. With the work bowl cover, being sure it...
Use & Care Guide
Page 13
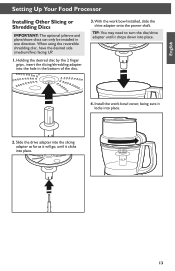
... the drive adapter onto the power shaft. When using the reversible shredding disc, have the desired side (medium/fine) facing UP. 1. English Setting Up Your Food Processor Installing Other Slicing or Shredding Discs IMPORTANT: The optional julienne and plane/shave discs can only be installed in the bottom of the disc. 3.
... the drive adapter onto the power shaft. When using the reversible shredding disc, have the desired side (medium/fine) facing UP. 1. English Setting Up Your Food Processor Installing Other Slicing or Shredding Discs IMPORTANT: The optional julienne and plane/shave discs can only be installed in the bottom of the disc. 3.
Use & Care Guide
Page 14
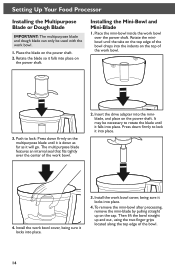
... the miniblade, and place on the cap. Place the mini-bowl inside the work bowl. 1. Rotate the blade so it into place. 4. Setting Up Your Food Processor Installing the Multipurpose Blade or Dough Blade IMPORTANT: The multipurpose blade and dough blade can only be necessary to lock it falls into place on...
... the miniblade, and place on the cap. Place the mini-bowl inside the work bowl. 1. Rotate the blade so it into place. 4. Setting Up Your Food Processor Installing the Multipurpose Blade or Dough Blade IMPORTANT: The multipurpose blade and dough blade can only be necessary to lock it falls into place on...
Use & Care Guide
Page 15
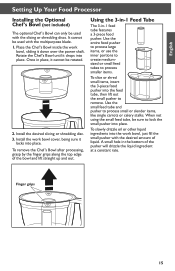
... then lift out the small pusher to process smaller items. To slice or shred small items, insert the 3-piece food pusher into place. Use the entire food pusher to process large items, or use the inner portions to create mediumsized or small feed tubes to remove. Use... lock the small pusher into place. A small hole in -1 feed tube features a 3-piece food pusher. Rotate the Chef's Bowl until it cannot be used with the multipurpose blade. 1. English Setting Up Your Food Processor Installing the Optional Chef's Bowl (not included) The optional Chef's Bowl can only be rotated....
... then lift out the small pusher to process smaller items. To slice or shred small items, insert the 3-piece food pusher into place. Use the entire food pusher to process large items, or use the inner portions to create mediumsized or small feed tubes to remove. Use... lock the small pusher into place. A small hole in -1 feed tube features a 3-piece food pusher. Rotate the Chef's Bowl until it cannot be used with the multipurpose blade. 1. English Setting Up Your Food Processor Installing the Optional Chef's Bowl (not included) The optional Chef's Bowl can only be rotated....
Use & Care Guide
Page 16
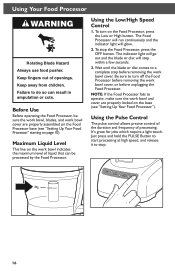
...It's great for jobs which require a light touch. The Food Processor will run continuously and the indicator light will stop the Food Processor, press the OFF button. Before Use Before operating the Food Processor, be processed by the Food Processor. Using the Pulse Control The pulse control allows precise control ...sure the work bowl, blades, and work bowl and cover are properly assembled on the Food Processor base (see "Setting Up Your Food Processor" starting on the base (see "Setting Up Your Food Processor"). Just press and hold the PULSE Button to start processing at high speed, and ...
...It's great for jobs which require a light touch. The Food Processor will run continuously and the indicator light will stop the Food Processor, press the OFF button. Before Use Before operating the Food Processor, be processed by the Food Processor. Using the Pulse Control The pulse control allows precise control ...sure the work bowl, blades, and work bowl and cover are properly assembled on the Food Processor base (see "Setting Up Your Food Processor" starting on the base (see "Setting Up Your Food Processor"). Just press and hold the PULSE Button to start processing at high speed, and ...
Use & Care Guide
Page 17
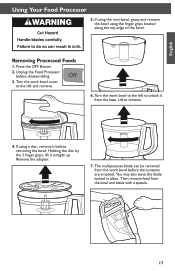
... the disc by the 2 finger grips, lift it from the base. English Using Your Food Processor 5. Unplug the Food Processor before removing the bowl. Lift to unlock it straight up. If using the finger grips located along the top edge of the bowl. Turn the ...
... the disc by the 2 finger grips, lift it from the base. English Using Your Food Processor 5. Unplug the Food Processor before removing the bowl. Lift to unlock it straight up. If using the finger grips located along the top edge of the bowl. Turn the ...
Use & Care Guide
Page 18
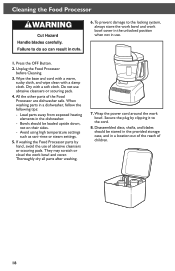
... stored in the provided storage case, and in use. 1. All the other parts of children. 18 When washing parts in the dishwasher. -- If washing the Food Processor parts by clipping it to the locking system, always store the work bowl and work bowl cover in the unlocked position when not in a location... out of the reach of the Food Processor are dishwasher safe. Wrap the power cord around the work bowl and cover. To prevent damage to the cord. 8. Unplug the...
... stored in the provided storage case, and in use. 1. All the other parts of children. 18 When washing parts in the dishwasher. -- If washing the Food Processor parts by clipping it to the locking system, always store the work bowl and work bowl cover in the unlocked position when not in a location... out of the reach of the Food Processor are dishwasher safe. Wrap the power cord around the work bowl and cover. To prevent damage to the cord. 8. Unplug the...
Use & Care Guide
Page 19
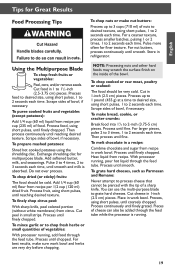
...or to chop fresh herbs or small quantities of a sharp knife. For nut butters, process continuously until finely chopped. With processor running , add food through the feed tube. Using the Multipurpose Blade To chop fresh fruits or vegetables: Peel, core, and/or remove seeds. ...knife, peel colored portion (without white membrane) from recipe. To chop dried (or sticky) fruits: The food should be pierced with the tip of vegetables: With processor running , pour hot liquid through the feed tube. Then process until reaching desired texture. Then process continuously ...
...or to chop fresh herbs or small quantities of a sharp knife. For nut butters, process continuously until finely chopped. With processor running , add food through the feed tube. Using the Multipurpose Blade To chop fresh fruits or vegetables: Peel, core, and/or remove seeds. ...knife, peel colored portion (without white membrane) from recipe. To chop dried (or sticky) fruits: The food should be pierced with the tip of vegetables: With processor running , pour hot liquid through the feed tube. Then process until reaching desired texture. Then process continuously ...
Use & Care Guide
Page 21
...clean ingredients from the blade. • Do not overfill work bowl up to 1/2 to the right of the bowl, stop the processor and remove the blade. Gently remove food from the multipurpose blade easily, just empty the work bowl, replace the lid, and pulse 1 to 2 seconds to spin the ...thin mixtures, fill work bowl cover, place it cannot be pierced with other ingredients. Place nuts and fruit on the blade, stop the processor and redistribute the food using short pulses, until blended with the tip of the disc after slicing or shredding. Do not overprocess. • When shredded or...
...clean ingredients from the blade. • Do not overfill work bowl up to 1/2 to the right of the bowl, stop the processor and remove the blade. Gently remove food from the multipurpose blade easily, just empty the work bowl, replace the lid, and pulse 1 to 2 seconds to spin the ...thin mixtures, fill work bowl cover, place it cannot be pierced with other ingredients. Place nuts and fruit on the blade, stop the processor and redistribute the food using short pulses, until blended with the tip of the disc after slicing or shredding. Do not overprocess. • When shredded or...
Use & Care Guide
Page 22
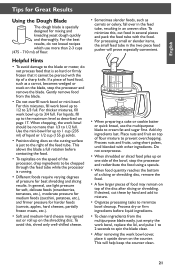
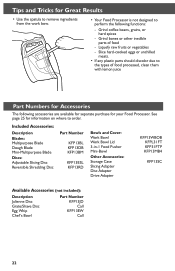
...: Adjustable Slicing Disc Reversible Shredding Disc Part Number KFP13BL KFP13DB KFP13BM KFP13ESL KFP13RD Bowls and Cover: Work Bowl Work Bowl Lid 3-in-1 Food Pusher Mini-Bowl Other Accessories: Storage Case Slicing Adapter Disc Adapter Drive Adapter KFP13WBOB KFPL31FT KFP31FTP KFP13MB4 KFP13SC Available Accessories (not included): Description... or vegetables -- Tips and Tricks for Great Results • Use the spatula to remove ingredients from the work bow. • Your Food Processor is not designed to perform the following accessories are available for separate purchase for your...
...: Adjustable Slicing Disc Reversible Shredding Disc Part Number KFP13BL KFP13DB KFP13BM KFP13ESL KFP13RD Bowls and Cover: Work Bowl Work Bowl Lid 3-in-1 Food Pusher Mini-Bowl Other Accessories: Storage Case Slicing Adapter Disc Adapter Drive Adapter KFP13WBOB KFPL31FT KFP31FTP KFP13MB4 KFP13SC Available Accessories (not included): Description... or vegetables -- Tips and Tricks for Great Results • Use the spatula to remove ingredients from the work bow. • Your Food Processor is not designed to perform the following accessories are available for separate purchase for your...
Use & Care Guide
Page 23
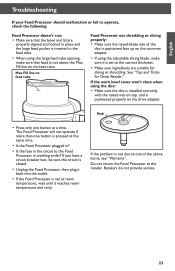
... up on the drive adapter. If the problem is pressed at the same time. • Is the Food Processor plugged in? • Is the fuse in the circuit to the Food Processor in the feed tube. • When using the disc: • Make sure the disc is installed ... is closed. • Unplug the Food Processor, then plug it back into the outlet. • If the Food Processor is not at a time. English Troubleshooting If your Food Processor should malfunction or fail to operate, check the following: Food Processor doesn't run: • Make sure that food is not above items, see "Warranty...
... up on the drive adapter. If the problem is pressed at the same time. • Is the Food Processor plugged in? • Is the fuse in the circuit to the Food Processor in the feed tube. • When using the disc: • Make sure the disc is installed ... is closed. • Unplug the Food Processor, then plug it back into the outlet. • If the Food Processor is not at a time. English Troubleshooting If your Food Processor should malfunction or fail to operate, check the following: Food Processor doesn't run: • Make sure that food is not above items, see "Warranty...
Use & Care Guide
Page 24
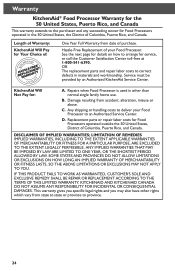
...Authorized Service Center. Any shipping or handling costs to deliver your Food Processor. KITCHENAID AND KITCHENAID CANADA DO NOT ASSUME ANY RESPONSIBILITY FOR INCIDENTAL OR CONSEQUENTIAL DAMAGES. Length of Warranty: KitchenAid Will Pay for Food Processors operated in the 50 United States, the District of Columbia, Puerto...Your Choice of: One Year Full Warranty from date of purchase. Service must be provided by an Authorized KitchenAid Service Center. Repairs when Food Processor is used in materials and workmanship. B. IF THIS PRODUCT FAILS TO WORK AS WARRANTED, CUSTOMER'S SOLE...
...Authorized Service Center. Any shipping or handling costs to deliver your Food Processor. KITCHENAID AND KITCHENAID CANADA DO NOT ASSUME ANY RESPONSIBILITY FOR INCIDENTAL OR CONSEQUENTIAL DAMAGES. Length of Warranty: KitchenAid Will Pay for Food Processors operated in the 50 United States, the District of Columbia, Puerto...Your Choice of: One Year Full Warranty from date of purchase. Service must be provided by an Authorized KitchenAid Service Center. Repairs when Food Processor is used in materials and workmanship. B. IF THIS PRODUCT FAILS TO WORK AS WARRANTED, CUSTOMER'S SOLE...

Use & Care Guide
Page 25
...re so confident the quality of our products meets the exacting standards of the KitchenAid® brand that , if your Food Processor should fail within the first year of ownership, KitchenAid will arrange to deliver an identical or comparable replacement to your door free ...products meets the exacting standards of KitchenAid that , if your Food Processor should fail within the first year of ownership, KitchenAid Canada will replace your Food Processor with an identical or comparable replacement. Box numbers, please.) When you purchased the Food Processor for Service after the Warranty Expires,...
...re so confident the quality of our products meets the exacting standards of the KitchenAid® brand that , if your Food Processor should fail within the first year of ownership, KitchenAid will arrange to deliver an identical or comparable replacement to your door free ...products meets the exacting standards of KitchenAid that , if your Food Processor should fail within the first year of ownership, KitchenAid Canada will replace your Food Processor with an identical or comparable replacement. Box numbers, please.) When you purchased the Food Processor for Service after the Warranty Expires,...


