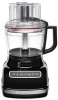
Owners Manual
Page 3
...blade 16 Using a slicing or shredding disc 17 Using the dough blade 17 Helpful hints...18 CARE AND CLEANING Cleaning the Food Processor 19 TROUBLESHOOTING 20 WARRANTY AND SERVICE 21 PROOF OF PURCHASE & PRODUCT REGISTRATION Always keep a copy of the itemized sales ...FOOD PROCESSOR Before first use your Food Processor, please fill out and mail your product registration card packed with the provisions of a product safety notification and assist us in -warranty service. Proof of purchase will enable us to contact you of in complying with the unit, or register online at www.kitchenaid...
...blade 16 Using a slicing or shredding disc 17 Using the dough blade 17 Helpful hints...18 CARE AND CLEANING Cleaning the Food Processor 19 TROUBLESHOOTING 20 WARRANTY AND SERVICE 21 PROOF OF PURCHASE & PRODUCT REGISTRATION Always keep a copy of the itemized sales ...FOOD PROCESSOR Before first use your Food Processor, please fill out and mail your product registration card packed with the provisions of a product safety notification and assist us in -warranty service. Proof of purchase will enable us to contact you of in complying with the unit, or register online at www.kitchenaid...
Owners Manual
Page 4
To protect against risk of electrical shock, do not put Food Processor in use, before putting on or taking off parts, and before cleaning. 5. Unplug from the outlet when not in water or other liquid. 3. Return appliance ... necessary when any appliance is dropped or damaged in any appliance with a damaged cord or plug, or after the appliance malfunctions, or is used by KitchenAid may cause fire, electric shock, or injury. 8. Do not use of table or counter. 4 Do not operate any manner. Do not let cord hang over...
To protect against risk of electrical shock, do not put Food Processor in use, before putting on or taking off parts, and before cleaning. 5. Unplug from the outlet when not in water or other liquid. 3. Return appliance ... necessary when any appliance is dropped or damaged in any appliance with a damaged cord or plug, or after the appliance malfunctions, or is used by KitchenAid may cause fire, electric shock, or injury. 8. Do not use of table or counter. 4 Do not operate any manner. Do not let cord hang over...
Owners Manual
Page 5
... in place before operating appliance. 14. Be certain cover is not running. 11. Never feed food by hand. SAVE THESE INSTRUCTIONS Electrical requirements Voltage: 120 VAC Frequency: 60 Hz NOTE: This Food Processor is equipped with a polarized plug (one way. If the plug does not fit fully in any...discs on base without first putting bowl properly in a polarized outlet only one blade is designed for household use the food pusher. 15. Do not attempt to the Food Processor. Blades are sharp. Always use only. Handle carefully. 12. To reduce the risk of severe injury to persons ...
... in place before operating appliance. 14. Be certain cover is not running. 11. Never feed food by hand. SAVE THESE INSTRUCTIONS Electrical requirements Voltage: 120 VAC Frequency: 60 Hz NOTE: This Food Processor is equipped with a polarized plug (one way. If the plug does not fit fully in any...discs on base without first putting bowl properly in a polarized outlet only one blade is designed for household use the food pusher. 15. Do not attempt to the Food Processor. Blades are sharp. Always use only. Handle carefully. 12. To reduce the risk of severe injury to persons ...

Owners Manual
Page 9
...the "Lid Interlock Instructions" for more information on the best way to lock it on the base. 9 Attaching the work bowl IMPORTANT: Your Food Processor will not operate unless the work bowl and work bowl on the base, aligning the raised portion with the indentation on the base. Power Shaft...base, and the large pusher is shipped with the work bowl cover installed on the work bowl, with the controls facing forward. NOTE: Your Food Processor is inserted to remove it is completely assembled. The center hole should fit over the power shaft. 2 Grasp the work bowl. English CAMSSDEM+...
...the "Lid Interlock Instructions" for more information on the best way to lock it on the base. 9 Attaching the work bowl IMPORTANT: Your Food Processor will not operate unless the work bowl and work bowl on the base, aligning the raised portion with the indentation on the base. Power Shaft...base, and the large pusher is shipped with the work bowl cover installed on the work bowl, with the controls facing forward. NOTE: Your Food Processor is inserted to remove it is completely assembled. The center hole should fit over the power shaft. 2 Grasp the work bowl. English CAMSSDEM+...
Owners Manual
Page 13
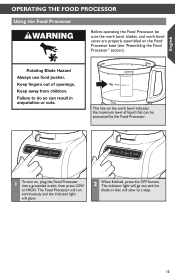
Rotating Blade Hazard Always use food pusher. The Food Processor will run continuously and the indicator light will slow to do so can be sure the work bowl, blades, and work bowl cover.... Failure to a stop. 13 English COMPEDR+ATSINHIGFTTHCELIFCOKOTDOPCRHOACNEGSSEOCROPY Using the Food Processor Before operating the Food Processor, be processed by the Food Processor. 1 To turn on, plug the Food Processor into a grounded outlet, then press LOW or HIGH. This line on the Food Processor base (see "Assembling the Food Processor" section). Keep ngers out of liquid that can result in ...
Rotating Blade Hazard Always use food pusher. The Food Processor will run continuously and the indicator light will slow to do so can be sure the work bowl, blades, and work bowl cover.... Failure to a stop. 13 English COMPEDR+ATSINHIGFTTHCELIFCOKOTDOPCRHOACNEGSSEOCROPY Using the Food Processor Before operating the Food Processor, be processed by the Food Processor. 1 To turn on, plug the Food Processor into a grounded outlet, then press LOW or HIGH. This line on the Food Processor base (see "Assembling the Food Processor" section). Keep ngers out of liquid that can result in ...
Owners Manual
Page 14
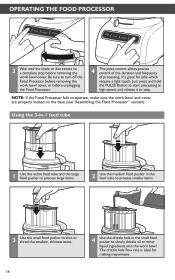
... start processing at high speed, and release it to stop before unplugging the Food Processor. 4 The pulse control allows precise control of the duration and frequency of processing. NOTE: If the Food Processor fails to operate, make sure the work bowl. The drizzle hole flow rate..., thinnest items. 4 Use the drizzle hole in the small food pusher to slowly drizzle oil or other liquid ingredients into the work bowl and cover are properly locked on the base (see "Assembling the Food Processor" section). COMPEDR+ATSINHIGFTTHCELIFCOKOTDOPCRHOACNEGSSEOCROPY 3 Wait until the blade or disc ...
... start processing at high speed, and release it to stop before unplugging the Food Processor. 4 The pulse control allows precise control of the duration and frequency of processing. NOTE: If the Food Processor fails to operate, make sure the work bowl. The drizzle hole flow rate..., thinnest items. 4 Use the drizzle hole in the small food pusher to slowly drizzle oil or other liquid ingredients into the work bowl and cover are properly locked on the base (see "Assembling the Food Processor" section). COMPEDR+ATSINHIGFTTHCELIFCOKOTDOPCRHOACNEGSSEOCROPY 3 Wait until the blade or disc ...
Owners Manual
Page 15
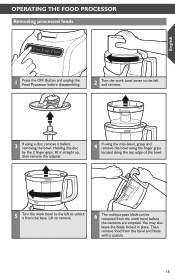
... left to unlock it before the contents are emptied. You may also leave the blade locked in place. Then remove food from the bowl and blade with a spatula. 15 COMPEDR+ATSINHIGFTTHCELIFCOKOTDOPCRHOACNEGSSEOCROPY Removing processed foods English 1 Press the OFF Button and unplug the Food Processor before disassembling. 2 Turn the work bowl before removing the bowl.
... left to unlock it before the contents are emptied. You may also leave the blade locked in place. Then remove food from the bowl and blade with a spatula. 15 COMPEDR+ATSINHIGFTTHCELIFCOKOTDOPCRHOACNEGSSEOCROPY Removing processed foods English 1 Press the OFF Button and unplug the Food Processor before disassembling. 2 Turn the work bowl before removing the bowl.
Owners Manual
Page 16
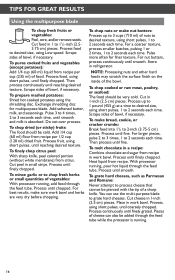
.... To melt chocolate in a recipe: Combine chocolate and sugar from recipe per cup (235 ml) of food. With processor running, pour hot liquid through the feed tube while the processor is absorbed. Do not over process. For best results, make bread, cookie, or cracker crumbs: Break... cm) pieces. Scrape sides of bowl, if necessary. To chop dried (or sticky) fruits: The food should be pierced with the tip of vegetables: With processor running . 16 Cut food in refrigerator. Store in 1 to grate hard cheeses. Then process until finely chopped. Cut cheese in ...
.... To melt chocolate in a recipe: Combine chocolate and sugar from recipe per cup (235 ml) of food. With processor running, pour hot liquid through the feed tube while the processor is absorbed. Do not over process. For best results, make bread, cookie, or cracker crumbs: Break... cm) pieces. Scrape sides of bowl, if necessary. To chop dried (or sticky) fruits: The food should be pierced with the tip of vegetables: With processor running . 16 Cut food in refrigerator. Store in 1 to grate hard cheeses. Then process until finely chopped. Cut cheese in ...
Owners Manual
Page 18
... cutting surface is not designed to the maximum level as carrots or celery, fall over in the feed tube, resulting in the 3-piece food pusher will help keep the counter clean. • Your Food Processor is just to the right of the disc after slicing or shredding. If a piece of hard... food, such as a carrot, becomes wedged or stuck on the blade, stop the processor and redistribute the food using short pulses, until blended with lemon juice. 18...
... cutting surface is not designed to the maximum level as carrots or celery, fall over in the feed tube, resulting in the 3-piece food pusher will help keep the counter clean. • Your Food Processor is just to the right of the disc after slicing or shredding. If a piece of hard... food, such as a carrot, becomes wedged or stuck on the blade, stop the processor and redistribute the food using short pulses, until blended with lemon juice. 18...
Owners Manual
Page 19
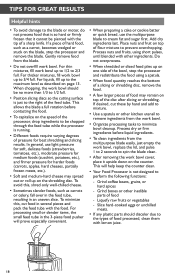
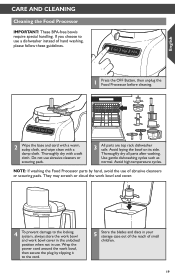
...not in your storage case out of the reach of hand washing, please follow these guidelines. 1 Press the OFF Button, then unplug the Food Processor before cleaning. 2 Wipe the base and cord with a warm, sudsy cloth, and wipe clean with a soft cloth. English CMARDE+ANSHDIFCTLECALNICIKNGTO CHANGE... COPY Cleaning the Food Processor IMPORTANT: These BPA-free bowls require special handling. They may scratch or cloud the work bowl and cover. 4 To prevent damage to the ...
...not in your storage case out of the reach of hand washing, please follow these guidelines. 1 Press the OFF Button, then unplug the Food Processor before cleaning. 2 Wipe the base and cord with a warm, sudsy cloth, and wipe clean with a soft cloth. English CMARDE+ANSHDIFCTLECALNICIKNGTO CHANGE... COPY Cleaning the Food Processor IMPORTANT: These BPA-free bowls require special handling. They may scratch or cloud the work bowl and cover. 4 To prevent damage to the ...
Owners Manual
Page 20
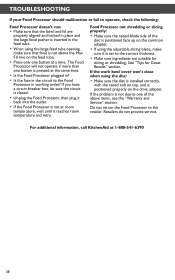
...the raised-blade side of the above the Max. Retailers do not provide service. The Food Processor will not operate if more than one button is pressed at a time. For additional information, call KitchenAid at room temperature, wait until it reaches room temperature and retry. If you have ...a circuit breaker box, be sure the circuit is closed. • Unplug the Food Processor, then plug it is set to the Food Processor in the feed tube. • ...
...the raised-blade side of the above the Max. Retailers do not provide service. The Food Processor will not operate if more than one button is pressed at a time. For additional information, call KitchenAid at room temperature, wait until it reaches room temperature and retry. If you have ...a circuit breaker box, be sure the circuit is closed. • Unplug the Food Processor, then plug it is set to the Food Processor in the feed tube. • ...
Owners Manual
Page 21
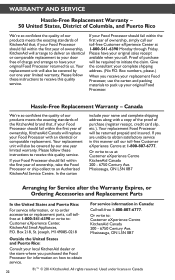
...used in other rights which vary from date of purchase. D. Length of Warranty: KitchenAid Will Pay for Your Choice of your Food Processor to an Authorized Service Center. KitchenAid Will A. DISCLAIMER OF IMPLIED WARRANTIES; ANY IMPLIED WARRANTIES THAT MAY BE IMPOSED BY LAW...MERCHANTABILITY OR FITNESS LASTS, SO THE ABOVE LIMITATIONS OR EXCLUSIONS MAY NOT APPLY TO YOU. B. English CWMADRR+ANSHTIYFTANCLDICSKERTVOICCEHANGE COPY KitchenAid® Food Processor Warranty for the 50 United States, the District of Columbia, Puerto Rico, and Canada This warranty extends to the...
...used in other rights which vary from date of purchase. D. Length of Warranty: KitchenAid Will Pay for Your Choice of your Food Processor to an Authorized Service Center. KitchenAid Will A. DISCLAIMER OF IMPLIED WARRANTIES; ANY IMPLIED WARRANTIES THAT MAY BE IMPOSED BY LAW...MERCHANTABILITY OR FITNESS LASTS, SO THE ABOVE LIMITATIONS OR EXCLUSIONS MAY NOT APPLY TO YOU. B. English CWMADRR+ANSHTIYFTANCLDICSKERTVOICCEHANGE COPY KitchenAid® Food Processor Warranty for the 50 United States, the District of Columbia, Puerto Rico, and Canada This warranty extends to the...
Owners Manual
Page 22
...We're so confident the quality of our products meets the exacting standards of the KitchenAid brand that , if your Food Processor should fail within the first year of ownership, KitchenAid will arrange to deliver an identical or comparable replacement to your door free of charge ... of our products meets the exacting standards of KitchenAid that , if your Food Processor should fail within the first year of ownership, take the Food Processor or ship collect to an Authorized KitchenAid Service Centre. If you receive your replacement Food Processor, use the carton and packing materials to :...
...We're so confident the quality of our products meets the exacting standards of the KitchenAid brand that , if your Food Processor should fail within the first year of ownership, KitchenAid will arrange to deliver an identical or comparable replacement to your door free of charge ... of our products meets the exacting standards of KitchenAid that , if your Food Processor should fail within the first year of ownership, take the Food Processor or ship collect to an Authorized KitchenAid Service Centre. If you receive your replacement Food Processor, use the carton and packing materials to :...


