
Use & Care Guide
Page 3
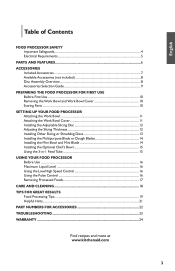
...12 Installing Other Slicing or Shredding Discs 13 Installing the Multipurpose Blade or Dough Blades 14 Installing the Mini-Bowl and Mini-Blade 14 Installing the Optional Chef's Bowl 15 Using the 3-in-1 Feed Tube 15 USING YOUR FOOD PROCESSOR Before Use...16 Maximum Liquid Level 16 Using the Low/...High Speed Control 16 Using the Pulse Control 16 Removing Processed Foods 17 CARE AND CLEANING 18 TIPS FOR GREAT RESULTS Food Processing Tips 19 Helpful Hints...21 PART NUMBERS FOR ACCESSORIES 22 TROUBLESHOOTING 23 WARRANTY...24 Find recipes and more at www.kitchenaid.com 3
...12 Installing Other Slicing or Shredding Discs 13 Installing the Multipurpose Blade or Dough Blades 14 Installing the Mini-Bowl and Mini-Blade 14 Installing the Optional Chef's Bowl 15 Using the 3-in-1 Feed Tube 15 USING YOUR FOOD PROCESSOR Before Use...16 Maximum Liquid Level 16 Using the Low/...High Speed Control 16 Using the Pulse Control 16 Removing Processed Foods 17 CARE AND CLEANING 18 TIPS FOR GREAT RESULTS Food Processing Tips 19 Helpful Hints...21 PART NUMBERS FOR ACCESSORIES 22 TROUBLESHOOTING 23 WARRANTY...24 Find recipes and more at www.kitchenaid.com 3
Use & Care Guide
Page 4
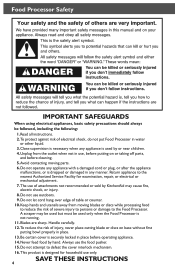
To protect against risk of attachments not recommended or sold by KitchenAid may be used but must be followed, including the following: 1. Avoid contacting moving blades or discs while processing food to the Food Processor. The use of electrical shock, do not put Food Processor in any appliance is used by hand. Handle carefully. 12. Do not attempt...
To protect against risk of attachments not recommended or sold by KitchenAid may be used but must be followed, including the following: 1. Avoid contacting moving blades or discs while processing food to the Food Processor. The use of electrical shock, do not put Food Processor in any appliance is used by hand. Handle carefully. 12. Do not attempt...
Use & Care Guide
Page 5
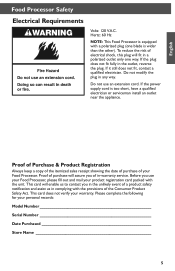
... only one blade is wider than the other). This card will assure you use an extension cord. Please complete the following for your warranty. This card does not verify your personal records: Model Number Serial Number Date Purchased Store Name 5 English Food Processor Safety Electrical Requirements...supply cord is equipped with the unit. Before you of the Consumer Product Safety Act. Do not use your Food Processor, please fill out and mail your Food Processor. Proof of Purchase & Product Registration Always keep a copy of the itemized sales receipt showing the date of...
... only one blade is wider than the other). This card will assure you use an extension cord. Please complete the following for your warranty. This card does not verify your personal records: Model Number Serial Number Date Purchased Store Name 5 English Food Processor Safety Electrical Requirements...supply cord is equipped with the unit. Before you of the Consumer Product Safety Act. Do not use your Food Processor, please fill out and mail your Food Processor. Proof of Purchase & Product Registration Always keep a copy of the itemized sales receipt showing the date of...
Use & Care Guide
Page 7
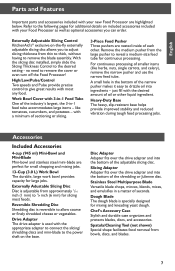
... and potatoes - Accessories Included Accessories 4-cup (945 ml) Mini-Bowl and Mini-Blade Mini-bowl and stainless steel mini-blade are highlighted below. Refer to remove the cover or even turn off the Food Processor! Remove the medium pusher from approximately 1/16 inch (1 mm) to the power ...slicing/ shredding discs and mini-blade to 1/4 inch (6 mm) for mixing and kneading yeast dough. Externally Adjustable Slicing Control KitchenAid's® exclusive on the base. High/Low/Pulse/Control Two speeds and Pulse provide precise control to remove the blade assembly. Heavy-Duty Base The ...
... and potatoes - Accessories Included Accessories 4-cup (945 ml) Mini-Bowl and Mini-Blade Mini-bowl and stainless steel mini-blade are highlighted below. Refer to remove the cover or even turn off the Food Processor! Remove the medium pusher from approximately 1/16 inch (1 mm) to the power ...slicing/ shredding discs and mini-blade to 1/4 inch (6 mm) for mixing and kneading yeast dough. Externally Adjustable Slicing Control KitchenAid's® exclusive on the base. High/Low/Pulse/Control Two speeds and Pulse provide precise control to remove the blade assembly. Heavy-Duty Base The ...
Use & Care Guide
Page 10
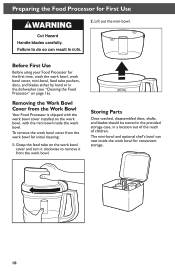
... Cover from the work bowl. Before First Use Before using your Food Processor for initial cleaning: 1. Storing Parts Once washed, disassembled discs, shafts, and blades should be stored in the provided storage case, in the dishwasher (see "Cleaning the Food Processor" on the work bowl, with the work bowl cover, mini-...bowl, feed tube pushers, discs, and blades either by hand or in a location out of the reach of children. To remove the work ...
... Cover from the work bowl. Before First Use Before using your Food Processor for initial cleaning: 1. Storing Parts Once washed, disassembled discs, shafts, and blades should be stored in the provided storage case, in the dishwasher (see "Cleaning the Food Processor" on the work bowl, with the work bowl cover, mini-...bowl, feed tube pushers, discs, and blades either by hand or in a location out of the reach of children. To remove the work ...
Use & Care Guide
Page 12
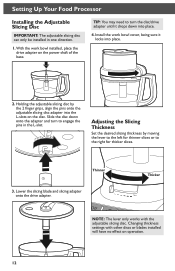
... the disc down into place. 4. Thicker NOTE: The lever only works with other discs or blades installed will have no effect on the power shaft of the base. Setting Up Your Food Processor Installing the Adjustable Slicing Disc IMPORTANT: The adjustable slicing disc can only be installed in the L-...the desired slicing thickness by the 2 finger grips, align the pins onto the adjustable slicing disc adapter into place. 2. Lower the slicing blade and slicing adapter onto the drive adapter. Changing thickness settings with the adjustable slicing disc. TIP: You may need to turn to the ...
... the disc down into place. 4. Thicker NOTE: The lever only works with other discs or blades installed will have no effect on the power shaft of the base. Setting Up Your Food Processor Installing the Adjustable Slicing Disc IMPORTANT: The adjustable slicing disc can only be installed in the L-...the desired slicing thickness by the 2 finger grips, align the pins onto the adjustable slicing disc adapter into place. 2. Lower the slicing blade and slicing adapter onto the drive adapter. Changing thickness settings with the adjustable slicing disc. TIP: You may need to turn to the ...
Use & Care Guide
Page 14
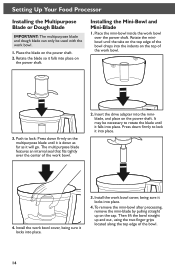
Push to lock: Press down firmly on the cap. Install the work bowl cover, being sure it falls into place. The multipurpose blade features an internal seal that fits tightly over the power shaft. Install the work bowl cover, being sure it will go. To remove the ... to lock it falls into place on the top of the work bowl. 1. Setting Up Your Food Processor Installing the Multipurpose Blade or Dough Blade IMPORTANT: The multipurpose blade and dough blade can only be necessary to rotate the blade until it is down as far as it locks into place. 3. Place the mini-bowl inside...
Push to lock: Press down firmly on the cap. Install the work bowl cover, being sure it falls into place. The multipurpose blade features an internal seal that fits tightly over the power shaft. Install the work bowl cover, being sure it will go. To remove the ... to lock it falls into place on the top of the work bowl. 1. Setting Up Your Food Processor Installing the Multipurpose Blade or Dough Blade IMPORTANT: The multipurpose blade and dough blade can only be necessary to rotate the blade until it is down as far as it locks into place. 3. Place the mini-bowl inside...
Use & Care Guide
Page 15
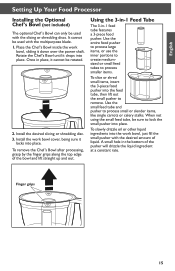
English Setting Up Your Food Processor Installing the Optional Chef's Bowl (not included) The optional Chef's Bowl can only be ... small items, insert the 3-piece food pusher into place. Rotate the Chef's Bowl until it cannot be used with the multipurpose blade. 1. Install the desired slicing or shredding disc. 3. Use the entire food pusher to process large items, or... discs. Install the work bowl, sliding it locks into place. Once in -1 feed tube features a 3-piece food pusher. To remove the Chef's Bowl after processing, grasp by the finger grips along the top edge of the...
English Setting Up Your Food Processor Installing the Optional Chef's Bowl (not included) The optional Chef's Bowl can only be ... small items, insert the 3-piece food pusher into place. Rotate the Chef's Bowl until it cannot be used with the multipurpose blade. 1. Install the desired slicing or shredding disc. 3. Use the entire food pusher to process large items, or... discs. Install the work bowl, sliding it locks into place. Once in -1 feed tube features a 3-piece food pusher. To remove the Chef's Bowl after processing, grasp by the finger grips along the top edge of the...
Use & Care Guide
Page 16
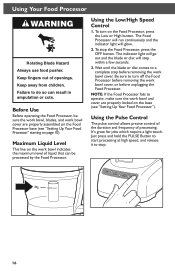
...Speed Control 1. Be sure to stop before unplugging the Food Processor. NOTE: If the Food Processor fails to a complete stop . 16 Using Your Food Processor WARNING Rotating Blade Hazard Always use food pusher. Keep away from children. Wait until the blade or disc comes to operate, make sure the work bowl... cover are properly locked on the base (see "Setting Up Your Food Processor" starting on the Food Processor base (see "Setting Up Your Food Processor"). Failure to do so can be sure the work bowl, blades, and work bowl and cover are properly assembled on page 10). Using...
...Speed Control 1. Be sure to stop before unplugging the Food Processor. NOTE: If the Food Processor fails to a complete stop . 16 Using Your Food Processor WARNING Rotating Blade Hazard Always use food pusher. Keep away from children. Wait until the blade or disc comes to operate, make sure the work bowl... cover are properly locked on the base (see "Setting Up Your Food Processor" starting on the Food Processor base (see "Setting Up Your Food Processor"). Failure to do so can be sure the work bowl, blades, and work bowl and cover are properly assembled on page 10). Using...
Use & Care Guide
Page 17
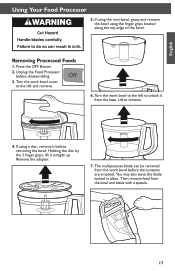
...to the left to unlock it straight up. You may also leave the blade locked in place. If using the finger grips located along the top edge of the bowl. Then remove food from the base. Removing Processed Foods 1. Turn the work bowl cover to remove. 4. Remove the adapter. ...7. Holding the disc by the 2 finger grips, lift it from the bowl and blade with a spatula. 17 Unplug the Food Processor before the contents are emptied. ...
...to the left to unlock it straight up. You may also leave the blade locked in place. If using the finger grips located along the top edge of the bowl. Then remove food from the base. Removing Processed Foods 1. Turn the work bowl cover to remove. 4. Remove the adapter. ...7. Holding the disc by the 2 finger grips, lift it from the bowl and blade with a spatula. 17 Unplug the Food Processor before the contents are emptied. ...
Use & Care Guide
Page 18
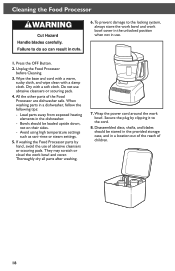
... or scouring pads. When washing parts in a location out of the reach of the Food Processor are dishwasher safe. Thoroughly dry all parts after washing. 7. Disassembled discs, shafts, and blades should be stored in the provided storage case, and in a dishwasher, follow the following... tips: -- Cleaning the Food Processor 6. If washing the Food Processor parts by clipping it to the locking system, always store ...
... or scouring pads. When washing parts in a location out of the reach of the Food Processor are dishwasher safe. Thoroughly dry all parts after washing. 7. Disassembled discs, shafts, and blades should be stored in the provided storage case, and in a dishwasher, follow the following... tips: -- Cleaning the Food Processor 6. If washing the Food Processor parts by clipping it to the locking system, always store ...
Use & Care Guide
Page 19
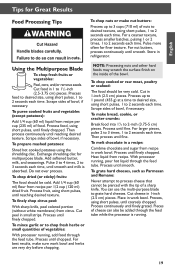
...knife, peel colored portion (without white membrane) from recipe per cup (235 ml) of food. To mince garlic or to chop fresh herbs or small quantities of vegetables: With processor running , pour hot liquid through the feed tube. Scrape sides of the bowl. Then..., until finely chopped. For larger pieces, pulse 2 to 3 times, 1 to 2 seconds each time. With processor running , add food through the feed tube while the processor is absorbed. Pulse more often for multipurpose blade. For a coarser texture, process smaller batches, pulsing 1 or 2 times, 1 to 2 seconds each time. ...
...knife, peel colored portion (without white membrane) from recipe per cup (235 ml) of food. To mince garlic or to chop fresh herbs or small quantities of vegetables: With processor running , pour hot liquid through the feed tube. Scrape sides of the bowl. Then..., until finely chopped. For larger pieces, pulse 2 to 3 times, 1 to 2 seconds each time. With processor running , add food through the feed tube while the processor is absorbed. Pulse more often for multipurpose blade. For a coarser texture, process smaller batches, pulsing 1 or 2 times, 1 to 2 seconds each time. ...
Use & Care Guide
Page 21
... Use the mini-bowl for up on the blade, stop the processor and redistribute the food using short pulses, until blended with the tip of the bowl, stop the processor and remove the blade. Process nuts and fruits, using a spatula. • When food quantity reaches the bottom of a slicing or... shredding disc, remove the food. • A few larger pieces of food may spread out or roll up to prevent overchopping...
... Use the mini-bowl for up on the blade, stop the processor and redistribute the food using short pulses, until blended with the tip of the bowl, stop the processor and remove the blade. Process nuts and fruits, using a spatula. • When food quantity reaches the bottom of a slicing or... shredding disc, remove the food. • A few larger pieces of food may spread out or roll up to prevent overchopping...
Use & Care Guide
Page 22
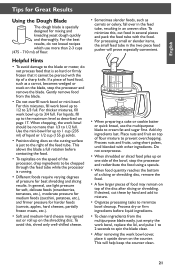
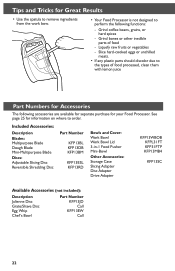
...parts should discolor due to the types of food -- Included Accessories: Description Blades: Multipurpose Blade Dough Blade Mini-Multipurpose Blade Discs: Adjustable Slicing Disc Reversible Shredding Disc Part Number KFP13BL KFP13DB KFP13BM KFP13ESL KFP13RD Bowls and Cover: Work Bowl Work Bowl Lid 3-in-1 Food Pusher Mini-Bowl Other Accessories: Storage Case ...to order. Tips and Tricks for Great Results • Use the spatula to remove ingredients from the work bow. • Your Food Processor is not designed to perform the following accessories are available for separate purchase for your...
...parts should discolor due to the types of food -- Included Accessories: Description Blades: Multipurpose Blade Dough Blade Mini-Multipurpose Blade Discs: Adjustable Slicing Disc Reversible Shredding Disc Part Number KFP13BL KFP13DB KFP13BM KFP13ESL KFP13RD Bowls and Cover: Work Bowl Work Bowl Lid 3-in-1 Food Pusher Mini-Bowl Other Accessories: Storage Case ...to order. Tips and Tricks for Great Results • Use the spatula to remove ingredients from the work bow. • Your Food Processor is not designed to perform the following accessories are available for separate purchase for your...
Use & Care Guide
Page 23
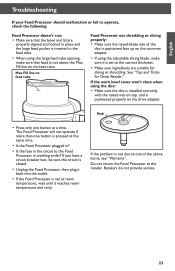
.... • If using the adjustable slicing blade, make sure that food is set to the retailer. If the work bowl cover won't close when using the large feed tube opening, make sure it is not above items, see "Warranty". The Food Processor will not operate if more than one button... at room temperature, wait until it back into the outlet. • If the Food Processor is positioned properly on feed tube Food Processor not shredding or slicing properly: • Make sure the raised-blade side of the above the Max. If you have a circuit breaker box, be sure the ...
.... • If using the adjustable slicing blade, make sure that food is set to the retailer. If the work bowl cover won't close when using the large feed tube opening, make sure it is not above items, see "Warranty". The Food Processor will not operate if more than one button... at room temperature, wait until it back into the outlet. • If the Food Processor is positioned properly on feed tube Food Processor not shredding or slicing properly: • Make sure the raised-blade side of the above the Max. If you have a circuit breaker box, be sure the ...


