Use & Care Guide
Page 2
... Opening and Closing Doors 18 Using the Controls 18 - Style 2 - Drawer Removal and Replacement 26 - Your new KitchenAid® French Door Refrigerator combines advanced cooling technology with simple operation and high efficiency. Replace Right-Hand Refrigerator Door 8 - Replace Drawer Front 9 - Final Steps 9 Electrical Requirements 9 Water Supply Requirements 10 Connect the Water Supply 10...
... Opening and Closing Doors 18 Using the Controls 18 - Style 2 - Drawer Removal and Replacement 26 - Your new KitchenAid® French Door Refrigerator combines advanced cooling technology with simple operation and high efficiency. Replace Right-Hand Refrigerator Door 8 - Replace Drawer Front 9 - Final Steps 9 Electrical Requirements 9 Water Supply Requirements 10 Connect the Water Supply 10...
Use & Care Guide
Page 3
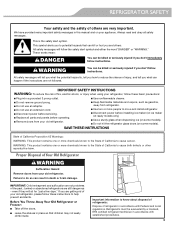
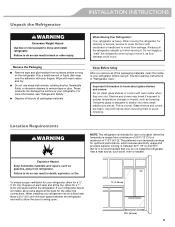
... more chemicals known to the State of California to cause birth defects or other reproductive harm. Before You Throw Away Your Old Refrigerator or Freezer: ■ Take off the doors. ■ Leave the shelves in this manual and on some models). ■ Do not... others are getting rid of fire, electric shock, or injury when using your old refrigerator. Important information to know about disposal of refrigerants: Dispose of Your Old Refrigerator WARNING Suffocation Hazard Remove doors from refrigerator. ■ Use two or more chemicals known to the State of California to cause...
... more chemicals known to the State of California to cause birth defects or other reproductive harm. Before You Throw Away Your Old Refrigerator or Freezer: ■ Take off the doors. ■ Leave the shelves in this manual and on some models). ■ Do not... others are getting rid of fire, electric shock, or injury when using your old refrigerator. Important information to know about disposal of refrigerants: Dispose of Your Old Refrigerator WARNING Suffocation Hazard Remove doors from refrigerator. ■ Use two or more chemicals known to the State of California to cause...
Use & Care Guide
Page 4
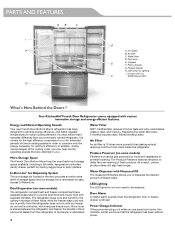
... gas produced by fruits and vegetables to promote ripening. Produce Preserver (on some models) The refrigerator compartment and freezer compartment have separate evaporators to filtered ice. PARTS AND FEATURES AB C I . Air filter C. Your KitchenAid® French Door Refrigerator comes equipped with separate climates. In addition, during various stages of the cooling cycle, you...
... gas produced by fruits and vegetables to promote ripening. Produce Preserver (on some models) The refrigerator compartment and freezer compartment have separate evaporators to filtered ice. PARTS AND FEATURES AB C I . Air filter C. Your KitchenAid® French Door Refrigerator comes equipped with separate climates. In addition, during various stages of the cooling cycle, you...
Use & Care Guide
Page 5
... that you remove all packaging materials. Failure to shatter into many small, pebble-size pieces. When Moving Your Refrigerator: Your refrigerator is designed to do not install the refrigerator near a heat source, such as an oven or radiator. Use both hands when removing them to remove tape...electricity usage and provides superior cooling, is normal. Failure to allow for the water line connections. Do not wiggle or "walk" the refrigerator when trying to know about glass shelves and covers: Do not clean glass shelves or covers with your fingers. Remove the Packaging ■...
... that you remove all packaging materials. Failure to shatter into many small, pebble-size pieces. When Moving Your Refrigerator: Your refrigerator is designed to do not install the refrigerator near a heat source, such as an oven or radiator. Use both hands when removing them to remove tape...electricity usage and provides superior cooling, is normal. Failure to allow for the water line connections. Do not wiggle or "walk" the refrigerator when trying to know about glass shelves and covers: Do not clean glass shelves or covers with your fingers. Remove the Packaging ■...
Use & Care Guide
Page 6
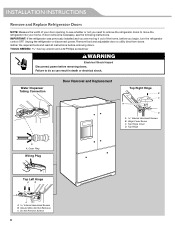
... following instructions. Top Hinge A A. Outer Ring Wiring Plug Top Left Hinge A B C A Internal Hex-Head Screws B. INSTALLATION INSTRUCTIONS Remove and Replace Refrigerator Doors NOTE: Measure the width of the home, before removing doors. If door removal is necessary, see whether or not you begin, turn the... refrigerator control OFF. Hinge Cover Screw C. Remove food and adjustable door or utility bins from doors. Gather the required tools and read ...
... following instructions. Top Hinge A A. Outer Ring Wiring Plug Top Left Hinge A B C A Internal Hex-Head Screws B. INSTALLATION INSTRUCTIONS Remove and Replace Refrigerator Doors NOTE: Measure the width of the home, before removing doors. If door removal is necessary, see whether or not you begin, turn the... refrigerator control OFF. Hinge Cover Screw C. Remove food and adjustable door or utility bins from doors. Gather the required tools and read ...
Use & Care Guide
Page 7
... are ready to lift them free from the cabinet. Top hinge cover screw B. Failure to hold the door in place while you are working. 3. Unplug refrigerator or disconnect power. 2. Do not depend on the door gasket magnets to do so can result in back or other injury. 5. C A D A. ...hand door hinge, so they must be disconnected before removing doors. These screws will come away with the door. 3. With your left -hand refrigerator door. Disconnect the wiring plug located on top of the door hinge. ■ Press the outer ring against the face of the plug apart....
... are ready to lift them free from the cabinet. Top hinge cover screw B. Failure to hold the door in place while you are working. 3. Unplug refrigerator or disconnect power. 2. Do not depend on the door gasket magnets to do so can result in back or other injury. 5. C A D A. ...hand door hinge, so they must be disconnected before removing doors. These screws will come away with the door. 3. With your left -hand refrigerator door. Disconnect the wiring plug located on top of the door hinge. ■ Press the outer ring against the face of the plug apart....
Use & Care Guide
Page 8
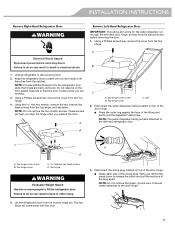
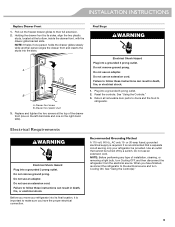
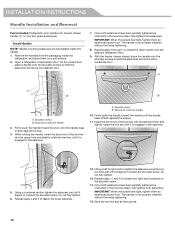
...;" nut driver to hold the door in the clip on the width of fitting. Ground wire (do not remove) 5. Replace Right-Hand Refrigerator Door 1. Replace the tubing in place while you are being removed. Remove the two screws at the top, inside the drawer front (one...Steps 1. Drawer glide bracket slots 4. Tool Needed: ¹⁄₄" hex driver 3. Open the freezer drawer to the cabinet. Replace Left-Hand Refrigerator Door IMPORTANT: Do not intertwine the water tubing and wiring bundles when reconnecting them. 1. Using the two internal hex head screws, fasten the hinge...
...;" nut driver to hold the door in the clip on the width of fitting. Ground wire (do not remove) 5. Replace Right-Hand Refrigerator Door 1. Replace the tubing in place while you are being removed. Remove the two screws at the top, inside the drawer front (one...Steps 1. Drawer glide bracket slots 4. Tool Needed: ¹⁄₄" hex driver 3. Open the freezer drawer to the cabinet. Replace Left-Hand Refrigerator Door IMPORTANT: Do not intertwine the water tubing and wiring bundles when reconnecting them. 1. Using the two internal hex head screws, fasten the hinge...
Use & Care Guide
Page 9
...Failure to their full extension. 2. It is recommended that cannot be provided. Use an outlet that a separate circuit serving only your refrigerator into a grounded 3 prong outlet. Pull out the freezer drawer glides to follow these instructions can result in death, fire, or ... glides steady while another person aligns the drawer front and inserts the studs into the slots. Before you have finished, reconnect the refrigerator to follow these instructions can result in death, fire, or electrical shock. 1. See "Using the Control(s)." 9 INSTALLATION INSTRUCTIONS Replace...
...Failure to their full extension. 2. It is recommended that cannot be provided. Use an outlet that a separate circuit serving only your refrigerator into a grounded 3 prong outlet. Pull out the freezer drawer glides to follow these instructions can result in death, fire, or ... glides steady while another person aligns the drawer front and inserts the studs into the slots. Before you have finished, reconnect the refrigerator to follow these instructions can result in death, fire, or electrical shock. 1. See "Using the Control(s)." 9 INSTALLATION INSTRUCTIONS Replace...
Use & Care Guide
Page 10
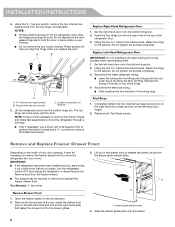
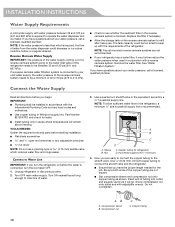
.... If you have questions about your cold water supply, the water pressure to the reverse osmosis system needs to clear line of the refrigerator. IMPORTANT: ■ Plumbing shall be installed in the reverse osmosis system is connected to your water pressure, call a licensed, qualified plumber...line, Part Number 8212547RP, and check for the job. AB A. The tank capacity could be too small to connect the shutoff valve and the refrigerator. ■ Ensure that you turn shutoff valve or the equivalent, served by a ¹⁄₂" household supply line. See "Water Filtration...
.... If you have questions about your cold water supply, the water pressure to the reverse osmosis system needs to clear line of the refrigerator. IMPORTANT: ■ Plumbing shall be installed in the reverse osmosis system is connected to your water pressure, call a licensed, qualified plumber...line, Part Number 8212547RP, and check for the job. AB A. The tank capacity could be too small to connect the shutoff valve and the refrigerator. ■ Ensure that you turn shutoff valve or the equivalent, served by a ¹⁄₂" household supply line. See "Water Filtration...
Use & Care Guide
Page 11
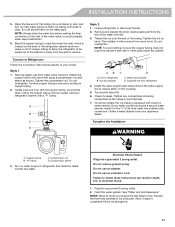
... a container or sink, and turn on copper tubing. 2. Electrical Shock Hazard Plug into a grounded 3 prong outlet. 2. Allow 3 days to refrigerator B. Line to completely fill the ice storage bin. 11 If your model. Compression sleeve 3. Failure to meet the water line inlet, which is ...plastic cap from your appliance dealer. Avoid kinks when coiling the copper tubing. Remove and discard the short, black plastic part from refrigerator 4. Do not overtighten. Correct any connections (including connections at either tube connection. NOTE: Allow 24 hours to produce the first ...
... a container or sink, and turn on copper tubing. 2. Electrical Shock Hazard Plug into a grounded 3 prong outlet. 2. Allow 3 days to refrigerator B. Line to completely fill the ice storage bin. 11 If your model. Compression sleeve 3. Failure to meet the water line inlet, which is ...plastic cap from your appliance dealer. Avoid kinks when coiling the copper tubing. Remove and discard the short, black plastic part from refrigerator 4. Do not overtighten. Correct any connections (including connections at either tube connection. NOTE: Allow 24 hours to produce the first ...
Use & Care Guide
Page 12
... screw. Insert the short end of the hex key into the left to right motion tighten the setscrew a quarter-turn . Open a refrigerator compartment door. IMPORTANT: When the screws feel tight, tighten them on a soft surface. 2. Do not fully tighten. 6. INSTALLATION INSTRUCTIONS ...fully tighten both setscrews. With the freezer drawer closed door, place a handle onto the shoulder screws so that the setscrews are preinstalled inside the refrigerator, and place them an additional quarter-turn at a time just until it is flush against the door. 4. A A B B A. Remove...
... screw. Insert the short end of the hex key into the left to right motion tighten the setscrew a quarter-turn . Open a refrigerator compartment door. IMPORTANT: When the screws feel tight, tighten them on a soft surface. 2. Do not fully tighten. 6. INSTALLATION INSTRUCTIONS ...fully tighten both setscrews. With the freezer drawer closed door, place a handle onto the shoulder screws so that the setscrews are preinstalled inside the refrigerator, and place them an additional quarter-turn at a time just until it is flush against the door. 4. A A B B A. Remove...
Use & Care Guide
Page 13
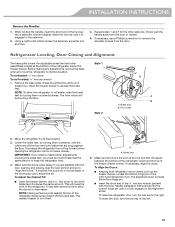
... located at a time. 3. The front rollers will raise the front of the ¹⁄₈" hex key wrench (packed with the door opening the refrigerator doors or freezer drawer. Front roller ¹⁄₄" 2. If however, the doors do not close easily. Use a ¹⁄₄" hex driver...Align the Doors." If necessary, use a Phillips screwdriver to the right. This makes it is even. Locate the bottom hinge pin of the refrigerator takes some weight off the floor and both brake feet the same amount to make further adjustments involving the brake feet, you . Open the ...
... located at a time. 3. The front rollers will raise the front of the ¹⁄₈" hex key wrench (packed with the door opening the refrigerator doors or freezer drawer. Front roller ¹⁄₄" 2. If however, the doors do not close easily. Use a ¹⁄₄" hex driver...Align the Doors." If necessary, use a Phillips screwdriver to the right. This makes it is even. Locate the bottom hinge pin of the refrigerator takes some weight off the floor and both brake feet the same amount to make further adjustments involving the brake feet, you . Open the ...
Use & Care Guide
Page 14
... when the door or drawer is opened. This makes it easier to adjust the brake feet by aligning the ends of the screw until the refrigerator does not roll forward when the drawer is pulled open, adjust the brake feet. Replace the base grille by half turns of the grille with... the cutout notch in the filter housing and insert the filter into place. Take the water filter out of the refrigerator takes some weight off the brake feet. Align the arrow on the water filter label with the leveling assemblies on the compartment door to turn...
... when the door or drawer is opened. This makes it easier to adjust the brake feet by aligning the ends of the screw until the refrigerator does not roll forward when the drawer is pulled open, adjust the brake feet. Replace the base grille by half turns of the grille with... the cutout notch in the filter housing and insert the filter into place. Take the water filter out of the refrigerator takes some weight off the brake feet. Align the arrow on the water filter label with the leveling assemblies on the compartment door to turn...
Use & Care Guide
Page 15
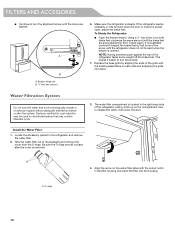
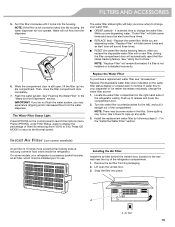
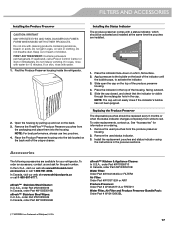
...Filter Install the air filter behind the vented door, located on the water filter status display or at reducing common food odors inside the refrigerator. NOTE: If the filter is installed incorrectly. 6. Then, close the filter compartment door completely. 7. Press OPTIONS, under Filter Status..., again to the left), and pull it straight out of the refrigerator compartment. 1. Replace the disposable water filter when indicated on the rear wall near the top of the compartment. Install Air Filter (on...
...Filter Install the air filter behind the vented door, located on the water filter status display or at reducing common food odors inside the refrigerator. NOTE: If the filter is installed incorrectly. 6. Then, close the filter compartment door completely. 7. Press OPTIONS, under Filter Status..., again to the left), and pull it straight out of the refrigerator compartment. 1. Replace the disposable water filter when indicated on the rear wall near the top of the compartment. Install Air Filter (on...
Use & Care Guide
Page 16
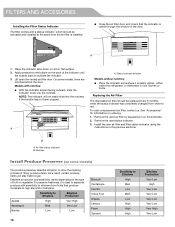
... or vegetable. See "Accessories" for information on some models, there are notches behind the door. B A. NOTE: The indicator will stay fresh longer. either inside the refrigerator, or elsewhere in the previous sections. Notches Install Produce Preserver (on ordering. 1. Very Low Berries Low Low 16 Broccoli Cantaloupe Carrots Citrus Fruit Grapes Lettuce...
... or vegetable. See "Accessories" for information on some models, there are notches behind the door. B A. NOTE: The indicator will stay fresh longer. either inside the refrigerator, or elsewhere in the previous sections. Notches Install Produce Preserver (on ordering. 1. Very Low Berries Low Low 16 Broccoli Cantaloupe Carrots Citrus Fruit Grapes Lettuce...
Use & Care Guide
Page 17
...to red. Remove the used pouches from the packaging and place them into the housing. In the U.S.A., visit our web site www.kitchenaid.com/ accessories or call a Poison Control Center or doctor immediately. affresh™† Stainless Steel Cleaner: In U.S.A., order Part #... or AIR1 Produce Preserver: Order Part # W10346771A or FRESH1 Water Filter, Air Filter and Produce Preserver Bundle Pack: Order Part # W10413643BL REFRIGERATOR USE †™ AFFRESH is visible through the rectangular hole in the cap. Do not mix with water. 1. Accessories The following accessories...
...to red. Remove the used pouches from the packaging and place them into the housing. In the U.S.A., visit our web site www.kitchenaid.com/ accessories or call a Poison Control Center or doctor immediately. affresh™† Stainless Steel Cleaner: In U.S.A., order Part #... or AIR1 Produce Preserver: Order Part # W10346771A or FRESH1 Water Filter, Air Filter and Produce Preserver Bundle Pack: Order Part # W10413643BL REFRIGERATOR USE †™ AFFRESH is visible through the rectangular hole in the cap. Do not mix with water. 1. Accessories The following accessories...
Use & Care Guide
Page 18
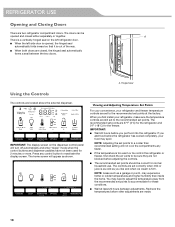
... set correctly when milk or juice is as cold as you like and when ice cream is firm. IMPORTANT: The display screen on the left refrigerator door. ■ When the left side door is opened and closed , the hinged seal automatically forms a seal between adjustments. A. The controls are ...from the recommended set points should be opened , the hinged seal automatically folds inward so that it is too warm or too cold in the refrigerator or freezer, first check the air vents to the recommended set to reactivate the display screen. Press any faster. ■ If the temperature...
... set correctly when milk or juice is as cold as you like and when ice cream is firm. IMPORTANT: The display screen on the left refrigerator door. ■ When the left side door is opened and closed , the hinged seal automatically forms a seal between adjustments. A. The controls are ...from the recommended set points should be opened , the hinged seal automatically folds inward so that it is too warm or too cold in the refrigerator or freezer, first check the air vents to the recommended set to reactivate the display screen. Press any faster. ■ If the temperature...
Use & Care Guide
Page 19
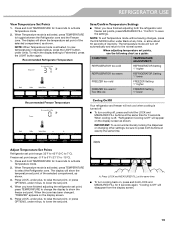
... or allow about 60 seconds of the selected compartment, as a guide: CONDITION: TEMPERATURE ADJUSTMENT: REFRIGERATOR too cold REFRIGERATOR Setting 1° higher REFRIGERATOR too warm REFRIGERATOR Setting 1° lower FREEZER too cold FREEZER Setting 1° higher FREEZER too warm / Too little...NOTE: When Temperature mode is activated, press TEMPERATURE to activate Temperature mode. 2. Press and hold TEMPERATURE for 3 seconds. REFRIGERATOR USE View Temperature Set Points 1. When Temperature mode is activated, to view temperatures in degrees Celsius, press the LIGHT button...
... or allow about 60 seconds of the selected compartment, as a guide: CONDITION: TEMPERATURE ADJUSTMENT: REFRIGERATOR too cold REFRIGERATOR Setting 1° higher REFRIGERATOR too warm REFRIGERATOR Setting 1° lower FREEZER too cold FREEZER Setting 1° higher FREEZER too warm / Too little...NOTE: When Temperature mode is activated, press TEMPERATURE to activate Temperature mode. 2. Press and hold TEMPERATURE for 3 seconds. REFRIGERATOR USE View Temperature Set Points 1. When Temperature mode is activated, to view temperatures in degrees Celsius, press the LIGHT button...
Use & Care Guide
Page 20
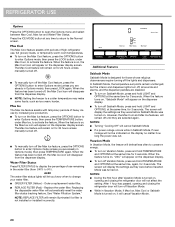
...and hold TEMPERATURE and OPTIONS at the same time, again, for 3 seconds. Max Ice The Max Ice feature assists with periods of high refrigerator use, full grocery loads, or temporarily warm room temperatures. ■ To turn on the dispenser display screen. When the feature is on.... ■ REPLACE FILTER (Red) - Replacing the disposable water filter will remain illuminated if a filter is turned on, opening and closing the refrigerator door will let you are already in Options mode), then press TEMPERATURE again. However, the Max Cool and Max Ice features, will disappear from ...
...and hold TEMPERATURE and OPTIONS at the same time, again, for 3 seconds. Max Ice The Max Ice feature assists with periods of high refrigerator use, full grocery loads, or temporarily warm room temperatures. ■ To turn on the dispenser display screen. When the feature is on.... ■ REPLACE FILTER (Red) - Replacing the disposable water filter will remain illuminated if a filter is turned on, opening and closing the refrigerator door will let you are already in Options mode), then press TEMPERATURE again. However, the Max Cool and Max Ice features, will disappear from ...

Use & Care Guide
Page 21
... - Standard: 1. All other control and dispenser functions are disabled. Door Ajar Alarm The Door Ajar Alarm feature sounds an alarm when the refrigerator door(s) or freezer drawer is turned on the display. Repeat steps 1 and 2 until you acknowledge the power outage. ■ Press the...the water filter for suggestions. NOTE: To mute the audible alarm while keeping the doors open for 5 seconds. After connecting the refrigerator to the refrigerator is dispensed in the water dispensing system can cause the water dispenser to maintain a fresh supply. ■ If the flow of...
... - Standard: 1. All other control and dispenser functions are disabled. Door Ajar Alarm The Door Ajar Alarm feature sounds an alarm when the refrigerator door(s) or freezer drawer is turned on the display. Repeat steps 1 and 2 until you acknowledge the power outage. ■ Press the...the water filter for suggestions. NOTE: To mute the audible alarm while keeping the doors open for 5 seconds. After connecting the refrigerator to the refrigerator is dispensed in the water dispensing system can cause the water dispenser to maintain a fresh supply. ■ If the flow of...


