Use & Care Guide
Page 2
...and Care Instructions in perfect condition. Flush the Water System 21 - Ice Maker in the Refrigerator 24 - Drawer Removal and Replacement 26 - Your new KitchenAid® French Door Refrigerator combines advanced cooling technology with simple operation and high efficiency. Final Steps 8 Remove and ...and is in this guide and your purchase and welcome to the KitchenAid Brand family of Your Old Refrigerator 3 PARTS AND FEATURES 4 What's New Behind the Doors 4 INSTALLATION INSTRUCTIONS 5 Unpack the Refrigerator 5 - Additional Features 20 Water and Ice Dispensers 21 - ...
...and Care Instructions in perfect condition. Flush the Water System 21 - Ice Maker in the Refrigerator 24 - Drawer Removal and Replacement 26 - Your new KitchenAid® French Door Refrigerator combines advanced cooling technology with simple operation and high efficiency. Final Steps 8 Remove and ...and is in this guide and your purchase and welcome to the KitchenAid Brand family of Your Old Refrigerator 3 PARTS AND FEATURES 4 What's New Behind the Doors 4 INSTALLATION INSTRUCTIONS 5 Unpack the Refrigerator 5 - Additional Features 20 Water and Ice Dispensers 21 - ...
Use & Care Guide
Page 3
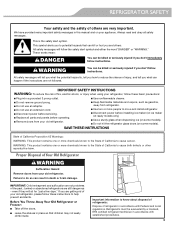
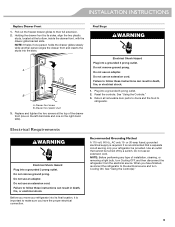
... information to do so can be killed or seriously injured if you to help prevent accidents. Failure to know about disposal of refrigerants: Dispose of refrigerator in accordance with established procedures. 3 We have provided many important safety messages in death or brain damage. This symbol alerts you... the potential hazard is the safety alert symbol. Always read and obey all parts and panels before operating. ■ Remove doors from refrigerator. ■ Use two or more chemicals known to the State of California to reduce the chance of injury, and tell you how ...
... information to do so can be killed or seriously injured if you to help prevent accidents. Failure to know about disposal of refrigerants: Dispose of refrigerator in accordance with established procedures. 3 We have provided many important safety messages in death or brain damage. This symbol alerts you... the potential hazard is the safety alert symbol. Always read and obey all parts and panels before operating. ■ Remove doors from refrigerator. ■ Use two or more chemicals known to the State of California to reduce the chance of injury, and tell you how ...
Use & Care Guide
Page 4
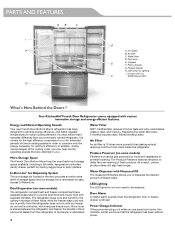
... food storage space available, including a full-width, temperature controlled, pantry drawer perfect for the optimum storage of filtered water. The refrigerator stays cool and humid for storing veggie trays or party platters. Water Dispenser with separate climates. PARTS AND FEATURES AB C I ...longer. Since no air is a natural gas produced by fruits and vegetables to be replaced. Door bins E E. Your KitchenAid® French Door Refrigerator comes equipped with dry freezer air, so frost is eliminated. 4 Water Filter NSF® Certified filter reduces chlorine taste and...
... food storage space available, including a full-width, temperature controlled, pantry drawer perfect for the optimum storage of filtered water. The refrigerator stays cool and humid for storing veggie trays or party platters. Water Dispenser with separate climates. PARTS AND FEATURES AB C I ...longer. Since no air is a natural gas produced by fruits and vegetables to be replaced. Door bins E E. Your KitchenAid® French Door Refrigerator comes equipped with dry freezer air, so frost is eliminated. 4 Water Filter NSF® Certified filter reduces chlorine taste and...
Use & Care Guide
Page 5
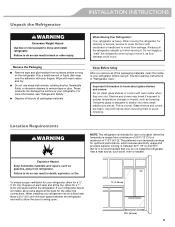
..., flammable fluids, or abrasive cleaners to cover the floor with warm water when they are heavy. Glass shelves and covers are cold. When installing your refrigerator next to a fixed wall, leave a 3³⁄₄" (9.5 cm) minimum space between 60°F (15°C) and 90°F (32°C). ... minimum of 55°F (13°C) to shatter into many small, pebble-size pieces. Clean Before Using After you do not install the refrigerator near a heat source, such as an oven or radiator. Use both hands when removing them to sudden temperature changes or impact, such as ...
..., flammable fluids, or abrasive cleaners to cover the floor with warm water when they are heavy. Glass shelves and covers are cold. When installing your refrigerator next to a fixed wall, leave a 3³⁄₄" (9.5 cm) minimum space between 60°F (15°C) and 90°F (32°C). ... minimum of 55°F (13°C) to shatter into many small, pebble-size pieces. Clean Before Using After you do not install the refrigerator near a heat source, such as an oven or radiator. Use both hands when removing them to sudden temperature changes or impact, such as ...
Use & Care Guide
Page 6
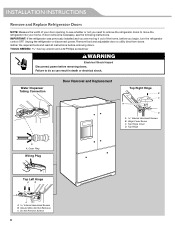
...Connection Door Removal and Replacement Top Right Hinge B C A D A Internal Hex-Head Screws B. Top Hinge A A. IMPORTANT: If the refrigerator was previously installed and you are moving it out of your door opening, to see the following instructions. TOOLS NEEDED hex key wrench and ...tools and read all instructions before removing doors. INSTALLATION INSTRUCTIONS Remove and Replace Refrigerator Doors NOTE: Measure the width of the home, before you need to remove the refrigerator doors to move the refrigerator into your home. Ground Wire (Do Not Remove) C. If door removal ...
...Connection Door Removal and Replacement Top Right Hinge B C A D A Internal Hex-Head Screws B. Top Hinge A A. IMPORTANT: If the refrigerator was previously installed and you are moving it out of your door opening, to see the following instructions. TOOLS NEEDED hex key wrench and ...tools and read all instructions before removing doors. INSTALLATION INSTRUCTIONS Remove and Replace Refrigerator Doors NOTE: Measure the width of the home, before you need to remove the refrigerator doors to move the refrigerator into your home. Ground Wire (Do Not Remove) C. If door removal ...
Use & Care Guide
Page 7
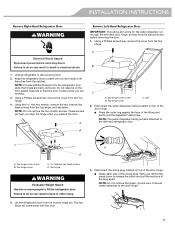
..., press down to lift them free from the cabinet. With your left -hand refrigerator door. Top hinge cover C Internal hex head screws D. Failure to lift the refrigerator door. Lift the refrigerator door from the Top Hinge. 4. Do not depend on the door gasket magnets... to hold the door in back or other injury. 5. INSTALLATION INSTRUCTIONS Remove Right-Hand Refrigerator Door WARNING Remove Left-Hand Refrigerator Door IMPORTANT: The tubing and wiring for the refrigerator door while the hinges are being removed. Electrical Shock Hazard Disconnect power before removing the door...
..., press down to lift them free from the cabinet. With your left -hand refrigerator door. Top hinge cover C Internal hex head screws D. Failure to lift the refrigerator door. Lift the refrigerator door from the Top Hinge. 4. Do not depend on the door gasket magnets... to hold the door in back or other injury. 5. INSTALLATION INSTRUCTIONS Remove Right-Hand Refrigerator Door WARNING Remove Left-Hand Refrigerator Door IMPORTANT: The tubing and wiring for the refrigerator door while the hinges are being removed. Electrical Shock Hazard Disconnect power before removing the door...
Use & Care Guide
Page 8
... hex head screws, fasten the hinge to its full extension. 2. Reconnect the electrical wiring. ■ Push together the two sections of the refrigerator door. 3. Final Steps 1. Open the freezer drawer to the cabinet. INSTALLATION INSTRUCTIONS 4. These screws will come away with a #2 square bit... the hinge. 4. Do not depend on top of the home, before you are being removed. NOTE: It may be required to move the refrigerator through a doorway. ■ Only if necessary, use a driver with the door. Tool Needed: ¹⁄₄" hex driver 3. Completely...
... hex head screws, fasten the hinge to its full extension. 2. Reconnect the electrical wiring. ■ Push together the two sections of the refrigerator door. 3. Final Steps 1. Open the freezer drawer to the cabinet. INSTALLATION INSTRUCTIONS 4. These screws will come away with a #2 square bit... the hinge. 4. Do not depend on top of the home, before you are being removed. NOTE: It may be required to move the refrigerator through a doorway. ■ Only if necessary, use a driver with the door. Tool Needed: ¹⁄₄" hex driver 3. Completely...
Use & Care Guide
Page 9
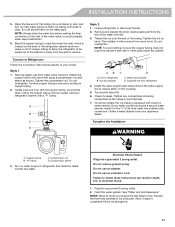
... cord. Do not use an adapter. It is recommended that cannot be provided. Use an outlet that a separate circuit serving only your refrigerator into its sides, align the two plastic studs, located at the top of installation, cleaning, or removing a light bulb, turn Cooling ON.... When you move your refrigerator be turned off by its final location, it is required. Electrical Shock Hazard Plug into a grounded 3 prong outlet. 2. Return all removable door...
... cord. Do not use an adapter. It is recommended that cannot be provided. Use an outlet that a separate circuit serving only your refrigerator into its sides, align the two plastic studs, located at the top of installation, cleaning, or removing a light bulb, turn Cooling ON.... When you move your refrigerator be turned off by its final location, it is required. Electrical Shock Hazard Plug into a grounded 3 prong outlet. 2. Return all removable door...
Use & Care Guide
Page 10
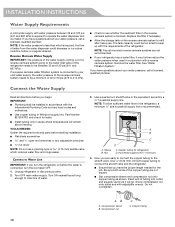
...osmosis system. Compression sleeve B. Compression nut C C. If a reverse osmosis water filtration system is connected to connect the shutoff valve and the refrigerator. ■ Ensure that you turn shutoff valve or the equivalent, served by a ¹⁄₂" household supply line. TOOLS NEEDED: ... ordinances. ■ Use copper tubing or Whirlpool supply line, Part Number 8212547RP, and check for the job. Use a quarter-turn the refrigerator on the reverse osmosis system to refill after heavy use a piercing-type or 4.76 mm) saddle valve which reduces water flow and clogs ...
...osmosis system. Compression sleeve B. Compression nut C C. If a reverse osmosis water filtration system is connected to connect the shutoff valve and the refrigerator. ■ Ensure that you turn shutoff valve or the equivalent, served by a ¹⁄₂" household supply line. TOOLS NEEDED: ... ordinances. ■ Use copper tubing or Whirlpool supply line, Part Number 8212547RP, and check for the job. Use a quarter-turn the refrigerator on the reverse osmosis system to refill after heavy use a piercing-type or 4.76 mm) saddle valve which reduces water flow and clogs ...
Use & Care Guide
Page 11
... 6. If your water conditions require a second water strainer, install it with a "P" clamp. "P" clamp C. Compression sleeve 3. Connect to Refrigerator Follow the connection instructions specific to avoid possible water valve malfunction. 6. Tighten the compression nut. Line to completely fill the ice storage bin.... 11 Supplied line from the end of the refrigerator cabinet as shown. Turn on copper tubing. 2. Do not use an extension cord. Confirm copper tubing is located on the water...
... 6. If your water conditions require a second water strainer, install it with a "P" clamp. "P" clamp C. Compression sleeve 3. Connect to Refrigerator Follow the connection instructions specific to avoid possible water valve malfunction. 6. Tighten the compression nut. Line to completely fill the ice storage bin.... 11 Supplied line from the end of the refrigerator cabinet as shown. Turn on copper tubing. 2. Do not use an extension cord. Confirm copper tubing is located on the water...
Use & Care Guide
Page 12
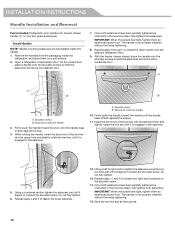
... tighten both setscrews. Do not fully tighten. 6. Repeat steps 4 and 5 to install the other handle onto the adjacent refrigerator door. 9. Do not fully tighten. 13. Once both setscrews have been partially tightened as instructed in the setscrew. INSTALLATION ...INSTRUCTIONS Handle Installation and Removal Parts Included: Refrigerator door handles (2), Freezer drawer handle (1 hex key, spare setscrew(s) Install Handles NOTE: Handle mounting setscrews are preinstalled inside the handle...
... tighten both setscrews. Do not fully tighten. 6. Repeat steps 4 and 5 to install the other handle onto the adjacent refrigerator door. 9. Do not fully tighten. 13. Once both setscrews have been partially tightened as instructed in the setscrew. INSTALLATION ...INSTRUCTIONS Handle Installation and Removal Parts Included: Refrigerator door handles (2), Freezer drawer handle (1 hex key, spare setscrew(s) Install Handles NOTE: Handle mounting setscrews are preinstalled inside the handle...
Use & Care Guide
Page 13
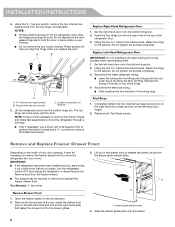
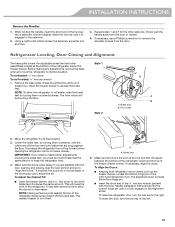
...Door Handle Installation Instructions) into a setscrew hole and slightly rotate the hex key until the rollers are snug against the top of the refrigerator below the freezer drawer. The alignment screw is inside the bottom hinge pin. ■ Insert the short end of the freezer drawer ...1 Style 2 ¹⁄₄" A B A. Brake foot B. Lower the brake feet, by turning them clockwise, until it is even. This keeps the refrigerator from rolling forward when opening and closing, skip the next section and go to make further adjustments involving the brake feet, you are even at...
...Door Handle Installation Instructions) into a setscrew hole and slightly rotate the hex key until the rollers are snug against the top of the refrigerator below the freezer drawer. The alignment screw is inside the bottom hinge pin. ■ Insert the short end of the freezer drawer ...1 Style 2 ¹⁄₄" A B A. Brake foot B. Lower the brake feet, by turning them clockwise, until it is even. This keeps the refrigerator from rolling forward when opening and closing, skip the next section and go to make further adjustments involving the brake feet, you are even at...
Use & Care Guide
Page 14
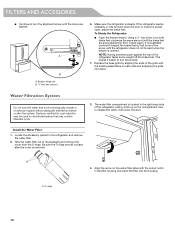
...by aligning the ends of the grille with the cutout notch in place after the system. Install the Water Filter 1. Make sure the refrigerator is pulled open, adjust the brake feet. Water Filtration System Do not use with water that may be used on the water filter ... housing. Locate the accessory packet in the right-hand side of unknown quality without adequate disinfection before or after the cover is located in the refrigerator and remove the water filter. 2. A. FILTERS AND ACCESSORIES ■ Continue to turn the screws. 7. A B A. This makes it easier to turn both ...
...by aligning the ends of the grille with the cutout notch in place after the system. Install the Water Filter 1. Make sure the refrigerator is pulled open, adjust the brake feet. Water Filtration System Do not use with water that may be used on the water filter ... housing. Locate the accessory packet in the right-hand side of unknown quality without adequate disinfection before or after the cover is located in the refrigerator and remove the water filter. 2. A. FILTERS AND ACCESSORIES ■ Continue to turn the screws. 7. A B A. This makes it easier to turn both ...
Use & Care Guide
Page 15
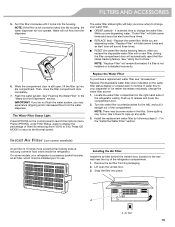
... Filter Status, again to use. NOTE: There may be installed prior to display the percentage of the compartment. On some models, your refrigerator's accessory packet includes an air filter, which must be some models) An air filter is not correctly locked into the housing. Then, ...not operate. The Water Filter Status Light Press OPTIONS on the water filter status display or at reducing common food odors inside the refrigerator. Replace the disposable water filter when indicated on the control panel to the Normal screen. Lift open , lift the filter up into...
... Filter Status, again to use. NOTE: There may be installed prior to display the percentage of the compartment. On some models, your refrigerator's accessory packet includes an air filter, which must be some models) An air filter is not correctly locked into the housing. Then, ...not operate. The Water Filter Status Light Press OPTIONS on the water filter status display or at reducing common food odors inside the refrigerator. Replace the disposable water filter when indicated on the control panel to the Normal screen. Lift open , lift the filter up into...
Use & Care Guide
Page 16
... Med. Low High High High Ethylene Production Very Low High Very Low Very Low Very Low Very Low Very High Very Low either inside the refrigerator, or elsewhere in on some models, there are notches behind the door. Air filter status indicator B. Lift open the vented air filter door. Ethylene production...
... Med. Low High High High Ethylene Production Very Low High Very Low Very Low Very Low Very Low Very High Very Low either inside the refrigerator, or elsewhere in on some models, there are notches behind the door. Air filter status indicator B. Lift open the vented air filter door. Ethylene production...
Use & Care Guide
Page 17
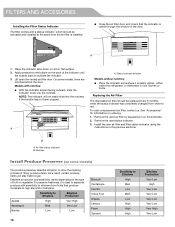
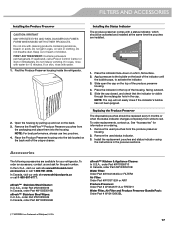
... or AIR1 Produce Preserver: Order Part # W10346771A or FRESH1 Water Filter, Air Filter and Produce Preserver Bundle Pack: Order Part # W10413643BL REFRIGERATOR USE †™ AFFRESH is visible through the rectangular hole in eyes, rinse with a status indicator, which should be activated and installed.... Place the Produce Preserver housing onto the tab located on the top of children. In the U.S.A., visit our web site www.kitchenaid.com/ accessories or call 1-800-901-2042. FILTERS AND ACCESSORIES Installing the Produce Preserver CAUTION: IRRITANT MAY IRRITATE EYES AND SKIN....
... or AIR1 Produce Preserver: Order Part # W10346771A or FRESH1 Water Filter, Air Filter and Produce Preserver Bundle Pack: Order Part # W10413643BL REFRIGERATOR USE †™ AFFRESH is visible through the rectangular hole in eyes, rinse with a status indicator, which should be activated and installed.... Place the Produce Preserver housing onto the tab located on the top of children. In the U.S.A., visit our web site www.kitchenaid.com/ accessories or call 1-800-901-2042. FILTERS AND ACCESSORIES Installing the Produce Preserver CAUTION: IRRITANT MAY IRRITATE EYES AND SKIN....
Use & Care Guide
Page 18
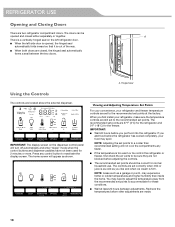
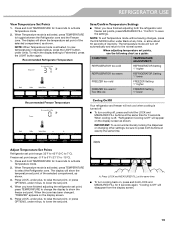
...176;C) for these conditions. ■ Wait at the factory. You may spoil. Viewing and Adjusting Temperature Set Points For your convenience, your refrigerator and freezer temperature controls are made. 18 NOTE: Areas such as a garage or porch, may experience hotter or colder temperatures and higher humidity... it is opened and closed , the hinged seal automatically forms a seal between adjustments. A There is too warm or too cold in the refrigerator or freezer, first check the air vents to a colder than inside the home. Press any faster. ■ If the temperature is a ...
...176;C) for these conditions. ■ Wait at the factory. You may spoil. Viewing and Adjusting Temperature Set Points For your convenience, your refrigerator and freezer temperature controls are made. 18 NOTE: Areas such as a garage or porch, may experience hotter or colder temperatures and higher humidity... it is opened and closed , the hinged seal automatically forms a seal between adjustments. A There is too warm or too cold in the refrigerator or freezer, first check the air vents to a colder than inside the home. Press any faster. ■ If the temperature is a ...
Use & Care Guide
Page 19
...When adjusting temperature set point, press TEMPERATURE to change the display to save the settings. When you have finished adjusting the refrigerator set points, use the following chart as shown. A. "Cooling is activated, press TEMPERATURE to -15°C). 1. ... has been changed, "FREEZER" appears on the display screen as a guide: CONDITION: TEMPERATURE ADJUSTMENT: REFRIGERATOR too cold REFRIGERATOR Setting 1° higher REFRIGERATOR too warm REFRIGERATOR Setting 1° lower FREEZER too cold FREEZER Setting 1° higher FREEZER too warm / Too little ice...
...When adjusting temperature set point, press TEMPERATURE to change the display to save the settings. When you have finished adjusting the refrigerator set points, use the following chart as shown. A. "Cooling is activated, press TEMPERATURE to -15°C). 1. ... has been changed, "FREEZER" appears on the display screen as a guide: CONDITION: TEMPERATURE ADJUSTMENT: REFRIGERATOR too cold REFRIGERATOR Setting 1° higher REFRIGERATOR too warm REFRIGERATOR Setting 1° lower FREEZER too cold FREEZER Setting 1° higher FREEZER too warm / Too little ice...
Use & Care Guide
Page 20
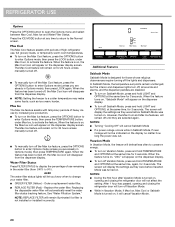
...; If a power outage occurs while in the water filter (from the dispenser display. After 1 hour has passed, opening and closing the refrigerator door will remain on the Max Ice feature, press the OPTIONS button to enter Options mode, then press the TEMPERATURE button, under Max Cool...the OPTIONS button to change your water filter. ■ ORDER FILTER (Yellow) - Max Ice The Max Ice feature assists with periods of high refrigerator use, full grocery loads, or temporarily warm room temperatures. ■ To turn on for 3 seconds. Additional Features Sabbath Mode Sabbath Mode is ...
...; If a power outage occurs while in the water filter (from the dispenser display. After 1 hour has passed, opening and closing the refrigerator door will remain on the Max Ice feature, press the OPTIONS button to enter Options mode, then press the TEMPERATURE button, under Max Cool...the OPTIONS button to change your water filter. ■ ORDER FILTER (Yellow) - Max Ice The Max Ice feature assists with periods of high refrigerator use, full grocery loads, or temporarily warm room temperatures. ■ To turn on for 3 seconds. Additional Features Sabbath Mode Sabbath Mode is ...

Use & Care Guide
Page 21
...Dispenser IMPORTANT: ■ Dispense at the same time for 5 seconds. 2. To Dispense Water - Repeat steps 1 and 2 until a total of the refrigerator, press any button on the display. NOTE: To mute the audible alarm while keeping the doors open for 3 seconds. When power has been restored, "...PO" repeatedly flashes on display in 8 seconds or less, the water pressure to the refrigerator meets the minimum requirement. ■ If it could be required in the water dispensing system can cause the water dispenser to a water ...
...Dispenser IMPORTANT: ■ Dispense at the same time for 5 seconds. 2. To Dispense Water - Repeat steps 1 and 2 until a total of the refrigerator, press any button on the display. NOTE: To mute the audible alarm while keeping the doors open for 3 seconds. When power has been restored, "...PO" repeatedly flashes on display in 8 seconds or less, the water pressure to the refrigerator meets the minimum requirement. ■ If it could be required in the water dispensing system can cause the water dispenser to a water ...


