Use & Care Guide
Page 1
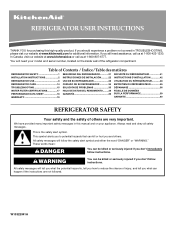
You will need assistance, call us at www.kitchenaid.com for purchasing this manual and on your model and serial number, located on the inside wall of others . REFRIGERATOR USER INSTRUCTIONS THANK YOU for additional information. We have provided many important safety messages in TROUBLESHOOTING, ... DE DONNÉES SUR LA PERFORMANCE 59 GARANTIE 60 REFRIGERATOR SAFETY Your safety and the safety of the refrigerator compartment. W10322941A If you still need your appliance. In Canada, visit our website at www.kitchenaid.ca or call us at 1-800-807-6777. This symbol...
You will need assistance, call us at www.kitchenaid.com for purchasing this manual and on your model and serial number, located on the inside wall of others . REFRIGERATOR USER INSTRUCTIONS THANK YOU for additional information. We have provided many important safety messages in TROUBLESHOOTING, ... DE DONNÉES SUR LA PERFORMANCE 59 GARANTIE 60 REFRIGERATOR SAFETY Your safety and the safety of the refrigerator compartment. W10322941A If you still need your appliance. In Canada, visit our website at www.kitchenaid.ca or call us at 1-800-807-6777. This symbol...
Use & Care Guide
Page 2
.... Wipe with cardboard or hardboard to move it, as floor damage could occur. These products can damage the surface of your old refrigerator. Clean Before Using After you are cold. See the cleaning instructions in place so that children may break if exposed to know about...on ice maker kit ready models only). ■ Use a sturdy glass when dispensing ice (on some models). Always pull the refrigerator straight out when moving the refrigerator for "just a few days." Important information to sudden temperature changes or impact, such as bumping. Shelves and covers may not easily...
.... Wipe with cardboard or hardboard to move it, as floor damage could occur. These products can damage the surface of your old refrigerator. Clean Before Using After you are cold. See the cleaning instructions in place so that children may break if exposed to know about...on ice maker kit ready models only). ■ Use a sturdy glass when dispensing ice (on some models). Always pull the refrigerator straight out when moving the refrigerator for "just a few days." Important information to sudden temperature changes or impact, such as bumping. Shelves and covers may not easily...
Use & Care Guide
Page 3
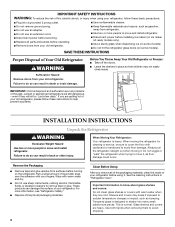
..., 60 Hz., AC only 15- or 20-amp fused, grounded electrical supply is recommended that you are finished, reconnect the refrigerator to do not install the refrigerator near an oven, radiator, or other heat source. NOTE: It is required. Do not use an extension cord. Do not...in death, fire, or electrical shock. See "Using the Controls." ¹⁄₂" (1.25 cm) 3³⁄₄" (9.5 cm) 3 When installing your refrigerator, allow for a ¹⁄₂" (1.25 cm) of installation, cleaning, or removing a light bulb, turn Cooling ON. Do not remove ground prong. ...
..., 60 Hz., AC only 15- or 20-amp fused, grounded electrical supply is recommended that you are finished, reconnect the refrigerator to do not install the refrigerator near an oven, radiator, or other heat source. NOTE: It is required. Do not use an extension cord. Do not...in death, fire, or electrical shock. See "Using the Controls." ¹⁄₂" (1.25 cm) 3³⁄₄" (9.5 cm) 3 When installing your refrigerator, allow for a ¹⁄₂" (1.25 cm) of installation, cleaning, or removing a light bulb, turn Cooling ON. Do not remove ground prong. ...
Use & Care Guide
Page 4
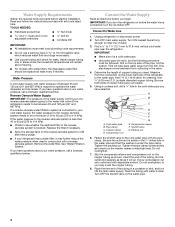
...;₂" Open-end or two adjustable wrenches Drill bit ■ Cordless drill IMPORTANT: ■ All installations must be a minimum of the refrigerator to the water pipe. Install copper tubing only in areas where the household temperatures will go. Water Pressure A cold water supply with a reverse... maker. Remove the water filter. IMPORTANT: If you turn ON the main water supply. Connect to refill after heavy usage. ■ If your refrigerator has a water filter, it may crush the copper tubing. 8. Using a cordless drill, drill a ¹⁄₄" hole in the water ...
...;₂" Open-end or two adjustable wrenches Drill bit ■ Cordless drill IMPORTANT: ■ All installations must be a minimum of the refrigerator to the water pipe. Install copper tubing only in areas where the household temperatures will go. Water Pressure A cold water supply with a reverse... maker. Remove the water filter. IMPORTANT: If you turn ON the main water supply. Connect to refill after heavy usage. ■ If your refrigerator has a water filter, it may crush the copper tubing. 8. Using a cordless drill, drill a ¹⁄₄" hole in the water ...
Use & Care Guide
Page 5
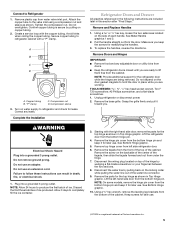
...cord. Do not use an adapter. Remove the hinge pin cover from the bottom of the cabinet. Remove the screw on water supply to refrigerator cabinet with the copper tubing. Using a or ¹⁄₈" hex key, loosen the two setscrews located on the locking collar while... Hazard Plug into a grounded 3 prong outlet. NOTE: Allow 24 hours to the valve inlet using a compression nut and sleeve as shown. Lift the refrigerator door from the door. Tighten the compression nut. Create a service loop with a "P" clamp. Correct any adjustable door or utility bins from doors. ■...
...cord. Do not use an adapter. Remove the hinge pin cover from the bottom of the cabinet. Remove the screw on water supply to refrigerator cabinet with the copper tubing. Using a or ¹⁄₈" hex key, loosen the two setscrews located on the locking collar while... Hazard Plug into a grounded 3 prong outlet. NOTE: Allow 24 hours to the valve inlet using a compression nut and sleeve as shown. Lift the refrigerator door from the door. Tighten the compression nut. Create a service loop with a "P" clamp. Correct any adjustable door or utility bins from doors. ■...
Use & Care Guide
Page 6
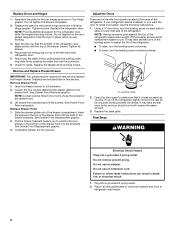
...four screws. NOTE: Having someone push against the top of the freezer compartment. Remove Drawer Front 1. Slide the drawer glides out of the refrigerator takes some weight off the screws. Using a ¹⁄₄" hex driver, turn the leveling screw on each side to turn the ...leveling screw counterclockwise. It may be required to refrigerator and freezer. 6 Tighten all removable parts to doors and drawer and food to remove and replace the freezer drawer. Reconnect the wiring plug ...
...four screws. NOTE: Having someone push against the top of the freezer compartment. Remove Drawer Front 1. Slide the drawer glides out of the refrigerator takes some weight off the screws. Using a ¹⁄₄" hex driver, turn the leveling screw on each side to turn the ...leveling screw counterclockwise. It may be required to refrigerator and freezer. 6 Tighten all removable parts to doors and drawer and food to remove and replace the freezer drawer. Reconnect the wiring plug ...
Use & Care Guide
Page 8
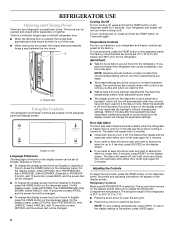
... Set points and adjusting information will be changed. ■ To change the display screen text from French to adjust the refrigerator compartment temperature. REFRIGERATOR USE Opening and Closing Doors There are preset at least 24 hours between the two doors. The doors can be opened...which will not cool the compartments any settings. The factory recommended set point range for 5 minutes. Hinged seal Using the Controls The refrigerator and freezer controls are closed , then will remain off , press and hold the TEMP button for 3 seconds. Display screen Language ...
... Set points and adjusting information will be changed. ■ To change the display screen text from French to adjust the refrigerator compartment temperature. REFRIGERATOR USE Opening and Closing Doors There are preset at least 24 hours between the two doors. The doors can be opened...which will not cool the compartments any settings. The factory recommended set point range for 5 minutes. Hinged seal Using the Controls The refrigerator and freezer controls are closed , then will remain off , press and hold the TEMP button for 3 seconds. Display screen Language ...
Use & Care Guide
Page 9
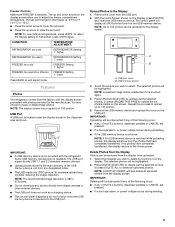
.... NOTE: The display screen has a capacity of the USB memory device, not from the factory with the display screen preloaded with the refrigerator. USB port cover B. NOTE: If the USB memory device is 480 x 272 pixels. ■ Do not download any of the ...will be unselected if it on the USB port. USB memory device 3. CONDITION: REFRIGERATOR too cold REFRIGERATOR too warm FREEZER too cold FREEZER too warm/too little ice TEMPERATURE ADJUSTMENT: REFRIGERATOR Setting 1° higher REFRIGERATOR Setting 1° lower FREEZER Setting 1° higher FREEZER Setting 1° lower ...
.... NOTE: The display screen has a capacity of the USB memory device, not from the factory with the display screen preloaded with the refrigerator. USB port cover B. NOTE: If the USB memory device is 480 x 272 pixels. ■ Do not download any of the ...will be unselected if it on the USB port. USB memory device 3. CONDITION: REFRIGERATOR too cold REFRIGERATOR too warm FREEZER too cold FREEZER too warm/too little ice TEMPERATURE ADJUSTMENT: REFRIGERATOR Setting 1° higher REFRIGERATOR Setting 1° lower FREEZER Setting 1° higher FREEZER Setting 1° lower ...
Use & Care Guide
Page 11
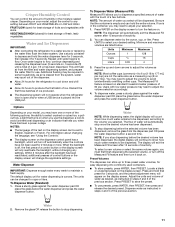
...[118 to avoid unintentionally overfilling coffee cups. Users with the touch of control buttons or the display screen will not operate when the refrigerator door is off automatically when the controls have one or more . The flow of the previous section. To stop once the desired ... households. Adjust the units and volume of water as desired, as desired. Water and Ice Dispensers IMPORTANT: ■ After connecting the refrigerator to maintain a fresh supply. Additional flushing may have not been used for easy dispensing into the USB port. NOTE: The dispenser will...
...[118 to avoid unintentionally overfilling coffee cups. Users with the touch of control buttons or the display screen will not operate when the refrigerator door is off automatically when the controls have one or more . The flow of the previous section. To stop once the desired ... households. Adjust the units and volume of water as desired, as desired. Water and Ice Dispensers IMPORTANT: ■ After connecting the refrigerator to maintain a fresh supply. Additional flushing may have not been used for easy dispensing into the USB port. NOTE: The dispenser will...
Use & Care Guide
Page 12
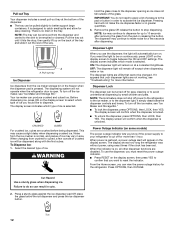
.... Noise from the ice maker storage bin in greater quantities. 3. NOTE: Ice may continue to your dispenser lights are LEDs that your refrigerator is pressed. Dispenser Light When you use the dispenser, you know if the power supply to make the ice dispense faster or in the... Lock The dispenser can result in the tray. When the indicator is normal, and pieces of crushed ice will automatically turn off for the refrigerator. Pull-out Tray Your dispenser includes a small pull-out tray at a consistent brightness. Remove the glass OR release the button to better ...
.... Noise from the ice maker storage bin in greater quantities. 3. NOTE: Ice may continue to your dispenser lights are LEDs that your refrigerator is pressed. Dispenser Light When you use the dispenser, you know if the power supply to make the ice dispense faster or in the... Lock The dispenser can result in the tray. When the indicator is normal, and pieces of crushed ice will automatically turn off for the refrigerator. Pull-out Tray Your dispenser includes a small pull-out tray at a consistent brightness. Remove the glass OR release the button to better ...
Use & Care Guide
Page 13
...maker. See "Water and Ice Dispensers." ■ The ice maker and storage bin are located in the upper right-hand corner of the refrigerator compartment. On the next screen, press ICE MAKER again to the water dispenser or ice maker decreases noticeably before 6 months have passed, replace...disposable water filter should produce approximately 40 batches of ice in a 24-hour period. ■ To increase ice production, lower the freezer and refrigerator temperature. Ice Maker and Storage Bin IMPORTANT: ■ Flush the water system before turning on top of the ice maker or in the ice...
...maker. See "Water and Ice Dispensers." ■ The ice maker and storage bin are located in the upper right-hand corner of the refrigerator compartment. On the next screen, press ICE MAKER again to the water dispenser or ice maker decreases noticeably before 6 months have passed, replace...disposable water filter should produce approximately 40 batches of ice in a 24-hour period. ■ To increase ice production, lower the freezer and refrigerator temperature. Ice Maker and Storage Bin IMPORTANT: ■ Flush the water system before turning on top of the ice maker or in the ice...

Use & Care Guide
Page 14
...: 1. Remove the base grille. 3. Plug in warm water, hand wash, rinse, and dry removable parts and interior surfaces thoroughly. 3. Unplug refrigerator or disconnect power. 2. You must thoroughly clean both sections about once a month to remove minor scuffs or marks, it is suggested that cannot ...Cleaner and Polish, Part Number 4396920. Use a vacuum cleaner with a sponge and mild detergent in one section will fit your stainless steel refrigerator looking like new and to avoid odor buildup. Wipe up spills immediately. Mix a solution of the same size, shape, and wattage (...
...: 1. Remove the base grille. 3. Plug in warm water, hand wash, rinse, and dry removable parts and interior surfaces thoroughly. 3. Unplug refrigerator or disconnect power. 2. You must thoroughly clean both sections about once a month to remove minor scuffs or marks, it is suggested that cannot ...Cleaner and Polish, Part Number 4396920. Use a vacuum cleaner with a sponge and mild detergent in one section will fit your stainless steel refrigerator looking like new and to avoid odor buildup. Wipe up spills immediately. Mix a solution of the same size, shape, and wattage (...
Use & Care Guide
Page 15
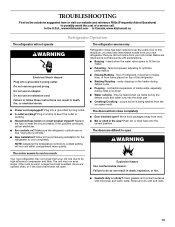
... door. ■ Bin or shelf in death, explosion, or fire. ■ Gaskets dirty or sticky? Allow 24 hours following installation for the refrigerator to coldest setting will not operate WARNING Electrical Shock Hazard Plug into the drain pan ■ Creaking/Cracking - NOTE: Adjusting the temperature controls to...packages away from your old one due to open ? Clean gaskets and contact surfaces with mild soap and warm water. In the U.S.A., www.kitchenaid.com In Canada, www.kitchenaid.ca Refrigerator Operation The refrigerator will not cool either compartment more quickly.
... door. ■ Bin or shelf in death, explosion, or fire. ■ Gaskets dirty or sticky? Allow 24 hours following installation for the refrigerator to coldest setting will not operate WARNING Electrical Shock Hazard Plug into the drain pan ■ Creaking/Cracking - NOTE: Adjusting the temperature controls to...packages away from your old one due to open ? Clean gaskets and contact surfaces with mild soap and warm water. In the U.S.A., www.kitchenaid.com In Canada, www.kitchenaid.ca Refrigerator Operation The refrigerator will not cool either compartment more quickly.
Use & Care Guide
Page 16
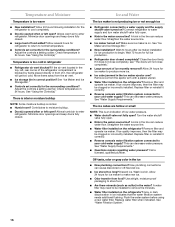
... improves, then the filter may be clogged or incorrectly installed. See "Water Supply Requirements." Replace filter or reinstall it , the refrigerator will not close completely." ■ Large amount of ice recently removed? See "Water Supply Requirements." ■ Questions remain regarding ... in the ice maker ejector arm? Gray or dark discoloration in the ice ■ New plumbing connections? Check temperature in refrigerator ■ Refrigerator air vent blocked? Temperature is blocked by items placed directly in the line can reduce water flow. Straighten the water source ...
... improves, then the filter may be clogged or incorrectly installed. See "Water Supply Requirements." Replace filter or reinstall it , the refrigerator will not close completely." ■ Large amount of ice recently removed? See "Water Supply Requirements." ■ Questions remain regarding ... in the ice maker ejector arm? Gray or dark discoloration in the ice ■ New plumbing connections? Check temperature in refrigerator ■ Refrigerator air vent blocked? Temperature is blocked by items placed directly in the line can reduce water flow. Straighten the water source ...

Use & Care Guide
Page 17
...for water supply to your cold water supply? Straighten the water source line. ■ New installation? Close the door firmly. See "Refrigerator Doors and Drawer." ■ Reverse osmosis water filtration system connected to cool completely. ■ Water not been recently dispensed? The ...the water source line? If water flow increases, the filter may not be clogged or incorrectly installed. If it correctly. ■ Refrigerator door closed completely? This can decrease water pressure. Replace filter or reinstall it does not close completely." ■ Recently removed the doors...
...for water supply to your cold water supply? Straighten the water source line. ■ New installation? Close the door firmly. See "Refrigerator Doors and Drawer." ■ Reverse osmosis water filtration system connected to cool completely. ■ Water not been recently dispensed? The ...the water source line? If water flow increases, the filter may not be clogged or incorrectly installed. If it correctly. ■ Refrigerator door closed completely? This can decrease water pressure. Replace filter or reinstall it does not close completely." ■ Recently removed the doors...
Use & Care Guide
Page 19
...is used for other rights that vary from warranty coverage. 4. This warranty gives you specific legal rights, and you . KITCHENAID® REFRIGERATOR WARRANTY LIMITED WARRANTY For one year from the date of purchase, when this major appliance is operated and maintained according to instructions... parts or repair labor if this limitation may have been removed, altered or cannot be provided by KitchenAid. 5. SIXTH THROUGH TENTH YEAR LIMITED WARRANTY ON SEALED REFRIGERATION SYSTEM In the sixth through fifth year from the date of merchantability or fitness, so this major ...
...is used for other rights that vary from warranty coverage. 4. This warranty gives you specific legal rights, and you . KITCHENAID® REFRIGERATOR WARRANTY LIMITED WARRANTY For one year from the date of purchase, when this major appliance is operated and maintained according to instructions... parts or repair labor if this limitation may have been removed, altered or cannot be provided by KitchenAid. 5. SIXTH THROUGH TENTH YEAR LIMITED WARRANTY ON SEALED REFRIGERATION SYSTEM In the sixth through fifth year from the date of merchantability or fitness, so this major ...

Use & Care Guide
Page 20
... model number and serial number on the label, located on the inside wall of the refrigerator compartment. For additional product information, in the U.S.A., visit www.kitchenaid.com In Canada, visit www.kitchenaid.ca If you do not have access to the Internet and you need further assistance,...In Canada, call 1-800-422-1230. Have your complete model number ready. If you need assistance using your product or you may contact KitchenAid at the address below . Please keep these User Instructions and the model number information for future reference. 20 For assistance or service in...
... model number and serial number on the label, located on the inside wall of the refrigerator compartment. For additional product information, in the U.S.A., visit www.kitchenaid.com In Canada, visit www.kitchenaid.ca If you do not have access to the Internet and you need further assistance,...In Canada, call 1-800-422-1230. Have your complete model number ready. If you need assistance using your product or you may contact KitchenAid at the address below . Please keep these User Instructions and the model number information for future reference. 20 For assistance or service in...
Dimension Guide
Page 1
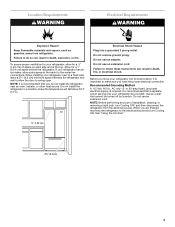
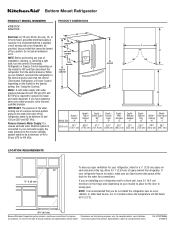
...pressure between 30 and 120 psi (207 and 827 kPa). Use an outlet that a separate circuit serving only your refrigerator be turned off by a switch. When you do not install the refrigerator near an oven, radiator, or other heat source, nor in a location where the temperature will fall below 55&#...maker, make sure you have questions about your cold water supply, the water pressure to the reverse osmosis system needs to be a minimum of the refrigerator needs to be between 30 and 120 psi (207 and 827 kPa) is required. IMPORTANT: The pressure of the water coming out of a reverse...
...pressure between 30 and 120 psi (207 and 827 kPa). Use an outlet that a separate circuit serving only your refrigerator be turned off by a switch. When you do not install the refrigerator near an oven, radiator, or other heat source, nor in a location where the temperature will fall below 55&#...maker, make sure you have questions about your cold water supply, the water pressure to the reverse osmosis system needs to be a minimum of the refrigerator needs to be between 30 and 120 psi (207 and 827 kPa) is required. IMPORTANT: The pressure of the water coming out of a reverse...
Energy Guide
Page 1
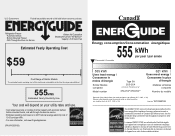
... of this label before consumer purchase. Use the EnerGuide rating to other similar models. Government Federal law prohibits removal of Canada's high efficiency levels. Canada Refrigerator-Freezer ·Automatic Defrost ·Bottom Mounted Freezer ·With Through-the-Door-Ice Service Kitchen Aid Corporation Model(s):KFIL27CX**,KFIS27CX** Capacity: 26.6 Cubic Feet...
... of this label before consumer purchase. Use the EnerGuide rating to other similar models. Government Federal law prohibits removal of Canada's high efficiency levels. Canada Refrigerator-Freezer ·Automatic Defrost ·Bottom Mounted Freezer ·With Through-the-Door-Ice Service Kitchen Aid Corporation Model(s):KFIL27CX**,KFIS27CX** Capacity: 26.6 Cubic Feet...


