User Instructions
Page 1
... etiqueta ubicada al lado derecho del interior del refrigerador. Table of Contents / Table des matières REFRIGERATOR SAFETY...1 INSTALLATION INSTRUCTIONS ...2 REFRIGERATOR USE ...7 REFRIGERATOR CARE...10 TROUBLESHOOTING...11 WATER FILTER CERTIFICATIONS ...13 PRODUCT DATA SHEETS ...14 WARRANTY...15 SÉCURITÉ...acerca de su producto, visite: www.kitchenaid.com. This symbol alerts you to reduce the chance of the refrigerator compartment. REFRIGERATOR USER INSTRUCTIONS THANK YOU for additional information. In Canada, visit our website at www.kitchenaid.ca or call us at 1-800-807...
... etiqueta ubicada al lado derecho del interior del refrigerador. Table of Contents / Table des matières REFRIGERATOR SAFETY...1 INSTALLATION INSTRUCTIONS ...2 REFRIGERATOR USE ...7 REFRIGERATOR CARE...10 TROUBLESHOOTING...11 WATER FILTER CERTIFICATIONS ...13 PRODUCT DATA SHEETS ...14 WARRANTY...15 SÉCURITÉ...acerca de su producto, visite: www.kitchenaid.com. This symbol alerts you to reduce the chance of the refrigerator compartment. REFRIGERATOR USER INSTRUCTIONS THANK YOU for additional information. In Canada, visit our website at www.kitchenaid.ca or call us at 1-800-807...

User Instructions
Page 2
...before operating. Replace all parts and panels before servicing. Remove doors from refrigerator. Use nonflammable cleaner. Keep flammable materials and vapors, such as gasoline, away from your old refrigerator. Disconnect power before installing ice maker (on ice maker kit ready models ... or injury to move and install refrigerator. IMPORTANT SAFETY INSTRUCTIONS WARNING: To reduce the risk of Your Old Refrigerator Before You Throw Away Your Old Refrigerator or Freezer: Use two or more people to persons when using the refrigerator, follow basic precautions, including the following...
...before operating. Replace all parts and panels before servicing. Remove doors from refrigerator. Use nonflammable cleaner. Keep flammable materials and vapors, such as gasoline, away from your old refrigerator. Disconnect power before installing ice maker (on ice maker kit ready models ... or injury to move and install refrigerator. IMPORTANT SAFETY INSTRUCTIONS WARNING: To reduce the risk of Your Old Refrigerator Before You Throw Away Your Old Refrigerator or Freezer: Use two or more people to persons when using the refrigerator, follow basic precautions, including the following...
User Instructions
Page 3
... Requirements WARNING WARNING Explosion Hazard Keep flammable materials and vapors, such as gasoline, away from the electrical source. Do not install the refrigerator in death, fire, or electrical shock. Do not use an extension cord. Do not use an extension cord. Electrical Shock Hazard ... Requirements Gather the required tools and parts before starting installation. Failure to allow extra space at the top and behind the refrigerator. Before you move your refrigerator, allow for a ¹⁄₂" (1.25 cm) space at the back for the door to follow the instructions ...
... Requirements WARNING WARNING Explosion Hazard Keep flammable materials and vapors, such as gasoline, away from the electrical source. Do not install the refrigerator in death, fire, or electrical shock. Do not use an extension cord. Do not use an extension cord. Electrical Shock Hazard ... Requirements Gather the required tools and parts before starting installation. Failure to allow extra space at the top and behind the refrigerator. Before you move your refrigerator, allow for a ¹⁄₂" (1.25 cm) space at the back for the door to follow the instructions ...

User Instructions
Page 5
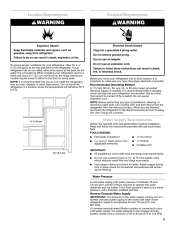
... are included later in this section. Open the freezer drawer to remove and replace the freezer drawer front. Remove Doors and Hinges IMPORTANT: Refrigerator Door(s) and Drawer Graphics are included later in the drawer front. 3. Remove and Replace Freezer Drawer Front IMPORTANT: Two people may be required.... NOTE: Loosen screws three to the drawer front. See Drawer Front Removal graphic. Align the door so that the bottom of the refrigerator door aligns evenly with the top of ice produced. Discard the first three batches of the freezer drawer. Make sure you keep the ...
... are included later in this section. Open the freezer drawer to remove and replace the freezer drawer front. Remove Doors and Hinges IMPORTANT: Refrigerator Door(s) and Drawer Graphics are included later in the drawer front. 3. Remove and Replace Freezer Drawer Front IMPORTANT: Two people may be required.... NOTE: Loosen screws three to the drawer front. See Drawer Front Removal graphic. Align the door so that the bottom of the refrigerator door aligns evenly with the top of ice produced. Discard the first three batches of the freezer drawer. Make sure you keep the ...
User Instructions
Page 7
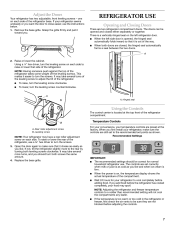
one on the left refrigerator door. If your refrigerator seems unsteady or you . Grasp the grille firmly and pull it toward you want the door to close easier, use the instructions below. 1. The doors can be opened and closed either separately or together. Adjust the Doors Your refrigerator has two adjustable, front leveling screws - Remove the base grille. There is a vertically-hinged seal on each side of the refrigerator base. REFRIGERATOR USE Opening and Closing Doors There are two refrigerator compartment doors.
one on the left refrigerator door. If your refrigerator seems unsteady or you . Grasp the grille firmly and pull it toward you want the door to close easier, use the instructions below. 1. The doors can be opened and closed either separately or together. Adjust the Doors Your refrigerator has two adjustable, front leveling screws - Remove the base grille. There is a vertically-hinged seal on each side of the refrigerator base. REFRIGERATOR USE Opening and Closing Doors There are two refrigerator compartment doors.
User Instructions
Page 9
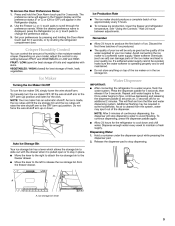
... the Freezer (+) or (-) touch pads to change the preference status. 3. Ice Production Rate Set your preferences by shutting the refrigerator compartment door. When the desired preference name is displayed, press the Refrigerator (+) or (-) touch pads to scroll through the preference names. The preference name will appear in the Freezer display and the...
... the Freezer (+) or (-) touch pads to change the preference status. 3. Ice Production Rate Set your preferences by shutting the refrigerator compartment door. When the desired preference name is displayed, press the Refrigerator (+) or (-) touch pads to scroll through the preference names. The preference name will appear in the Freezer display and the...
User Instructions
Page 10
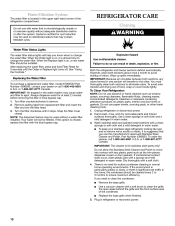
...label from replacement filter and insert the filter end into the filter head. 3. Snap the filter cover closed. Unplug refrigerator or disconnect power. 2. REFRIGERATOR CARE Cleaning Do not use with the blue bypass cap. Systems certified for cyst reduction may contain filterable cysts. Both the... sponge or soft cloth and a mild detergent in warm water. 3. When the Order light is almost time to eliminate odors. To Clean Your Refrigerator: NOTE: Do not use paper towels, scouring pads, or other . Hand wash, rinse, and dry removable parts and interior surfaces thoroughly. Failure...
...label from replacement filter and insert the filter end into the filter head. 3. Snap the filter cover closed. Unplug refrigerator or disconnect power. 2. REFRIGERATOR CARE Cleaning Do not use with the blue bypass cap. Systems certified for cyst reduction may contain filterable cysts. Both the... sponge or soft cloth and a mild detergent in warm water. 3. When the Order light is almost time to eliminate odors. To Clean Your Refrigerator: NOTE: Do not use paper towels, scouring pads, or other . Hand wash, rinse, and dry removable parts and interior surfaces thoroughly. Failure...
User Instructions
Page 11
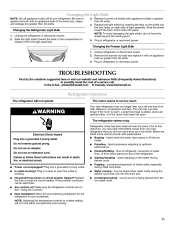
... its high-efficiency compressor and fans. Below are opened often, or if the doors have been left open. In the U.S.A., www.kitchenaid.com In Canada, www.kitchenaid.ca Refrigerator Operation The refrigerator will fit your old model. Replace the light shield by inserting the tabs on each side of the compartment to release it...
... its high-efficiency compressor and fans. Below are opened often, or if the doors have been left open. In the U.S.A., www.kitchenaid.com In Canada, www.kitchenaid.ca Refrigerator Operation The refrigerator will fit your old model. Replace the light shield by inserting the tabs on each side of the compartment to release it...

User Instructions
Page 15
... keep this User Instructions and model number information for other than normal, single-family household use of products not approved by KitchenAid. 5. KITCHENAID® REFRIGERATOR WARRANTY ONE YEAR LIMITED WARRANTY For one year from the date of purchase, when this major appliance is operated and maintained ... or systems resulting from the date of purchase, when this warranty does not apply. ITEMS KITCHENAID WILL NOT PAY FOR 1. Damage resulting from the date of the refrigerator/freezer cavity liner (including labor costs) if the part cracks due to correct defects in materials...
... keep this User Instructions and model number information for other than normal, single-family household use of products not approved by KitchenAid. 5. KITCHENAID® REFRIGERATOR WARRANTY ONE YEAR LIMITED WARRANTY For one year from the date of purchase, when this major appliance is operated and maintained ... or systems resulting from the date of purchase, when this warranty does not apply. ITEMS KITCHENAID WILL NOT PAY FOR 1. Damage resulting from the date of the refrigerator/freezer cavity liner (including labor costs) if the part cracks due to correct defects in materials...


