Use & Care Guide
Page 2
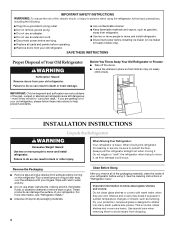
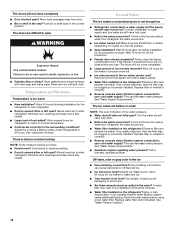
... Child entrapment and suffocation are not problems of your refrigerator. Important information to avoid impact from surfaces before turning on ice maker kit ready models only). For your refrigerator before servicing. ■ Replace all packaging materials. Glass shelves and covers ...refrigerator. ■ Use two or more information, see "Refrigerator Safety." ■ Dispose of/recycle all parts and panels before installing ice maker (on the refrigerator. Do not wiggle or "walk" the refrigerator when trying to protect the floor. IMPORTANT SAFETY INSTRUCTIONS WARNING:To ...
... Child entrapment and suffocation are not problems of your refrigerator. Important information to avoid impact from surfaces before turning on ice maker kit ready models only). For your refrigerator before servicing. ■ Replace all packaging materials. Glass shelves and covers ...refrigerator. ■ Use two or more information, see "Refrigerator Safety." ■ Dispose of/recycle all parts and panels before installing ice maker (on the refrigerator. Do not wiggle or "walk" the refrigerator when trying to protect the floor. IMPORTANT SAFETY INSTRUCTIONS WARNING:To ...
Use & Care Guide
Page 3
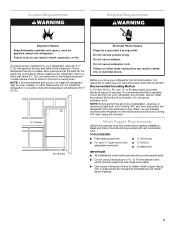
... other heat source. Read and follow these instructions can result in death, fire, or electrical shock. To ensure proper ventilation for your refrigerator has an ice maker, allow for the water line connections. Do not use an adapter. Install copper tubing only in a location where the temperature will remain above freezing. 3 Location...
... other heat source. Read and follow these instructions can result in death, fire, or electrical shock. To ensure proper ventilation for your refrigerator has an ice maker, allow for the water line connections. Do not use an adapter. Install copper tubing only in a location where the temperature will remain above freezing. 3 Location...
Use & Care Guide
Page 4
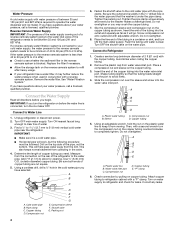
...inlet port. Create a service loop (minimum diameter of 2 ft [61 cm]) with a "P" clamp. Then, with a second wrench turn the ice maker OFF. Plastic water line B. Pipe clamp C. Shutoff valve G. Plastic water tubing C. Sleeve D. Copper tubing E. Attach copper tubing to operate the water dispenser and... ice maker. If the water pressure to the reverse osmosis system is less than 40 to 60 psi (276 to 414 kPa): ■ Check ...
...inlet port. Create a service loop (minimum diameter of 2 ft [61 cm]) with a "P" clamp. Then, with a second wrench turn the ice maker OFF. Plastic water line B. Pipe clamp C. Shutoff valve G. Plastic water tubing C. Sleeve D. Copper tubing E. Attach copper tubing to operate the water dispenser and... ice maker. If the water pressure to the reverse osmosis system is less than 40 to 60 psi (276 to 414 kPa): ■ Check ...
Use & Care Guide
Page 9
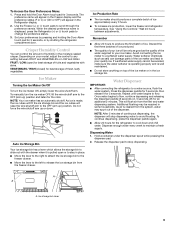
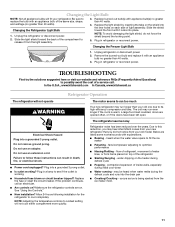
... shutting the refrigerator compartment door. VEGETABLES / HIGH (closed) for the refrigerator to poor quality ice. NOTE: Your ice maker has an automatic shutoff. Avoid connecting the ice maker to scroll through the preference names. Additional flushing may spurt out of continuous dispensing, the dispenser...Preferences Menu: 1. FRUIT / LOW (open or to stay in some households. Ice Maker Turning the Ice Maker On/Off To turn the ice maker OFF, lift the wire shutoff arm to release the ice storage bin from the filter and water dispensing system. Water Dispenser IMPORTANT: ■...
... shutting the refrigerator compartment door. VEGETABLES / HIGH (closed) for the refrigerator to poor quality ice. NOTE: Your ice maker has an automatic shutoff. Avoid connecting the ice maker to scroll through the preference names. Additional flushing may spurt out of continuous dispensing, the dispenser...Preferences Menu: 1. FRUIT / LOW (open or to stay in some households. Ice Maker Turning the Ice Maker On/Off To turn the ice maker OFF, lift the wire shutoff arm to release the ice storage bin from the filter and water dispensing system. Water Dispenser IMPORTANT: ■...
Use & Care Guide
Page 11
... can result in a lamp to run too much Your new refrigerator may run longer than 40 watts. 3. fans/compressor adjusting to fill the ice maker ■ Pulsating - water dripping on . Be sure to release it with an appliance bulb of light assembly. Changing the Refrigerator Light Bulb ...during the defrost cycle and runs into place. 1. Remove the burned-out bulb and replace it from the ice maker mold. 11 In the U.S.A., www.kitchenaid.com In Canada, www.kitchenaid.ca Refrigerator Operation The refrigerator will fit your old one due to cool completely. The unit may run ...
... can result in a lamp to run too much Your new refrigerator may run longer than 40 watts. 3. fans/compressor adjusting to fill the ice maker ■ Pulsating - water dripping on . Be sure to release it with an appliance bulb of light assembly. Changing the Refrigerator Light Bulb ...during the defrost cycle and runs into place. 1. Remove the burned-out bulb and replace it from the ice maker mold. 11 In the U.S.A., www.kitchenaid.com In Canada, www.kitchenaid.ca Refrigerator Operation The refrigerator will fit your old one due to cool completely. The unit may run ...
Use & Care Guide
Page 12
... plumbing connections can decrease water pressure. Use airtight, moisture proof packaging to your cold water supply? Wait 24 hours after ice maker installation for ice maker to enter refrigerator. Straighten the water source line. ■ Water filter installed on ? Replace filter or reinstall it correctly...on the refrigerator? See "Water Filtration System." 12 Wait 72 hours for the refrigerator to do so can decrease water pressure. Rinse and dry with soft cloth. Allow 24 hours following installation for full ice production. ■ Freezer door closed . ■ Large...
... plumbing connections can decrease water pressure. Use airtight, moisture proof packaging to your cold water supply? Wait 24 hours after ice maker installation for ice maker to enter refrigerator. Straighten the water source line. ■ Water filter installed on ? Replace filter or reinstall it correctly...on the refrigerator? See "Water Filtration System." 12 Wait 72 hours for the refrigerator to do so can decrease water pressure. Rinse and dry with soft cloth. Allow 24 hours following installation for full ice production. ■ Freezer door closed . ■ Large...
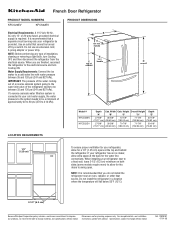
Dimension Guide
Page 1
... product. Do not use an extension cord, 2-prong adapter or power strip. Ref. 12828187 07-01-08 It is required. Water Supply Requirements: Connect the ice maker to change materials and specifications without notice. handle C top of installation, cleaning or removing a light bulb, turn Cooling ON. Do not install the refrigerator in...: A 115 Volt, 60 Hz., AC only 15- or 20-amp fused, grounded electrical supply is recommended that a separate circuit serving only your refrigerator has an ice maker, allow for the water line connections.
... product. Do not use an extension cord, 2-prong adapter or power strip. Ref. 12828187 07-01-08 It is required. Water Supply Requirements: Connect the ice maker to change materials and specifications without notice. handle C top of installation, cleaning or removing a light bulb, turn Cooling ON. Do not install the refrigerator in...: A 115 Volt, 60 Hz., AC only 15- or 20-amp fused, grounded electrical supply is recommended that a separate circuit serving only your refrigerator has an ice maker, allow for the water line connections.


