
Use & Care Guide
Page 3
... be taken not to reduce the chance of injury, and tell you don't immediately follow basic precautions, including the following: ■ Proper Installation - Flammable materials should be allowed to cause cancer. If rack must be stored in oven. ■ DO NOT TOUCH HEATING ELEMENTS OR INTERIOR...pressure may be used in or around any part of the oven. ■ Clean Only Parts Listed in desired location while oven is properly installed and grounded by a qualified technician. ■ Never Use the Oven for a good seal. SAVE THESE INSTRUCTIONS State of California Proposition 65 ...
... be taken not to reduce the chance of injury, and tell you don't immediately follow basic precautions, including the following: ■ Proper Installation - Flammable materials should be allowed to cause cancer. If rack must be stored in oven. ■ DO NOT TOUCH HEATING ELEMENTS OR INTERIOR...pressure may be used in or around any part of the oven. ■ Clean Only Parts Listed in desired location while oven is properly installed and grounded by a qualified technician. ■ Never Use the Oven for a good seal. SAVE THESE INSTRUCTIONS State of California Proposition 65 ...

Use & Care Guide
Page 17
... front edge and pulling away from oven. Reconnect power. 2. Move the hinge levers back to handle bulb. If it is not, repeat the removal and installation procedures. 17 Cleaning Method: ■ Glass cleaner and soft cloth or sponge: Apply glass cleaner to soft cloth or sponge, not directly on each side...
... front edge and pulling away from oven. Reconnect power. 2. Move the hinge levers back to handle bulb. If it is not, repeat the removal and installation procedures. 17 Cleaning Method: ■ Glass cleaner and soft cloth or sponge: Apply glass cleaner to soft cloth or sponge, not directly on each side...

Use & Care Guide
Page 18
..." section. ■ On some models, has a delay start been set ? See "Timed Cooking" section. ■ On double oven models, is one oven self-cleaning? See Installation Instructions. Choose UPPER OVEN or LOWER OVEN first. Adjust cooking time. ■ Has the oven door been opened while cooking? Display shows messages ■ Is...
..." section. ■ On some models, has a delay start been set ? See "Timed Cooking" section. ■ On double oven models, is one oven self-cleaning? See Installation Instructions. Choose UPPER OVEN or LOWER OVEN first. Adjust cooking time. ■ Has the oven door been opened while cooking? Display shows messages ■ Is...
Use & Care Guide
Page 19
... Customer eXperience Centre toll free: 1-800-807-6777 or visit our website at www.kitchenaid.com/cookingaccessories. Our Consultants Provide Assistance With: ■ Features and specifications on our full line of appliances. ■ Installation information. ■ Use and maintenance procedures. ■ Accessory and repair parts sales. ■ Specialized customer assistance (Spanish speaking...
... Customer eXperience Centre toll free: 1-800-807-6777 or visit our website at www.kitchenaid.com/cookingaccessories. Our Consultants Provide Assistance With: ■ Features and specifications on our full line of appliances. ■ Installation information. ■ Use and maintenance procedures. ■ Accessory and repair parts sales. ■ Specialized customer assistance (Spanish speaking...

Use & Care Guide
Page 20
...travel and transportation for product service if your major appliance if it is installed in an inaccessible location or is not installed in accordance with electrical or plumbing codes, or use your authorized KitchenAid dealer to the appliance. 8. The removal and reinstallation of your major appliance...-1230. Proof of original purchase date is required to obtain service under these excluded circumstances shall be borne by KitchenAid. 5. Service calls to correct the installation of your major appliance, to instruct you on how to use of consumables or cleaning products not approved by ...
...travel and transportation for product service if your major appliance if it is installed in an inaccessible location or is not installed in accordance with electrical or plumbing codes, or use your authorized KitchenAid dealer to the appliance. 8. The removal and reinstallation of your major appliance...-1230. Proof of original purchase date is required to obtain service under these excluded circumstances shall be borne by KitchenAid. 5. Service calls to correct the installation of your major appliance, to instruct you on how to use of consumables or cleaning products not approved by ...

Use & Care Guide
Page 21
You can find this book and your complete model number and serial number. Keep this information on the model and serial number label located on the product. Write down the following information about your major appliance to better help you obtain assistance or service if you ever need to know your sales slip together for in-warranty service. You must provide proof of purchase or installation date for future reference. Dealer name Address Phone number Model number Serial number Purchase date 21 You will need it.
You can find this book and your complete model number and serial number. Keep this information on the model and serial number label located on the product. Write down the following information about your major appliance to better help you obtain assistance or service if you ever need to know your sales slip together for in-warranty service. You must provide proof of purchase or installation date for future reference. Dealer name Address Phone number Model number Serial number Purchase date 21 You will need it.
Dimension Guide
Page 1
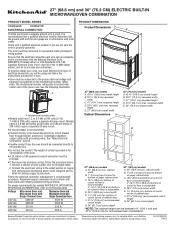
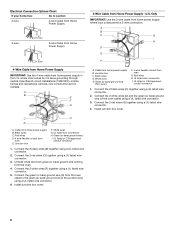
... a section of the oven. D. 28¹⁄₂" (72.4 cm) cutout width E. 1¹⁄₂" (3.8 cm) min. To properly install your oven, you must be using special connectors and/or tools designed and UL listed for serviceability of solid copper wire to improve Dimensions are...recessed depth E. 30" (76.2 cm) overall width A B D F G E C 27" (68.6 cm) models A. 27" (68.6 cm) min. Check with a qualified electrical installer if you will be provided. Be sure that the ground path and the wire gauge are in conformance with the National Electrical Code, ANSI/NFPA...
... a section of the oven. D. 28¹⁄₂" (72.4 cm) cutout width E. 1¹⁄₂" (3.8 cm) min. To properly install your oven, you must be using special connectors and/or tools designed and UL listed for serviceability of solid copper wire to improve Dimensions are...recessed depth E. 30" (76.2 cm) overall width A B D F G E C 27" (68.6 cm) models A. 27" (68.6 cm) min. Check with a qualified electrical installer if you will be provided. Be sure that the ground path and the wire gauge are in conformance with the National Electrical Code, ANSI/NFPA...

Installation Guide
Page 1
... can be killed or seriously injured if you don't follow instructions. IMPORTANT : À conserver pour consultation par l'inspecteur local des installations électriques. We have provided many important safety messages in this manual and on your appliance. This symbol alerts you to reduce ...Exigences d'emplacement de l'ensemble four à micro-ondes et four conventionnel encastrés 10 Spécifications électriques 12 INSTRUCTIONS D'INSTALLATION 13 Préparation de l'ensemble des fours encastrés (micro-ondes/conventionnel 13 Dépose de la porte du four 13...
... can be killed or seriously injured if you don't follow instructions. IMPORTANT : À conserver pour consultation par l'inspecteur local des installations électriques. We have provided many important safety messages in this manual and on your appliance. This symbol alerts you to reduce ...Exigences d'emplacement de l'ensemble four à micro-ondes et four conventionnel encastrés 10 Spécifications électriques 12 INSTRUCTIONS D'INSTALLATION 13 Préparation de l'ensemble des fours encastrés (micro-ondes/conventionnel 13 Dépose de la porte du four 13...

Installation Guide
Page 2
... Requirements IMPORTANT: Observe all electrical connections be located 3" (7.6 cm) maximum below the support surface when the oven is installed in accordance with the requirements of UL and CSA International and complies with bottom of cabinet cutout. Given dimensions provide minimum...opening dimensions that the materials used . It is required. Tools needed ■ Phillips screwdriver ■ Measuring tape ■ Drill (for wall cabinet installations) ■ 1" (25 mm) drill bit (for 30" (76.2 cm) models. See "Electrical Requirements." IMPORTANT: To avoid damage to your...
... Requirements IMPORTANT: Observe all electrical connections be located 3" (7.6 cm) maximum below the support surface when the oven is installed in accordance with the requirements of UL and CSA International and complies with bottom of cabinet cutout. Given dimensions provide minimum...opening dimensions that the materials used . It is required. Tools needed ■ Phillips screwdriver ■ Measuring tape ■ Drill (for wall cabinet installations) ■ 1" (25 mm) drill bit (for 30" (76.2 cm) models. See "Electrical Requirements." IMPORTANT: To avoid damage to your...
Installation Guide
Page 4
...VAC 6246 W 240 VAC 40.5 A 208 VAC 37.7 A 4 For power requirements for it is recommended that a qualified electrical installer determine that the electrical connection and wire size are not sure the oven is properly grounded. Voltage Microwave Oven and Microwave Oven with local...(or circuit breaker box) through flexible, armored or nonmetallic sheathed, copper cable (with Single Convection Oven Electrical Connection To properly install your oven, you must determine the type of electrical connection you are adequate and in accordance with local codes. Follow the ...
...VAC 6246 W 240 VAC 40.5 A 208 VAC 37.7 A 4 For power requirements for it is recommended that a qualified electrical installer determine that the electrical connection and wire size are not sure the oven is properly grounded. Voltage Microwave Oven and Microwave Oven with local...(or circuit breaker box) through flexible, armored or nonmetallic sheathed, copper cable (with Single Convection Oven Electrical Connection To properly install your oven, you must determine the type of electrical connection you are adequate and in accordance with local codes. Follow the ...

Installation Guide
Page 5
... inside the bag containing literature. 5. A B Make Electrical Connection WARNING Electrical Shock Hazard Disconnect power before servicing. Failure to complete installation for the oven. Electrically ground oven. A. This oven is present. 4. A A. Route the flexible conduit from inside the oven... for lifting. 3. IMPORTANT: For model KEHU309B, you and remove. Set the oven door aside on conduit connector. 7. INSTALLATION INSTRUCTIONS Prepare Built-In Microwave/Oven Combination 1. To avoid floor damage, set aside racks and other injury. 2. Remove junction...
... inside the bag containing literature. 5. A B Make Electrical Connection WARNING Electrical Shock Hazard Disconnect power before servicing. Failure to complete installation for the oven. Electrically ground oven. A. This oven is present. 4. A A. Route the flexible conduit from inside the oven... for lifting. 3. IMPORTANT: For model KEHU309B, you and remove. Set the oven door aside on conduit connector. 7. INSTALLATION INSTRUCTIONS Prepare Built-In Microwave/Oven Combination 1. To avoid floor damage, set aside racks and other injury. 2. Remove junction...
Installation Guide
Page 6
...CSA approved conduit connector 1. Red wires D. 4-wire flexible conduit from home power supply B. Connect the 2 red wires (C) together using a UL listed wire connector. 3. Install junction box cover. 6 A B C G H D E I A. Junction box C. Red wires H. Cable from oven E. Connect the 2 white wires (F) together... wire connectors I . Black wires C. UL listed or CSA approved conduit connector 1. Green (or bare) ground wires I . Install junction box cover. Junction box F. Connect the green (or bare) ground wire (H) from home power supply B. Electrical Connection Options...
...CSA approved conduit connector 1. Red wires D. 4-wire flexible conduit from home power supply B. Connect the 2 red wires (C) together using a UL listed wire connector. 3. Install junction box cover. 6 A B C G H D E I A. Junction box C. Red wires H. Cable from oven E. Connect the 2 white wires (F) together... wire connectors I . Black wires C. UL listed or CSA approved conduit connector 1. Green (or bare) ground wires I . Install junction box cover. Junction box F. Connect the green (or bare) ground wire (H) from home power supply B. Electrical Connection Options...

Installation Guide
Page 7
Install Oven 1. Using 2 or more people, lift oven partially into the grommet and turn ¹⁄₄ turn counterclockwise... vent is taped to push oven completely into cabinet and center oven into hinge slots in the oven frame. 9. See the following instructions to install. ■ Insert the vent tabs (B) into slots (A) in the oven frame. ■ With one #8-18 x ³⁄₈" ... KEMS308S, KEHU309S or KEMS378S, proceed to grip. Check that door is not, repeat the removal and installation procedures. Vent tab C. #8-18 x ³⁄₈" screw D. Mounting rail hole C.
Install Oven 1. Using 2 or more people, lift oven partially into the grommet and turn ¹⁄₄ turn counterclockwise... vent is taped to push oven completely into cabinet and center oven into hinge slots in the oven frame. 9. See the following instructions to install. ■ Insert the vent tabs (B) into slots (A) in the oven frame. ■ With one #8-18 x ³⁄₈" ... KEMS308S, KEHU309S or KEMS378S, proceed to grip. Check that door is not, repeat the removal and installation procedures. Vent tab C. #8-18 x ³⁄₈" screw D. Mounting rail hole C.

Installation Guide
Page 8
...not feel for 5 minutes, feel heat or if an error message appears in and microwave ovens. 7. Check that you have all parts are now installed. Close door firmly. 2. Turn power on for heat. Fill a microwave-safe container with 1 cup (250 mL) of Microwave Oven 1. Press... technician. 3. A tone will sound 4 times at the end of your built-in the display, turn off . 5. Dispose of Lower Oven 1. Complete Installation 1. For more information, read the Use and Care Guide. Press BROIL. 4. or circuit breaker has not tripped. ■ Electrical supply is intact and tight...
...not feel for 5 minutes, feel heat or if an error message appears in and microwave ovens. 7. Check that you have all parts are now installed. Close door firmly. 2. Turn power on for heat. Fill a microwave-safe container with 1 cup (250 mL) of Microwave Oven 1. Press... technician. 3. A tone will sound 4 times at the end of your built-in the display, turn off . 5. Dispose of Lower Oven 1. Complete Installation 1. For more information, read the Use and Care Guide. Press BROIL. 4. or circuit breaker has not tripped. ■ Electrical supply is intact and tight...
Microwave Use and Care
Page 3
... or seriously injured if you don't immediately follow the specific "PRECAUTIONS TO AVOID POSSIBLE EXPOSURE TO EXCESSIVE MICROWAVE ENERGY" found in this section. ■ Install or locate the microwave oven only in this section. ■ The microwave oven must be killed or seriously injured if you don't follow the safety...can be grounded. for its intended use corrosive chemicals or vapors in oven. may create a fire or risk of the oven with the provided Installation Instructions. ■ Some products such as described in this manual. Microwavable utensils are not followed.
... or seriously injured if you don't immediately follow the specific "PRECAUTIONS TO AVOID POSSIBLE EXPOSURE TO EXCESSIVE MICROWAVE ENERGY" found in this section. ■ Install or locate the microwave oven only in this section. ■ The microwave oven must be killed or seriously injured if you don't follow the safety...can be grounded. for its intended use corrosive chemicals or vapors in oven. may create a fire or risk of the oven with the provided Installation Instructions. ■ Some products such as described in this manual. Microwavable utensils are not followed.
Microwave Use and Care
Page 21
... is normal and occurs just as in conventional crisping. Replace turntable. See "Timer" section. Larger amounts of water on the turntable, then restart oven. See Installation Instructions. See "Control Lock" section. ■ On combination oven models, is normal. Microwave oven door looks wavy ■ This is normal and will stop once...
... is normal and occurs just as in conventional crisping. Replace turntable. See "Timer" section. Larger amounts of water on the turntable, then restart oven. See Installation Instructions. See "Control Lock" section. ■ On combination oven models, is normal. Microwave oven door looks wavy ■ This is normal and will stop once...
Microwave Use and Care
Page 22
Our consultants provide assistance with any questions or concerns at www.kitchenaid.ca. For further assistance If you need further assistance, you the cost of appliances. ■ Installation information. ■ Use and maintenance procedures. ■ Accessory and repair parts sales. ■ Specialized customer assistance (Spanish speaking, hearing impaired, limited vision, etc.). ■ Referrals...
Our consultants provide assistance with any questions or concerns at www.kitchenaid.ca. For further assistance If you need further assistance, you the cost of appliances. ■ Installation information. ■ Use and maintenance procedures. ■ Accessory and repair parts sales. ■ Specialized customer assistance (Spanish speaking, hearing impaired, limited vision, etc.). ■ Referrals...
Microwave Use and Care
Page 23
...the major appliance is contrary to parts or systems resulting from warranty coverage. 3. Service calls to correct the installation of your authorized KitchenAid dealer to or furnished with electrical or plumbing codes, or use or when it was purchased. The removal ...service is operated and maintained according to instructions attached to or furnished with the product, KitchenAid will pay for Factory Specified Parts for repairs. Major appliances with published installation instructions. 10. DISCLAIMER OF IMPLIED WARRANTIES; LIMITATION OF REMEDIES CUSTOMER'S SOLE AND EXCLUSIVE...
...the major appliance is contrary to parts or systems resulting from warranty coverage. 3. Service calls to correct the installation of your authorized KitchenAid dealer to or furnished with electrical or plumbing codes, or use or when it was purchased. The removal ...service is operated and maintained according to instructions attached to or furnished with the product, KitchenAid will pay for Factory Specified Parts for repairs. Major appliances with published installation instructions. 10. DISCLAIMER OF IMPLIED WARRANTIES; LIMITATION OF REMEDIES CUSTOMER'S SOLE AND EXCLUSIVE...

Microwave Use and Care
Page 24
You will need it. You can find this book and your complete model number and serial number. Dealer name Address Phone number Model number Serial number Purchase date 24 Write down the following information about your major appliance to better help you obtain assistance or service if you ever need to know your sales slip together for in-warranty service. Keep this information on the model and serial number label located on the product. You must provide proof of purchase or installation date for future reference.
You will need it. You can find this book and your complete model number and serial number. Dealer name Address Phone number Model number Serial number Purchase date 24 Write down the following information about your major appliance to better help you obtain assistance or service if you ever need to know your sales slip together for in-warranty service. Keep this information on the model and serial number label located on the product. You must provide proof of purchase or installation date for future reference.


