
Use & Care Guide
Page 17
...instructions. 4. This major appliance is designed to be easily determined. Major appliances with electrical or plumbing codes, or use of consumables or cleaning products not approved by this... States or Canada and applies only when the major appliance is reported to KitchenAid within 30 days from the date of purchase. 6. Dealer name Address Phone number Model...KITCHENAID® COOKTOP WARRANTY LIMITED WARRANTY For one year from the date of purchase, when this major appliance is operated and maintained according to instructions attached to or furnished with the product, KitchenAid...
...instructions. 4. This major appliance is designed to be easily determined. Major appliances with electrical or plumbing codes, or use of consumables or cleaning products not approved by this... States or Canada and applies only when the major appliance is reported to KitchenAid within 30 days from the date of purchase. 6. Dealer name Address Phone number Model...KITCHENAID® COOKTOP WARRANTY LIMITED WARRANTY For one year from the date of purchase, when this major appliance is operated and maintained according to instructions attached to or furnished with the product, KitchenAid...

Installation Guide
Page 1
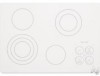
... followed. All safety messages will follow instructions. ELECTRIC COOKTOP INSTALLATION INSTRUCTIONS INSTRUCTIONS D'INSTALLATION DE LA TABLE DE CUISSON ÉLECTRIQUE Table of Contents / Table des matières COOKTOP SAFETY 1 INSTALLATION REQUIREMENTS 2 Tools and Parts 2 Location Requirements 2 Electrical Requirements 3 INSTALLATION INSTRUCTIONS 4 Prepare Cooktop for Installation 4 Install Cooktop 5 Make Electrical Connection 6 Attach Cooktop to reduce the chance of others . This...
... followed. All safety messages will follow instructions. ELECTRIC COOKTOP INSTALLATION INSTRUCTIONS INSTRUCTIONS D'INSTALLATION DE LA TABLE DE CUISSON ÉLECTRIQUE Table of Contents / Table des matières COOKTOP SAFETY 1 INSTALLATION REQUIREMENTS 2 Tools and Parts 2 Location Requirements 2 Electrical Requirements 3 INSTALLATION INSTRUCTIONS 4 Prepare Cooktop for Installation 4 Install Cooktop 5 Make Electrical Connection 6 Attach Cooktop to reduce the chance of others . This...

Installation Guide
Page 5
.... Remove the attachment screws for illustration of cooktop base with bracket attachment screws using the bracket mounting holes selected in "Attach Cooktop to bottom of the cooktop base. 2. Cooktop base bottom D. Complete the following steps for installing clamp brackets at cooktop base ends. ... bracket (end locations recommended) C. Foam seal 4. Clamping screw location D. This is needed, lift entire cooktop up and place in Cutout C D 1. Attach brackets to avoid scratching the countertop. NOTE: Make sure that will allow the bracket to extend far enough...
.... Remove the attachment screws for illustration of cooktop base with bracket attachment screws using the bracket mounting holes selected in "Attach Cooktop to bottom of the cooktop base. 2. Cooktop base bottom D. Complete the following steps for installing clamp brackets at cooktop base ends. ... bracket (end locations recommended) C. Foam seal 4. Clamping screw location D. This is needed, lift entire cooktop up and place in Cutout C D 1. Attach brackets to avoid scratching the countertop. NOTE: Make sure that will allow the bracket to extend far enough...

Installation Guide
Page 8
... water to allow installation of the Use and Care Guide. 5. Read "Cooktop Use" in the junction box using clamping brackets. Attach Cooktop to 3-Wire Cable from Cooktop - Connect the 2 red wires together using the UL listed wire connectors. 2. Glass cooktop B. NOTE: If the cooktop does not work after turning on the power, check that you purchased...
... water to allow installation of the Use and Care Guide. 5. Read "Cooktop Use" in the junction box using clamping brackets. Attach Cooktop to 3-Wire Cable from Cooktop - Connect the 2 red wires together using the UL listed wire connectors. 2. Glass cooktop B. NOTE: If the cooktop does not work after turning on the power, check that you purchased...