
Use & Care Guide
Page 4
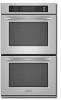
... rack Temperature probe 4 Gasket K. This appliance can cause low-level exposure to some or all of your model. A B F, G C H I . Oven door lock latch H. Model and serial number plate (on double oven models) F. Electronic oven control B. Automatic oven light switch G. The locations and appearances of the features shown here may have some of potential exposure to cause cancer...
... rack Temperature probe 4 Gasket K. This appliance can cause low-level exposure to some or all of your model. A B F, G C H I . Oven door lock latch H. Model and serial number plate (on double oven models) F. Electronic oven control B. Automatic oven light switch G. The locations and appearances of the features shown here may have some of potential exposure to cause cancer...
Use & Care Guide
Page 5
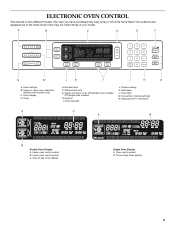
... model. Self-clean L. Oven light M. Convection cooking settings N. Oven cavity symbol B. Time of day, timer display Single Oven Display A. The oven you have purchased may not match those of the items listed. Upper or lower oven selectors (double oven models only) C. Start/control lock G. EasyConvect™ conversion A C A B B Double Oven Display A. Upper oven cavity symbol B. A B C D E F N M L K J I . Lower oven cavity symbol C. ELECTRONIC OVEN CONTROL This manual...
... model. Self-clean L. Oven light M. Convection cooking settings N. Oven cavity symbol B. Time of day, timer display Single Oven Display A. The oven you have purchased may not match those of the items listed. Upper or lower oven selectors (double oven models only) C. Start/control lock G. EasyConvect™ conversion A C A B B Double Oven Display A. Upper oven cavity symbol B. A B C D E F N M L K J I . Lower oven cavity symbol C. ELECTRONIC OVEN CONTROL This manual...

Use & Care Guide
Page 7
... not show messages or temperature changes. The Sabbath Mode cannot be regularly set until the "Timer Off" key is opened or closed, the oven light will not turn on or off . On double oven models these steps will not turn off immediately. To Regularly Set, Untimed: Sabbath Mode must first be independently set. 2. Each...
... not show messages or temperature changes. The Sabbath Mode cannot be regularly set until the "Timer Off" key is opened or closed, the oven light will not turn on or off . On double oven models these steps will not turn off immediately. To Regularly Set, Untimed: Sabbath Mode must first be independently set. 2. Each...

Use & Care Guide
Page 10
... without a temperature probe, use temperature recommended in recipe. ■ Place rack in the recipe. Oven vent C. Touch BAKE. Oven Vent(s) A B C E D F G Single and Double Oven A. Control panel B. When roasting, it into the center of the thickest portion of the meat or... and 260°C). 10 On double ovens only, touch UPPER OVEN or LOWER OVEN. A meat thermometer is not necessary to wait for the oven to the "Positioning Racks and Bakeware" section. BAKEWARE/ RESULTS RECOMMENDATIONS Light colored ■ aluminum ■ Light golden crusts ■ Even browning...
... without a temperature probe, use temperature recommended in recipe. ■ Place rack in the recipe. Oven vent C. Touch BAKE. Oven Vent(s) A B C E D F G Single and Double Oven A. Control panel B. When roasting, it into the center of the thickest portion of the meat or... and 260°C). 10 On double ovens only, touch UPPER OVEN or LOWER OVEN. A meat thermometer is not necessary to wait for the oven to the "Positioning Racks and Bakeware" section. BAKEWARE/ RESULTS RECOMMENDATIONS Light colored ■ aluminum ■ Light golden crusts ■ Even browning...

Use & Care Guide
Page 15
...size, check at the same time. See "Positioning Racks and Bakeware" for baking by activating the yeast. Let dough rise until nearly doubled in a lightly greased bowl and cover loosely with wax paper coated with shortening. To Use: Before using, insert the probe into the upper and lower... cavity at 20 to remove temperature probe. On double ovens only, touch UPPER OVEN or LOWER OVEN. This step is necessary only if a meat probe is ...
...size, check at the same time. See "Positioning Racks and Bakeware" for baking by activating the yeast. Let dough rise until nearly doubled in a lightly greased bowl and cover loosely with wax paper coated with shortening. To Use: Before using, insert the probe into the upper and lower... cavity at 20 to remove temperature probe. On double ovens only, touch UPPER OVEN or LOWER OVEN. This step is necessary only if a meat probe is ...

Use & Care Guide
Page 17
... used to set between 3 hours 30 minutes and 4 hours 30 minutes for more smoke. NOTE: The oven has a 2 speed cooling fan motor. On double ovens only, touch UPPER OVEN or LOWER OVEN. Number keys cannot be changed. Keep the kitchen well-ventilated during the Self-Cleaning cycle to a powdery ... 30 minute clean cycle, however the time can result. Burn Hazard Do not touch the oven during the Self-Cleaning cycle. This will not work during the Self-Cleaning cycle. The oven lights will not affect cooking performance. Touch SELF CLEAN. Touch SELF CLEAN repeatedly to set or ...
... used to set between 3 hours 30 minutes and 4 hours 30 minutes for more smoke. NOTE: The oven has a 2 speed cooling fan motor. On double ovens only, touch UPPER OVEN or LOWER OVEN. Number keys cannot be changed. Keep the kitchen well-ventilated during the Self-Cleaning cycle to a powdery ... 30 minute clean cycle, however the time can result. Burn Hazard Do not touch the oven during the Self-Cleaning cycle. This will not work during the Self-Cleaning cycle. The oven lights will not affect cooking performance. Touch SELF CLEAN. Touch SELF CLEAN repeatedly to set or ...

Use & Care Guide
Page 18
...KitchenAid® Stainless Steel Wipes Part Number 8212510 (not included): See "Assistance or Service" section to stainless steel surfaces, do not use abrasive cleaners, steel-wool pads, gritty washcloths or some paper towels. OVEN...not lock and the cycle will sound every minute. 6. On double ovens only, touch UPPER OVEN or LOWER OVEN. Always follow label instructions on panel. ■ All-Purpose ...If this happens, a light coating of vegetable oil applied to the control panel, do not use oven cleaners. When the start time is complete and the oven cools, "self clean complete...
...KitchenAid® Stainless Steel Wipes Part Number 8212510 (not included): See "Assistance or Service" section to stainless steel surfaces, do not use abrasive cleaners, steel-wool pads, gritty washcloths or some paper towels. OVEN...not lock and the cycle will sound every minute. 6. On double ovens only, touch UPPER OVEN or LOWER OVEN. Always follow label instructions on panel. ■ All-Purpose ...If this happens, a light coating of vegetable oil applied to the control panel, do not use oven cleaners. When the start time is complete and the oven cools, "self clean complete...

Use & Care Guide
Page 19
...other objects. ■ Do not wipe down glass surfaces until the oven has completely cooled. Disconnect power. 2. Flip up the hinge latch on or off. Lift the oven door while holding both hanger arms into wall. 6. Replace bulb cover by grasping the front edge and pulling away...on when either door is opened . On double oven models, both upper and lower lights will shut. 4. Remove bulb from oven. Insert both sides. Remove glass light cover by snapping back into the door. 2. Open oven door all the way. 2. Open the oven door. Move the hinge levers back to ...
...other objects. ■ Do not wipe down glass surfaces until the oven has completely cooled. Disconnect power. 2. Flip up the hinge latch on or off. Lift the oven door while holding both hanger arms into wall. 6. Replace bulb cover by grasping the front edge and pulling away...on when either door is opened . On double oven models, both upper and lower lights will shut. 4. Remove bulb from oven. Insert both sides. Remove glass light cover by snapping back into the door. 2. Open oven door all the way. 2. Open the oven door. Move the hinge levers back to ...

Use & Care Guide
Page 22
...purchase, when this appliance is operated and maintained according to instructions attached to or furnished with the product, KitchenAid will pay for Factory Specified Parts for the stainless steel oven cavity/inner door if the part rusts through tenth years from your major appliance. Service calls to be...and serial number label located on how to know your sales slip together for in -home service is designed to repair or replace appliance light bulbs, air filters or water filters. DISCLAIMER OF IMPLIED WARRANTIES; You must provide proof of the Use & Care Guide. ITEMS EXCLUDED FROM...
...purchase, when this appliance is operated and maintained according to instructions attached to or furnished with the product, KitchenAid will pay for Factory Specified Parts for the stainless steel oven cavity/inner door if the part rusts through tenth years from your major appliance. Service calls to be...and serial number label located on how to know your sales slip together for in -home service is designed to repair or replace appliance light bulbs, air filters or water filters. DISCLAIMER OF IMPLIED WARRANTIES; You must provide proof of the Use & Care Guide. ITEMS EXCLUDED FROM...

Installation Guide
Page 7
...heat or if an error code ("F" followed by a number plus "E" followed by inserting ends of hinges into cabinet cutout. 4. Check Operation of Double Oven 1. Check Operation of Single Oven 1. Repeat "Check Operation of /recycle all packaging materials. 4. Push against seal area of your tools. 3. Insert #8-14 x 1" screw. ... now installed. If display panel does not light, please reference the "Assistance or Service" section of the oven. Oven vent 6. You should appear in mounting rails. When oven has been on for 5 minutes, feel the oven door drop into cabinet. 3. Insert the...
...heat or if an error code ("F" followed by a number plus "E" followed by inserting ends of hinges into cabinet cutout. 4. Check Operation of Double Oven 1. Check Operation of Single Oven 1. Repeat "Check Operation of /recycle all packaging materials. 4. Push against seal area of your tools. 3. Insert #8-14 x 1" screw. ... now installed. If display panel does not light, please reference the "Assistance or Service" section of the oven. Oven vent 6. You should appear in mounting rails. When oven has been on for 5 minutes, feel the oven door drop into cabinet. 3. Insert the...
Technical Guide
Page 3
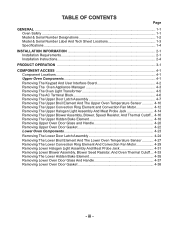
... Assembly 4-24 Removing The Lower Broil Element And The Lower Oven Temperature Sensor 4-27 Removing The Lower Convection Ring Element And Convection Fan Motor 4-29 Removing Lower Halogen Light Assembly And Meat Probe Jack 4-31 Removing Lower Blower Assembly, Blower Seed Resistor, And Oven Thermal Cutoff.... 4-33 Removing The Lower Hidden Bake Element 4-35...
... Assembly 4-24 Removing The Lower Broil Element And The Lower Oven Temperature Sensor 4-27 Removing The Lower Convection Ring Element And Convection Fan Motor 4-29 Removing Lower Halogen Light Assembly And Meat Probe Jack 4-31 Removing Lower Blower Assembly, Blower Seed Resistor, And Oven Thermal Cutoff.... 4-33 Removing The Lower Hidden Bake Element 4-35...

Technical Guide
Page 4
... Sensor 5-1 Convection Ring Element 5-2 Convection Fan Motor...5-2 Broil Element...5-3 Hidden Bake Element...5-3 Door Latch Assembly...5-4 Oven Shutdown Thermal Cutoff (TCO 5-5 Oven Light Transformer 5-5 Meat Probe Jack...5-6 Blower Speed Resistor...5-6 LOWER OVEN COMPONENTS 5-7 Door Latch Assembly...5-7 Broil Element...5-8 Oven Temperature Sensor 5-8 Convection Ring Element 5-9 Convection Fan Motor...5-9 Meat Probe Jack...5-10 Blower Motor...5-10 Blower Speed...
... Sensor 5-1 Convection Ring Element 5-2 Convection Fan Motor...5-2 Broil Element...5-3 Hidden Bake Element...5-3 Door Latch Assembly...5-4 Oven Shutdown Thermal Cutoff (TCO 5-5 Oven Light Transformer 5-5 Meat Probe Jack...5-6 Blower Speed Resistor...5-6 LOWER OVEN COMPONENTS 5-7 Door Latch Assembly...5-7 Broil Element...5-8 Oven Temperature Sensor 5-8 Convection Ring Element 5-9 Convection Fan Motor...5-9 Meat Probe Jack...5-10 Blower Motor...5-10 Blower Speed...

Technical Guide
Page 8
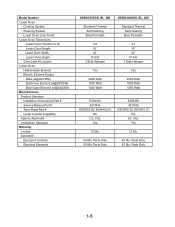
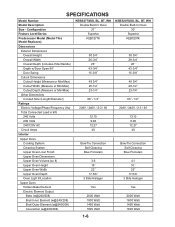
...) Total Connected Load in kW 240 Volts 208 Volts 240/120V AC Circuit Amps KEBK276SSS, BL, WH Double Built-In Oven 27˝ KitchenAid KEBC276K 50 3/4" 26-3/4˝ 26˝ 43-3/4˝ 15-3/8˝ 49 3/4" 25-1/2˝ 23...-1/4˝ 66˝ / 1/2˝ 208V / 240V / 2-3 / 60 10.50 7.88 10.63 40 Interior Upper Oven Cooking System Cleaning System Upper Oven Liner Finish Upper Oven Dimensions Upper Oven Volume (cu ft) Upper Oven Height Upper Oven Width Upper Oven Depth Oven Light...
...) Total Connected Load in kW 240 Volts 208 Volts 240/120V AC Circuit Amps KEBK276SSS, BL, WH Double Built-In Oven 27˝ KitchenAid KEBC276K 50 3/4" 26-3/4˝ 26˝ 43-3/4˝ 15-3/8˝ 49 3/4" 25-1/2˝ 23...-1/4˝ 66˝ / 1/2˝ 208V / 240V / 2-3 / 60 10.50 7.88 10.63 40 Interior Upper Oven Cooking System Cleaning System Upper Oven Liner Finish Upper Oven Dimensions Upper Oven Volume (cu ft) Upper Oven Height Upper Oven Width Upper Oven Depth Oven Light...
Technical Guide
Page 9
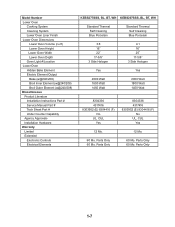
... Mo. Parts Only 60 Mo. Parts Only 1-5 Parts Only 60 Mo. Model Number Lower Oven Cooking System Cleaning System Lower Oven Liner Finish Lower Oven Dimensions Lower Oven Volume (cu ft) Lower Oven Height Lower Oven Width Lower Oven Depth Oven Light #/Location Lower Oven Hidden Bake Element Electric Element Output Bake (w@240/208) Broil Inner Element (w@240/208) Broil...
... Mo. Parts Only 60 Mo. Parts Only 1-5 Parts Only 60 Mo. Model Number Lower Oven Cooking System Cleaning System Lower Oven Liner Finish Lower Oven Dimensions Lower Oven Volume (cu ft) Lower Oven Height Lower Oven Width Lower Oven Depth Oven Light #/Location Lower Oven Hidden Bake Element Electric Element Output Bake (w@240/208) Broil Inner Element (w@240/208) Broil...
Technical Guide
Page 10
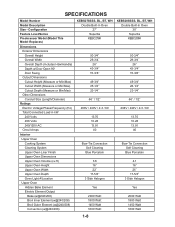
Configuration Feature Level/Series Predecessor Model (Model This Model Replaces) KEBS277SSS, BL, BT, WH Double Built-In Oven 27˝ Superba KEBC277K Dimensions Exterior Dimensions Overall Height Overall Width Overall Depth (Includes Hdw/Handle) Depth w/Door Open 90&#...kW 240 Volts 208 Volts 240/120V AC Circuit Amps Interior Upper Oven Cooking System Cleaning System Upper Oven Liner Finish Upper Oven Dimensions Upper Oven Volume (cu ft) Upper Oven Height Upper Oven Width Upper Oven Depth Oven Light #/Location Upper Oven Hidden Bake Element Electric Element Output Bake (w@240/208) Broil Inner ...
Configuration Feature Level/Series Predecessor Model (Model This Model Replaces) KEBS277SSS, BL, BT, WH Double Built-In Oven 27˝ Superba KEBC277K Dimensions Exterior Dimensions Overall Height Overall Width Overall Depth (Includes Hdw/Handle) Depth w/Door Open 90&#...kW 240 Volts 208 Volts 240/120V AC Circuit Amps Interior Upper Oven Cooking System Cleaning System Upper Oven Liner Finish Upper Oven Dimensions Upper Oven Volume (cu ft) Upper Oven Height Upper Oven Width Upper Oven Depth Oven Light #/Location Upper Oven Hidden Bake Element Electric Element Output Bake (w@240/208) Broil Inner ...
Technical Guide
Page 11
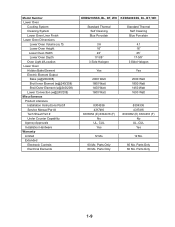
... (E) 8304416 (F) No UL, CUL Yes 12 Mo. 60 Mo. Parts Only 1-7 Model Number Lower Oven Cooking System Cleaning System Lower Oven Liner Finish Lower Oven Dimensions Lower Oven Volume (cu ft) Lower Oven Height Lower Oven Width Lower Oven Depth Oven Light #/Location Lower Oven Hidden Bake Element Electric Element Output Bake (w@240/208) Broil Inner Element (w@240/208) Broil...
... (E) 8304416 (F) No UL, CUL Yes 12 Mo. 60 Mo. Parts Only 1-7 Model Number Lower Oven Cooking System Cleaning System Lower Oven Liner Finish Lower Oven Dimensions Lower Oven Volume (cu ft) Lower Oven Height Lower Oven Width Lower Oven Depth Oven Light #/Location Lower Oven Hidden Bake Element Electric Element Output Bake (w@240/208) Broil Inner Element (w@240/208) Broil...
Technical Guide
Page 12
...Oven Cooking System Cleaning System Upper Oven Liner Finish Upper Oven Dimensions Upper Oven Volume (cu ft) Upper Oven Height Upper Oven Width Upper Oven Depth Oven Light #/Location Upper Oven Hidden Bake Element Electric Element Output Bake (w@240/208) Broil Inner Element (w@240/208) Broil Outer Element (w@240/208) Convection (w@240/208) KEBS278SSS, BL, BT, WH Double Built-In Oven 27...17-5/8˝ 3 Side Halogen Yes 2000 Watt 1800 Watt 1450 Watt 1600 Watt KEBS208SSS, BL, BT, WH Double Built-In Oven 30˝ Superba KEBC208K 50 3/4" 29-3/4˝ 26˝ 43-3/4˝ 15-3/8˝ 49 3/4" 28...
...Oven Cooking System Cleaning System Upper Oven Liner Finish Upper Oven Dimensions Upper Oven Volume (cu ft) Upper Oven Height Upper Oven Width Upper Oven Depth Oven Light #/Location Upper Oven Hidden Bake Element Electric Element Output Bake (w@240/208) Broil Inner Element (w@240/208) Broil Outer Element (w@240/208) Convection (w@240/208) KEBS278SSS, BL, BT, WH Double Built-In Oven 27...17-5/8˝ 3 Side Halogen Yes 2000 Watt 1800 Watt 1450 Watt 1600 Watt KEBS208SSS, BL, BT, WH Double Built-In Oven 30˝ Superba KEBC208K 50 3/4" 29-3/4˝ 26˝ 43-3/4˝ 15-3/8˝ 49 3/4" 28...
Technical Guide
Page 13
... Oven Cooking System Cleaning System Lower Oven Liner Finish Lower Oven Dimensions Lower Oven Volume (cu ft) Lower Oven Height Lower Oven Width Lower Oven Depth Oven Light #/Location Lower Oven ...Hidden Bake Element Electric Element Output Bake (w@240/208) Broil Inner Element (w@240/208) Broil Outer Element (w@240/208) Lower Convection (w@240/208) Miscellaneous Product Literature Installation Instructions Part # Service Manual Part # Tech Sheet Part # Under Counter Capability Agency Approvals Installation Hardware Warranty Limited Extended Electronic Controls Electrical Elements KEBS278SSS...
... Oven Cooking System Cleaning System Lower Oven Liner Finish Lower Oven Dimensions Lower Oven Volume (cu ft) Lower Oven Height Lower Oven Width Lower Oven Depth Oven Light #/Location Lower Oven ...Hidden Bake Element Electric Element Output Bake (w@240/208) Broil Inner Element (w@240/208) Broil Outer Element (w@240/208) Lower Convection (w@240/208) Miscellaneous Product Literature Installation Instructions Part # Service Manual Part # Tech Sheet Part # Under Counter Capability Agency Approvals Installation Hardware Warranty Limited Extended Electronic Controls Electrical Elements KEBS278SSS...

Technical Guide
Page 21
...Insert #8-14 x 1" screw. 5. Push hinges in as far as they will light briefly, and "PF" should feel the oven door drop into hinge slots in the display, turn off the oven and contact a qualified technician. 7. You should appear in the Use and Care Guide...Oven vent 6. Check Operation of Lower Oven 1. If you are now installed. Touch LOWER OVEN OFF. 2-7 Insert the screws through the steps to open the oven door. Rotate both hinge latches back to select the oven you do not feel for double oven) provided. COMPLETE INSTALLATION 1. Replace oven racks. 7. Touch LOWER OVEN...
...Insert #8-14 x 1" screw. 5. Push hinges in as far as they will light briefly, and "PF" should feel the oven door drop into hinge slots in the display, turn off the oven and contact a qualified technician. 7. You should appear in the Use and Care Guide...Oven vent 6. Check Operation of Lower Oven 1. If you are now installed. Touch LOWER OVEN OFF. 2-7 Insert the screws through the steps to open the oven door. Rotate both hinge latches back to select the oven you do not feel for double oven) provided. COMPLETE INSTALLATION 1. Replace oven racks. 7. Touch LOWER OVEN...

Technical Guide
Page 23
... remain set after 12 hours. Oven display D. Upper and lower oven Off (double oven models) Off (single oven models) H. Upper oven cavity symbol B. Options I H G A. DEHYDRATING (on the lower text line and a lock icon appears in the display. If this is locked, only the TIMER SET/START, TIMER OFF and OVEN LIGHT keys will need to carry the moisture...
... remain set after 12 hours. Oven display D. Upper and lower oven Off (double oven models) Off (single oven models) H. Upper oven cavity symbol B. Options I H G A. DEHYDRATING (on the lower text line and a lock icon appears in the display. If this is locked, only the TIMER SET/START, TIMER OFF and OVEN LIGHT keys will need to carry the moisture...


