Use and Care Guide
Page 18
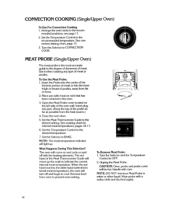
...temperatures, pages 16-17. 6. Unplug the Meat Probe. Wipe probe with care. Insert plug into the inner thigh or breast of the oven wall. Place pan with the heating elements. Set the Meat Thermometer Guide to the recommended temperature. Set the Selector to the desired temperature. 7....it when roasting any type of meat. Turn the Selector to OFF. 2. mended positions, see page 11. 2. CONVECTION COOKING (Single/Upper Oven) To Use For Convection Cooking 1. NOTE: DO NOT immerse Meat Probe in water or other liquid. Turn the Selector and the Temperature Control ...
...temperatures, pages 16-17. 6. Unplug the Meat Probe. Wipe probe with care. Insert plug into the inner thigh or breast of the oven wall. Place pan with the heating elements. Set the Meat Thermometer Guide to the recommended temperature. Set the Selector to the desired temperature. 7....it when roasting any type of meat. Turn the Selector to OFF. 2. mended positions, see page 11. 2. CONVECTION COOKING (Single/Upper Oven) To Use For Convection Cooking 1. NOTE: DO NOT immerse Meat Probe in water or other liquid. Turn the Selector and the Temperature Control ...
Use and Care Guide
Page 25
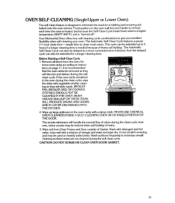
... to instruc- [ tions on heavily soiled areas. A non-scratch scouring pad may be used on page 11. Your KitchenAid Oven offers four self-cleaning cycle combinations to clean most ovens. Re- It is "burned off." The Automatic Self-Clean Cycle features a preset 21/2 hour clean time -ample time... to eliminate the need for a longer cleaning time. that the oven racks be extended for scrubbing and scouring soil baked onto the oven interior. Food spatters on the oven wall become harder to remove each time the oven is heated, but because the Self-Clean Cycle heats these areas ...
... to instruc- [ tions on heavily soiled areas. A non-scratch scouring pad may be used on page 11. Your KitchenAid Oven offers four self-cleaning cycle combinations to clean most ovens. Re- It is "burned off." The Automatic Self-Clean Cycle features a preset 21/2 hour clean time -ample time... to eliminate the need for a longer cleaning time. that the oven racks be extended for scrubbing and scouring soil baked onto the oven interior. Food spatters on the oven wall become harder to remove each time the oven is heated, but because the Self-Clean Cycle heats these areas ...
Installation Instructions
Page 2
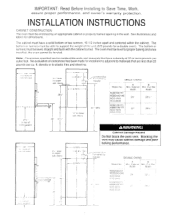
...: Read Before Installing to materials that are for combustible walls and materials that have a solid bottom or two runners, 19-112 inches apart and centered within the cabinet. The bottom or runners must be leveled. the oven cannot be able to plastic tiles and sheeting. 2%" ...MIN 1" upper 28%" Junction Box / Furnished by an appropriate cabinet or properly framed opening in the wall. See illustrations and tables for a double oven...
...: Read Before Installing to materials that are for combustible walls and materials that have a solid bottom or two runners, 19-112 inches apart and centered within the cabinet. The bottom or runners must be leveled. the oven cannot be able to plastic tiles and sheeting. 2%" ...MIN 1" upper 28%" Junction Box / Furnished by an appropriate cabinet or properly framed opening in the wall. See illustrations and tables for a double oven...
Installation Instructions
Page 5
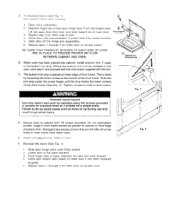
...double ovens. B When oven has been placed into cabinet; Personal Injury Hazard Securely fasten wall oven to move or tip during use and result in oven. Depress finger tab In oven door hinge area. Failure to do so could cause oven to cabinets using the screws provided (4 screws for a double oven or 2 screws for other door on double oven...of door. 4. F Reinstall the doors (See Fig. 1). 1 Slide door hinge arms until approximately 5 inches from door liner and slide toward oven. Oven door IS heavy 1 Open door completely. 2. Push tab toward top of front frame. for other side ...
...double ovens. B When oven has been placed into cabinet; Personal Injury Hazard Securely fasten wall oven to move or tip during use and result in oven. Depress finger tab In oven door hinge area. Failure to do so could cause oven to cabinets using the screws provided (4 screws for a double oven or 2 screws for other door on double oven...of door. 4. F Reinstall the doors (See Fig. 1). 1 Slide door hinge arms until approximately 5 inches from door liner and slide toward oven. Oven door IS heavy 1 Open door completely. 2. Push tab toward top of front frame. for other side ...


