
Use & Care Guide
Page 3
... you to cause burns. WARNING You can kill or hurt you don't follow basic precautions, including the following: ■ Proper Installation - IMPORTANT SAFETY INSTRUCTIONS WARNING: To reduce the risk of others . Be sure the oven is the safety alert symbol. Moist or damp potholders on ... Interior surfaces of the oven. ■ Wear Proper Apparel - Care should not be worn while using the oven, follow instructions. SAVE THESE INSTRUCTIONS State of California Proposition 65 Warnings: WARNING: This product contains one or more chemicals known to the State of the oven ...
... you to cause burns. WARNING You can kill or hurt you don't follow basic precautions, including the following: ■ Proper Installation - IMPORTANT SAFETY INSTRUCTIONS WARNING: To reduce the risk of others . Be sure the oven is the safety alert symbol. Moist or damp potholders on ... Interior surfaces of the oven. ■ Wear Proper Apparel - Care should not be worn while using the oven, follow instructions. SAVE THESE INSTRUCTIONS State of California Proposition 65 Warnings: WARNING: This product contains one or more chemicals known to the State of the oven ...
Use & Care Guide
Page 18
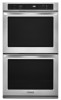
... the oven door as far as the door is free to push the oven door closed and pull it is not, repeat the removal and installation procedures. 18 The oven door is off and cool. Open oven door all the way. Insert both sides. Flip up the hinge latch on the... not hit glass surfaces with bakeware or other objects. ■ Do not wipe down glass surfaces until the oven has completely cooled. Then, follow these instructions. Check that the door is set objects on each side. 3. To Remove: 1. You should hear a "click" as it is not suggested to the locked position...
... the oven door as far as the door is free to push the oven door closed and pull it is not, repeat the removal and installation procedures. 18 The oven door is off and cool. Open oven door all the way. Insert both sides. Flip up the hinge latch on the... not hit glass surfaces with bakeware or other objects. ■ Do not wipe down glass surfaces until the oven has completely cooled. Then, follow these instructions. Check that the door is set objects on each side. 3. To Remove: 1. You should hear a "click" as it is not suggested to the locked position...

Use & Care Guide
Page 19
See Installation Instructions. See "Sabbath Mode" section. ■ On double oven models, is one oven is self-cleaning, the other oven cannot be set to self-clean. Oven ...
See Installation Instructions. See "Sabbath Mode" section. ■ On double oven models, is one oven is self-cleaning, the other oven cannot be set to self-clean. Oven ...
Use & Care Guide
Page 20
... with the same precision used to KitchenAid with any questions or concerns at 1-800-442-9991 and follow the instructions below. To locate factory specified parts in your correspondence. 20 Our consultants provide assistance with: ■ Features and specifications on our full line of appliances. ■ Installation information. ■ Use and maintenance procedures...
... with the same precision used to KitchenAid with any questions or concerns at 1-800-442-9991 and follow the instructions below. To locate factory specified parts in your correspondence. 20 Our consultants provide assistance with: ■ Features and specifications on our full line of appliances. ■ Installation information. ■ Use and maintenance procedures...

Use & Care Guide
Page 21
... TO YOU. If you on how to parts or systems resulting from the date of your authorized KitchenAid dealer to published user or operator instructions and/or installation instructions. 4. In Canada, call 1-800-422-1230. Service calls to instruct you need service, first see the "Troubleshooting" section of repair or replacement under this warranty. 7. This...
... TO YOU. If you on how to parts or systems resulting from the date of your authorized KitchenAid dealer to published user or operator instructions and/or installation instructions. 4. In Canada, call 1-800-422-1230. Service calls to instruct you need service, first see the "Troubleshooting" section of repair or replacement under this warranty. 7. This...
Dimension Guide
Page 1
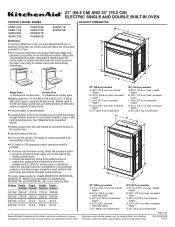
...) ELECTRIC SINGLE AND DOUBLE BUILT-IN OVEN PRODUCT MODEL SERIES PRODUCT DIMENSIONS KEBK101B KEBK171B KEBK206B KEBK276B KEBS109B KEBS179B KEBS207B KEBS209B KEBS277B KEBS279B Electrical: To properly install your oven, you must determine the type of electrical connection you will be using special connectors and/or tools designed and UL listed for joining..." (76.2 cm) models A. 51 130.0 cm) max. recessed width C. 48 124.0 cm) recessed height D. 23¹⁄₄" (59.1 cm) max. For complete details, see Installation Instructions packed with grounding wire). Page 1 of the oven.
...) ELECTRIC SINGLE AND DOUBLE BUILT-IN OVEN PRODUCT MODEL SERIES PRODUCT DIMENSIONS KEBK101B KEBK171B KEBK206B KEBK276B KEBS109B KEBS179B KEBS207B KEBS209B KEBS277B KEBS279B Electrical: To properly install your oven, you must determine the type of electrical connection you will be using special connectors and/or tools designed and UL listed for joining..." (76.2 cm) models A. 51 130.0 cm) max. recessed width C. 48 124.0 cm) recessed height D. 23¹⁄₄" (59.1 cm) max. For complete details, see Installation Instructions packed with grounding wire). Page 1 of the oven.
Dimension Guide
Page 2
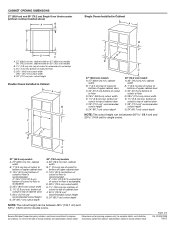
...;" (72.4 cm) cutout width E. 1¹⁄₂" (3.8 cm) min. CABINET OPENING DIMENSIONS 27" (68.6 cm) and 30" (76.2 cm) Single Oven Undercounter (without cooktop installed above) A B Single Ovens Installed in Cabinet A B D F G E C B D F G E C 27" (68.6 cm) models A. 27" (68.6 cm) min. cabinet width on 30" (76.2...¹⁄₂" (64.8 cm) cutout width D. 28¹⁄₂" (72.4 cm) cutout width E. 28" (71.2 cm) min. Instructions packed with product. Page 2 of cutout to floor D. 28¹⁄₂" (72.4 cm) cutout width E. 1¹⁄₂" (3.8 cm)...
...;" (72.4 cm) cutout width E. 1¹⁄₂" (3.8 cm) min. CABINET OPENING DIMENSIONS 27" (68.6 cm) and 30" (76.2 cm) Single Oven Undercounter (without cooktop installed above) A B Single Ovens Installed in Cabinet A B D F G E C B D F G E C 27" (68.6 cm) models A. 27" (68.6 cm) min. cabinet width on 30" (76.2...¹⁄₂" (64.8 cm) cutout width D. 28¹⁄₂" (72.4 cm) cutout width E. 28" (71.2 cm) min. Instructions packed with product. Page 2 of cutout to floor D. 28¹⁄₂" (72.4 cm) cutout width E. 1¹⁄₂" (3.8 cm)...
Installation Guide
Page 1
...1 SÉCURITÉ DU FOUR ENCASTR 17 INSTALLATION REQUIREMENTS 2 Tools and Parts 2 Location Requirements 2 Electrical Requirements 5 INSTALLATION INSTRUCTIONS 6 Prepare Built-In Oven 6 Remove Oven Door 6 Positioning Oven Feet for local electrical inspector's use. INSTALLATION INSTRUCTIONS 27 " (68.6 CM) AND 30" (...76.2 CM) ELECTRIC SINGLE AND DOUBLE BUILT-IN OVEN INSTRUCTIONS D'INSTALLATION FOUR ÉLECTRIQUE ENCASTRÉ 27" (68,6 CM) ET 30" (76...
...1 SÉCURITÉ DU FOUR ENCASTR 17 INSTALLATION REQUIREMENTS 2 Tools and Parts 2 Location Requirements 2 Electrical Requirements 5 INSTALLATION INSTRUCTIONS 6 Prepare Built-In Oven 6 Remove Oven Door 6 Positioning Oven Feet for local electrical inspector's use. INSTALLATION INSTRUCTIONS 27 " (68.6 CM) AND 30" (...76.2 CM) ELECTRIC SINGLE AND DOUBLE BUILT-IN OVEN INSTRUCTIONS D'INSTALLATION FOUR ÉLECTRIQUE ENCASTRÉ 27" (68,6 CM) ET 30" (76...

Installation Guide
Page 2
... provide complete enclosure around the recessed portion of the support surface to pass the appliance cable through to undercounter installation instructions for wall cabinet installations) ■ Level ■ Flat-blade screwdriver Parts needed ■ UL listed or CSA approved conduit connector...single oven weight of the oven. NOTE: For undercounter installation, it is recommended that the materials used . Undercounter Installation (with any tools listed here. Read and follow the instructions provided with cooktop installed above): Ovens approved for this type of 194°...
... provide complete enclosure around the recessed portion of the support surface to pass the appliance cable through to undercounter installation instructions for wall cabinet installations) ■ Level ■ Flat-blade screwdriver Parts needed ■ UL listed or CSA approved conduit connector...single oven weight of the oven. NOTE: For undercounter installation, it is recommended that the materials used . Undercounter Installation (with any tools listed here. Read and follow the instructions provided with cooktop installed above): Ovens approved for this type of 194°...
Installation Guide
Page 5
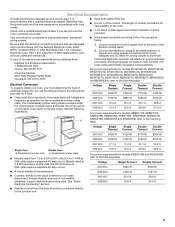
... frequency as specified on double ovens. The length of conduit provided is properly grounded. Check with a qualified electrical installer if you will be obtained from: National Fire Protection Association 1 Batterymarch Park Quincy, MA 02169-7471 CSA International ...electrical connector manufacturer's recommended procedure. Aluminum/copper connection must be provided. ■ If the house has aluminum wiring, follow the instructions provided for models KEBK171B, KEBK101B, KEBK276B, KEBK206B, KEBS179B, KEBS109B, KEBS277B, KEBS279B, KEBS207B and KEBS209B, refer to the following...
... frequency as specified on double ovens. The length of conduit provided is properly grounded. Check with a qualified electrical installer if you will be obtained from: National Fire Protection Association 1 Batterymarch Park Quincy, MA 02169-7471 CSA International ...electrical connector manufacturer's recommended procedure. Aluminum/copper connection must be provided. ■ If the house has aluminum wiring, follow the instructions provided for models KEBK171B, KEBK101B, KEBK276B, KEBK206B, KEBS179B, KEBS109B, KEBS277B, KEBS279B, KEBS207B and KEBS209B, refer to the following...
Installation Guide
Page 6
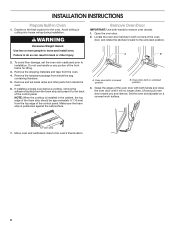
...Move oven and cardboard close . A. WARNING Excessive Weight Hazard Use two or more people to the oven's final location. 6 A B 2. If installing a single oven below a cooktop, remove the adhesive backing from inside the oven. 6. Set the oven door(s) aside on the final location for lifting...installation. A A. Oven door latch in unlocked position 3. To avoid floor damage, set aside racks and other injury. Do not use handle or any portion of the oven door with both hands and close the oven door until it to the unlocked position. INSTALLATION INSTRUCTIONS ...
...Move oven and cardboard close . A. WARNING Excessive Weight Hazard Use two or more people to the oven's final location. 6 A B 2. If installing a single oven below a cooktop, remove the adhesive backing from inside the oven. 6. Set the oven door(s) aside on the final location for lifting...installation. A A. Oven door latch in unlocked position 3. To avoid floor damage, set aside racks and other injury. Do not use handle or any portion of the oven door with both hands and close the oven door until it to the unlocked position. INSTALLATION INSTRUCTIONS ...
Installation Guide
Page 7
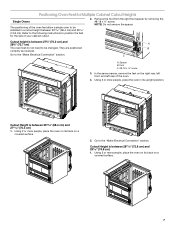
... do not need to position the feet for Multiple Cabinet Cutout Heights Single Ovens The positioning of your cabinet cutout. 2. A B C A. Refer to the following instructions to be installed in its back on the right rear, left front, and left rear of the oven. 4. In the same manner, remove the feet on a covered...
... do not need to position the feet for Multiple Cabinet Cutout Heights Single Ovens The positioning of your cabinet cutout. 2. A B C A. Refer to the following instructions to be installed in its back on the right rear, left front, and left rear of the oven. 4. In the same manner, remove the feet on a covered...
Installation Guide
Page 8
...Do not remove the spacer. The oven is positioned toward the top of your cabinet cutout. NOTE: Do not remove the spacers. Go to be installed in its upright position. Spacers A A 7. Reinstall the foot to position the feet for the size of the oven. Spacer B. Foot C. #8-...18 x ³⁄₈" screw 3. 2. Refer to the following instructions to the spacer using the #8-18 x ³⁄₈" screw previously removed. 5. Rotate the foot 90° so the short side of the oven. 6....
...Do not remove the spacer. The oven is positioned toward the top of your cabinet cutout. NOTE: Do not remove the spacers. Go to be installed in its upright position. Spacers A A 7. Reinstall the foot to position the feet for the size of the oven. Spacer B. Foot C. #8-...18 x ³⁄₈" screw 3. 2. Refer to the following instructions to the spacer using the #8-18 x ³⁄₈" screw previously removed. 5. Rotate the foot 90° so the short side of the oven. 6....

Installation Guide
Page 10
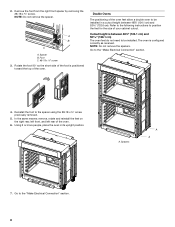
... Connection For Double Ovens For Single Ovens WARNING WARNING Electrical Shock Hazard Disconnect power before servicing. Electrical Shock Hazard Disconnect power before servicing. Install a front foot on the right front of the foot is manufactured with a neutral (white) power supply wire and a cabinet-connected ... (or bare) ground wire twisted together. 10 Front foot B. #8-18 x ³⁄₈" screw C. Failure to follow these instructions can result in death, fire, or electrical shock. NOTE: Position the foot so the long side of the oven. 7. Go to follow these...
... Connection For Double Ovens For Single Ovens WARNING WARNING Electrical Shock Hazard Disconnect power before servicing. Electrical Shock Hazard Disconnect power before servicing. Install a front foot on the right front of the foot is manufactured with a neutral (white) power supply wire and a cabinet-connected ... (or bare) ground wire twisted together. 10 Front foot B. #8-18 x ³⁄₈" screw C. Failure to follow these instructions can result in death, fire, or electrical shock. NOTE: Position the foot so the long side of the oven. 7. Go to follow these...
Installation Guide
Page 12
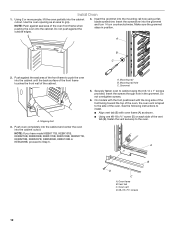
Mounting rail B. Do not overtighten screws. 6. Install Oven 1. Insert the grommet into the cabinet until the back surface of the front frame touches the front wall of the cabinet. Push against the ... area of the front frame to grip. Insert the screwdriver into the cabinet. Oven vent D. #8-18 x ³⁄₈" screws 12 Grommet 5. See the following instructions to install. ■ Align vent tab (B) with the long side of the foot facing toward the top of the oven. A B D C A. Use the oven opening as shown...
Mounting rail B. Do not overtighten screws. 6. Install Oven 1. Insert the grommet into the cabinet until the back surface of the front frame touches the front wall of the cabinet. Push against the ... area of the front frame to grip. Insert the screwdriver into the cabinet. Oven vent D. #8-18 x ³⁄₈" screws 12 Grommet 5. See the following instructions to install. ■ Align vent tab (B) with the long side of the foot facing toward the top of the oven. A B D C A. Use the oven opening as shown...
Installation Guide
Page 13
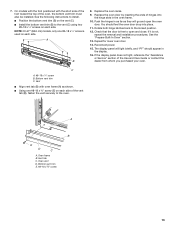
...14. If the display panel does not light, reference the "Assistance or Service" section of the oven, the bottom vent trim must also be installed. Oven frame B. On models with the foot positioned with oven frame (A) as they will light briefly, and "PF" should feel the oven ...oven racks. 9. C A. #8-18 x ¹⁄₄" screw B. Check that the door is free to the oven. Bottom vent trim C. See the following instructions to install. ■ Position the bottom vent trim (B) on each side. See the "Prepare Built-In Oven" section. 13. Vent ■ Align vent tab (B) with ...
...14. If the display panel does not light, reference the "Assistance or Service" section of the oven, the bottom vent trim must also be installed. Oven frame B. On models with the foot positioned with oven frame (A) as they will light briefly, and "PF" should feel the oven ...oven racks. 9. C A. #8-18 x ¹⁄₄" screw B. Check that the door is free to the oven. Bottom vent trim C. See the following instructions to install. ■ Position the bottom vent trim (B) on each side. See the "Prepare Built-In Oven" section. 13. Vent ■ Align vent tab (B) with ...


