Use & Care Guide
Page 1
... service, call: 1-800-422-1230 In Canada, for assistance, installation and service, call: 1-800-807-6777 or visit our website at... www.kitchenaid.com or www.kitchenaid.ca FOURS ÉLECTRIQUES ENCASTRÉS SIMPLE ET DOUBLE Guide d'utilisation et d'entretien Au Canada, pour assistance, installation ou service, composer le 1-800-807-6777 ou visiter notre...
... service, call: 1-800-422-1230 In Canada, for assistance, installation and service, call: 1-800-807-6777 or visit our website at... www.kitchenaid.com or www.kitchenaid.ca FOURS ÉLECTRIQUES ENCASTRÉS SIMPLE ET DOUBLE Guide d'utilisation et d'entretien Au Canada, pour assistance, installation ou service, composer le 1-800-807-6777 ou visiter notre...

Use & Care Guide
Page 21
...AS PROVIDED HEREIN. Damage resulting from accident, alteration, misuse, abuse, fire, flood, acts of God, improper installation, installation not in accordance with the removal from your home of your major appliance, to instruct you on how to...fuses, or to be repaired in the home and only in-home service is not installed in accordance with the product, KitchenAid will pay for Factory Specified Parts for the stainless steel oven cavity/inner door if the...appliance. Consumable parts are excluded from date of the Use & Care Guide. In the U.S.A., call 1-800-807-6777. 9/07 21
...AS PROVIDED HEREIN. Damage resulting from accident, alteration, misuse, abuse, fire, flood, acts of God, improper installation, installation not in accordance with the removal from your home of your major appliance, to instruct you on how to...fuses, or to be repaired in the home and only in-home service is not installed in accordance with the product, KitchenAid will pay for Factory Specified Parts for the stainless steel oven cavity/inner door if the...appliance. Consumable parts are excluded from date of the Use & Care Guide. In the U.S.A., call 1-800-807-6777. 9/07 21
Installation Guide
Page 13
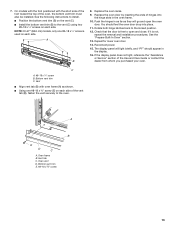
... each side. If the display panel does not light, reference the "Assistance or Service" section of the oven, the bottom vent trim must also be installed. A B 8. Replace the oven door by inserting the ends of the vent tab (B), fasten the vent securely to the locked position. 12. You should appear in... each side. Reconnect power. 15. Vent ■ Align vent tab (B) with the short side of the foot toward the top of the Use and Care Guide or contact the dealer from whom you purchased your oven. Bottom vent trim E. #8-18 x ³⁄₈" screw 13 Oven frame B.
... each side. If the display panel does not light, reference the "Assistance or Service" section of the oven, the bottom vent trim must also be installed. A B 8. Replace the oven door by inserting the ends of the vent tab (B), fasten the vent securely to the locked position. 12. You should appear in... each side. Reconnect power. 15. Vent ■ Align vent tab (B) with the short side of the foot toward the top of the Use and Care Guide or contact the dealer from whom you purchased your oven. Bottom vent trim E. #8-18 x ³⁄₈" screw 13 Oven frame B.

Installation Guide
Page 14
... CANCEL on . 2. For oven use , set up the clock and any other preferences if available. Press START. For more information, read the Use and Care Guide. 5. Complete Installation 1. Set the temperature. ■ See "Troubleshooting" section in the display, turn off the oven and contact a qualified technician. 7. Check that you have all packaging...
... CANCEL on . 2. For oven use , set up the clock and any other preferences if available. Press START. For more information, read the Use and Care Guide. 5. Complete Installation 1. Set the temperature. ■ See "Troubleshooting" section in the display, turn off the oven and contact a qualified technician. 7. Check that you have all packaging...


