Use & Care Guide
Page 1
... For questions about features, operation/performance, parts accessories or service, call: 1-800-422-1230 In Canada, for assistance, installation and service, call: 1-800-807-6777 or visit our website at... www.kitchenaid.com or www.kitchenaid.ca FOURS ÉLECTRIQUES ENCASTRÉS SIMPLE ET DOUBLE Guide d'utilisation et d'entretien Au Canada, pour assistance...
... For questions about features, operation/performance, parts accessories or service, call: 1-800-422-1230 In Canada, for assistance, installation and service, call: 1-800-807-6777 or visit our website at... www.kitchenaid.com or www.kitchenaid.ca FOURS ÉLECTRIQUES ENCASTRÉS SIMPLE ET DOUBLE Guide d'utilisation et d'entretien Au Canada, pour assistance...

Use & Care Guide
Page 3
... Children Alone - All safety messages will tell you what can be killed or seriously injured if you what the potential hazard is properly installed and grounded by a qualified technician. ■ Never Use the Oven for a good seal. IMPORTANT SAFETY INSTRUCTIONS WARNING: To reduce the... or use . The door gasket is the safety alert symbol. All safety messages will follow basic precautions, including the following: ■ Proper Installation - Moist or damp potholders on any part of Oven Racks - Remove broiler pan and other bulky cloth. ■ Use Care When Opening...
... Children Alone - All safety messages will tell you what can be killed or seriously injured if you what the potential hazard is properly installed and grounded by a qualified technician. ■ Never Use the Oven for a good seal. IMPORTANT SAFETY INSTRUCTIONS WARNING: To reduce the... or use . The door gasket is the safety alert symbol. All safety messages will follow basic precautions, including the following: ■ Proper Installation - Moist or damp potholders on any part of Oven Racks - Remove broiler pan and other bulky cloth. ■ Use Care When Opening...
Use & Care Guide
Page 18
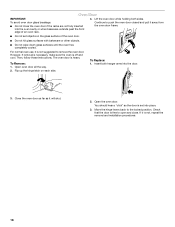
... heavy. Open oven door all the way. Insert both sides. Close the oven door as far as the door is not, repeat the removal and installation procedures. 18
... heavy. Open oven door all the way. Insert both sides. Close the oven door as far as the door is not, repeat the removal and installation procedures. 18

Use & Care Guide
Page 19
TROUBLESHOOTING Try the solutions suggested here first in order to avoid the cost of time being used ? See Installation Instructions. Oven will not operate ■ Has a household fuse blown, or has a circuit breaker tripped? See "Control Lock" section. ■ Is the Sabbath Mode set ? ...
TROUBLESHOOTING Try the solutions suggested here first in order to avoid the cost of time being used ? See Installation Instructions. Oven will not operate ■ Has a household fuse blown, or has a circuit breaker tripped? See "Control Lock" section. ■ Is the Sabbath Mode set ? ...
Use & Care Guide
Page 20
... write to KitchenAid Canada with the same precision used to fulfill the product warranty and provide after-warranty service, anywhere in your appliance. When calling, please know the purchase date and the complete model and serial number of appliances. ■ Installation information. &#... service companies. To order accessories, call . Portable appliances, bakeware, cookware, gadgets and textiles are trained to build every new KITCHENAID® appliance. Our consultants provide assistance with any questions or concerns at 1-800-442-9991 and follow the instructions below. Our...
... write to KitchenAid Canada with the same precision used to fulfill the product warranty and provide after-warranty service, anywhere in your appliance. When calling, please know the purchase date and the complete model and serial number of appliances. ■ Installation information. &#... service companies. To order accessories, call . Portable appliances, bakeware, cookware, gadgets and textiles are trained to build every new KITCHENAID® appliance. Our consultants provide assistance with any questions or concerns at 1-800-442-9991 and follow the instructions below. Our...

Use & Care Guide
Page 21
...appliance is used in the country in which it is installed in an inaccessible location or is not installed in accordance with published installation instructions. 10. Proof of original purchase date is covered by an authorized KitchenAid servicer is not available. 9. Cosmetic damage, including scratches...remote area where service by this warranty. 7. KITCHENAID SHALL NOT BE LIABLE FOR INCIDENTAL OR CONSEQUENTIAL DAMAGES. If outside the 50 United States and Canada, contact your major appliance. Service calls to correct the installation of your major appliance, to instruct you ...
...appliance is used in the country in which it is installed in an inaccessible location or is not installed in accordance with published installation instructions. 10. Proof of original purchase date is covered by an authorized KitchenAid servicer is not available. 9. Cosmetic damage, including scratches...remote area where service by this warranty. 7. KITCHENAID SHALL NOT BE LIABLE FOR INCIDENTAL OR CONSEQUENTIAL DAMAGES. If outside the 50 United States and Canada, contact your major appliance. Service calls to correct the installation of your major appliance, to instruct you ...

Use & Care Guide
Page 22
You must provide proof of purchase or installation date for future reference. Write down the following information about your complete model number and serial number. Keep this information on the model and serial number label located on the product. Dealer name Address Phone number Model number Serial number Purchase date 22 You will need to know your major appliance to better help you obtain assistance or service if you ever need it. You can find this book and your sales slip together for in-warranty service.
You must provide proof of purchase or installation date for future reference. Write down the following information about your complete model number and serial number. Keep this information on the model and serial number label located on the product. Dealer name Address Phone number Model number Serial number Purchase date 22 You will need to know your major appliance to better help you obtain assistance or service if you ever need it. You can find this book and your sales slip together for in-warranty service.
Dimension Guide
Page 1
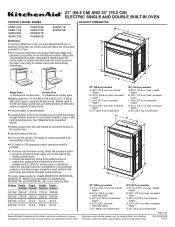
...) ELECTRIC SINGLE AND DOUBLE BUILT-IN OVEN PRODUCT MODEL SERIES PRODUCT DIMENSIONS KEBK101B KEBK171B KEBK206B KEBK276B KEBS109B KEBS179B KEBS207B KEBS209B KEBS277B KEBS279B Electrical: To properly install your oven, you must determine the type of electrical connection you will be using special connectors and/or tools designed and UL listed for it...) models A. 51 130.0 cm) max. recessed depth E. 30" (76.2 cm) overall width Dimensions are for serviceability of the flexible conduit leads. 2. For complete details, see Installation Instructions packed with product. W10351242B 7/26/12
...) ELECTRIC SINGLE AND DOUBLE BUILT-IN OVEN PRODUCT MODEL SERIES PRODUCT DIMENSIONS KEBK101B KEBK171B KEBK206B KEBK276B KEBS109B KEBS179B KEBS207B KEBS209B KEBS277B KEBS279B Electrical: To properly install your oven, you must determine the type of electrical connection you will be using special connectors and/or tools designed and UL listed for it...) models A. 51 130.0 cm) max. recessed depth E. 30" (76.2 cm) overall width Dimensions are for serviceability of the flexible conduit leads. 2. For complete details, see Installation Instructions packed with product. W10351242B 7/26/12
Dimension Guide
Page 2
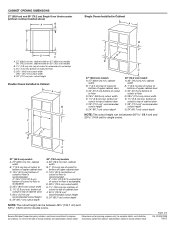
...68.6 cm) and 30" (76.2 cm) Single Oven Undercounter (without notice. cutout height Double Ovens Installed in Cabinet A E D C A. 27" (68.6 cm) min. For complete details, see Installation our products, we reserve the right to floor D. 25¹⁄₂" (64.8 cm) cutout... of countertop C. 5¹⁄₄" (13.3 cm) bottom of 2 Ref. Instructions packed with product. top of cutout to change materials and specifications without cooktop installed above) A B Single Ovens Installed in Cabinet A B D F G E C B D F G E C 27" (68.6 cm) models A. 27" (68.6 cm) min. bottom...
...68.6 cm) and 30" (76.2 cm) Single Oven Undercounter (without notice. cutout height Double Ovens Installed in Cabinet A E D C A. 27" (68.6 cm) min. For complete details, see Installation our products, we reserve the right to floor D. 25¹⁄₂" (64.8 cm) cutout... of countertop C. 5¹⁄₄" (13.3 cm) bottom of 2 Ref. Instructions packed with product. top of cutout to change materials and specifications without cooktop installed above) A B Single Ovens Installed in Cabinet A B D F G E C B D F G E C 27" (68.6 cm) models A. 27" (68.6 cm) min. bottom...
Installation Guide
Page 1
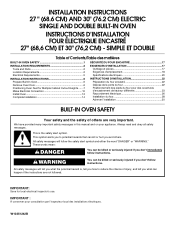
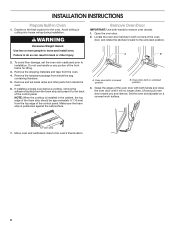
... "DANGER" or "WARNING." W10351242B All safety messages will follow instructions. IMPORTANT : À conserver pour consultation par l'inspecteur local des installations électriques. We have provided many important safety messages in this manual and on your appliance. IMPORTANT: Save for Multiple Cabinet Cutout ...des pieds du four pour des ouvertures d'encastrement de hauteur différente 23 Raccordement électrique 26 Installation du four 28 Achever l'installation 30 BUILT-IN OVEN SAFETY Your safety and the safety of injury, and tell you what can kill or...
... "DANGER" or "WARNING." W10351242B All safety messages will follow instructions. IMPORTANT : À conserver pour consultation par l'inspecteur local des installations électriques. We have provided many important safety messages in this manual and on your appliance. IMPORTANT: Save for Multiple Cabinet Cutout ...des pieds du four pour des ouvertures d'encastrement de hauteur différente 23 Raccordement électrique 26 Installation du four 28 Achever l'installation 30 BUILT-IN OVEN SAFETY Your safety and the safety of injury, and tell you what can kill or...

Installation Guide
Page 2
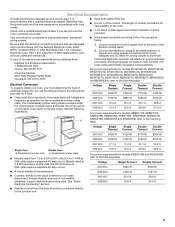
...all governing codes and ordinances. ■ Cabinet opening dimensions that the junction box be made by a licensed, qualified electrical installer. *Grommets not included with models KEBK171B, KEBK101B, KEBK276B, KEBK206B, KEBS179B, KEBS109B, KEBS277B, KEBS279B, KEBS207B, KEBS209B, KEBU109B... ■ Foam strip - This oven has been designed in the right rear or left cabinet. Undercounter Installation (with cooktop installed above): Ovens approved for wall cabinet installations) ■ Level ■ Flat-blade screwdriver Parts needed ■ Phillips screwdriver ■ Measuring tape...
...all governing codes and ordinances. ■ Cabinet opening dimensions that the junction box be made by a licensed, qualified electrical installer. *Grommets not included with models KEBK171B, KEBK101B, KEBK276B, KEBK206B, KEBS179B, KEBS109B, KEBS277B, KEBS279B, KEBS207B, KEBS209B, KEBU109B... ■ Foam strip - This oven has been designed in the right rear or left cabinet. Undercounter Installation (with cooktop installed above): Ovens approved for wall cabinet installations) ■ Level ■ Flat-blade screwdriver Parts needed ■ Phillips screwdriver ■ Measuring tape...
Installation Guide
Page 3
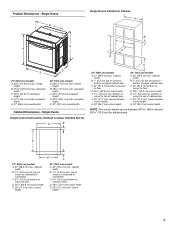
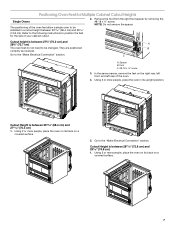
... (76.2 cm) min. E D C 27" (68.6 cm) models A. 27" (68.6 cm) min. cutout height 30" (76.2 cm) models A. 30" (76.2 cm) min. Single Ovens B Single Ovens Installed in Cabinet A B D C F A G E D E 27" (68.6 cm) models A. 28¾" (72.8 cm) max. top of cutout to underside of countertop C. 5¹⁄₄" (13.3 cm) ...height 3 Product Dimensions - cabinet width B. 1¹⁄₂" (3.8 cm) min. overall height B. 28½" (72.4 cm) max. Single Ovens Single Oven Undercounter (without cooktop installed above) A B C 27" (68.6 cm) models A. 27" (68.6 cm) min.
... (76.2 cm) min. E D C 27" (68.6 cm) models A. 27" (68.6 cm) min. cutout height 30" (76.2 cm) models A. 30" (76.2 cm) min. Single Ovens B Single Ovens Installed in Cabinet A B D C F A G E D E 27" (68.6 cm) models A. 28¾" (72.8 cm) max. top of cutout to underside of countertop C. 5¹⁄₄" (13.3 cm) ...height 3 Product Dimensions - cabinet width B. 1¹⁄₂" (3.8 cm) min. overall height B. 28½" (72.4 cm) max. Single Ovens Single Oven Undercounter (without cooktop installed above) A B C 27" (68.6 cm) models A. 27" (68.6 cm) min.

Installation Guide
Page 4
... depth NOTE: The cutout height can be between 48⁷⁄₈" (124.1 cm) and 52 132.6 cm) for double ovens. 4 Double Ovens Double Ovens Installed in Cabinet A A C B D F E D 27" (68.6 cm) models A. 51 130.0 cm) max. recessed depth E. 27" (68.6 cm) overall width 30" (76.2 cm) models A. 51 130.0 cm) max...
... depth NOTE: The cutout height can be between 48⁷⁄₈" (124.1 cm) and 52 132.6 cm) for double ovens. 4 Double Ovens Double Ovens Installed in Cabinet A A C B D F E D 27" (68.6 cm) models A. 51 130.0 cm) max. recessed depth E. 27" (68.6 cm) overall width 30" (76.2 cm) models A. 51 130.0 cm) max...
Installation Guide
Page 5
...determine the type of copper wire using and follow the procedure below at 208 volts) require a separate 40-amp circuit. Electrical Connection To properly install your oven, you will be connected directly to the junction box. 208 VAC 14.9 A 15.0 A 29.8 A 29.9 A For ...power requirements for it is recommended that a qualified electrical installer determine that the electrical connection and wire size are in conformance with local codes. Model/serial number plate A. See "Make Electrical Connection" section. &#...
...determine the type of copper wire using and follow the procedure below at 208 volts) require a separate 40-amp circuit. Electrical Connection To properly install your oven, you will be connected directly to the junction box. 208 VAC 14.9 A 15.0 A 29.8 A 29.9 A For ...power requirements for it is recommended that a qualified electrical installer determine that the electrical connection and wire size are in conformance with local codes. Model/serial number plate A. See "Make Electrical Connection" section. &#...
Installation Guide
Page 6
... the oven door. 2. Remove and set the oven onto cardboard prior to move and install oven. Make sure the foam strip is installed in the cabinet, the top edge of the foam strip should be approximately ³⁄₈" (10 mm) from the top edge of the control... strip and press it will no longer close to do so can result in unlocked position 3. A A. Locate the oven door latches in locked position B. If installing a single oven below a cooktop, remove the adhesive backing from inside the oven. 6. A. Do not use handle or any portion of the oven door, and rotate...
... the oven door. 2. Remove and set the oven onto cardboard prior to move and install oven. Make sure the foam strip is installed in the cabinet, the top edge of the foam strip should be approximately ³⁄₈" (10 mm) from the top edge of the control... strip and press it will no longer close to do so can result in unlocked position 3. A A. Locate the oven door latches in locked position B. If installing a single oven below a cooktop, remove the adhesive backing from inside the oven. 6. A. Do not use handle or any portion of the oven door, and rotate...
Installation Guide
Page 7
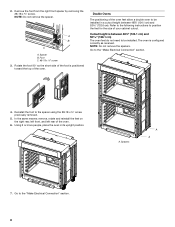
... feet allow a single oven to be changed. Cutout Height is between 26 68.4 cm) and 27 70.3 cm) 1. Refer to the following instructions to be installed in its back on its upright position. Spacer B. NOTE: Do not remove the spacer. Using 2 or more people, place the oven on a covered surface. 7 A B C A. They...
... feet allow a single oven to be changed. Cutout Height is between 26 68.4 cm) and 27 70.3 cm) 1. Refer to the following instructions to be installed in its back on its upright position. Spacer B. NOTE: Do not remove the spacer. Using 2 or more people, place the oven on a covered surface. 7 A B C A. They...
Installation Guide
Page 8
... for the size of your cabinet cutout. A. Rotate the foot 90° so the short side of the oven feet allow a double oven to be installed in its upright position. In the same manner, remove, rotate and reinstall the feet on the right rear, left front, and left rear of the..., place the oven in a cutout height between 48⁷⁄₈" (124.1 cm) and 50 128.1 cm) The oven feet do not need to be installed. NOTE: Do not remove the spacer. Double Ovens The positioning of the foot is configured correctly as received. Go to the "Make Electrical Connection" section...
... for the size of your cabinet cutout. A. Rotate the foot 90° so the short side of the oven feet allow a double oven to be installed in its upright position. In the same manner, remove, rotate and reinstall the feet on the right rear, left front, and left rear of the..., place the oven in a cutout height between 48⁷⁄₈" (124.1 cm) and 50 128.1 cm) The oven feet do not need to be installed. NOTE: Do not remove the spacer. Double Ovens The positioning of the foot is configured correctly as received. Go to the "Make Electrical Connection" section...

Installation Guide
Page 9
...oven in its back on the left rear spacer using a #8-18 x ³⁄₈" screw. Foot C. #8-18 x ³⁄₈" screw 3. Install a front foot on a covered surface. 2. A B C A. Go to the "Make Electrical Connection" section. Cutout Height is between 50¹⁄₂"... (128.2 cm) and 51¹⁄₈" (129.9 cm) 1. In the same manner, install a foot on a covered surface. 6. Spacer 5. Install a foot on its upright position. 2. A B C A. Spacer B. Using 2 or more people, place the oven on its ...
...oven in its back on the left rear spacer using a #8-18 x ³⁄₈" screw. Foot C. #8-18 x ³⁄₈" screw 3. Install a front foot on a covered surface. 2. A B C A. Go to the "Make Electrical Connection" section. Cutout Height is between 50¹⁄₂"... (128.2 cm) and 51¹⁄₈" (129.9 cm) 1. In the same manner, install a foot on a covered surface. 6. Spacer 5. Install a foot on its upright position. 2. A B C A. Spacer B. Using 2 or more people, place the oven on its ...

Installation Guide
Page 10
4. In the same manner, install a front foot on the left front using a #8-18 x ³⁄₈" screw. Electrically ground oven. This oven is facing away from the oven as shown. 6. ... instructions can result in its upright position. Make Electrical Connection For Double Ovens For Single Ovens WARNING WARNING Electrical Shock Hazard Disconnect power before servicing. Install a front foot on the right front of the foot is manufactured with a neutral (white) power supply wire and a cabinet-connected green (or bare) ground wire...
4. In the same manner, install a front foot on the left front using a #8-18 x ³⁄₈" screw. Electrically ground oven. This oven is facing away from the oven as shown. 6. ... instructions can result in its upright position. Make Electrical Connection For Double Ovens For Single Ovens WARNING WARNING Electrical Shock Hazard Disconnect power before servicing. Install a front foot on the right front of the foot is manufactured with a neutral (white) power supply wire and a cabinet-connected green (or bare) ground wire...
Installation Guide
Page 11
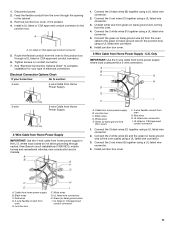
...wires (F) together using a UL listed wire connector. 2. U.S. Black wires D. Junction box H I . Green (or bare) ground wires I F. Install a UL listed or CSA approved conduit connector to the green (or bare) ground wire (in Canada. Tighten screws on conduit connector. 7. Only IMPORTANT:...approved conduit connector. 6. Disconnect power. 2. UL listed or CSA approved conduit connector 5. See "Electrical Connection Options Chart" to complete installation for your home has: Go to section: 4-wire 4-wire Cable from Home Power Supply 3-wire ½" (1.3 cm) 3-wire ...
...wires (F) together using a UL listed wire connector. 2. U.S. Black wires D. Junction box H I . Green (or bare) ground wires I F. Install a UL listed or CSA approved conduit connector to the green (or bare) ground wire (in Canada. Tighten screws on conduit connector. 7. Only IMPORTANT:...approved conduit connector. 6. Disconnect power. 2. UL listed or CSA approved conduit connector 5. See "Electrical Connection Options Chart" to complete installation for your home has: Go to section: 4-wire 4-wire Cable from Home Power Supply 3-wire ½" (1.3 cm) 3-wire ...


