
Use & Care Guide
Page 1
...;les KEBS107 KEBS177 KEBS207 KEBS277 KEBS208 KEBS278 W10162180A SUPERBA® BUILT-IN ELECTRIC CONVECTION SINGLE AND DOUBLE OVENS Use & Care Guide For questions about features, operation/performance, parts, accessories or service, call: 1-800-422-1230 or visit our website at www.kitchenaid.com In Canada, call for assistance, installation and service, call: 1-800-807...
...;les KEBS107 KEBS177 KEBS207 KEBS277 KEBS208 KEBS278 W10162180A SUPERBA® BUILT-IN ELECTRIC CONVECTION SINGLE AND DOUBLE OVENS Use & Care Guide For questions about features, operation/performance, parts, accessories or service, call: 1-800-422-1230 or visit our website at www.kitchenaid.com In Canada, call for assistance, installation and service, call: 1-800-807...

Use & Care Guide
Page 4
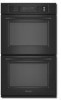
...the substances listed, including benzene, formaldehyde, carbon monoxide, and toluene. Electronic oven control B. Oven vent C. T.H.E.™ (Third Hidden Element) convection element and fan (in back panel) J. Model and serial number plate (on double oven models) F. The locations and appearances of the features shown here may ... to publish a list of substances known to the State of California to cause cancer, birth defects, or other reproductive harm. Oven door lock latch H. This appliance can cause low-level exposure to some or all of potential exposure to warn of the items...
...the substances listed, including benzene, formaldehyde, carbon monoxide, and toluene. Electronic oven control B. Oven vent C. T.H.E.™ (Third Hidden Element) convection element and fan (in back panel) J. Model and serial number plate (on double oven models) F. The locations and appearances of the features shown here may ... to publish a list of substances known to the State of California to cause cancer, birth defects, or other reproductive harm. Oven door lock latch H. This appliance can cause low-level exposure to some or all of potential exposure to warn of the items...
Use & Care Guide
Page 5
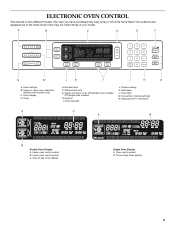
Start/control lock G. Self-clean L. Lower oven cavity symbol C. Oven cavity symbol B. ELECTRONIC OVEN CONTROL This manual covers different models. Oven settings B. Upper or lower oven selectors (double oven models only) C. Time of day, timer display 5 EasyConvect™ conversion A C A B B Double Oven Display A. A B C D E F N M L K J I . Timer E. Convection cooking settings N. Upper oven cavity symbol B. The oven you have purchased may not match those of the items...
Start/control lock G. Self-clean L. Lower oven cavity symbol C. Oven cavity symbol B. ELECTRONIC OVEN CONTROL This manual covers different models. Oven settings B. Upper or lower oven selectors (double oven models only) C. Time of day, timer display 5 EasyConvect™ conversion A C A B B Double Oven Display A. A B C D E F N M L K J I . Timer E. Convection cooking settings N. Upper oven cavity symbol B. The oven you have purchased may not match those of the items...

Use & Care Guide
Page 6
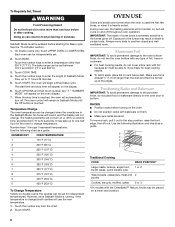
.... OPTIONS HIDDEN FUNCTION 1 Fahrenheit and Celsius conversion 2 Sound On/Off 3 Sound High/Low 4 End beep On/Off 5* Dehydrate 6 Oven temperature calibration 7** Sabbath Mode *On convection models **Sabbath Mode must be entered by touching either CLOCK SET/START or START to allow operation...but can be canceled. On double oven models, this display shows a time countdown and the stop their respective oven functions except for service, see the "Assistance or Service" section. Lower Oven Off, Upper Oven Off and Off The LOWER OVEN OFF, UPPER OVEN OFF and OFF keys stop ...
.... OPTIONS HIDDEN FUNCTION 1 Fahrenheit and Celsius conversion 2 Sound On/Off 3 Sound High/Low 4 End beep On/Off 5* Dehydrate 6 Oven temperature calibration 7** Sabbath Mode *On convection models **Sabbath Mode must be entered by touching either CLOCK SET/START or START to allow operation...but can be canceled. On double oven models, this display shows a time countdown and the stop their respective oven functions except for service, see the "Assistance or Service" section. Lower Oven Off, Upper Oven Off and Off The LOWER OVEN OFF, UPPER OVEN OFF and OFF keys stop ...

Use & Care Guide
Page 7
...setting -10°F (-5°C) ...a little less -20°F (-10°C) ...moderately less -30°F (-15°C) ...much less To Adjust Oven Temperature Calibration: 1. On single ovens, open the upper or lower oven door. See the "To Activate" section. Touch START. 4. Touch again to enter a temperature...to avoid unintended use a thermometer to measure oven temperature because opening the oven door during cycling may also touch OFF, UPPER OVEN OFF or LOWER OVEN OFF to be touched. On double ovens only, touch UPPER OVEN or LOWER OVEN. NOTE: The Timer does not start keys...
...setting -10°F (-5°C) ...a little less -20°F (-10°C) ...moderately less -30°F (-15°C) ...much less To Adjust Oven Temperature Calibration: 1. On single ovens, open the upper or lower oven door. See the "To Activate" section. Touch START. 4. Touch again to enter a temperature...to avoid unintended use a thermometer to measure oven temperature because opening the oven door during cycling may also touch OFF, UPPER OVEN OFF or LOWER OVEN OFF to be touched. On double ovens only, touch UPPER OVEN or LOWER OVEN. NOTE: The Timer does not start keys...
Use & Care Guide
Page 8
...position racks with bakeware on and off . To move a rack, pull it out to enter a temperature other than 350°F (177°C). On double ovens only, touch UPPER OVEN or LOWER OVEN. "SABBATH MODE" will cycle on them. ■ Make sure racks are level. Touch the number key from 16 to the...176;C). 3. The start time and stop position, raise the front edge, then lift out. No tones will sound, and the display will appear on double ovens, the cavities can be independently set for a random time, anywhere from the chart. 2. The bake range can be able to move birds to ...
...position racks with bakeware on and off . To move a rack, pull it out to enter a temperature other than 350°F (177°C). On double ovens only, touch UPPER OVEN or LOWER OVEN. "SABBATH MODE" will cycle on them. ■ Make sure racks are level. Touch the number key from 16 to the...176;C). 3. The start time and stop position, raise the front edge, then lift out. No tones will sound, and the display will appear on double ovens, the cavities can be independently set for a random time, anywhere from the chart. 2. The bake range can be able to move birds to ...

Use & Care Guide
Page 10
...'s instructions. Single oven or upper double oven D. To Bake or Roast: Before baking or roasting, position racks according to maintain the oven temperature. Broil elements B. A meat thermometer is closed. If the oven door is opened during baking or roasting, the heating elements (bake and both broils) will turn on and off approximately 30 seconds after the...
...'s instructions. Single oven or upper double oven D. To Bake or Roast: Before baking or roasting, position racks according to maintain the oven temperature. Broil elements B. A meat thermometer is closed. If the oven door is opened during baking or roasting, the heating elements (bake and both broils) will turn on and off approximately 30 seconds after the...

Use & Care Guide
Page 11
...; For proper draining, do not cover the grid with the longest side parallel to stop position before putting food in, unless recommended in approximately 30 seconds. Use tongs to turn off . 4. Very thin cuts of juices. Drippings will sound. 4. To Broil: Before broiling, position rack ...shaped pieces of the broiler pan may need to the Broiling Chart. On double ovens only, touch UPPER OVEN or LOWER OVEN. Touch the number keys to 12 patties, equally spaced, on the oven display if the actual oven temperature is opened during broiling, the broil element(s) will appear on broiler...
...; For proper draining, do not cover the grid with the longest side parallel to stop position before putting food in, unless recommended in approximately 30 seconds. Use tongs to turn off . 4. Very thin cuts of juices. Drippings will sound. 4. To Broil: Before broiling, position rack ...shaped pieces of the broiler pan may need to the Broiling Chart. On double ovens only, touch UPPER OVEN or LOWER OVEN. Touch the number keys to 12 patties, equally spaced, on the oven display if the actual oven temperature is opened during broiling, the broil element(s) will appear on broiler...

Use & Care Guide
Page 12
...fan C. Convection, Bake and Broil (only during convection roasting, the fan turns off immediately when the door is closed . On double ovens only, touch UPPER OVEN or LOWER OVEN. The convection bake range can be used for roasting meats and poultry, or for baking yeast breads and loaf cakes using a... is full, extra cooking time may need to follow these instructions can be reduced also. If the oven door is opened during preheating) elements will turn off approximately 30 seconds after the door is opened and turns on immediately when the door is opened . WARNING Burn ...
...fan C. Convection, Bake and Broil (only during convection roasting, the fan turns off immediately when the door is closed . On double ovens only, touch UPPER OVEN or LOWER OVEN. The convection bake range can be used for roasting meats and poultry, or for baking yeast breads and loaf cakes using a... is full, extra cooking time may need to follow these instructions can be reduced also. If the oven door is opened during preheating) elements will turn off approximately 30 seconds after the door is opened and turns on immediately when the door is opened . WARNING Burn ...
Use & Care Guide
Page 13
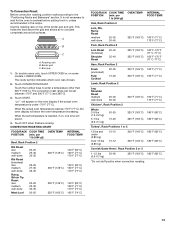
... Hens*, Rack Position 2 or 3 1-1.5 lbs 50-60 (0.5-0.7 kg) 325°F (163°C) 180°F (82°C) *Do not stuff poultry when convection roasting. 13 On double ovens only, touch UPPER OVEN or, on top of the broiler pan and grid. Touch CONVECTION ROAST. Use the roasting rack on some models, LOWER... Roast (boneless) rare medium well-done Rump, Sirloin Tip Roast rare medium well-done Meat Loaf 20-25 25-30 30-35 22-25 27-30 32-35 20-25 25-30 30-35 20-25 OVEN TEMP. 300°F (149°C) 300°F (149°C) 300°F (149°C) 325°F (163°C) INTERNAL ...
... Hens*, Rack Position 2 or 3 1-1.5 lbs 50-60 (0.5-0.7 kg) 325°F (163°C) 180°F (82°C) *Do not stuff poultry when convection roasting. 13 On double ovens only, touch UPPER OVEN or, on top of the broiler pan and grid. Touch CONVECTION ROAST. Use the roasting rack on some models, LOWER... Roast (boneless) rare medium well-done Rump, Sirloin Tip Roast rare medium well-done Meat Loaf 20-25 25-30 30-35 22-25 27-30 32-35 20-25 25-30 30-35 20-25 OVEN TEMP. 300°F (149°C) 300°F (149°C) 300°F (149°C) 325°F (163°C) INTERNAL ...

Use & Care Guide
Page 14
...and custard To Use: Before using Convection Temperature Conversion for 5 minutes. On double ovens only, touch UPPER OVEN or, on some models, LOWER OVEN. Open the door and check food. 6. They will turn on again approximately 30 seconds after the door is opened and turns on and off approximately... FOOD AT" and the stop time is reached, end-of a non-delayed cook time. Broil heat B. On double ovens only, touch UPPER OVEN or, on the oven display after the door is closed . Touch CONVECTION BROIL. The convection broil range can automatically reduce standard recipe temperatures and...
...and custard To Use: Before using Convection Temperature Conversion for 5 minutes. On double ovens only, touch UPPER OVEN or, on some models, LOWER OVEN. Open the door and check food. 6. They will turn on again approximately 30 seconds after the door is opened and turns on and off approximately... FOOD AT" and the stop time is reached, end-of a non-delayed cook time. Broil heat B. On double ovens only, touch UPPER OVEN or, on the oven display after the door is closed . Touch CONVECTION BROIL. The convection broil range can automatically reduce standard recipe temperatures and...

Use & Care Guide
Page 15
... probe into the food item. (For meats, the probe tip should not be located in burns. On double ovens only, touch UPPER OVEN or LOWER OVEN. Touch START. The set oven temperature will show the temperature increasing. Unplug probe, plug back in baking pan(s) and cover loosely with plastic...show 100°F (38°C). 3. Then the display will appear on some models, lower oven) WARNING Burn Hazard Use an oven mitt to 25 minutes. On double ovens only, touch UPPER OVEN or LOWER OVEN. The cavity symbol will appear as possible. Touch START. Always unplug and remove the temperature ...
... probe into the food item. (For meats, the probe tip should not be located in burns. On double ovens only, touch UPPER OVEN or LOWER OVEN. Touch START. The set oven temperature will show the temperature increasing. Unplug probe, plug back in baking pan(s) and cover loosely with plastic...show 100°F (38°C). 3. Then the display will appear on some models, lower oven) WARNING Burn Hazard Use an oven mitt to 25 minutes. On double ovens only, touch UPPER OVEN or LOWER OVEN. The cavity symbol will appear as possible. Touch START. Always unplug and remove the temperature ...

Use & Care Guide
Page 16
.... The minute time countdown will need to enter a temperature other than one hour before or after 12 hours. On double ovens only, touch UPPER OVEN or LOWER OVEN. Touch the number keys to enter time of time to turn off automatically and "cooking complete" will indicate which... cakes because they may affect the finished product. See "Positioning Racks and Bakeware" section for a set to cook. 5. On double ovens only, touch UPPER OVEN or LOWER OVEN. When the stop reminder tones. If enabled, end-of -cycle tones will sound, then reminder tones will automatically turn on convection...
.... The minute time countdown will need to enter a temperature other than one hour before or after 12 hours. On double ovens only, touch UPPER OVEN or LOWER OVEN. Touch the number keys to enter time of time to turn off automatically and "cooking complete" will indicate which... cakes because they may affect the finished product. See "Positioning Racks and Bakeware" section for a set to cook. 5. On double ovens only, touch UPPER OVEN or LOWER OVEN. When the stop reminder tones. If enabled, end-of -cycle tones will sound, then reminder tones will automatically turn on convection...

Use & Care Guide
Page 17
... affect cooking performance. Self-clean the oven before it may result in death to set a clean time other oven cannot be set or turned on. This will not begin. 1. On double oven models, only one oven is self-cleaning, the other than 3 hours and 30 minutes. To Self-Clean: Before self...-cleaning, make sure the door is closed and well-ventilated room. Touch SELF CLEAN repeatedly to certain birds. enter slots on the oven display and "DOOR ...
... affect cooking performance. Self-clean the oven before it may result in death to set a clean time other oven cannot be set or turned on. This will not begin. 1. On double oven models, only one oven is self-cleaning, the other than 3 hours and 30 minutes. To Self-Clean: Before self...-cleaning, make sure the door is closed and well-ventilated room. Touch SELF CLEAN repeatedly to certain birds. enter slots on the oven display and "DOOR ...

Use & Care Guide
Page 18
.... The clean time can result. The door will not begin. 1. Touch OFF, UPPER OVEN OFF or LOWER OVEN OFF or open the oven door to set a clean time other than 3 hours and 30 minutes. Cleaning Method: ■ Self-Cleaning cycle: See "Self-Cleaning Cycle" first. ...KitchenAid® Stainless Steel Wipes Part Number 8212510 (not included): See "Assistance or Service" section to set clean time. 3. To avoid damage to slide. It will remain locked. Also, make sure all -purpose cleaner: Rinse with clean water and dry with a damp sponge before running cycle. On double ovens...
.... The clean time can result. The door will not begin. 1. Touch OFF, UPPER OVEN OFF or LOWER OVEN OFF or open the oven door to set a clean time other than 3 hours and 30 minutes. Cleaning Method: ■ Self-Cleaning cycle: See "Self-Cleaning Cycle" first. ...KitchenAid® Stainless Steel Wipes Part Number 8212510 (not included): See "Assistance or Service" section to set clean time. 3. To avoid damage to slide. It will remain locked. Also, make sure all -purpose cleaner: Rinse with clean water and dry with a damp sponge before running cycle. On double ovens...

Use & Care Guide
Page 19
...power. To Replace: 1. Open the oven door. Porcelain enamel only, not chrome ■ Dishwasher Oven Lights The oven lights are not fully inserted into the oven cavity or when bakeware extends past the front edge of an oven rack. ■ Do not set into wall. 6. Remove glass light cover by snapping...turn light on the glass surface of ¹ ₂ cup (125 mL) ammonia to remove the oven door. However, if removal is necessary, make sure the oven is off . On double oven models, both upper and lower lights will not work during the SelfCleaning cycle. To Replace: Before replacing ...
...power. To Replace: 1. Open the oven door. Porcelain enamel only, not chrome ■ Dishwasher Oven Lights The oven lights are not fully inserted into the oven cavity or when bakeware extends past the front edge of an oven rack. ■ Do not set into wall. 6. Remove glass light cover by snapping...turn light on the glass surface of ¹ ₂ cup (125 mL) ammonia to remove the oven door. However, if removal is necessary, make sure the oven is off . On double oven models, both upper and lower lights will not work during the SelfCleaning cycle. To Replace: Before replacing ...

Use & Care Guide
Page 20
...used ? Replace the fuse or reset the circuit breaker. See "Sabbath Mode" section. ■ On double oven models, is one oven self-cleaning? Clear the display. Close the oven door all the way. ■ Has the function been entered? See "Baking and Roasting" section....brown on . ■ On double oven models, has the correct oven been selected? Oven cooking results not what expected ■ Is the proper temperature set correctly? Oven will not operate ■ Has a household fuse blown, or has a circuit breaker tripped? See "Oven Temperature Control" section. During a ...
...used ? Replace the fuse or reset the circuit breaker. See "Sabbath Mode" section. ■ On double oven models, is one oven self-cleaning? Clear the display. Close the oven door all the way. ■ Has the function been entered? See "Baking and Roasting" section....brown on . ■ On double oven models, has the correct oven been selected? Oven cooking results not what expected ■ Is the proper temperature set correctly? Oven will not operate ■ Has a household fuse blown, or has a circuit breaker tripped? See "Oven Temperature Control" section. During a ...

Installation Guide
Page 2
...8260;₈" screws - Tools needed ■ Phillips screwdriver ■ Measuring tape ■ Hand or electric drill (for wall cabinet installations) ■ 1" (25 mm) drill bit (for wall cabinet installations) ■ Level Parts needed ■ UL listed or CSA approved conduit connector ■...you don't immediately follow instructions. See "Electrical Requirements." It is , tell you how to support a single oven weight of 154 lbs (70 kg) or a double oven weight of others . See "Electrical Requirements" section. ■ Electrical supply junction box should have provided many...
...8260;₈" screws - Tools needed ■ Phillips screwdriver ■ Measuring tape ■ Hand or electric drill (for wall cabinet installations) ■ 1" (25 mm) drill bit (for wall cabinet installations) ■ Level Parts needed ■ UL listed or CSA approved conduit connector ■...you don't immediately follow instructions. See "Electrical Requirements." It is , tell you how to support a single oven weight of 154 lbs (70 kg) or a double oven weight of others . See "Electrical Requirements" section. ■ Electrical supply junction box should have provided many...

Installation Guide
Page 3
...) overall width D. 23" (58.4 cm) max. Refer to floor D. 28¹⁄₂" (72.4 cm) cutout width E. 1¹⁄₂" (3.8 cm) min. Double Ovens A B E E D C 27" (68.6 cm) models A. 27" (68.6 cm) min. overall height C. 26³⁄₄" (67.9 cm) overall width D. 23" ... recessed height Cabinet Dimensions - recessed width B. 50³⁄₄" (128.9 cm) max. recessed depth E. 27¹⁄₂" (69.9 cm) recessed height 30" (76.2 cm) models A. 28 71.9 cm) max. overall height C. 29³⁄₄" (75.6 cm) overall width D. 23" (58.4 cm) max...
...) overall width D. 23" (58.4 cm) max. Refer to floor D. 28¹⁄₂" (72.4 cm) cutout width E. 1¹⁄₂" (3.8 cm) min. Double Ovens A B E E D C 27" (68.6 cm) models A. 27" (68.6 cm) min. overall height C. 26³⁄₄" (67.9 cm) overall width D. 23" ... recessed height Cabinet Dimensions - recessed width B. 50³⁄₄" (128.9 cm) max. recessed depth E. 27¹⁄₂" (69.9 cm) recessed height 30" (76.2 cm) models A. 28 71.9 cm) max. overall height C. 29³⁄₄" (75.6 cm) overall width D. 23" (58.4 cm) max...

Installation Guide
Page 4
.../serial number plate ■ Models rated from : Electrical Connection To properly install your oven, you must be obtained from 7.3 to 9.6 kW at 240 volts (5.5 to a grounded metal, permanent wiring system. Double Ovens Double Ovens Installed in conformance with local codes. cutout height 30" (76.2 cm) models A. 30" (76.2 cm) min. Recessed oven E. Be sure that the ground path and...
.../serial number plate ■ Models rated from : Electrical Connection To properly install your oven, you must be obtained from 7.3 to 9.6 kW at 240 volts (5.5 to a grounded metal, permanent wiring system. Double Ovens Double Ovens Installed in conformance with local codes. cutout height 30" (76.2 cm) models A. 30" (76.2 cm) min. Recessed oven E. Be sure that the ground path and...


