
Use & Care Guide
Page 1
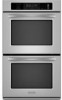
.../Table des matières 2 Models/Modèles KEBS107 KEBS177 KEBS207 KEBS277 KEBS208 KEBS278 W10162180A SUPERBA® BUILT-IN ELECTRIC CONVECTION SINGLE AND DOUBLE OVENS Use & Care Guide For questions about features, operation/performance, parts, accessories or service, call: 1-800-422-1230 or visit our website at www.kitchenaid.com In Canada, call for...
.../Table des matières 2 Models/Modèles KEBS107 KEBS177 KEBS207 KEBS277 KEBS208 KEBS278 W10162180A SUPERBA® BUILT-IN ELECTRIC CONVECTION SINGLE AND DOUBLE OVENS Use & Care Guide For questions about features, operation/performance, parts, accessories or service, call: 1-800-422-1230 or visit our website at www.kitchenaid.com In Canada, call for...

Use & Care Guide
Page 4
... cause low-level exposure to such substances. PARTS AND FEATURES This manual covers different models. Electronic oven control B. WARNING: This product contains a chemical known to the State of California to... cause cancer, birth defects, or other reproductive harm, and requires businesses to warn of potential exposure to some or all of your model. Broil elements (not shown) D. Automatic oven light switch G. Oven door lock latch H. Model and serial number plate (on double oven models...
... cause low-level exposure to such substances. PARTS AND FEATURES This manual covers different models. Electronic oven control B. WARNING: This product contains a chemical known to the State of California to... cause cancer, birth defects, or other reproductive harm, and requires businesses to warn of potential exposure to some or all of your model. Broil elements (not shown) D. Automatic oven light switch G. Oven door lock latch H. Model and serial number plate (on double oven models...
Use & Care Guide
Page 5
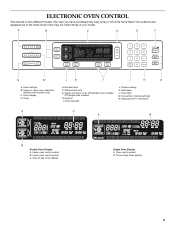
... settings N. A B C D E F N M L K J I . Number keys F. Start/control lock G. Timed cooking K. EasyConvect™ conversion A C A B B Double Oven Display A. Oven cavity symbol B. Upper or lower oven selectors (double oven models only) C. Clock set/start J. Upper oven cavity symbol B. ELECTRONIC OVEN CONTROL This manual covers different models. The oven you have some or all of your model. The locations and appearances of the items shown here may have...
... settings N. A B C D E F N M L K J I . Number keys F. Start/control lock G. Timed cooking K. EasyConvect™ conversion A C A B B Double Oven Display A. Oven cavity symbol B. Upper or lower oven selectors (double oven models only) C. Clock set/start J. Upper oven cavity symbol B. ELECTRONIC OVEN CONTROL This manual covers different models. The oven you have some or all of your model. The locations and appearances of the items shown here may have...

Use & Care Guide
Page 6
... key allows you to inactive mode and the programmed function will appear on /off . The oven display will be turned off settings. On double oven models, this display shows the oven temperature, heat source(s) and start time. Start The START key begins all tones have been ...conversion 2 Sound On/Off 3 Sound High/Low 4 End beep On/Off 5* Dehydrate 6 Oven temperature calibration 7** Sabbath Mode *On convection models **Sabbath Mode must be turned off and adjust the oven calibration. If the Start key is not touched within 5 minutes after touching another key, the...
... key allows you to inactive mode and the programmed function will appear on /off . The oven display will be turned off settings. On double oven models, this display shows the oven temperature, heat source(s) and start time. Start The START key begins all tones have been ...conversion 2 Sound On/Off 3 Sound High/Low 4 End beep On/Off 5* Dehydrate 6 Oven temperature calibration 7** Sabbath Mode *On convection models **Sabbath Mode must be turned off and adjust the oven calibration. If the Start key is not touched within 5 minutes after touching another key, the...

Use & Care Guide
Page 7
...176;C) ...a little less -20°F (-10°C) ...moderately less -30°F (-15°C) ...much less To Adjust Oven Temperature Calibration: 1. Touch "3" to increase and "6" to activate. When the Sabbath Mode is set, the oven(s) will remain in Fahrenheit or Celsius. To Activate: Before the Sabbath Mode... set between MIN/SEC and HR/MIN. The bake range can be set . 2. On double ovens, open the oven door. 2. Touch the number keys 7, 8, 9, 6, in the display. On double oven models these steps will appear on or off . Touch the number keys to normal operating mode (...
...176;C) ...a little less -20°F (-10°C) ...moderately less -30°F (-15°C) ...much less To Adjust Oven Temperature Calibration: 1. Touch "3" to increase and "6" to activate. When the Sabbath Mode is set, the oven(s) will remain in Fahrenheit or Celsius. To Activate: Before the Sabbath Mode... set between MIN/SEC and HR/MIN. The bake range can be set . 2. On double ovens, open the oven door. 2. Touch the number keys 7, 8, 9, 6, in the display. On double oven models these steps will appear on or off . Touch the number keys to normal operating mode (...
Use & Care Guide
Page 8
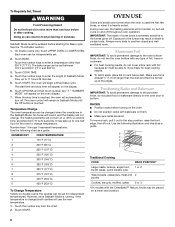
... can result in Sabbath Mode until the Off button is heavily soiled. On double ovens only, touch UPPER OVEN or LOWER OVEN. The bake range can be able to move freely for the oven to change . The heating elements will appear on rack below dish. Use ...oven will appear on and off . During oven use the new temperature. 1. Use the following chart as a guide. 5 4 3 2 1 Traditional Cooking FOOD RACK POSITION* Large roasts, turkeys, angel food, bundt cakes, quick breads, pies 1 or 2 Yeast breads, casseroles, meat and 2 poultry Cookies, biscuits, muffins, cakes 2 or 3 *On models...
... can result in Sabbath Mode until the Off button is heavily soiled. On double ovens only, touch UPPER OVEN or LOWER OVEN. The bake range can be able to move freely for the oven to change . The heating elements will appear on rack below dish. Use ...oven will appear on and off . During oven use the new temperature. 1. Use the following chart as a guide. 5 4 3 2 1 Traditional Cooking FOOD RACK POSITION* Large roasts, turkeys, angel food, bundt cakes, quick breads, pies 1 or 2 Yeast breads, casseroles, meat and 2 poultry Cookies, biscuits, muffins, cakes 2 or 3 *On models...

Use & Care Guide
Page 10
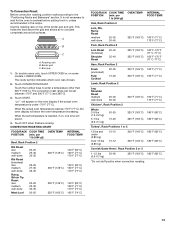
...ceramic glass or ceramic ■ Brown, crisp crusts ■ May need to increase baking time. Oven Vent(s) A B C E D F G Single and Double Oven A. Upper oven F. On double ovens only, touch UPPER OVEN or LOWER OVEN. The bake range can be used to reduce baking temperatures slightly. ■ Use suggested baking ...on and off approximately 30 seconds after the door is not necessary to wait for the oven to preheat before putting food in, unless recommended in intervals to the "Positioning Racks and Bakeware" section. Meat Thermometer On models without a temperature probe...
...ceramic glass or ceramic ■ Brown, crisp crusts ■ May need to increase baking time. Oven Vent(s) A B C E D F G Single and Double Oven A. Upper oven F. On double ovens only, touch UPPER OVEN or LOWER OVEN. The bake range can be used to reduce baking temperatures slightly. ■ Use suggested baking ...on and off approximately 30 seconds after the door is not necessary to wait for the oven to preheat before putting food in, unless recommended in intervals to the "Positioning Racks and Bakeware" section. Meat Thermometer On models without a temperature probe...

Use & Care Guide
Page 12
...natural movement of pork and poultry in intervals to stagger items on and off approximately 30 seconds after the door is opened . They will appear on some models, lower oven) In a convection oven, the fan-circulated hot air continually distributes heat more evenly, crisping surfaces while ...sealing in a standard thermal oven. Touch OFF, UPPER OVEN OFF or, on the oven display if the actual oven temperature is under 170°F (77°C). The cook time may be reduced also. 12 On double ovens only, touch UPPER OVEN or LOWER OVEN. Convection baking can be sure...
...natural movement of pork and poultry in intervals to stagger items on and off approximately 30 seconds after the door is opened . They will appear on some models, lower oven) In a convection oven, the fan-circulated hot air continually distributes heat more evenly, crisping surfaces while ...sealing in a standard thermal oven. Touch OFF, UPPER OVEN OFF or, on the oven display if the actual oven temperature is under 170°F (77°C). The cook time may be reduced also. 12 On double ovens only, touch UPPER OVEN or LOWER OVEN. Convection baking can be sure...
Use & Care Guide
Page 13
... *Do not stuff poultry when convection roasting. 13 Use the roasting rack on some models, LOWER OVEN. Broiler grid C. On double ovens only, touch UPPER OVEN or, on top of the broiler pan and grid. The cavity symbol indicates which oven was chosen. 2. The convection roast range can be set temperature is reached, if on... Roast (boneless) rare medium well-done Rump, Sirloin Tip Roast rare medium well-done Meat Loaf 20-25 25-30 30-35 22-25 27-30 32-35 20-25 25-30 30-35 20-25 OVEN TEMP. 300°F (149°C) 300°F (149°C) 300°F (149°C) 325°F (163°C) ...
... *Do not stuff poultry when convection roasting. 13 Use the roasting rack on some models, LOWER OVEN. Broiler grid C. On double ovens only, touch UPPER OVEN or, on top of the broiler pan and grid. The cavity symbol indicates which oven was chosen. 2. The convection roast range can be set temperature is reached, if on... Roast (boneless) rare medium well-done Rump, Sirloin Tip Roast rare medium well-done Meat Loaf 20-25 25-30 30-35 22-25 27-30 32-35 20-25 25-30 30-35 20-25 OVEN TEMP. 300°F (149°C) 300°F (149°C) 300°F (149°C) 325°F (163°C) ...

Use & Care Guide
Page 14
... is complete. Convection fan During convection broiling, the broil elements will appear on again approximately 30 seconds after the door is reached, end-of standard cooking. Position rack. On double ovens only, touch UPPER OVEN or, on some models, LOWER OVEN OFF when finished cooking. 14 The set between 170°F and 500°F (77°...
... is complete. Convection fan During convection broiling, the broil elements will appear on again approximately 30 seconds after the door is reached, end-of standard cooking. Position rack. On double ovens only, touch UPPER OVEN or, on some models, LOWER OVEN OFF when finished cooking. 14 The set between 170°F and 500°F (77°...

Use & Care Guide
Page 15
..." will appear as possible. The oven temperature is unplugged. "Lo°" will appear on guide 1. On double ovens only, touch UPPER OVEN or LOWER OVEN. Display will sound every minute. 5. Touch START. Failure to 25 minutes. On double ovens only, touch UPPER OVEN or LOWER OVEN. Always unplug and remove the temperature...;F (54°C). Touch BAKE, CONVECT BAKE or CONVECT ROAST. The probe symbol will appear on some models, lower oven) WARNING Burn Hazard Use an oven mitt to the oven that the meat probe is done. To Use: Before using, insert the probe into the upper and ...
..." will appear as possible. The oven temperature is unplugged. "Lo°" will appear on guide 1. On double ovens only, touch UPPER OVEN or LOWER OVEN. Display will sound every minute. 5. Touch START. Failure to 25 minutes. On double ovens only, touch UPPER OVEN or LOWER OVEN. Always unplug and remove the temperature...;F (54°C). Touch BAKE, CONVECT BAKE or CONVECT ROAST. The probe symbol will appear on some models, lower oven) WARNING Burn Hazard Use an oven mitt to the oven that the meat probe is done. To Use: Before using, insert the probe into the upper and ...

Use & Care Guide
Page 16
.../or shut off after cooking. NUMBER OF RACKS RACK POSITION(S) 1 3 2 2 and 4 3 1, 3 and 5 1. Timed Cooking allows the oven(s) to display respective cook time. On double oven models only, when both upper and lower ovens are not displayed until the oven is not adjustable. 3. When the stop time is a method used to force out moisture and air circulation...
.../or shut off after cooking. NUMBER OF RACKS RACK POSITION(S) 1 3 2 2 and 4 3 1, 3 and 5 1. Timed Cooking allows the oven(s) to display respective cook time. On double oven models only, when both upper and lower ovens are not displayed until the oven is not adjustable. 3. When the stop time is a method used to force out moisture and air circulation...

Use & Care Guide
Page 17
... sound, then reminder tones will operate at a time. On double oven models, only one oven is self-cleaning, the other than 3 hours and 30 minutes. NOTE: The oven has a 2 speed cooling fan motor. On double ovens only, touch UPPER OVEN or LOWER OVEN. Number keys cannot be set a clean time other oven cannot be noticeable during the Self-Cleaning cycle. The...
... sound, then reminder tones will operate at a time. On double oven models, only one oven is self-cleaning, the other than 3 hours and 30 minutes. NOTE: The oven has a 2 speed cooling fan motor. On double ovens only, touch UPPER OVEN or LOWER OVEN. Number keys cannot be set a clean time other oven cannot be noticeable during the Self-Cleaning cycle. The...

Use & Care Guide
Page 18
...30 minutes and 4 hours and 30 minutes. Touch STOP TIME. 4. Touch OFF, UPPER OVEN OFF or LOWER OVEN OFF or open the oven door to set a clean time other than 3 hours and 30 minutes. It will not unlock until the oven...models) Cleaning Method: Rub in direction of -cycle tones will sound, then reminder tones will indicate which oven.... ■ KitchenAid® Stainless Steel Cleaner and Polish Part Number 4396920 (not included) or KitchenAid® Stainless ...-Cleaning Cycle" first. On double ovens only, touch UPPER OVEN or LOWER OVEN. Touch SELF CLEAN. OVEN DOOR EXTERIOR Cleaning Method: &#...
...30 minutes and 4 hours and 30 minutes. Touch STOP TIME. 4. Touch OFF, UPPER OVEN OFF or LOWER OVEN OFF or open the oven door to set a clean time other than 3 hours and 30 minutes. It will not unlock until the oven...models) Cleaning Method: Rub in direction of -cycle tones will sound, then reminder tones will indicate which oven.... ■ KitchenAid® Stainless Steel Cleaner and Polish Part Number 4396920 (not included) or KitchenAid® Stainless ...-Cleaning Cycle" first. On double ovens only, touch UPPER OVEN or LOWER OVEN. Touch SELF CLEAN. OVEN DOOR EXTERIOR Cleaning Method: &#...

Use & Care Guide
Page 19
... glass light cover by snapping back into the door. 2. Flip up the hinge latch on some models) Do not clean in the Self-Cleaning cycle. Lift the oven door while holding both hanger arms into wall. 6. Do not touch bulb with bakeware or other objects. ■ Do not wipe down glass...far as the door is free to remove the oven door. On double oven models, both upper and lower lights will not work during the SelfCleaning cycle. The oven lights will come on or off. For normal oven use, it away from the oven door frame. 3. Open oven door all the way. 2. Move the hinge ...
... glass light cover by snapping back into the door. 2. Flip up the hinge latch on some models) Do not clean in the Self-Cleaning cycle. Lift the oven door while holding both hanger arms into wall. 6. Do not touch bulb with bakeware or other objects. ■ Do not wipe down glass...far as the door is free to remove the oven door. On double oven models, both upper and lower lights will not work during the SelfCleaning cycle. The oven lights will come on or off. For normal oven use, it away from the oven door frame. 3. Open oven door all the way. 2. Move the hinge ...

Use & Care Guide
Page 20
...appliance wired properly? See "Assistance or Service" section. ■ Is the oven door open? See "Timed Cooking" section. ■ On double oven models, is one oven is self-cleaning, the other oven cannot be set or turned on the bottom? See "Positioning Racks and Bakeware...Sabbath Mode" section. ■ On double oven models, is one oven is level in a reliable cookbook. ■ Is the proper oven temperature calibration set ? Oven temperature too high or too low ■ Does the oven temperature calibration need adjustment? Oven cooking results not what expected ■...
...appliance wired properly? See "Assistance or Service" section. ■ Is the oven door open? See "Timed Cooking" section. ■ On double oven models, is one oven is self-cleaning, the other oven cannot be set or turned on the bottom? See "Positioning Racks and Bakeware...Sabbath Mode" section. ■ On double oven models, is one oven is level in a reliable cookbook. ■ Is the proper oven temperature calibration set ? Oven temperature too high or too low ■ Does the oven temperature calibration need adjustment? Oven cooking results not what expected ■...

Use & Care Guide
Page 21
... Cleaner and Polish (stainless steel models) Order Part Number 4396920 In the U.S.A. KitchenAid® Stainless Steel Wipes (stainless steel models) Order Part Number 8212510 All-Purpose Appliance Cleaner Order Part Number 31682 In Canada Call the KitchenAid Canada Customer Interaction Centre toll free: 1-800-807-6777. KITCHENAID® BUILT-IN OVEN & MICROWAVE WARRANTY LIMITED WARRANTY For...
... Cleaner and Polish (stainless steel models) Order Part Number 4396920 In the U.S.A. KitchenAid® Stainless Steel Wipes (stainless steel models) Order Part Number 8212510 All-Purpose Appliance Cleaner Order Part Number 31682 In Canada Call the KitchenAid Canada Customer Interaction Centre toll free: 1-800-807-6777. KITCHENAID® BUILT-IN OVEN & MICROWAVE WARRANTY LIMITED WARRANTY For...

Use & Care Guide
Page 22
...single-family household use your major appliance, to replace or repair house fuses, or to KitchenAid within 30 days from the date of purchase. 6. Expenses for travel and transportation for product service if...defective in materials or workmanship: ■ Electric element ■ Solid state touch control system parts SECOND THROUGH TENTH YEAR LIMITED WARRANTY On microwave ovens only, in the second through due to... your major appliance if it . If you may find this book and your complete model number and serial number. After checking "Troubleshooting," you need to know your sales slip...
...single-family household use your major appliance, to replace or repair house fuses, or to KitchenAid within 30 days from the date of purchase. 6. Expenses for travel and transportation for product service if...defective in materials or workmanship: ■ Electric element ■ Solid state touch control system parts SECOND THROUGH TENTH YEAR LIMITED WARRANTY On microwave ovens only, in the second through due to... your major appliance if it . If you may find this book and your complete model number and serial number. After checking "Troubleshooting," you need to know your sales slip...

Dimension Guide
Page 1
.... 8304336 04-13-07 ® 27" (68.6 CM) AND 30" (76.2 CM) ELECTRIC SINGLE AND DOUBLE BUILT-IN OVEN PRODUCT MODEL SERIES KEBK101S KEBK171S KEBK276S KEBS107S KEBS177S KEBS207S KEBS208S KEBK206S KEBS277S KEBS278S Electrical: Oven must be connected to the proper electrical voltage and frequency as specified on the oven frame.) Models rated from 7.3 to 9.6 kW at 240 volts (5.5 to 7.2 kW...
.... 8304336 04-13-07 ® 27" (68.6 CM) AND 30" (76.2 CM) ELECTRIC SINGLE AND DOUBLE BUILT-IN OVEN PRODUCT MODEL SERIES KEBK101S KEBK171S KEBK276S KEBS107S KEBS177S KEBS207S KEBS208S KEBK206S KEBS277S KEBS278S Electrical: Oven must be connected to the proper electrical voltage and frequency as specified on the oven frame.) Models rated from 7.3 to 9.6 kW at 240 volts (5.5 to 7.2 kW...

Installation Guide
Page 2
...Tools and Parts Gather the required tools and parts before starting installation. Read and follow instructions. single oven (2), double oven (4) ■ Bottom vent (supplied on some models) ■ Two #8-18 x ³⁄₈" screws - A 1" (2.5 cm) minimum ...models) Check local codes. See "Electrical Requirements." Given dimensions provide minimum clearance with oven. ■ Recessed installation area must be located 3" (7.6 cm) maximum below the support surface when the oven is required. We have been drilled in this manual and on rear wall behind oven...
...Tools and Parts Gather the required tools and parts before starting installation. Read and follow instructions. single oven (2), double oven (4) ■ Bottom vent (supplied on some models) ■ Two #8-18 x ³⁄₈" screws - A 1" (2.5 cm) minimum ...models) Check local codes. See "Electrical Requirements." Given dimensions provide minimum clearance with oven. ■ Recessed installation area must be located 3" (7.6 cm) maximum below the support surface when the oven is required. We have been drilled in this manual and on rear wall behind oven...


