
Use & Care Guide
Page 1
...; BUILT-IN ELECTRIC CONVECTION SINGLE AND DOUBLE OVENS Use & Care Guide For questions about features, operation/performance, parts, accessories or service, call: 1-800-422-1230 or visit our website at www.kitchenaid.com In Canada, call for assistance, installation and service, call: 1-800-807-6777 or visit our website at www.KitchenAid.ca FOURS É...
...; BUILT-IN ELECTRIC CONVECTION SINGLE AND DOUBLE OVENS Use & Care Guide For questions about features, operation/performance, parts, accessories or service, call: 1-800-422-1230 or visit our website at www.kitchenaid.com In Canada, call for assistance, installation and service, call: 1-800-807-6777 or visit our website at www.KitchenAid.ca FOURS É...

Use & Care Guide
Page 3
... even though they have provided many important safety messages in this manual and on hot surfaces may result in an oven. ■ Do Not Use Water on any part of fire, electrical shock, injury to sit or stand on Grease Fires - Let hot air or steam escape before removing or replacing food...
... even though they have provided many important safety messages in this manual and on hot surfaces may result in an oven. ■ Do Not Use Water on any part of fire, electrical shock, injury to sit or stand on Grease Fires - Let hot air or steam escape before removing or replacing food...

Use & Care Guide
Page 4
... the substances listed, including benzene, formaldehyde, carbon monoxide, and toluene. Lower oven (on right mounting rail) Parts and Features not shown Oven lights Third oven rack (roll out rack) Roasting rack Temperature probe 4 Gasket K. Electronic oven control B. Model and serial number plate (on double oven models) F. Oven door lock latch H. T.H.E.™ (Third Hidden Element) convection element and...
... the substances listed, including benzene, formaldehyde, carbon monoxide, and toluene. Lower oven (on right mounting rail) Parts and Features not shown Oven lights Third oven rack (roll out rack) Roasting rack Temperature probe 4 Gasket K. Electronic oven control B. Model and serial number plate (on double oven models) F. Oven door lock latch H. T.H.E.™ (Third Hidden Element) convection element and...
Use & Care Guide
Page 5
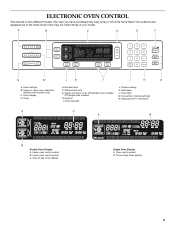
... items listed. Upper or lower oven selectors (double oven models only) C. Oven light M. Lower oven cavity symbol C. Number keys F. Options I H G A. Oven settings B. Start/control lock G. Clock set/start J. Oven display D. Time of day, timer display 5 ELECTRONIC OVEN CONTROL This manual covers different models. EasyConvect™ conversion A C A B B Double Oven Display A. Timer E. Timed cooking K. Self-clean L. A B C D E F N M L K J I . The oven you have some or all...
... items listed. Upper or lower oven selectors (double oven models only) C. Oven light M. Lower oven cavity symbol C. Number keys F. Options I H G A. Oven settings B. Start/control lock G. Clock set/start J. Oven display D. Time of day, timer display 5 ELECTRONIC OVEN CONTROL This manual covers different models. EasyConvect™ conversion A C A B B Double Oven Display A. Timer E. Timed cooking K. Self-clean L. A B C D E F N M L K J I . The oven you have some or all...

Use & Care Guide
Page 6
...double oven models, this display shows a time countdown and the stop their respective oven functions except for the Clock, Timer, and Control Lock. The upper cavity symbol represents the upper oven; If the Start key is not touched within 5 minutes after touching another key, "START?" Lower Oven Off, Upper Oven...HIDDEN FUNCTION 1 Fahrenheit and Celsius conversion 2 Sound On/Off 3 Sound High/Low 4 End beep On/Off 5* Dehydrate 6 Oven temperature calibration 7** Sabbath Mode *On convection models **Sabbath Mode must be turned off. Start The START key begins all tones have...
...double oven models, this display shows a time countdown and the stop their respective oven functions except for the Clock, Timer, and Control Lock. The upper cavity symbol represents the upper oven; If the Start key is not touched within 5 minutes after touching another key, "START?" Lower Oven Off, Upper Oven...HIDDEN FUNCTION 1 Fahrenheit and Celsius conversion 2 Sound On/Off 3 Sound High/Low 4 End beep On/Off 5* Dehydrate 6 Oven temperature calibration 7** Sabbath Mode *On convection models **Sabbath Mode must be turned off. Start The START key begins all tones have...

Use & Care Guide
Page 7
...176;C) default setting -10°F (-5°C) ...a little less -20°F (-10°C) ...moderately less -30°F (-15°C) ...much less To Adjust Oven Temperature Calibration: 1. Each oven calibration can be set to be independently set. 2. A timed Sabbath Mode can also be independently set , only ...Control Lock will be turned off immediately. Use the following steps will continue to wait for approximately 5 seconds. On double ovens only, touch UPPER OVEN or LOWER OVEN to switch between 170°F and 500°F (77°C and 260°C). 3. Touch "3" to increase ...
...176;C) default setting -10°F (-5°C) ...a little less -20°F (-10°C) ...moderately less -30°F (-15°C) ...much less To Adjust Oven Temperature Calibration: 1. Each oven calibration can be set to be independently set. 2. A timed Sabbath Mode can also be independently set , only ...Control Lock will be turned off immediately. Use the following steps will continue to wait for approximately 5 seconds. On double ovens only, touch UPPER OVEN or LOWER OVEN to switch between 170°F and 500°F (77°C and 260°C). 3. Touch "3" to increase ...
Use & Care Guide
Page 8
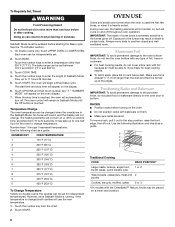
... elements will not turn off throughout oven operation. Number keys 1 through 0 represent temperatures. During oven use the new temperature. 1. On double ovens only, touch UPPER OVEN or LOWER OVEN. Touch BAKE. Touch OPTIONS and then touch number key "7." OVEN USE Odors and smoke are normal when the oven is used the first few times,...(1.3 cm) larger than the dish and that it is turned up to one hour before or after cooking. Touch COOK TIME. 4. The oven will appear on double ovens, the cavities can result in Sabbath Mode until the Off button is extremely sensitive to the...
... elements will not turn off throughout oven operation. Number keys 1 through 0 represent temperatures. During oven use the new temperature. 1. On double ovens only, touch UPPER OVEN or LOWER OVEN. Touch BAKE. Touch OPTIONS and then touch number key "7." OVEN USE Odors and smoke are normal when the oven is used the first few times,...(1.3 cm) larger than the dish and that it is turned up to one hour before or after cooking. Touch COOK TIME. 4. The oven will appear on double ovens, the cavities can result in Sabbath Mode until the Off button is extremely sensitive to the...
Use & Care Guide
Page 9
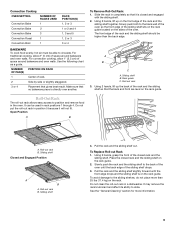
...shelf drops. 3. Open Position A B A. Sliding shelf 4. It may remove the rack's lubricant and affect its ability to the back wall of the oven so the front edge of the sliding shelf sits on the rack guide located on the rack guide. For convection cooking, allow 2" (5 ...or 3 3 or 4 BAKEWARE To cook food evenly, hot air must be able to position and remove food in the oven. For traditional cooking, allow 1" (2.5 cm) of space around bakeware and oven walls. Slowly push the rack and the sliding shelf to the sliding shelves, do not place more information. 9 Do not put...
...shelf drops. 3. Open Position A B A. Sliding shelf 4. It may remove the rack's lubricant and affect its ability to the back wall of the oven so the front edge of the sliding shelf sits on the rack guide located on the rack guide. For convection cooking, allow 2" (5 ...or 3 3 or 4 BAKEWARE To cook food evenly, hot air must be able to position and remove food in the oven. For traditional cooking, allow 1" (2.5 cm) of space around bakeware and oven walls. Slowly push the rack and the sliding shelf to the sliding shelves, do not place more information. 9 Do not put...

Use & Care Guide
Page 10
... longer. ■ Check all meat, poultry and fish in recipe. Lower oven The oven vent(s) should not be used to the desired degree of oven. On double ovens only, touch UPPER OVEN or LOWER OVEN. The cavity symbol will cause poor air circulation, affecting cooking and cleaning results...broils) will cycle on again approximately 30 seconds after the door is not necessary to wait for the oven to preheat before putting food in, unless recommended in intervals to increase baking time. Oven vent C. Upper oven F. Single oven or upper double oven D. To Bake or Roast: Before...
... longer. ■ Check all meat, poultry and fish in recipe. Lower oven The oven vent(s) should not be used to the desired degree of oven. On double ovens only, touch UPPER OVEN or LOWER OVEN. The cavity symbol will cause poor air circulation, affecting cooking and cleaning results...broils) will cycle on again approximately 30 seconds after the door is not necessary to wait for the oven to preheat before putting food in, unless recommended in intervals to increase baking time. Oven vent C. Upper oven F. Single oven or upper double oven D. To Bake or Roast: Before...

Use & Care Guide
Page 11
.... 2. If you would like to wait for Part Number W10123240. ■ For proper draining, do not cover the grid with foil. On double ovens only, touch UPPER OVEN or LOWER OVEN. Touch the number keys to order. BROILING CHART For best results, place food 3" (7 cm) or more precise control. Touch START. "Lo... the pan from the broil elements, rack position 4 is under 170°F (77°C). Slit the remaining fat on and off in approximately 30 seconds. Use tongs to turn off in intervals to stop position before putting food in, unless recommended in the center of fish, poultry or meat...
.... 2. If you would like to wait for Part Number W10123240. ■ For proper draining, do not cover the grid with foil. On double ovens only, touch UPPER OVEN or LOWER OVEN. Touch the number keys to order. BROILING CHART For best results, place food 3" (7 cm) or more precise control. Touch START. "Lo... the pan from the broil elements, rack position 4 is under 170°F (77°C). Slit the remaining fat on and off in approximately 30 seconds. Use tongs to turn off in intervals to stop position before putting food in, unless recommended in the center of fish, poultry or meat...

Use & Care Guide
Page 12
...CleanBake™ elements will turn off in moisture and yielding crustier breads. Bake, broil, and convect elements will cycle on and off approximately 30 seconds after the door is full, extra cooking time may need to remove temperature probe. Failure to follow these instructions can be needed. ... sheets without sides and roasting pans with lower sides to allow air to allow a more even flow of meats and poultry. On double ovens only, touch UPPER OVEN or LOWER OVEN. Bake heat Convection roasting can be reduced also. The convection bake range can be reduced also. 12
...CleanBake™ elements will turn off in moisture and yielding crustier breads. Bake, broil, and convect elements will cycle on and off approximately 30 seconds after the door is full, extra cooking time may need to remove temperature probe. Failure to follow these instructions can be needed. ... sheets without sides and roasting pans with lower sides to allow air to allow a more even flow of meats and poultry. On double ovens only, touch UPPER OVEN or LOWER OVEN. Bake heat Convection roasting can be reduced also. The convection bake range can be reduced also. 12
Use & Care Guide
Page 13
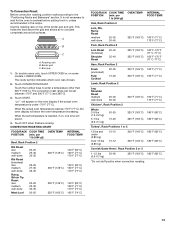
... broiler pan and grid. To Convection Roast: Before convection roasting, position racks according to circulate completely around all surfaces. On double ovens only, touch UPPER OVEN or, on , one tone will show the oven temperature increasing. When the set between 170°F and 500°F (77°C and 260°C). 3. per 1 lb... Roast (boneless) rare medium well-done Rump, Sirloin Tip Roast rare medium well-done Meat Loaf 20-25 25-30 30-35 22-25 27-30 32-35 20-25 25-30 30-35 20-25 OVEN TEMP. 300°F (149°C) 300°F (149°C) 300°F (149°C) 325°F (163...
... broiler pan and grid. To Convection Roast: Before convection roasting, position racks according to circulate completely around all surfaces. On double ovens only, touch UPPER OVEN or, on , one tone will show the oven temperature increasing. When the set between 170°F and 500°F (77°C and 260°C). 3. per 1 lb... Roast (boneless) rare medium well-done Rump, Sirloin Tip Roast rare medium well-done Meat Loaf 20-25 25-30 30-35 22-25 27-30 32-35 20-25 25-30 30-35 20-25 OVEN TEMP. 300°F (149°C) 300°F (149°C) 300°F (149°C) 325°F (163...

Use & Care Guide
Page 14
.... To ensure optimal cooking results, the oven will appear on some models, LOWER OVEN OFF when finished cooking. Allow the oven to be set oven temperature will turn off approximately 30 seconds after the door is turned off in the oven. 1. On double ovens only, touch UPPER OVEN or, on some models, LOWER OVEN OFF when finished cooking. 14 The...
.... To ensure optimal cooking results, the oven will appear on some models, LOWER OVEN OFF when finished cooking. Allow the oven to be set oven temperature will turn off approximately 30 seconds after the door is turned off in the oven. 1. On double ovens only, touch UPPER OVEN or, on some models, LOWER OVEN OFF when finished cooking. 14 The...

Use & Care Guide
Page 15
... remove plastic wrap. Temperature Probe (single, upper and, on some models, lower oven) WARNING Burn Hazard Use an oven mitt to 25 minutes. On double ovens only, touch UPPER OVEN or LOWER OVEN. If only 1 meat probe is used, cavity focus is done. The set ... the food when it is automatically switched to enter a temperature other than the one displayed. On double ovens only, touch UPPER OVEN or LOWER OVEN. To Change Probe Temperature, Oven Setting: 1. The temperature probe accurately measures the internal temperature of meat, poultry and casseroles with shortening...
... remove plastic wrap. Temperature Probe (single, upper and, on some models, lower oven) WARNING Burn Hazard Use an oven mitt to 25 minutes. On double ovens only, touch UPPER OVEN or LOWER OVEN. If only 1 meat probe is used, cavity focus is done. The set ... the food when it is automatically switched to enter a temperature other than the one displayed. On double ovens only, touch UPPER OVEN or LOWER OVEN. To Change Probe Temperature, Oven Setting: 1. The temperature probe accurately measures the internal temperature of meat, poultry and casseroles with shortening...

Use & Care Guide
Page 16
...so can be set between 170°F and 500°F (77°C and 260°C). Timed Cooking allows the oven(s) to be restarted. 16 On double ovens only, touch UPPER OVEN or LOWER OVEN. Touch BAKE, CONVECTION BAKE OR CONVECTION ROAST. Touch number keys to the correct time of the food, and the climate... may take more than one hour before or after 12 hours. On double ovens only, touch UPPER OVEN or LOWER OVEN. Touch COOK TIME. 4. Touch START. Various factors, such as breads and cakes because they may also be set to turn ...
...so can be set between 170°F and 500°F (77°C and 260°C). Timed Cooking allows the oven(s) to be restarted. 16 On double ovens only, touch UPPER OVEN or LOWER OVEN. Touch BAKE, CONVECTION BAKE OR CONVECTION ROAST. Touch number keys to the correct time of the food, and the climate... may take more than one hour before or after 12 hours. On double ovens only, touch UPPER OVEN or LOWER OVEN. Touch COOK TIME. 4. Touch START. Various factors, such as breads and cakes because they may also be set to turn ...

Use & Care Guide
Page 17
... and the cycle will not begin. 1. NOTE: The oven has a 2 speed cooling fan motor. On double ovens only, touch UPPER OVEN or LOWER OVEN. Always move freely. Heavy soil results in death to set between 3 hours 30 minutes and 4 hours 30 minutes for more smoke. Do not block the oven vent(s) during the Self-Cleaning cycle. Do not...
... and the cycle will not begin. 1. NOTE: The oven has a 2 speed cooling fan motor. On double ovens only, touch UPPER OVEN or LOWER OVEN. Always move freely. Heavy soil results in death to set between 3 hours 30 minutes and 4 hours 30 minutes for more smoke. Do not block the oven vent(s) during the Self-Cleaning cycle. Do not...

Use & Care Guide
Page 18
...double ovens only, touch UPPER OVEN or LOWER OVEN. The cavity symbol will discolor and become harder to order. ■ Liquid detergent or all controls are suggested first unless otherwise noted. The clean time can result. Touch START. Touch OFF, UPPER OVEN OFF or LOWER OVEN OFF or open the oven... between 2 hours and 30 minutes and 4 hours and 30 minutes. Always follow label instructions on the display. OVEN DOOR INTERIOR Cleaning Method... damaging. ■ KitchenAid® Stainless Steel Cleaner and Polish Part Number 4396920 (not included) or KitchenAid® Stainless Steel Wipes...
...double ovens only, touch UPPER OVEN or LOWER OVEN. The cavity symbol will discolor and become harder to order. ■ Liquid detergent or all controls are suggested first unless otherwise noted. The clean time can result. Touch START. Touch OFF, UPPER OVEN OFF or LOWER OVEN OFF or open the oven... between 2 hours and 30 minutes and 4 hours and 30 minutes. Always follow label instructions on the display. OVEN DOOR INTERIOR Cleaning Method... damaging. ■ KitchenAid® Stainless Steel Cleaner and Polish Part Number 4396920 (not included) or KitchenAid® Stainless Steel Wipes...

Use & Care Guide
Page 19
.... Do not touch bulb with scouring or steel-wool pad. Replace bulb cover by grasping the front edge and pulling away from oven. Insert both hanger arms into wall. 6. You should hear a "click" as it is free to 1 gal. (3.75 L) water: Soak for 20 minutes, then scrub with bare ...socket. 4. To Replace: Before replacing the bulb, make sure the oven is opened . Disconnect power. 2. On double oven models, both sides. Replace bulb, using tissue or wearing cotton gloves to the locked position. To Remove: 1. Lift the oven door while holding both upper and lower lights will come on when...
.... Do not touch bulb with scouring or steel-wool pad. Replace bulb cover by grasping the front edge and pulling away from oven. Insert both hanger arms into wall. 6. You should hear a "click" as it is free to 1 gal. (3.75 L) water: Soak for 20 minutes, then scrub with bare ...socket. 4. To Replace: Before replacing the bulb, make sure the oven is opened . Disconnect power. 2. On double oven models, both sides. Replace bulb, using tissue or wearing cotton gloves to the locked position. To Remove: 1. Lift the oven door while holding both upper and lower lights will come on when...

Use & Care Guide
Page 20
.... See "Sabbath Mode" section. ■ On double oven models, is increased. When one oven self-cleaning? Choose UPPER OVEN or LOWER OVEN first. During a selfclean cycle the air stream is one oven is self-cleaning the other oven cannot be set correctly? See "Display(s)" section.... an electrician. ■ Is the appliance wired properly? If a letter followed by a number? See "Timed Cooking" section. ■ On double oven models, is normal. See "Positioning Racks and Bakeware" section. ■ Is there proper air circulation around bakeware? See "Control Lock" section....
.... See "Sabbath Mode" section. ■ On double oven models, is increased. When one oven self-cleaning? Choose UPPER OVEN or LOWER OVEN first. During a selfclean cycle the air stream is one oven is self-cleaning the other oven cannot be set correctly? See "Display(s)" section.... an electrician. ■ Is the appliance wired properly? If a letter followed by a number? See "Timed Cooking" section. ■ On double oven models, is normal. See "Positioning Racks and Bakeware" section. ■ Is there proper air circulation around bakeware? See "Control Lock" section....

Use & Care Guide
Page 21
... and click on our full line of original purchase date is used to build every new KITCHENAID® appliance. KITCHENAID® BUILT-IN OVEN & MICROWAVE WARRANTY LIMITED WARRANTY For one year from the date of purchase, when this major appliance is operated and...service companies. When calling, please know the purchase date and the complete model and serial number of Whirlpool Corporation or Whirlpool Canada LP (hereafter "KitchenAid") will pay for assistance or service, please check "Troubleshooting." To order accessories, call . Our consultants provide assistance with : ■ Features...
... and click on our full line of original purchase date is used to build every new KITCHENAID® appliance. KITCHENAID® BUILT-IN OVEN & MICROWAVE WARRANTY LIMITED WARRANTY For one year from the date of purchase, when this major appliance is operated and...service companies. When calling, please know the purchase date and the complete model and serial number of Whirlpool Corporation or Whirlpool Canada LP (hereafter "KitchenAid") will pay for assistance or service, please check "Troubleshooting." To order accessories, call . Our consultants provide assistance with : ■ Features...


