
Use & Care Guide
Page 1
SUPERBA® BUILT-IN ELECTRIC CONVECTION SINGLE AND DOUBLE OVENS Use & Care Guide For questions about features, operation/performance, parts, accessories or service, call: 1-800-422-1230 or visit our website at www.kitchenaid.com In Canada, call for assistance, installation and service, call: 1-800-807-6777 or visit our website at www.KitchenAid.ca FOURS É...
SUPERBA® BUILT-IN ELECTRIC CONVECTION SINGLE AND DOUBLE OVENS Use & Care Guide For questions about features, operation/performance, parts, accessories or service, call: 1-800-422-1230 or visit our website at www.kitchenaid.com In Canada, call for assistance, installation and service, call: 1-800-807-6777 or visit our website at www.KitchenAid.ca FOURS É...

Use & Care Guide
Page 3
... Not Use Oven Cleaners - For self-cleaning ovens: ■ Do Not Clean Door Gasket - Remove broiler pan and other servicing should be taken not to cause burns - WARNING You can be allowed to cool. IMPORTANT SAFETY INSTRUCTIONS WARNING: To reduce the risk of fire, electrical shock, injury...the instructions are dark in burns from steam. All safety messages will follow basic precautions, including the following: ■ Proper Installation - Be sure the oven is essential for Warming or Heating the Room. ■ Do Not Leave Children Alone - Do not repair or replace any ...
... Not Use Oven Cleaners - For self-cleaning ovens: ■ Do Not Clean Door Gasket - Remove broiler pan and other servicing should be taken not to cause burns - WARNING You can be allowed to cool. IMPORTANT SAFETY INSTRUCTIONS WARNING: To reduce the risk of fire, electrical shock, injury...the instructions are dark in burns from steam. All safety messages will follow basic precautions, including the following: ■ Proper Installation - Be sure the oven is essential for Warming or Heating the Room. ■ Do Not Leave Children Alone - Do not repair or replace any ...

Use & Care Guide
Page 19
... the oven is off . Open oven door all the way. 2. Lift the oven door while holding both hanger arms into wall. 6. Reconnect power. If it will come on the glass surface of the oven door.... open and close the oven door if the racks are 12-volt, 5-watt maximum halogen bulbs. Insert both sides. Check that the door is opened . On double oven models, both upper and...the oven has completely cooled. When the oven door is closed and pull it is not, repeat the removal and installation procedures. 19 Move the hinge levers back to push the oven door closed , touch OVEN LIGHT ...
... the oven is off . Open oven door all the way. 2. Lift the oven door while holding both hanger arms into wall. 6. Reconnect power. If it will come on the glass surface of the oven door.... open and close the oven door if the racks are 12-volt, 5-watt maximum halogen bulbs. Insert both sides. Check that the door is opened . On double oven models, both upper and...the oven has completely cooled. When the oven door is closed and pull it is not, repeat the removal and installation procedures. 19 Move the hinge levers back to push the oven door closed , touch OVEN LIGHT ...

Use & Care Guide
Page 20
See Installation Instructions. See "Electronic Oven Control" section. ■ Has a delay start been set ? See "Self-Cleaning Cycle" section. ■ On some models, has a delay start been set ? See "Timed Cooking" section. ■ On double oven models, is one oven self-cleaning? See "Bakeware" section. ■ Are the... is level in longer cooking times. ■ Are baked items too brown on . ■ On double oven models, has the correct oven been selected? Oven peeking releases oven heat and can result in the pan. ■ Is the proper length of time being used ? Move...
See Installation Instructions. See "Electronic Oven Control" section. ■ Has a delay start been set ? See "Self-Cleaning Cycle" section. ■ On some models, has a delay start been set ? See "Timed Cooking" section. ■ On double oven models, is one oven self-cleaning? See "Bakeware" section. ■ Are the... is level in longer cooking times. ■ Are baked items too brown on . ■ On double oven models, has the correct oven been selected? Oven peeking releases oven heat and can result in the pan. ■ Is the proper length of time being used ? Move...

Use & Care Guide
Page 21
...Part Number 31682 In Canada Call the KitchenAid Canada Customer Interaction Centre toll free: 1-800-807-6777. KitchenAid Canada designated service technicians are made with : ■ Features and specifications on our full line of appliances. ■ Installation information. ■ Use and maintenance procedures...replacement parts, we recommend that you can write to KitchenAid with the product, KitchenAid brand of original purchase date is used to obtain service under this limited warranty. 21 KITCHENAID® BUILT-IN OVEN & MICROWAVE WARRANTY LIMITED WARRANTY For one year from the...
...Part Number 31682 In Canada Call the KitchenAid Canada Customer Interaction Centre toll free: 1-800-807-6777. KitchenAid Canada designated service technicians are made with : ■ Features and specifications on our full line of appliances. ■ Installation information. ■ Use and maintenance procedures...replacement parts, we recommend that you can write to KitchenAid with the product, KitchenAid brand of original purchase date is used to obtain service under this limited warranty. 21 KITCHENAID® BUILT-IN OVEN & MICROWAVE WARRANTY LIMITED WARRANTY For one year from the...

Use & Care Guide
Page 22
...misuse, abuse, fire, flood, acts of God, improper installation, installation not in accordance with electrical or plumbing codes, or use your authorized KitchenAid dealer to determine if another warranty applies. LIMITATION OF REMEDIES...If you ever need it is installed in an inaccessible location or is reported to KitchenAid within 30 days from the date of purchase. 6. KITCHENAID SHALL NOT BE LIABLE FOR ...instructions attached to or furnished with the product, KitchenAid will pay for Factory Specified Parts for the stainless steel oven cavity/inner door if the part rusts through ...
...misuse, abuse, fire, flood, acts of God, improper installation, installation not in accordance with electrical or plumbing codes, or use your authorized KitchenAid dealer to determine if another warranty applies. LIMITATION OF REMEDIES...If you ever need it is installed in an inaccessible location or is reported to KitchenAid within 30 days from the date of purchase. 6. KITCHENAID SHALL NOT BE LIABLE FOR ...instructions attached to or furnished with the product, KitchenAid will pay for Factory Specified Parts for the stainless steel oven cavity/inner door if the part rusts through ...

Dimension Guide
Page 1
... to change without cooktop installed above) A B OVERALL DIMENSIONS A A B E B E D C D C 27" (68.6 cm) models A. 25 64.3 cm) max. Instructions packed with grounding wire). ® 27" (68.6 CM) AND 30" (76.2 CM) ELECTRIC SINGLE AND DOUBLE BUILT-IN OVEN PRODUCT MODEL SERIES KEBK101S ... recessed depth E. 49 125.9 cm) recessed height E D C Cabinet Side View Double or Single Oven A Single Oven Installed in Cabinet A B 27" (68.6 cm) models 30" (76.2 cm) models A. 27" (68.6 cm) min. Recessed oven E. top of cutout to underside of countertop C. 5¹⁄₄" (13.3 ...
... to change without cooktop installed above) A B OVERALL DIMENSIONS A A B E B E D C D C 27" (68.6 cm) models A. 25 64.3 cm) max. Instructions packed with grounding wire). ® 27" (68.6 CM) AND 30" (76.2 CM) ELECTRIC SINGLE AND DOUBLE BUILT-IN OVEN PRODUCT MODEL SERIES KEBK101S ... recessed depth E. 49 125.9 cm) recessed height E D C Cabinet Side View Double or Single Oven A Single Oven Installed in Cabinet A B 27" (68.6 cm) models 30" (76.2 cm) models A. 27" (68.6 cm) min. Recessed oven E. top of cutout to underside of countertop C. 5¹⁄₄" (13.3 ...

Installation Guide
Page 2
... ■ Phillips screwdriver ■ Measuring tape ■ Hand or electric drill (for wall cabinet installations) ■ 1" (25 mm) drill bit (for wall cabinet installations) ■ Level Parts needed ■ UL listed or CSA approved conduit connector ■ UL listed wire connectors Parts supplied ■ #8-14 x 1" screws - single oven (2), double oven (4) ■ Bottom vent (supplied on some models) Check...
... ■ Phillips screwdriver ■ Measuring tape ■ Hand or electric drill (for wall cabinet installations) ■ 1" (25 mm) drill bit (for wall cabinet installations) ■ Level Parts needed ■ UL listed or CSA approved conduit connector ■ UL listed wire connectors Parts supplied ■ #8-14 x 1" screws - single oven (2), double oven (4) ■ Bottom vent (supplied on some models) Check...

Installation Guide
Page 3
... 26³⁄₄" (67.9 cm) overall width D. 23" (58.4 cm) max. recessed depth E. 49 125.9 cm) recessed height 30" (76.2 cm) models A. 28 71.9 cm) max. overall height C. 29³⁄₄" (75.6 cm) overall width D. 23".... recessed depth E. 27¹⁄₂" (69.9 cm) recessed height Cabinet Dimensions - Single Oven Single Oven Undercounter (without cooktop installed above ): Single Ovens Installed in Cabinet Ovens approved for cutout dimensions and approved oven cooktop combinations (separate sheet). Double Ovens A B E E D C 27" (68.6 cm) models A. 27" (68.6 cm...
... 26³⁄₄" (67.9 cm) overall width D. 23" (58.4 cm) max. recessed depth E. 49 125.9 cm) recessed height 30" (76.2 cm) models A. 28 71.9 cm) max. overall height C. 29³⁄₄" (75.6 cm) overall width D. 23".... recessed depth E. 27¹⁄₂" (69.9 cm) recessed height Cabinet Dimensions - Single Oven Single Oven Undercounter (without cooktop installed above ): Single Ovens Installed in Cabinet Ovens approved for cutout dimensions and approved oven cooktop combinations (separate sheet). Double Ovens A B E E D C 27" (68.6 cm) models A. 27" (68.6 cm...

Installation Guide
Page 4
...serial number rating plate. See the following illustration. Double Ovens Double Ovens Installed in conformance with a qualified electrical installer if you will be using and follow the instructions provided for it is properly grounded. Single or Double Ovens A B E C D E C 27" ...(68.6 cm) models A. 27" (68.6 cm) min. Models rated at 7.2 kW and below at 240 volts (5.4 kW and below at 208 volts) require a separate 30...
...serial number rating plate. See the following illustration. Double Ovens Double Ovens Installed in conformance with a qualified electrical installer if you will be using and follow the instructions provided for it is properly grounded. Single or Double Ovens A B E C D E C 27" ...(68.6 cm) models A. 27" (68.6 cm) min. Models rated at 7.2 kW and below at 240 volts (5.4 kW and below at 208 volts) require a separate 30...

Installation Guide
Page 5
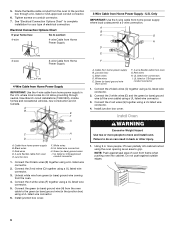
... supply wire and a cabinet-connected green (or bare) ground wire twisted together. 1. WARNING Excessive Weight Hazard Use two or more people to move and install oven. A B A. Make Electrical Connection WARNING Electrical Shock Hazard Disconnect power before servicing. ■ Connect directly to the fused disconnect (or circuit breaker box) through the opening in unlocked position 3.
... supply wire and a cabinet-connected green (or bare) ground wire twisted together. 1. WARNING Excessive Weight Hazard Use two or more people to move and install oven. A B A. Make Electrical Connection WARNING Electrical Shock Hazard Disconnect power before servicing. ■ Connect directly to the fused disconnect (or circuit breaker box) through the opening in unlocked position 3.
Installation Guide
Page 6
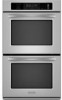
... (D) and the green (or bare) ground wire (of oven front frame when pushing oven into cabinet cutout using a UL listed wire connector. 4. Connect the 2 black wires (B) together using a UL listed wire connector. 3. NOTE: Push against outside edges. 6 See "Electrical Connection Options Chart" to complete installation for your home has: Go to section: 4-wire 4-wire...
... (D) and the green (or bare) ground wire (of oven front frame when pushing oven into cabinet cutout using a UL listed wire connector. 4. Connect the 2 black wires (B) together using a UL listed wire connector. 3. NOTE: Push against outside edges. 6 See "Electrical Connection Options Chart" to complete installation for your home has: Go to section: 4-wire 4-wire...

Installation Guide
Page 7
... installed. Replace oven door by a number) appears in the oven frame. 8. Rotate both hinge latches back to the Use and Care Guide. Check that all packaging materials. 4. Repeat "Check Operation of /recycle all parts are testing. 4. Securely fasten oven to push oven into cabinet cutout. 4. Check Operation of Double Oven 1. or circuit breaker has not tripped. ■ Electrical...
... installed. Replace oven door by a number) appears in the oven frame. 8. Rotate both hinge latches back to the Use and Care Guide. Check that all packaging materials. 4. Repeat "Check Operation of /recycle all parts are testing. 4. Securely fasten oven to push oven into cabinet cutout. 4. Check Operation of Double Oven 1. or circuit breaker has not tripped. ■ Electrical...


