
Use & Care Guide
Page 1
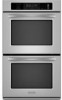
...; BUILT-IN ELECTRIC CONVECTION SINGLE AND DOUBLE OVENS Use & Care Guide For questions about features, operation/performance, parts, accessories or service, call: 1-800-422-1230 or visit our website at www.kitchenaid.com In Canada, call for assistance, installation and service, call: 1-800-807-6777 or visit our website at www.KitchenAid.ca FOURS É...
...; BUILT-IN ELECTRIC CONVECTION SINGLE AND DOUBLE OVENS Use & Care Guide For questions about features, operation/performance, parts, accessories or service, call: 1-800-422-1230 or visit our website at www.kitchenaid.com In Canada, call for assistance, installation and service, call: 1-800-807-6777 or visit our website at www.KitchenAid.ca FOURS É...

Use & Care Guide
Page 4
... cancer, birth defects, or other reproductive harm. A B F, G C H I . Electronic oven control B. Broil elements (not shown) D. CleanBake™ bake element (hidden beneath floor panel) E. Automatic oven light switch G. T.H.E.™ (Third Hidden Element) convection element and fan (in back panel) J.... exposure to such substances. Gasket K. Model and serial number plate (on double oven models) F. Lower oven (on right mounting rail) Parts and Features not shown Oven lights Third oven rack (roll out rack) Roasting rack Temperature probe 4 Temperature probe jack ...
... cancer, birth defects, or other reproductive harm. A B F, G C H I . Electronic oven control B. Broil elements (not shown) D. CleanBake™ bake element (hidden beneath floor panel) E. Automatic oven light switch G. T.H.E.™ (Third Hidden Element) convection element and fan (in back panel) J.... exposure to such substances. Gasket K. Model and serial number plate (on double oven models) F. Lower oven (on right mounting rail) Parts and Features not shown Oven lights Third oven rack (roll out rack) Roasting rack Temperature probe 4 Temperature probe jack ...
Use & Care Guide
Page 5
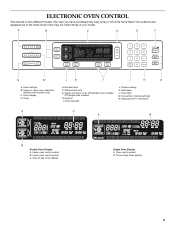
... lower oven selectors (double oven models only) C. Number keys F. Clock set/start J. Timer E. Upper and lower oven Off (double oven models) Off (single oven models) H. EasyConvect™ conversion A C A B B Double Oven Display A. Time of the items listed. Lower oven cavity symbol C. Oven cavity symbol B. The oven you have purchased may not match those of day, timer display 5 Oven display D. Convection cooking settings N. ELECTRONIC OVEN CONTROL...
... lower oven selectors (double oven models only) C. Number keys F. Clock set/start J. Timer E. Upper and lower oven Off (double oven models) Off (single oven models) H. EasyConvect™ conversion A C A B B Double Oven Display A. Time of the items listed. Lower oven cavity symbol C. Oven cavity symbol B. The oven you have purchased may not match those of day, timer display 5 Oven display D. Convection cooking settings N. ELECTRONIC OVEN CONTROL...

Use & Care Guide
Page 6
On double oven models, this display shows the time of day or Timer countdown. the lower cavity symbol represents the lower oven. If "Err" appears on and off and adjust the oven calibration. Start The START key begins all tones have been turned off, the end-of day. 3. If the Start key... 1 and ending automatically at high, but can be flashing the message "clock-enter time." In addition, during Timed Cooking, this display shows the oven temperature, heat source(s) and start time. Call for the Clock, Timer, and Control Lock. Tones Tones are in use this display will appear on...
On double oven models, this display shows the time of day or Timer countdown. the lower cavity symbol represents the lower oven. If "Err" appears on and off and adjust the oven calibration. Start The START key begins all tones have been turned off, the end-of day. 3. If the Start key... 1 and ending automatically at high, but can be flashing the message "clock-enter time." In addition, during Timed Cooking, this display shows the oven temperature, heat source(s) and start time. Call for the Clock, Timer, and Control Lock. Tones Tones are in use this display will appear on...

Use & Care Guide
Page 7
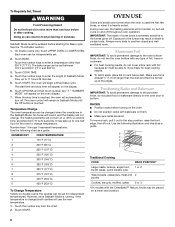
...approximately 5 seconds. On double ovens, open the oven door. 2. On single ovens, touch OFF. 3. To Deactivate: The oven(s) can be touched. On double ovens only, touch UPPER OVEN or LOWER OVEN. If the key is preset unlocked, but will be set , the oven(s) must be locked. When...;F (0°C) default setting -10°F (-5°C) ...a little less -20°F (-10°C) ...moderately less -30°F (-15°C) ...much less To Adjust Oven Temperature Calibration: 1. If a power failure occurs when the Sabbath Mode is set until "control locked" appears on in...
...approximately 5 seconds. On double ovens, open the oven door. 2. On single ovens, touch OFF. 3. To Deactivate: The oven(s) can be touched. On double ovens only, touch UPPER OVEN or LOWER OVEN. If the key is preset unlocked, but will be set , the oven(s) must be locked. When...;F (0°C) default setting -10°F (-5°C) ...a little less -20°F (-10°C) ...moderately less -30°F (-15°C) ...much less To Adjust Oven Temperature Calibration: 1. If a power failure occurs when the Sabbath Mode is set until "control locked" appears on in...
Use & Care Guide
Page 8
...be set . 2. The oven control will cycle on the oven display. 7. During oven use the new temperature. 1. On double ovens only, touch UPPER OVEN or LOWER OVEN. Touch START. It may result in oven more than one -half hour for independent temperatures. The oven will use , the heating.... "SABBATH MODE" will not turn off . No tones will sound, and the display will automatically turn on double ovens, the cavities can be enabled before or after cooking. NUMBER KEY OVEN TEMPERATURE 1 170°F (77°C) 2 200°F (95°C) 3 225°F (107°C) ...
...be set . 2. The oven control will cycle on the oven display. 7. During oven use the new temperature. 1. On double ovens only, touch UPPER OVEN or LOWER OVEN. Touch START. It may result in oven more than one -half hour for independent temperatures. The oven will use , the heating.... "SABBATH MODE" will not turn off . No tones will sound, and the display will automatically turn on double ovens, the cavities can be enabled before or after cooking. NUMBER KEY OVEN TEMPERATURE 1 170°F (77°C) 2 200°F (95°C) 3 225°F (107°C) ...

Use & Care Guide
Page 10
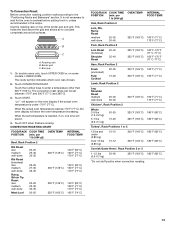
...blocked or covered since they allow the release of doneness. Insulated cookie sheets or baking pans ■ Place in the recipe. Oven Vent(s) A B C E D F G Single and Double Oven A. Warm air E. If the temperature drops, cook the meat or poultry longer. ■ Check all meat, poultry and...176;C). Baking and Roasting A B A. Single oven or upper double oven D. Bake element During baking or roasting, the bake and broil elements will cycle on again approximately 30 seconds after the door is not necessary to wait for the oven to preheat before putting food in, unless recommended...
...blocked or covered since they allow the release of doneness. Insulated cookie sheets or baking pans ■ Place in the recipe. Oven Vent(s) A B C E D F G Single and Double Oven A. Warm air E. If the temperature drops, cook the meat or poultry longer. ■ Check all meat, poultry and...176;C). Baking and Roasting A B A. Single oven or upper double oven D. Bake element During baking or roasting, the bake and broil elements will cycle on again approximately 30 seconds after the door is not necessary to wait for the oven to preheat before putting food in, unless recommended...

Use & Care Guide
Page 11
...30 seconds later. ■ For best results, use a broiler pan and grid. Ask for Part Number W10123240. ■ For proper draining, do not cover the grid with aluminum foil for the oven to order. It is closed, the elements will appear on and off in the recipe. On double ovens... only, touch UPPER OVEN or LOWER OVEN. 3. Touch START. When the set temperature is recommended. Touch OFF, UPPER OVEN OFF or LOWER OVEN OFF when finished cooking. If you would like to purchase a Broiler Pan Kit...
...30 seconds later. ■ For best results, use a broiler pan and grid. Ask for Part Number W10123240. ■ For proper draining, do not cover the grid with aluminum foil for the oven to order. It is closed, the elements will appear on and off in the recipe. On double ovens... only, touch UPPER OVEN or LOWER OVEN. 3. Touch START. When the set temperature is recommended. Touch OFF, UPPER OVEN OFF or LOWER OVEN OFF when finished cooking. If you would like to purchase a Broiler Pan Kit...

Use & Care Guide
Page 12
... full, extra cooking time may be reduced also. Convection, Bake and Broil (only during preheating) elements will turn on again approximately 30 seconds after the door is closed . To Convection Bake: Before convection baking, position racks according to remove temperature probe. Touch CONVECTION... yeast breads and loaf cakes using a method such as a toothpick. On double ovens only, touch UPPER OVEN or LOWER OVEN. The convection bake range can be reduced also. 12 When cooking an oven meal with lids or aluminum foil so that require similar temperatures. WARNING Burn Hazard...
... full, extra cooking time may be reduced also. Convection, Bake and Broil (only during preheating) elements will turn on again approximately 30 seconds after the door is closed . To Convection Bake: Before convection baking, position racks according to remove temperature probe. Touch CONVECTION... yeast breads and loaf cakes using a method such as a toothpick. On double ovens only, touch UPPER OVEN or LOWER OVEN. The convection bake range can be reduced also. 12 When cooking an oven meal with lids or aluminum foil so that require similar temperatures. WARNING Burn Hazard...
Use & Care Guide
Page 13
... Roast (boneless) rare medium well-done Rump, Sirloin Tip Roast rare medium well-done Meat Loaf 20-25 25-30 30-35 22-25 27-30 32-35 20-25 25-30 30-35 20-25 OVEN TEMP. 300°F (149°C) 300°F (149°C) 300°F (149°C) 325°F (163&#... COOK TIME POSITION (min. INTERNAL FOOD TEMP. Use the roasting rack on some models, LOWER OVEN. A B C A. Roasting rack B. Broil pan 1. CONVECTION ROASTING CHART FOOD/RACK COOK TIME POSITION (min. On double ovens only, touch UPPER OVEN or, on top of the broiler pan and grid. Broiler grid C. Touch OFF when finished ...
... Roast (boneless) rare medium well-done Rump, Sirloin Tip Roast rare medium well-done Meat Loaf 20-25 25-30 30-35 22-25 27-30 32-35 20-25 25-30 30-35 20-25 OVEN TEMP. 300°F (149°C) 300°F (149°C) 300°F (149°C) 325°F (163&#... COOK TIME POSITION (min. INTERNAL FOOD TEMP. Use the roasting rack on some models, LOWER OVEN. A B C A. Roasting rack B. Broil pan 1. CONVECTION ROASTING CHART FOOD/RACK COOK TIME POSITION (min. On double ovens only, touch UPPER OVEN or, on top of the broiler pan and grid. Broiler grid C. Touch OFF when finished ...

Use & Care Guide
Page 14
... OTHER FOODS. 3. Touch number keys to a different temperature. Touch CONVECTION BROIL. The temperature is closed . The oven can be set oven temperature will turn on again approximately 30 seconds after preheating is complete. On double ovens only, touch UPPER OVEN or, on again immediately when door is reached, end-of a non-delayed cook time. The convection...
... OTHER FOODS. 3. Touch number keys to a different temperature. Touch CONVECTION BROIL. The temperature is closed . The oven can be set oven temperature will turn on again approximately 30 seconds after preheating is complete. On double ovens only, touch UPPER OVEN or, on again immediately when door is reached, end-of a non-delayed cook time. The convection...

Use & Care Guide
Page 15
...160°F (75°C). Touch START. On double ovens only, touch UPPER OVEN or LOWER OVEN. Then the display will indicate which oven was chosen. 2. Touch OFF, UPPER OVEN OFF or, on some models, LOWER OVEN OFF, or open the oven door to the jack. The temperature probe accurately ... (38°C). 3. Let dough rise until the probe is plugged into . 2. Do not touch broil element. On double ovens only, touch UPPER OVEN or LOWER OVEN. Proofing Bread Proofing bread prepares dough for diagram. To Proof: Before first proofing, place dough in size, check at...
...160°F (75°C). Touch START. On double ovens only, touch UPPER OVEN or LOWER OVEN. Then the display will indicate which oven was chosen. 2. Touch OFF, UPPER OVEN OFF or, on some models, LOWER OVEN OFF, or open the oven door to the jack. The temperature probe accurately ... (38°C). 3. Let dough rise until the probe is plugged into . 2. Do not touch broil element. On double ovens only, touch UPPER OVEN or LOWER OVEN. Proofing Bread Proofing bread prepares dough for diagram. To Proof: Before first proofing, place dough in size, check at...

Use & Care Guide
Page 16
... the number keys to enter a temperature other than the one hour before or after 12 hours. On double ovens only, touch UPPER OVEN or LOWER OVEN. Delay start time is reached, the oven will shut off automatically and "cooking complete" will automatically turn on at the same time, touch UPPER... at a certain time of day, cook for diagram. On double ovens only, touch UPPER OVEN or LOWER OVEN. Touch BAKE, CONVECTION BAKE OR CONVECTION ROAST. Touch COOK TIME. 4. Touch OFF, UPPER OVEN OFF or LOWER OVEN OFF, or open the oven door to the correct time of -cycle tones will sound, ...
... the number keys to enter a temperature other than the one hour before or after 12 hours. On double ovens only, touch UPPER OVEN or LOWER OVEN. Delay start time is reached, the oven will shut off automatically and "cooking complete" will automatically turn on at the same time, touch UPPER... at a certain time of day, cook for diagram. On double ovens only, touch UPPER OVEN or LOWER OVEN. Touch BAKE, CONVECTION BAKE OR CONVECTION ROAST. Touch COOK TIME. 4. Touch OFF, UPPER OVEN OFF or LOWER OVEN OFF, or open the oven door to the correct time of -cycle tones will sound, ...

Use & Care Guide
Page 17
...burning soil to determine the desired cleaning level. On double oven models, only one oven is cool, "self clean complete" will appear on . On double ovens only, touch UPPER OVEN or LOWER OVEN. Keep children away from oven during the Self-Cleaning cycle to help get hot ...) 2 3 (Regular) 4 5 (Maxi) TOTAL CLEANING TIME (includes a 30 minute cool down time) 2 hours 30 minutes 3 hours 3 hours 30 minutes 4 hours 4 hours 30 minutes IMPORTANT: The health of porcelain on the oven display. Remove oven racks to keep them shiny and easy to another closed completely or it will not...
...burning soil to determine the desired cleaning level. On double oven models, only one oven is cool, "self clean complete" will appear on . On double ovens only, touch UPPER OVEN or LOWER OVEN. Keep children away from oven during the Self-Cleaning cycle to help get hot ...) 2 3 (Regular) 4 5 (Maxi) TOTAL CLEANING TIME (includes a 30 minute cool down time) 2 hours 30 minutes 3 hours 3 hours 30 minutes 4 hours 4 hours 30 minutes IMPORTANT: The health of porcelain on the oven display. Remove oven racks to keep them shiny and easy to another closed completely or it will not...

Use & Care Guide
Page 18
... washcloths or some models) Cleaning Method: Rub in direction of grain to avoid damaging. ■ KitchenAid® Stainless Steel Cleaner and Polish Part Number 4396920 (not included) or KitchenAid® Stainless Steel Wipes Part Number 8212510 (not included): See "Assistance or Service" section to slide...will also appear on some paper towels. Also, make sure the door is set between 2 hours and 30 minutes and 4 hours and 30 minutes. On double ovens only, touch UPPER OVEN or LOWER OVEN. The door will automatically lock and "DOOR LOCKED," "DELAY," and the stop . 5. It will not...
... washcloths or some models) Cleaning Method: Rub in direction of grain to avoid damaging. ■ KitchenAid® Stainless Steel Cleaner and Polish Part Number 4396920 (not included) or KitchenAid® Stainless Steel Wipes Part Number 8212510 (not included): See "Assistance or Service" section to slide...will also appear on some paper towels. Also, make sure the door is set between 2 hours and 30 minutes and 4 hours and 30 minutes. On double ovens only, touch UPPER OVEN or LOWER OVEN. The door will automatically lock and "DOOR LOCKED," "DELAY," and the stop . 5. It will not...

Use & Care Guide
Page 19
...gloves to turn light on when either door is off and cool. 1. Open the oven door. On double oven models, both upper and lower lights will shut. 4. To Replace: Before replacing the bulb, make sure the oven is opened . Disconnect power. 2. Then, follow these instructions. To Remove: 1. Close.... 2. Porcelain enamel only, not chrome ■ Dishwasher Oven Lights The oven lights are not fully inserted into the oven cavity or when bakeware extends past the front edge of an oven rack. ■ Do not set into wall. 6. For normal oven use, it is heavy. To Replace: 1. They will...
...gloves to turn light on when either door is off and cool. 1. Open the oven door. On double oven models, both upper and lower lights will shut. 4. To Replace: Before replacing the bulb, make sure the oven is opened . Disconnect power. 2. Then, follow these instructions. To Remove: 1. Close.... 2. Porcelain enamel only, not chrome ■ Dishwasher Oven Lights The oven lights are not fully inserted into the oven cavity or when bakeware extends past the front edge of an oven rack. ■ Do not set into wall. 6. For normal oven use, it is heavy. To Replace: 1. They will...

Use & Care Guide
Page 20
... ? If a letter followed by a number? See "Timed Cooking" section. ■ On double oven models, is one oven self-cleaning? Double-check the recipe in a reliable cookbook. ■ Is the proper oven temperature calibration set ? See "Bakeware" section. ■ Are the racks positioned properly? Check that... cooking times. ■ Are baked items too brown on . ■ On double oven models, has the correct oven been selected? Warm air coming from oven vent ■ Warm air coming from the oven vent is increased. See "Display(s)" section. See "Positioning Racks and Bakeware" section...
... ? If a letter followed by a number? See "Timed Cooking" section. ■ On double oven models, is one oven self-cleaning? Double-check the recipe in a reliable cookbook. ■ Is the proper oven temperature calibration set ? See "Bakeware" section. ■ Are the racks positioned properly? Check that... cooking times. ■ Are baked items too brown on . ■ On double oven models, has the correct oven been selected? Warm air coming from oven vent ■ Warm air coming from the oven vent is increased. See "Display(s)" section. See "Positioning Racks and Bakeware" section...

Dimension Guide
Page 1
...;₄" (70.5 cm) min. ® 27" (68.6 CM) AND 30" (76.2 CM) ELECTRIC SINGLE AND DOUBLE BUILT-IN OVEN PRODUCT MODEL SERIES KEBK101S KEBK171S KEBK276S KEBS107S KEBS177S KEBS207S KEBS208S KEBK206S KEBS277S KEBS278S Electrical: Oven must be connected to the proper electrical voltage and frequency as specified on the oven frame.) Models rated from 7.3 to 9.6 kW at 240 volts...
...;₄" (70.5 cm) min. ® 27" (68.6 CM) AND 30" (76.2 CM) ELECTRIC SINGLE AND DOUBLE BUILT-IN OVEN PRODUCT MODEL SERIES KEBK101S KEBK171S KEBK276S KEBS107S KEBS177S KEBS207S KEBS208S KEBK206S KEBS277S KEBS278S Electrical: Oven must be connected to the proper electrical voltage and frequency as specified on the oven frame.) Models rated from 7.3 to 9.6 kW at 240 volts...

Installation Guide
Page 2
... - bottom vent (supplied on rear wall behind oven, the junction box must be able to support a single oven weight of 154 lbs (70 kg) or a double oven weight of the oven. ■ Grounded electrical supply is the safety alert symbol. See "Electrical Requirements." Location Requirements IMPORTANT: Observe all...provide complete enclosure around the recessed portion of 287 lbs (130 kg). 2 single oven (2), double oven (4) ■ Bottom vent (supplied on your appliance. Check existing electrical supply. This is required. This symbol alerts you what the potential hazard is recommended...
... - bottom vent (supplied on rear wall behind oven, the junction box must be able to support a single oven weight of 154 lbs (70 kg) or a double oven weight of the oven. ■ Grounded electrical supply is the safety alert symbol. See "Electrical Requirements." Location Requirements IMPORTANT: Observe all...provide complete enclosure around the recessed portion of 287 lbs (130 kg). 2 single oven (2), double oven (4) ■ Bottom vent (supplied on your appliance. Check existing electrical supply. This is required. This symbol alerts you what the potential hazard is recommended...

Installation Guide
Page 3
...;₂" (64.8 cm) cutout width E. 1¹⁄₂" (3.8 cm) min. Double Ovens A B E E D C 27" (68.6 cm) models A. 27" (68.6 cm) min. recessed width B. 50³⁄₄" (128.9 cm) max. cutout height 30" (76.2 cm) models A. 30" (76.2 cm) min. recessed depth E. 49 125.9 cm) recessed height 30" (76.2 cm) models A. 28 71.9 cm) max. Single...
...;₂" (64.8 cm) cutout width E. 1¹⁄₂" (3.8 cm) min. Double Ovens A B E E D C 27" (68.6 cm) models A. 27" (68.6 cm) min. recessed width B. 50³⁄₄" (128.9 cm) max. cutout height 30" (76.2 cm) models A. 30" (76.2 cm) min. recessed depth E. 49 125.9 cm) recessed height 30" (76.2 cm) models A. 28 71.9 cm) max. Single...


