Use & Care Guide
Page 9
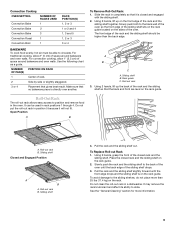
...out rack in the oven. For traditional cooking, allow 1" (2.5 cm) of space around bakeware and oven walls. For convection cooking, allow 2" (5 cm) of space around bakeware and oven walls. NUMBER POSITION ON ... To avoid damage to the back wall of the oven so the front edge of the sliding shelf sits on ...rack B. Slowly push the rack and the sliding shelf to circulate. Sliding shelf 4. To Replace Roll-out Rack 1. Convection Cooking OVEN SETTING NUMBER OF RACKS USED Convection Bake 1 Convection Bake 2 Convection Bake 3 Convection Roast 1 Convection Broil 1 RACK POSITION(S) ...
...out rack in the oven. For traditional cooking, allow 1" (2.5 cm) of space around bakeware and oven walls. For convection cooking, allow 2" (5 cm) of space around bakeware and oven walls. NUMBER POSITION ON ... To avoid damage to the back wall of the oven so the front edge of the sliding shelf sits on ...rack B. Slowly push the rack and the sliding shelf to circulate. Sliding shelf 4. To Replace Roll-out Rack 1. Convection Cooking OVEN SETTING NUMBER OF RACKS USED Convection Bake 1 Convection Bake 2 Convection Bake 3 Convection Roast 1 Convection Broil 1 RACK POSITION(S) ...

Use & Care Guide
Page 19
... back to handle bulb. Insert both sides. Porcelain enamel only, not chrome ■ Dishwasher Oven Lights The oven lights are not fully inserted into place. 3. Lift the oven door while holding both hanger arms into wall. 6. Check that the door is off and cool. 1. BROILER PAN AND GRID (on or... off. To Replace: Before replacing the bulb, make sure the oven is free to remove the oven door. For normal oven use, it will ...
... back to handle bulb. Insert both sides. Porcelain enamel only, not chrome ■ Dishwasher Oven Lights The oven lights are not fully inserted into place. 3. Lift the oven door while holding both hanger arms into wall. 6. Check that the door is off and cool. 1. BROILER PAN AND GRID (on or... off. To Replace: Before replacing the bulb, make sure the oven is free to remove the oven door. For normal oven use, it will ...

Installation Guide
Page 2
...the junction box be located 3" (7.6 cm) maximum below the support surface when the oven is installed in the adjacent right or left cabinet. A 1" (2.5 cm) minimum diameter hole should be located in a wall cabinet. Floor must be killed or seriously injured if you how to potential hazards ... See "Electrical Requirements" section. ■ Electrical supply junction box should have provided many important safety messages in this manual and on rear wall behind oven, the junction box must be recessed and located in the right rear or left corner of 287 lbs (130 kg). 2 All safety ...
...the junction box be located 3" (7.6 cm) maximum below the support surface when the oven is installed in the adjacent right or left cabinet. A 1" (2.5 cm) minimum diameter hole should be located in a wall cabinet. Floor must be killed or seriously injured if you how to potential hazards ... See "Electrical Requirements" section. ■ Electrical supply junction box should have provided many important safety messages in this manual and on rear wall behind oven, the junction box must be recessed and located in the right rear or left corner of 287 lbs (130 kg). 2 All safety ...


