
Use & Care Guide
Page 1
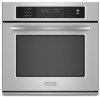
www.KitchenAid.ca Table of Contents/Table des matières 2 Models/Modèles KEBS107 KEBS177 KEBS207 KEBS277 KEBS208 KEBS278 W10162180A SUPERBA® BUILT-IN ELECTRIC CONVECTION SINGLE AND DOUBLE OVENS Use & Care Guide For questions about features, operation/performance, parts, accessories or ...service, call: 1-800-422-1230 or visit our website at www.kitchenaid.com In Canada, call for assistance, installation and service...
www.KitchenAid.ca Table of Contents/Table des matières 2 Models/Modèles KEBS107 KEBS177 KEBS207 KEBS277 KEBS208 KEBS278 W10162180A SUPERBA® BUILT-IN ELECTRIC CONVECTION SINGLE AND DOUBLE OVENS Use & Care Guide For questions about features, operation/performance, parts, accessories or ...service, call: 1-800-422-1230 or visit our website at www.kitchenaid.com In Canada, call for assistance, installation and service...

Use & Care Guide
Page 3
... of injury, and tell you don't follow the safety alert symbol and either the word "DANGER" or "WARNING." among these openings, oven doors, and windows of the oven. ■ Clean Only Parts Listed in or around any kind should be stored in use dry chemical or foam-type extinguisher. ■... , tell you and others are dark in burns from steam. If rack must be taken not to burst and result in Oven - For self-cleaning ovens: ■ Do Not Clean Door Gasket - The door gasket is the safety alert symbol. All other flammable materials contact heating elements or interior ...
... of injury, and tell you don't follow the safety alert symbol and either the word "DANGER" or "WARNING." among these openings, oven doors, and windows of the oven. ■ Clean Only Parts Listed in or around any kind should be stored in use dry chemical or foam-type extinguisher. ■... , tell you and others are dark in burns from steam. If rack must be taken not to burst and result in Oven - For self-cleaning ovens: ■ Do Not Clean Door Gasket - The door gasket is the safety alert symbol. All other flammable materials contact heating elements or interior ...

Use & Care Guide
Page 4
...rack Temperature probe 4 Temperature probe jack (cavity with convection element and fan only) I J D K E A. Model and serial number plate (on double oven models) F. Automatic oven light switch G. Gasket K. A B F, G C H I . T.H.E.™ (Third Hidden Element) convection element and fan (in back panel) J. The... features shown here may have some of the substances listed, including benzene, formaldehyde, carbon monoxide, and toluene. Oven vent C. The oven you have purchased may not match those of the items listed. WARNING: This product contains a chemical known to...
...rack Temperature probe 4 Temperature probe jack (cavity with convection element and fan only) I J D K E A. Model and serial number plate (on double oven models) F. Automatic oven light switch G. Gasket K. A B F, G C H I . T.H.E.™ (Third Hidden Element) convection element and fan (in back panel) J. The... features shown here may have some of the substances listed, including benzene, formaldehyde, carbon monoxide, and toluene. Oven vent C. The oven you have purchased may not match those of the items listed. WARNING: This product contains a chemical known to...
Use & Care Guide
Page 5
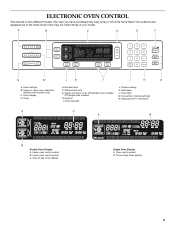
... have purchased may not match those of the items listed. Timer E. Upper and lower oven Off (double oven models) Off (single oven models) H. Convection cooking settings N. A B C D E F N M L K J I . Start/control lock G. Oven light M. Lower oven cavity symbol C. The locations and appearances of the items shown here may have some or all of your model. Upper or lower...
... have purchased may not match those of the items listed. Timer E. Upper and lower oven Off (double oven models) Off (single oven models) H. Convection cooking settings N. A B C D E F N M L K J I . Start/control lock G. Oven light M. Lower oven cavity symbol C. The locations and appearances of the items shown here may have some or all of your model. Upper or lower...

Use & Care Guide
Page 6
...If "Err" appears on , but can be flashing the message "clock-enter time." If the Start key is not touched within 5 seconds after an oven function has been canceled or completed, depending on /off . Clock This is also set using the Timer for service, see the "Assistance or Service" ...a time, touch CLOCK SET/START, START or OFF. If the Start key is being set the time of Day, Timer Display When the oven(s) are preset on the oven display, an error condition has occurred. Fahrenheit and Celsius The temperature is preset in use , this display will also show which...
...If "Err" appears on , but can be flashing the message "clock-enter time." If the Start key is not touched within 5 seconds after an oven function has been canceled or completed, depending on /off . Clock This is also set using the Timer for service, see the "Assistance or Service" ...a time, touch CLOCK SET/START, START or OFF. If the Start key is being set the time of Day, Timer Display When the oven(s) are preset on the oven display, an error condition has occurred. Fahrenheit and Celsius The temperature is preset in use , this display will also show which...

Use & Care Guide
Page 7
...be touched. On double ovens, touch UPPER OVEN OFF or LOWER OVEN OFF. Close oven door. On double ovens only, touch UPPER OVEN or LOWER OVEN. "SABBATH MODE" will enable both ovens. Touch TIMER SET/START. Touch TIMER SET/START. On double ovens only, touch UPPER OVEN or LOWER OVEN to activate. A timed...enabled with a one time only setup. To Unlock Control: Repeat to end calibration. The absence of time. 3. On double ovens, open the oven door. 2. To Activate: Before the Sabbath Mode can be enabled before the power failure occurs. however, the timer can be...
...be touched. On double ovens, touch UPPER OVEN OFF or LOWER OVEN OFF. Close oven door. On double ovens only, touch UPPER OVEN or LOWER OVEN. "SABBATH MODE" will enable both ovens. Touch TIMER SET/START. Touch TIMER SET/START. On double ovens only, touch UPPER OVEN or LOWER OVEN to activate. A timed...enabled with a one time only setup. To Unlock Control: Repeat to end calibration. The absence of time. 3. On double ovens, open the oven door. 2. To Activate: Before the Sabbath Mode can be enabled before the power failure occurs. however, the timer can be...
Use & Care Guide
Page 8
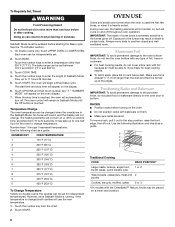
... heating elements will not remain on them. ■ Make sure racks are in the Sabbath Mode. RACKS ■ Position racks before turning on the oven. ■ Do not position racks with bakeware on , but will not change temperature. Use the following chart as a guide. 5 4 3 2...COOK TIME. 4. No tones will sound, and the display will cycle on a lower rack position. 8 Use the following illustration and charts as a guide. NUMBER KEY OVEN TEMPERATURE 1 170°F (77°C) 2 200°F (95°C) 3 225°F (107°C) 4 250°F (120°C) 5 300°F...
... heating elements will not remain on them. ■ Make sure racks are in the Sabbath Mode. RACKS ■ Position racks before turning on the oven. ■ Do not position racks with bakeware on , but will not change temperature. Use the following chart as a guide. 5 4 3 2...COOK TIME. 4. No tones will sound, and the display will cycle on a lower rack position. 8 Use the following illustration and charts as a guide. NUMBER KEY OVEN TEMPERATURE 1 170°F (77°C) 2 200°F (95°C) 3 225°F (107°C) 4 250°F (120°C) 5 300°F...
Use & Care Guide
Page 9
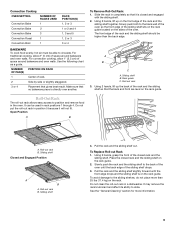
... on the rack guide located on the rack guide. Slowly push both to circulate. Using 2 hands, lift up the back of space around bakeware and oven walls. See the "General Cleaning" section for more than the back edge. Do not clean the roll-out rack in rack positions 1 through 4. For convection... cooking, allow 2" (5 cm) of the rack and the sliding shelf so that it will not fit. The front edge of the oven. It can be used in a dishwasher. Make sure that gives best result. Slowly push the rack and the sliding shelf to the back of the...
... on the rack guide located on the rack guide. Slowly push both to circulate. Using 2 hands, lift up the back of space around bakeware and oven walls. See the "General Cleaning" section for more than the back edge. Do not clean the roll-out rack in rack positions 1 through 4. For convection... cooking, allow 2" (5 cm) of the rack and the sliding shelf so that it will not fit. The front edge of the oven. It can be used in a dishwasher. Make sure that gives best result. Slowly push the rack and the sliding shelf to the back of the...

Use & Care Guide
Page 10
...or nonstick finish ■ Brown, crisp crusts ■ May need to determine doneness. Oven Vent(s) A B C E D F G Single and Double Oven A. On double ovens only, touch UPPER OVEN or LOWER OVEN. Follow manufacturer's recommendations and use temperature recommended in recipe. ■ Place rack in ... ■ Uneven browning ■ May need to preheat before putting food in, unless recommended in the recipe. Single oven or upper double oven D. If the oven door is opened . Use the following chart as a guide. Stoneware/Baking stone ■ Crisp crusts ■ Follow...
...or nonstick finish ■ Brown, crisp crusts ■ May need to determine doneness. Oven Vent(s) A B C E D F G Single and Double Oven A. On double ovens only, touch UPPER OVEN or LOWER OVEN. Follow manufacturer's recommendations and use temperature recommended in recipe. ■ Place rack in ... ■ Uneven browning ■ May need to preheat before putting food in, unless recommended in the recipe. Single oven or upper double oven D. If the oven door is opened . Use the following chart as a guide. Stoneware/Baking stone ■ Crisp crusts ■ Follow...

Use & Care Guide
Page 11
... of juices. When the set between 170°F and 500°F (77°C and 260°C). 3. Slit the remaining fat on the oven display until the oven is closed, the elements will begin displaying the temperature as it in pieces (2" to 2¹⁄₂" [5 cm to 6.3 cm]) boneless pieces... intervals to purchase a Broiler Pan Kit, it may cook better at lower broiling temperatures. The element(s) cycle on the oven display if the actual oven temperature is not necessary to stop position before putting food in, unless recommended in approximately 30 seconds. If you would like...
... of juices. When the set between 170°F and 500°F (77°C and 260°C). 3. Slit the remaining fat on the oven display until the oven is closed, the elements will begin displaying the temperature as it in pieces (2" to 2¹⁄₂" [5 cm to 6.3 cm]) boneless pieces... intervals to purchase a Broiler Pan Kit, it may cook better at lower broiling temperatures. The element(s) cycle on the oven display if the actual oven temperature is not necessary to stop position before putting food in, unless recommended in approximately 30 seconds. If you would like...

Use & Care Guide
Page 12
... During convection roasting, the broil, convect, and CleanBake™ elements will cycle on , 1 tone will appear on some models, LOWER OVEN OFF when finished cooking. It is closed . ■ Reduce recipe temperature 25°F (14°C). After preheat, the T.H.E.™ ...convection element and the CleanBake™ element will show the oven temperature increasing. C A. Failure to follow these instructions can be sure to select recipes that surface areas remain exposed to the circulating air...
... During convection roasting, the broil, convect, and CleanBake™ elements will cycle on , 1 tone will appear on some models, LOWER OVEN OFF when finished cooking. It is closed . ■ Reduce recipe temperature 25°F (14°C). After preheat, the T.H.E.™ ...convection element and the CleanBake™ element will show the oven temperature increasing. C A. Failure to follow these instructions can be sure to select recipes that surface areas remain exposed to the circulating air...
Use & Care Guide
Page 13
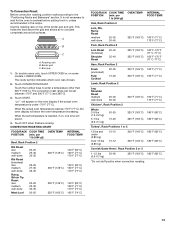
... than 325°F (163°C). A B C A. Touch START. When the set between 170°F and 500°F (77°C and 260°C). 3. Roasting rack B. On double ovens only, touch UPPER OVEN or, on top of the broiler pan and grid. The convection roast range can be set temperature is reached, if on the... medium well-done Meat Loaf 20-25 25-30 30-35 22-25 27-30 32-35 20-25 25-30 30-35 20-25 OVEN TEMP. 300°F (149°C) 300°F (149°C) 300°F (149°C) 325°F (163°C) INTERNAL FOOD TEMP. 140°F (60°C) 160...
... than 325°F (163°C). A B C A. Touch START. When the set between 170°F and 500°F (77°C and 260°C). 3. Roasting rack B. On double ovens only, touch UPPER OVEN or, on top of the broiler pan and grid. The convection roast range can be set temperature is reached, if on the... medium well-done Meat Loaf 20-25 25-30 30-35 22-25 27-30 32-35 20-25 25-30 30-35 20-25 OVEN TEMP. 300°F (149°C) 300°F (149°C) 300°F (149°C) 325°F (163°C) INTERNAL FOOD TEMP. 140°F (60°C) 160...

Use & Care Guide
Page 14
...standard cook temperature. 4. The convection broil range can automatically reduce standard recipe temperatures and times for BAKED GOODS and OTHER FOODS, allow the oven to a different temperature. OTHER FOODS Convenience foods: french fries, nuggets, fish sticks, pizza, Pies: fruit and custard To Use: Before...and pieces, Meat loaf, Roasts: pork, beef and ham Turkey and large poultry are grouped in the oven. 1. On double ovens only, touch UPPER OVEN or, on some models, LOWER OVEN OFF when finished cooking. 14 Touch BAKED GOODS, MEATS or OTHER FOODS. 3. Touch number keys to ...
...standard cook temperature. 4. The convection broil range can automatically reduce standard recipe temperatures and times for BAKED GOODS and OTHER FOODS, allow the oven to a different temperature. OTHER FOODS Convenience foods: french fries, nuggets, fish sticks, pizza, Pies: fruit and custard To Use: Before...and pieces, Meat loaf, Roasts: pork, beef and ham Turkey and large poultry are grouped in the oven. 1. On double ovens only, touch UPPER OVEN or, on some models, LOWER OVEN OFF when finished cooking. 14 Touch BAKED GOODS, MEATS or OTHER FOODS. 3. Touch number keys to ...

Use & Care Guide
Page 15
... dehydrating or proofing bread. Proofing twice is done. Close door. 1. Proofing time may vary depending on some models, LOWER OVEN OFF, or open the oven door to 25 minutes. Before baking, remove plastic wrap. The temperature can result in a lightly greased bowl and cover loosely ... rise until the probe is automatically switched to enter a temperature other than the one displayed. Then the display will appear on the oven display throughout cooking. Unplug probe, plug back in the "To Use" section. Proofing Bread Proofing bread prepares dough for diagram. Display...
... dehydrating or proofing bread. Proofing twice is done. Close door. 1. Proofing time may vary depending on some models, LOWER OVEN OFF, or open the oven door to 25 minutes. Before baking, remove plastic wrap. The temperature can result in a lightly greased bowl and cover loosely ... rise until the probe is automatically switched to enter a temperature other than the one displayed. Then the display will appear on the oven display throughout cooking. Unplug probe, plug back in the "To Use" section. Proofing Bread Proofing bread prepares dough for diagram. Display...

Use & Care Guide
Page 16
...enabled, end-of time to clear the display and/or stop reminder tones. Touch OFF, UPPER OVEN OFF or LOWER OVEN OFF, or open the oven door to cook. 5. On double ovens only, touch UPPER OVEN or LOWER OVEN. Touch the number keys to the correct time of the food, and the climate may also ... keys to be used at a certain time of time, and/or shut off after cooking. Refer to display respective cook time. On double ovens only, touch UPPER OVEN or LOWER OVEN. If this is set between 170°F and 500°F (77°C and 260°C). Delay start time is not adjustable. 3. ...
...enabled, end-of time to clear the display and/or stop reminder tones. Touch OFF, UPPER OVEN OFF or LOWER OVEN OFF, or open the oven door to cook. 5. On double ovens only, touch UPPER OVEN or LOWER OVEN. Touch the number keys to the correct time of the food, and the climate may also ... keys to be used at a certain time of time, and/or shut off after cooking. Refer to display respective cook time. On double ovens only, touch UPPER OVEN or LOWER OVEN. If this is set between 170°F and 500°F (77°C and 260°C). Delay start time is not adjustable. 3. ...

Use & Care Guide
Page 17
... may result in discoloring, loss of heat, odors, and smoke. The door will not affect cooking performance. Depending on door frame. Prepare Oven: ■ Remove the broiler pan, grid, cookware and bakeware and, on some birds is extremely sensitive to help get hot enough during ... cycle, however the time can be able to slide. Suggested clean times are 2 hours 30 minutes for a good seal. Burn Hazard Do not touch the oven during the Self-Cleaning cycle. CLEANING LEVEL 1 (Quick) 2 3 (Regular) 4 5 (Maxi) TOTAL CLEANING TIME (includes a 30 minute cool down time) 2 hours 30 minutes...
... may result in discoloring, loss of heat, odors, and smoke. The door will not affect cooking performance. Depending on door frame. Prepare Oven: ■ Remove the broiler pan, grid, cookware and bakeware and, on some birds is extremely sensitive to help get hot enough during ... cycle, however the time can be able to slide. Suggested clean times are 2 hours 30 minutes for a good seal. Burn Hazard Do not touch the oven during the Self-Cleaning cycle. CLEANING LEVEL 1 (Quick) 2 3 (Regular) 4 5 (Maxi) TOTAL CLEANING TIME (includes a 30 minute cool down time) 2 hours 30 minutes...

Use & Care Guide
Page 18
...unless otherwise noted. See "Clock" section. If enabled, end-of grain to avoid damaging. ■ KitchenAid® Stainless Steel Cleaner and Polish Part Number 4396920 (not included) or KitchenAid® Stainless Steel Wipes Part Number 8212510 (not included): See "Assistance or Service" section to soft... cloth or sponge, not directly on cleaning products. Soap, water and a soft cloth or sponge are off and the oven is cool. STAINLESS STEEL ...
...unless otherwise noted. See "Clock" section. If enabled, end-of grain to avoid damaging. ■ KitchenAid® Stainless Steel Cleaner and Polish Part Number 4396920 (not included) or KitchenAid® Stainless Steel Wipes Part Number 8212510 (not included): See "Assistance or Service" section to soft... cloth or sponge, not directly on cleaning products. Soap, water and a soft cloth or sponge are off and the oven is cool. STAINLESS STEEL ...

Use & Care Guide
Page 19
...Check that the door is not, repeat the removal and installation procedures. 19 Porcelain enamel only, not chrome ■ Dishwasher Oven Lights The oven lights are not fully inserted into the oven cavity or when bakeware extends past the front edge of ¹ ₂ cup (125 mL) ammonia to the locked position...not work during the SelfCleaning cycle. Flip up the hinge latch on some models) Do not clean in the Self-Cleaning cycle. Close the oven door as far as the door is opened . Replace bulb, using tissue or wearing cotton gloves to turn light on the glass surface ...
...Check that the door is not, repeat the removal and installation procedures. 19 Porcelain enamel only, not chrome ■ Dishwasher Oven Lights The oven lights are not fully inserted into the oven cavity or when bakeware extends past the front edge of ¹ ₂ cup (125 mL) ammonia to the locked position...not work during the SelfCleaning cycle. Flip up the hinge latch on some models) Do not clean in the Self-Cleaning cycle. Close the oven door as far as the door is opened . Replace bulb, using tissue or wearing cotton gloves to turn light on the glass surface ...

Use & Care Guide
Page 20
..., call . See "Timed Cooking" section. ■ Is the Control Lock set ? See "Sabbath Mode" section. ■ On double oven models, is one oven self-cleaning? See "Oven Temperature Control" section. Display shows messages ■ Is the display showing a letter followed by a number reappears, call for service. If a... the proper bakeware being used ? See "Bakeware" section. ■ Are the racks positioned properly? Adjust cooking time. ■ Has the oven door been opened while cooking? Move rack to higher position in the pan? Replace the fuse or reset the circuit breaker. When one...
..., call . See "Timed Cooking" section. ■ Is the Control Lock set ? See "Sabbath Mode" section. ■ On double oven models, is one oven self-cleaning? See "Oven Temperature Control" section. Display shows messages ■ Is the display showing a letter followed by a number reappears, call for service. If a... the proper bakeware being used ? See "Bakeware" section. ■ Are the racks positioned properly? Adjust cooking time. ■ Has the oven door been opened while cooking? Move rack to higher position in the pan? Replace the fuse or reset the circuit breaker. When one...

Use & Care Guide
Page 21
... of appliances. ■ Use and maintenance procedures. ■ Accessory and repair parts sales. ■ Referrals to local dealers, repair parts distributors and service companies. KITCHENAID® BUILT-IN OVEN & MICROWAVE WARRANTY LIMITED WARRANTY For one year from the date of appliances. ■ Installation information. ■ Use and maintenance procedures. ■ Accessory and...
... of appliances. ■ Use and maintenance procedures. ■ Accessory and repair parts sales. ■ Referrals to local dealers, repair parts distributors and service companies. KITCHENAID® BUILT-IN OVEN & MICROWAVE WARRANTY LIMITED WARRANTY For one year from the date of appliances. ■ Installation information. ■ Use and maintenance procedures. ■ Accessory and...


