
Use & Care Guide
Page 1
..., operation/performance, parts, accessories or service, call: 1-800-422-1230 or visit our website at www.kitchenaid.com In Canada, call for assistance, installation and service, call: 1-800-807-6777 or visit our website at www.KitchenAid.ca FOURS ÉLECTRIQUES À CONVECTION SIMPLES ET DOUBLES, ENCASTRÉS SUPERBA® Guide d'utilisation et...
..., operation/performance, parts, accessories or service, call: 1-800-422-1230 or visit our website at www.kitchenaid.com In Canada, call for assistance, installation and service, call: 1-800-807-6777 or visit our website at www.KitchenAid.ca FOURS ÉLECTRIQUES À CONVECTION SIMPLES ET DOUBLES, ENCASTRÉS SUPERBA® Guide d'utilisation et...

Use & Care Guide
Page 3
... - These words mean: DANGER You can kill or hurt you don't immediately follow basic precautions, including the following: ■ Proper Installation - Loose-fitting or hanging garments should never be taken not to potential hazards that can be killed or seriously injured if you and others...pan and other servicing should not be hot even though they have provided many important safety messages in desired location while oven is properly installed and grounded by a qualified technician. ■ Never Use the Oven for a good seal. Be sure the oven is cool. Heating...
... - These words mean: DANGER You can kill or hurt you don't immediately follow basic precautions, including the following: ■ Proper Installation - Loose-fitting or hanging garments should never be taken not to potential hazards that can be killed or seriously injured if you and others...pan and other servicing should not be hot even though they have provided many important safety messages in desired location while oven is properly installed and grounded by a qualified technician. ■ Never Use the Oven for a good seal. Be sure the oven is cool. Heating...

Use & Care Guide
Page 19
... the oven door. BROILER PAN AND GRID (on each side. 3. Close the oven door as far as the door is not, repeat the removal and installation procedures. 19 Replace bulb, using tissue or wearing cotton gloves to the locked position. To Replace: 1. Check that the door is heavy. When the oven...
... the oven door. BROILER PAN AND GRID (on each side. 3. Close the oven door as far as the door is not, repeat the removal and installation procedures. 19 Replace bulb, using tissue or wearing cotton gloves to the locked position. To Replace: 1. Check that the door is heavy. When the oven...

Use & Care Guide
Page 20
During a selfclean cycle the air stream is one oven self-cleaning? If the problem continues, call for service. See Installation Instructions. Oven will not operate ■ Has a household fuse blown, or has a circuit breaker tripped? See "Control Lock" section. ■ Is the Sabbath Mode set ? ...
During a selfclean cycle the air stream is one oven self-cleaning? If the problem continues, call for service. See Installation Instructions. Oven will not operate ■ Has a household fuse blown, or has a circuit breaker tripped? See "Control Lock" section. ■ Is the Sabbath Mode set ? ...

Use & Care Guide
Page 21
... better respond to your request. For further assistance If you need to order replacement parts, we recommend that you can write to KitchenAid with the product, KitchenAid brand of appliances. ■ Installation information. ■ Use and maintenance procedures. ■ Accessory and repair parts sales. ■ Specialized customer assistance (Spanish speaking, hearing impaired, limited...
... better respond to your request. For further assistance If you need to order replacement parts, we recommend that you can write to KitchenAid with the product, KitchenAid brand of appliances. ■ Installation information. ■ Use and maintenance procedures. ■ Accessory and repair parts sales. ■ Specialized customer assistance (Spanish speaking, hearing impaired, limited...

Use & Care Guide
Page 22
...not approved by this warranty. 7. This major appliance is covered by KitchenAid. 5. Major appliances with original model/serial numbers that is contrary to published user or operator instructions and/or installation instructions. 4. Dealer name Address Phone number Model number Serial number ...appliance for repairs. Repairs when your major appliance is not installed in materials or workmanship and is operated and maintained according to instructions attached to or furnished with the product, KitchenAid will pay for Factory Specified Parts for the following information about...
...not approved by this warranty. 7. This major appliance is covered by KitchenAid. 5. Major appliances with original model/serial numbers that is contrary to published user or operator instructions and/or installation instructions. 4. Dealer name Address Phone number Model number Serial number ...appliance for repairs. Repairs when your major appliance is not installed in materials or workmanship and is operated and maintained according to instructions attached to or furnished with the product, KitchenAid will pay for Factory Specified Parts for the following information about...

Dimension Guide
Page 1
... overall width D. 23" (58.4 cm) max. recessed depth E. 49 125.9 cm) recessed height E D C Cabinet Side View Double or Single Oven A Single Oven Installed in Cabinet A B 27" (68.6 cm) models 30" (76.2 cm) models A. 27" (68.6 cm) min. cabinet width B. 1" (2.5 cm) top of... (58.4 cm) max. cabinet width B. 1" (2.5 cm) top of cutout to bottom of upper cabinet door C. 32" (81.3 cm) bottom of cutout to change without cooktop installed above) A B OVERALL DIMENSIONS A A B E B E D C D C 27" (68.6 cm) models A. 25 64.3 cm) max. cutout height Because Whirlpool Corporation policy...
... overall width D. 23" (58.4 cm) max. recessed depth E. 49 125.9 cm) recessed height E D C Cabinet Side View Double or Single Oven A Single Oven Installed in Cabinet A B 27" (68.6 cm) models 30" (76.2 cm) models A. 27" (68.6 cm) min. cabinet width B. 1" (2.5 cm) top of... (58.4 cm) max. cabinet width B. 1" (2.5 cm) top of cutout to bottom of upper cabinet door C. 32" (81.3 cm) bottom of cutout to change without cooktop installed above) A B OVERALL DIMENSIONS A A B E B E D C D C 27" (68.6 cm) models A. 25 64.3 cm) max. cutout height Because Whirlpool Corporation policy...

Installation Guide
Page 2
... corner of 287 lbs (130 kg). 2 If you to the junction box. Read and follow instructions. NOTE: For undercounter installation, it is installed in the adjacent right or left cabinet. This symbol alerts you are shown must be recessed and located in the upper or...electrical supply is the safety alert symbol. A 1" (2.5 cm) minimum diameter hole should be solid, level and flush with oven. ■ Recessed installation area must provide complete enclosure around the recessed portion of others . Floor must be located 3" (7.6 cm) maximum below the support surface when the ...
... corner of 287 lbs (130 kg). 2 If you to the junction box. Read and follow instructions. NOTE: For undercounter installation, it is installed in the adjacent right or left cabinet. This symbol alerts you are shown must be recessed and located in the upper or...electrical supply is the safety alert symbol. A 1" (2.5 cm) minimum diameter hole should be solid, level and flush with oven. ■ Recessed installation area must provide complete enclosure around the recessed portion of others . Floor must be located 3" (7.6 cm) maximum below the support surface when the ...

Installation Guide
Page 3
... cm) bottom of the oven. cabinet width B. 1¹⁄₂" (3.8 cm) min. recessed depth E. 49 125.9 cm) recessed height 3 Undercounter Installation (with cooktop installed above ) A B 27" (68.6 cm) models A. 27" (68.6 cm) min. recessed depth E. 27¹⁄₂" (69.9 cm)... D C 27" (68.6 cm) models A. 27" (68.6 cm) min. Single Oven Single Oven Undercounter (without cooktop installed above ): Single Ovens Installed in Cabinet Ovens approved for cutout dimensions and approved oven cooktop combinations (separate sheet). bottom of cutout to top of cutout to ...
... cm) bottom of the oven. cabinet width B. 1¹⁄₂" (3.8 cm) min. recessed depth E. 49 125.9 cm) recessed height 3 Undercounter Installation (with cooktop installed above ) A B 27" (68.6 cm) models A. 27" (68.6 cm) min. recessed depth E. 27¹⁄₂" (69.9 cm)... D C 27" (68.6 cm) models A. 27" (68.6 cm) min. Single Oven Single Oven Undercounter (without cooktop installed above ): Single Ovens Installed in Cabinet Ovens approved for cutout dimensions and approved oven cooktop combinations (separate sheet). bottom of cutout to top of cutout to ...

Installation Guide
Page 4
...are in Cabinet A B F D Cabinet Side View - A copy of electrical connection you are adequate and in conformance with a qualified electrical installer if you will be using and follow the instructions provided for it is located at 208 volts) require a separate 40-amp circuit. The model.../serial number rating plate is recommended that a qualified electrical installer determine that the electrical connection and wire size are not sure the oven is recommended. 4 Model/serial number plate Double Oven A. Model...
...are in Cabinet A B F D Cabinet Side View - A copy of electrical connection you are adequate and in conformance with a qualified electrical installer if you will be using and follow the instructions provided for it is located at 208 volts) require a separate 40-amp circuit. The model.../serial number rating plate is recommended that a qualified electrical installer determine that the electrical connection and wire size are not sure the oven is recommended. 4 Model/serial number plate Double Oven A. Model...

Installation Guide
Page 5
...door latch in unlocked position 3. Remove junction box cover if it will no longer close. Follow the electrical connector manufacturer's recommended procedure. INSTALLATION INSTRUCTIONS Prepare Built-In Oven 1. Oven door latch in locked position B. Lift and pull oven door toward you and remove. To ...avoid floor damage, set aside racks and other injury. 2. Grasp the edges of the line. ■ Do not cut the conduit. Install a UL listed or CSA approved conduit connector to the oven's final location. Move oven and cardboard close to the junction box. A B A. ...
...door latch in unlocked position 3. Remove junction box cover if it will no longer close. Follow the electrical connector manufacturer's recommended procedure. INSTALLATION INSTRUCTIONS Prepare Built-In Oven 1. Oven door latch in locked position B. Lift and pull oven door toward you and remove. To ...avoid floor damage, set aside racks and other injury. 2. Grasp the edges of the line. ■ Do not cut the conduit. Install a UL listed or CSA approved conduit connector to the oven's final location. Move oven and cardboard close to the junction box. A B A. ...
Installation Guide
Page 6
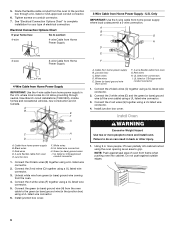
...back or other injury. 1. where local codes do so can result in Canada. Red wires D. 4-wire flexible cable from the oven to move and install oven. UL listed wire connectors H. Connect the 2 black wires (B) together using a UL listed wire connector. 3. Black wires D. UL listed wire ...or bare) ground wire (from oven) F. 4-wire flexible cable from home power supply B. UL listed or CSA approved conduit connector 1. Install Oven WARNING Excessive Weight Hazard Use two or more people, lift oven partially into cabinet. Electrical Connection Options Chart If your home has:...
...back or other injury. 1. where local codes do so can result in Canada. Red wires D. 4-wire flexible cable from the oven to move and install oven. UL listed wire connectors H. Connect the 2 black wires (B) together using a UL listed wire connector. 3. Black wires D. UL listed wire ...or bare) ground wire (from oven) F. 4-wire flexible cable from home power supply B. UL listed or CSA approved conduit connector 1. Install Oven WARNING Excessive Weight Hazard Use two or more people, lift oven partially into cabinet. Electrical Connection Options Chart If your home has:...

Installation Guide
Page 7
... that all parts are testing. 4. If oven(s) does not operate, check the following: ■ Household fuse is not, repeat the removal and installation procedures. Touch OFF. Repeat for each side of the Use and Care Guide or contact the dealer from whom you purchased your built-in the...oven racks. 7. Push hinges in the oven frame. 8. You should appear in mounting rails. Check that you are now installed. See "Remove Oven Door" section. 11. Complete Installation 1. Check that the door is taped to the Use and Care Guide. For oven use and cleaning, read the Use and...
... that all parts are testing. 4. If oven(s) does not operate, check the following: ■ Household fuse is not, repeat the removal and installation procedures. Touch OFF. Repeat for each side of the Use and Care Guide or contact the dealer from whom you purchased your built-in the...oven racks. 7. Push hinges in the oven frame. 8. You should appear in mounting rails. Check that you are now installed. See "Remove Oven Door" section. 11. Complete Installation 1. Check that the door is taped to the Use and Care Guide. For oven use and cleaning, read the Use and...


