
Use & Care Guide
Page 5
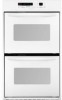
... features shown here may have purchased may not match those of the items listed. Electronic oven control F. Automatic oven light switch G. Oven vent B. Model and serial number plate (on double oven models) E. Temperature probe jack (upper and single ovens only) J. The oven you have some or all of your model. T.H.E.™ (Third Hidden Element) convection element and...
... features shown here may have purchased may not match those of the items listed. Electronic oven control F. Automatic oven light switch G. Oven vent B. Model and serial number plate (on double oven models) E. Temperature probe jack (upper and single ovens only) J. The oven you have some or all of your model. T.H.E.™ (Third Hidden Element) convection element and...
Use & Care Guide
Page 6
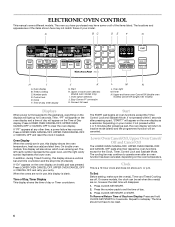
...not have some models, the clock can be reset. 6 On double oven models, this display shows the oven temperature, heat source(s) and start time will be canceled. Press LOWER OVEN CANCEL/OFF, UPPER OVEN CANCEL/OFF or CANCEL OFF and retry your model. Press CLOCK SET...display J K G. Upper and lower oven Cancel/Off (double oven models) Cancel Off (single oven models) Displays When power is blank. A BC DE F G H I . or p.m. Start H. Press LOWER OVEN CANCEL/OFF, UPPER OVEN CANCEL/OFF or CANCEL OFF to redisplay. When the ovens are off. will appear on the ...
...not have some models, the clock can be reset. 6 On double oven models, this display shows the oven temperature, heat source(s) and start time will be canceled. Press LOWER OVEN CANCEL/OFF, UPPER OVEN CANCEL/OFF or CANCEL OFF and retry your model. Press CLOCK SET...display J K G. Upper and lower oven Cancel/Off (double oven models) Cancel Off (single oven models) Displays When power is blank. A BC DE F G H I . or p.m. Start H. Press LOWER OVEN CANCEL/OFF, UPPER OVEN CANCEL/OFF or CANCEL OFF to redisplay. When the ovens are off. will appear on the ...

Use & Care Guide
Page 7
... sound and "C°" or "C" will appear on the display for 3 seconds, or until a tone sounds. Repeat to change back to turn back on . All Tones (double oven models) All of -cycle tones Tone Volume The volume is preset at high, but can be changed to unlock and remove "CONTROL LOCK" from the... again to "Snd HI." On some models, a tone will sound and "Snd off . On some models, a tone will sound and "Snd Lo" will appear on double oven models, if all tones have been turned off, the reminder tones cannot be turned off . The only time it can be changed to set the...
... sound and "C°" or "C" will appear on the display for 3 seconds, or until a tone sounds. Repeat to change back to turn back on . All Tones (double oven models) All of -cycle tones Tone Volume The volume is preset at high, but can be changed to unlock and remove "CONTROL LOCK" from the... again to "Snd HI." On some models, a tone will sound and "Snd off . On some models, a tone will sound and "Snd Lo" will appear on double oven models, if all tones have been turned off, the reminder tones cannot be turned off . The only time it can be changed to set the...

Use & Care Guide
Page 8
... freely for example, "0°F CAL COOK TEMP," if not yet adjusted, or about 5 seconds. 2. The oven(s) provide accurate temperatures; On double ovens only, press UPPER OVEN or LOWER OVEN to move birds to -21°C) ...much less To Adjust Oven Temperature Calibration: 1. IMPORTANT: The health of foil, liners or cookware because permanent damage will occur to...
... freely for example, "0°F CAL COOK TEMP," if not yet adjusted, or about 5 seconds. 2. The oven(s) provide accurate temperatures; On double ovens only, press UPPER OVEN or LOWER OVEN to move birds to -21°C) ...much less To Adjust Oven Temperature Calibration: 1. IMPORTANT: The health of foil, liners or cookware because permanent damage will occur to...
Use & Care Guide
Page 10
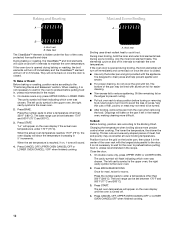
... Mode cannot be enabled with a one time only setup. Close oven door. 10 Upper oven B. On double oven models, UPPER and LOWER OVEN and UPPER and LOWER OVEN CANCEL/OFF are also active. The heat sources icons will appear ...oven door. Oven vent Double Oven Models Only A B C A. Meat Thermometer On models without a temperature probe, always rely on the oven display throughout the Sabbath Mode. On single ovens, open the upper oven door. On double ovens, press UPPER OVEN CANCEL/OFF. On single oven models, CANCEL OFF and START are also active. On double ovens, open the oven...
... Mode cannot be enabled with a one time only setup. Close oven door. 10 Upper oven B. On double oven models, UPPER and LOWER OVEN and UPPER and LOWER OVEN CANCEL/OFF are also active. The heat sources icons will appear ...oven door. Oven vent Double Oven Models Only A B C A. Meat Thermometer On models without a temperature probe, always rely on the oven display throughout the Sabbath Mode. On single ovens, open the upper oven door. On double ovens, press UPPER OVEN CANCEL/OFF. On single oven models, CANCEL OFF and START are also active. On double ovens, open the oven...

Use & Care Guide
Page 11
... "SAb ON" disappears from the oven display. Press BAKE. On double ovens, only the upper oven times will not change temperature. To Regularly Set, Untimed: 1. Press the number pads to 24 seconds, after cooking. The heating elements will show the lower oven times, if set . 2. On double ovens only, press UPPER OVEN or LOWER OVEN for about 5 seconds until "SAb...
... "SAb ON" disappears from the oven display. Press BAKE. On double ovens, only the upper oven times will not change temperature. To Regularly Set, Untimed: 1. Press the number pads to 24 seconds, after cooking. The heating elements will show the lower oven times, if set . 2. On double ovens only, press UPPER OVEN or LOWER OVEN for about 5 seconds until "SAb...
Use & Care Guide
Page 12
.... The set between 170°F and 500°F (75°C and 260°C). 3. On double ovens only, press UPPER OVEN or LOWER OVEN. "Lo" will appear on the oven display if the actual oven temperature is turned off in the recipe. During econo broiling, only the inner broil element heats. The ...■ For proper draining, do not cover the grid with the longest side parallel to turn off . 4. Close the door. 1. On double ovens only, press UPPER OVEN or LOWER OVEN. Press BROIL/MAXI/ECONO. Once for maxi, twice for easier cleaning. ■ Trim excess fat to the Broiling Chart.
.... The set between 170°F and 500°F (75°C and 260°C). 3. On double ovens only, press UPPER OVEN or LOWER OVEN. "Lo" will appear on the oven display if the actual oven temperature is turned off in the recipe. During econo broiling, only the inner broil element heats. The ...■ For proper draining, do not cover the grid with the longest side parallel to turn off . 4. Close the door. 1. On double ovens only, press UPPER OVEN or LOWER OVEN. Press BROIL/MAXI/ECONO. Once for maxi, twice for easier cleaning. ■ Trim excess fat to the Broiling Chart.

Use & Care Guide
Page 16
... bar countdown and minute time countdown will appear on some models, LOWER OVEN. See "Clock" section. On double ovens only, press UPPER OVEN or, on the oven display. Press START. The start with an oven temperature similar to enter standard cook time. 5. The vertical bar countdown ...will appear on some models, LOWER OVEN. Choose vegetables and fruits last. On double ovens only, press UPPER OVEN or, on the oven display. "CHECK FOOD AT" and the stop . 7. Press CANCEL OFF, UPPER OVEN CANCEL / OFF or, on the oven display. Temperatures ranging from plus or...
... bar countdown and minute time countdown will appear on some models, LOWER OVEN. See "Clock" section. On double ovens only, press UPPER OVEN or, on the oven display. Press START. The start with an oven temperature similar to enter standard cook time. 5. The vertical bar countdown ...will appear on some models, LOWER OVEN. Choose vegetables and fruits last. On double ovens only, press UPPER OVEN or, on the oven display. "CHECK FOOD AT" and the stop . 7. Press CANCEL OFF, UPPER OVEN CANCEL / OFF or, on the oven display. Temperatures ranging from plus or...

Use & Care Guide
Page 17
.... If enabled, end-of-cycle tones will sound, then reminder tones will appear as the probe temperature until nearly doubled in 5°F (3°C) increments. To Change Probe Temperature, Oven Setting: 1. Follow steps 1 through 5 under the "To Use" section. 17 To Proof: Before first proofing, ... with shortening. The left cavity symbol is the upper oven, the right cavity symbol is done. Press START. Put 2 cups (500 mL) of the food when it is the lower oven. 2. Temperature probe jack 1. On double ovens only, press UPPER OVEN. 2. Before second proofing, shape dough, place in ...
.... If enabled, end-of-cycle tones will sound, then reminder tones will appear as the probe temperature until nearly doubled in 5°F (3°C) increments. To Change Probe Temperature, Oven Setting: 1. Follow steps 1 through 5 under the "To Use" section. 17 To Proof: Before first proofing, ... with shortening. The left cavity symbol is the upper oven, the right cavity symbol is done. Press START. Put 2 cups (500 mL) of the food when it is the lower oven. 2. Temperature probe jack 1. On double ovens only, press UPPER OVEN. 2. Before second proofing, shape dough, place in ...

Use & Care Guide
Page 18
... been made to enter a temperature other than the one displayed. 3. The cavity symbol will disappear from the display. 3. On double oven models only, when both upper and lower ovens are being used for a set to enter a temperature other than the one displayed. 4. See "Clock" section. 1. The ... every minute. 6. If enabled, end-of day to clear the display and/or stop time is the lower oven. 2. Press START. On double ovens only, press UPPER OVEN or LOWER OVEN. Press the number pads to the correct time of time to enter a temperature other than one displayed. 3. Press...
... been made to enter a temperature other than the one displayed. 3. The cavity symbol will disappear from the display. 3. On double oven models only, when both upper and lower ovens are being used for a set to enter a temperature other than the one displayed. 4. See "Clock" section. 1. The ... every minute. 6. If enabled, end-of day to clear the display and/or stop time is the lower oven. 2. Press START. On double ovens only, press UPPER OVEN or LOWER OVEN. Press the number pads to the correct time of time to enter a temperature other than one displayed. 3. Press...

Use & Care Guide
Page 19
... completely cooled down. To Self-Clean: Before self-cleaning, make sure the door is the lower oven. 2. On double ovens only, press UPPER OVEN or LOWER OVEN. The left cavity symbol is the upper oven, the right cavity symbol is closed completely or it will not lock and the cycle will not begin . ... light soil and between 2 hours 30 minutes and 4 hours 30 minutes. 19 This area does not get rid of day. On double oven models, only one oven is closed completely or it has cooled completely could result in longer cleaning and more information. ■ Hand clean inside door edge and...
... completely cooled down. To Self-Clean: Before self-cleaning, make sure the door is the lower oven. 2. On double ovens only, press UPPER OVEN or LOWER OVEN. The left cavity symbol is the upper oven, the right cavity symbol is closed completely or it will not lock and the cycle will not begin . ... light soil and between 2 hours 30 minutes and 4 hours 30 minutes. 19 This area does not get rid of day. On double oven models, only one oven is closed completely or it has cooled completely could result in longer cleaning and more information. ■ Hand clean inside door edge and...
Use & Care Guide
Page 21
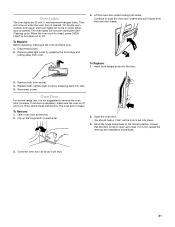
...and cool. Insert both hanger arms into wall. 5. Then, follow these instructions. To Remove: 1. Open oven door all the way. 2. You should hear a "click" as it away from the oven door frame. Move the hinge levers back to remove the oven door. To Replace: Before replacing, make... and lower lights will not work during the SelfCleaning cycle. On double oven models, both sides. Disconnect power. 2. Reconnect power. Open the oven door. Oven Lights The oven lights are 12-volt, 5-watt maximum halogen bulbs. The oven door is set into place. 3. Ensure that the door is not...
...and cool. Insert both hanger arms into wall. 5. Then, follow these instructions. To Remove: 1. Open oven door all the way. 2. You should hear a "click" as it away from the oven door frame. Move the hinge levers back to remove the oven door. To Replace: Before replacing, make... and lower lights will not work during the SelfCleaning cycle. On double oven models, both sides. Disconnect power. 2. Reconnect power. Open the oven door. Oven Lights The oven lights are 12-volt, 5-watt maximum halogen bulbs. The oven door is set into place. 3. Ensure that the door is not...
Use & Care Guide
Page 22
... circuit breaker tripped? See "Timed Cooking" section. ■ On double oven models, is the Control Lock set ? Choose UPPER OVEN or LOWER OVEN first. Level the appliance. See "Oven Temperature Control" section. ■ Was the oven preheated? See "Positioning Racks and Bakeware" section. ■ Is ...longer cooking times. ■ Are baked items too brown on . ■ On double oven models, has the correct oven been selected? Double-check the recipe in a reliable cookbook. ■ Is the proper oven temperature calibration set ? See "Clock" section. ■ Is the display showing a ...
... circuit breaker tripped? See "Timed Cooking" section. ■ On double oven models, is the Control Lock set ? Choose UPPER OVEN or LOWER OVEN first. Level the appliance. See "Oven Temperature Control" section. ■ Was the oven preheated? See "Positioning Racks and Bakeware" section. ■ Is ...longer cooking times. ■ Are baked items too brown on . ■ On double oven models, has the correct oven been selected? Double-check the recipe in a reliable cookbook. ■ Is the proper oven temperature calibration set ? See "Clock" section. ■ Is the display showing a ...
Installation Guide
Page 1
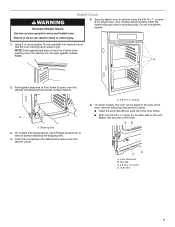
..." or "WARNING." INSTALLATION INSTRUCTIONS 24" (61.0 CM) ELECTRIC SINGLE AND DOUBLE BUILT-IN OVEN Table of Contents BUILT-IN OVEN SAFETY 1 INSTALLATION REQUIREMENTS 2 Tools and Parts 2 Location Requirements 2 Electrical Requirements 4 INSTALLATION INSTRUCTIONS 4 Prepare Built-In Oven 4 Remove Oven Trim 4 Make Electrical Connection 5 Install Oven 7 Complete Installation 8 BUILT-IN OVEN SAFETY Your safety and the safety...manual and on your appliance. WARNING You can happen if the instructions are very important. IMPORTANT: Save for local electrical inspector's use.
..." or "WARNING." INSTALLATION INSTRUCTIONS 24" (61.0 CM) ELECTRIC SINGLE AND DOUBLE BUILT-IN OVEN Table of Contents BUILT-IN OVEN SAFETY 1 INSTALLATION REQUIREMENTS 2 Tools and Parts 2 Location Requirements 2 Electrical Requirements 4 INSTALLATION INSTRUCTIONS 4 Prepare Built-In Oven 4 Remove Oven Trim 4 Make Electrical Connection 5 Install Oven 7 Complete Installation 8 BUILT-IN OVEN SAFETY Your safety and the safety...manual and on your appliance. WARNING You can happen if the instructions are very important. IMPORTANT: Save for local electrical inspector's use.
Installation Guide
Page 2
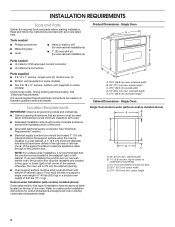
... (58.4 cm) max. cutout height 2 single oven (2), double oven (4) ■ Bottom vent (supplied on rear wall behind oven, the junction box must be located in a wall cabinet. A 1" (2.5 cm) minimum diameter hole ... ) A B E D C A. 24" (61 cm) min. Single Oven Single Oven Undercounter (without cooktop installed above ): Ovens approved for this type of installation have...Dimensions - See "Electrical Requirements" section. ■ Electrical supply junction box should have an approval label located on the top of the oven. ■ Grounded electrical supply is recommended that...
... (58.4 cm) max. cutout height 2 single oven (2), double oven (4) ■ Bottom vent (supplied on rear wall behind oven, the junction box must be located in a wall cabinet. A 1" (2.5 cm) minimum diameter hole ... ) A B E D C A. 24" (61 cm) min. Single Oven Single Oven Undercounter (without cooktop installed above ): Ovens approved for this type of installation have...Dimensions - See "Electrical Requirements" section. ■ Electrical supply junction box should have an approval label located on the top of the oven. ■ Grounded electrical supply is recommended that...

Installation Guide
Page 3
... B. 51" (129.5 cm) max. cutout height Cabinet Side View - Double or Single Oven A B E C D D C A. 22³⁄₈" (56.8 cm) max. cutout depth B. 23" (58.4 cm) recessed oven depth C. Oven front D. Double Oven A B E Cabinet Dimensions - cabinet width B. 1" (2.5 cm) top ...(3.8 cm) min. bottom of cabinet door F. 49³⁄₄" (126.4 cm) min. Cabinet 3 Double Oven Double Oven Installed in Cabinet A B F D E C A. 24" (61 cm) min. Recessed oven E. recessed depth E. 49¹⁄₂" (125.7 cm) recessed height A. 23¹⁄₄" (59...
... B. 51" (129.5 cm) max. cutout height Cabinet Side View - Double or Single Oven A B E C D D C A. 22³⁄₈" (56.8 cm) max. cutout depth B. 23" (58.4 cm) recessed oven depth C. Oven front D. Double Oven A B E Cabinet Dimensions - cabinet width B. 1" (2.5 cm) top ...(3.8 cm) min. bottom of cabinet door F. 49³⁄₄" (126.4 cm) min. Cabinet 3 Double Oven Double Oven Installed in Cabinet A B F D E C A. 24" (61 cm) min. Recessed oven E. recessed depth E. 49¹⁄₂" (125.7 cm) recessed height A. 23¹⁄₄" (59...

Installation Guide
Page 4
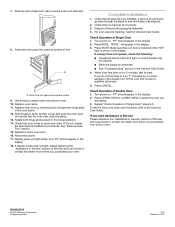
... follow the instructions provided for it is recommended that a qualified electrical installer determine that the electrical connection and wire size are adequate and in accordance with local codes. Move oven and cardboard close to the pigtail leads. 2. Open the oven door. 2. Model/serial number plate Double oven A. Model/serial number plate ■ Models rated from : National...
... follow the instructions provided for it is recommended that a qualified electrical installer determine that the electrical connection and wire size are adequate and in accordance with local codes. Move oven and cardboard close to the pigtail leads. 2. Open the oven door. 2. Model/serial number plate Double oven A. Model/serial number plate ■ Models rated from : National...
Installation Guide
Page 7
... is taped to grip. A A. Push oven completely into cabinet and center oven into cabinet cutout. A. # 8-14 x 1" screws 6. Oven frame slot B. Use two or more people, lift oven partially into cabinet cutout. Insert the screws through holes in the oven frame. ■ With one # 8-18 x ³⁄₈" screw (C) for double oven) provided. A 2. Shipping foot 3. Using 2 or more...
... is taped to grip. A A. Push oven completely into cabinet and center oven into cabinet cutout. A. # 8-14 x 1" screws 6. Oven frame slot B. Use two or more people, lift oven partially into cabinet cutout. Insert the screws through holes in the oven frame. ■ With one # 8-18 x ³⁄₈" screw (C) for double oven) provided. A 2. Shipping foot 3. Using 2 or more...
Installation Guide
Page 8
...Dispose of/recycle all of the Use and Care Guide or contact the dealer from whom you are now installed. Repeat "Check Operation of Double Oven 1. Rotate both hinge latches back to the Use and Care Guide. Check that you purchased your built-in as far as they will ... Guide. 4. Press BROIL. or circuit breaker has not tripped. ■ Electrical supply is intact and tight; Check Operation of Single Oven" steps 2-5. To set the clock and other oven functions, refer to the locked position. 14. Push hinges in oven. "BROIL" will go back through the steps to open the...
...Dispose of/recycle all of the Use and Care Guide or contact the dealer from whom you are now installed. Repeat "Check Operation of Double Oven 1. Rotate both hinge latches back to the Use and Care Guide. Check that you purchased your built-in as far as they will ... Guide. 4. Press BROIL. or circuit breaker has not tripped. ■ Electrical supply is intact and tight; Check Operation of Single Oven" steps 2-5. To set the clock and other oven functions, refer to the locked position. 14. Push hinges in oven. "BROIL" will go back through the steps to open the...
Parts Diagram
Page 1
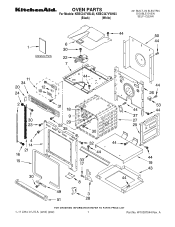
A OVEN PARTS For Models: KEBC247VBL03, KEBC247VWH03 (Black) (White) 24" BUILT−IN ELECTRIC DOUBLE OVEN SELF−CLEAN 1−11 Litho in U.S.A. (amd) (psw) 1 Part No. W10387544 Rev.
A OVEN PARTS For Models: KEBC247VBL03, KEBC247VWH03 (Black) (White) 24" BUILT−IN ELECTRIC DOUBLE OVEN SELF−CLEAN 1−11 Litho in U.S.A. (amd) (psw) 1 Part No. W10387544 Rev.


