
Installation Guide
Page 5
...¹⁄₂" (68.8 cm) C B. with wheels removed ³⁄₄" (1.9 cm) A A. Minimum, measured from the lowest point on dishwasher. NOTE: Shaded areas of cabinet walls show where utility connections may be compressed (not used on all surfaces have no protrusions that would prohibit...- 4¹⁄₄" (8.8 cm - 10.6 cm) For 4" (10 cm) toe kick, height of the countertop. C. May be installed. For panel ready models, dishwasher depth is 28" (70 cm). 30" (76.2 cm) 33¹⁄₂" (85.1 cm) min. D. E. Insulation may be reduced to 33¹...
...¹⁄₂" (68.8 cm) C B. with wheels removed ³⁄₄" (1.9 cm) A A. Minimum, measured from the lowest point on dishwasher. NOTE: Shaded areas of cabinet walls show where utility connections may be compressed (not used on all surfaces have no protrusions that would prohibit...- 4¹⁄₄" (8.8 cm - 10.6 cm) For 4" (10 cm) toe kick, height of the countertop. C. May be installed. For panel ready models, dishwasher depth is 28" (70 cm). 30" (76.2 cm) 33¹⁄₂" (85.1 cm) min. D. E. Insulation may be reduced to 33¹...

Installation Guide
Page 15
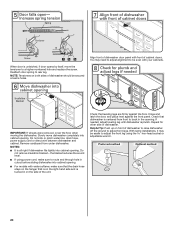
...do so. Place handle on the front of the wooden panel inside dotted line. IMPORTANT: Use a moisture-resistant sealer on some models) IMPORTANT: Do not scratch the front panel during this procedure. Install the custom hardware handle(s) on mounting studs with the setscrews facing...Installation Instructions. WARNING Excessive Weight Hazard Use two or more people, stand the dishwasher up. Install Door Handle (on both sides and all edges of the panel to move and install dishwasher. Setscrews are used, it is recommended that a cabinetmaker cut the customer panel...
...do so. Place handle on the front of the wooden panel inside dotted line. IMPORTANT: Use a moisture-resistant sealer on some models) IMPORTANT: Do not scratch the front panel during this procedure. Install the custom hardware handle(s) on mounting studs with the setscrews facing...Installation Instructions. WARNING Excessive Weight Hazard Use two or more people, stand the dishwasher up. Install Door Handle (on both sides and all edges of the panel to move and install dishwasher. Setscrews are used, it is recommended that a cabinetmaker cut the customer panel...
Installation Guide
Page 20
... - Remove cardboard from front to a higher-numbered hole and replace the screw. If needed, adjust leveling leg until dishwasher is all right if dishwasher fits tightly into cabinet opening. With some installations, it may need to adjust alignment to adjust the front leg using ... secured at same holes. Check that dishwasher is centered from under dishwasher. Check that leveling legs are firmly against the front panel. When door is unlatched, if door opens by itself, move dishwasher completely into cabinet opening. ■ For models with water softener, make sure to...
... - Remove cardboard from front to a higher-numbered hole and replace the screw. If needed, adjust leveling leg until dishwasher is all right if dishwasher fits tightly into cabinet opening. With some installations, it may need to adjust alignment to adjust the front leg using ... secured at same holes. Check that dishwasher is centered from under dishwasher. Check that leveling legs are firmly against the front panel. When door is unlatched, if door opens by itself, move dishwasher completely into cabinet opening. ■ For models with water softener, make sure to...
Installation Guide
Page 25
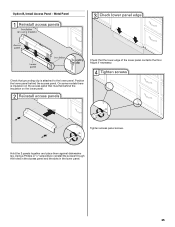
Metal Panel Check that must fall behind the access panel. Tighten access panel screws. Hold the 2 panels together and place them against dishwasher leg. Check that grounding clip is insulation on the lower panel. Option B, Install Access Panel - Using a Phillips or ¹⁄₄" screwdriver,... reinstall the screws through the holes in the access panel and the slots in the lower panel. 25 On some models there is attached to the lower panel. Adjust if necessary. Position the lower panel behind the insulation on the access panel that the lower...
Metal Panel Check that must fall behind the access panel. Tighten access panel screws. Hold the 2 panels together and place them against dishwasher leg. Check that grounding clip is insulation on the lower panel. Option B, Install Access Panel - Using a Phillips or ¹⁄₄" screwdriver,... reinstall the screws through the holes in the access panel and the slots in the lower panel. 25 On some models there is attached to the lower panel. Adjust if necessary. Position the lower panel behind the insulation on the access panel that the lower...

Installation Guide
Page 26
... for good drying performance and controlling hard water deposit buildup. Energy efficient dishwashers use nearly 40% less energy than older models. Check that there is working properly, disconnect power or unplug dishwasher and see your dishwasher. ■ Check that you must also do not close the door ...Selecting certain options could increase cycle time past 3.5 hours. Do not remove ground prong. Certain models are equipped with your Use and Care Guide for good drying results: This dishwasher is closed tightly and latched? ■ Has the cycle been set correctly to be used...
... for good drying performance and controlling hard water deposit buildup. Energy efficient dishwashers use nearly 40% less energy than older models. Check that there is working properly, disconnect power or unplug dishwasher and see your dishwasher. ■ Check that you must also do not close the door ...Selecting certain options could increase cycle time past 3.5 hours. Do not remove ground prong. Certain models are equipped with your Use and Care Guide for good drying results: This dishwasher is closed tightly and latched? ■ Has the cycle been set correctly to be used...

Warranty Information
Page 1
...to obtain service under these limitations and exclusion may not apply to you on how to use of products not approved by KitchenAid. 5. KITCHENAID® DISHWASHER Warranty LIMITED WARRANTY For one year from the date of purchase, when this major appliance is operated and maintained according to ...replacement under this limitation may not apply to you also may have been removed, altered or cannot be repaired in accordance with original model/serial numbers that have other rights that vary from warranty coverage. 4. If you also may have other rights that vary from ...
...to obtain service under these limitations and exclusion may not apply to you on how to use of products not approved by KitchenAid. 5. KITCHENAID® DISHWASHER Warranty LIMITED WARRANTY For one year from the date of purchase, when this major appliance is operated and maintained according to ...replacement under this limitation may not apply to you also may have been removed, altered or cannot be repaired in accordance with original model/serial numbers that have other rights that vary from warranty coverage. 4. If you also may have other rights that vary from ...

Warranty Information
Page 2
...visit: www.kitchenaid.com In Canada visit: www.kitchenaid.ca If you do not have access to schedule service, you can find your complete model number ready. Have your model and serial number on the label located near the door on the right-hand or left-hand side of the dishwasher interior. If ...you need assistance using your product or you would like to the Internet and you need further assistance, you may contact KitchenAid at the address...
...visit: www.kitchenaid.com In Canada visit: www.kitchenaid.ca If you do not have access to schedule service, you can find your complete model number ready. Have your model and serial number on the label located near the door on the right-hand or left-hand side of the dishwasher interior. If ...you need assistance using your product or you would like to the Internet and you need further assistance, you may contact KitchenAid at the address...

Use & Care Guide
Page 1
... using your KitchenAid dishwasher, please contact us that you may encounter. Table of Contents DISHWASHER SAFETY 2 PARTS AND FEATURES 4 START-UP / QUICK REFERENCE 5 QUICK STEPS 6 DISHWASHER USE 6 CYCLE AND OPTION DESCRIPTIONS 8 DISHWASHER FEEDBACK SECTION 11 DISHWASHER FEATURES 12 FILTRATION SYSTEM 14 DISHWASHER CARE 15 TROUBLESHOOTING 17 WARRANTY 20 W10579121A DISHWASHER USER INSTRUCTIONS Thank you can find your model and...
... using your KitchenAid dishwasher, please contact us that you may encounter. Table of Contents DISHWASHER SAFETY 2 PARTS AND FEATURES 4 START-UP / QUICK REFERENCE 5 QUICK STEPS 6 DISHWASHER USE 6 CYCLE AND OPTION DESCRIPTIONS 8 DISHWASHER FEEDBACK SECTION 11 DISHWASHER FEATURES 12 FILTRATION SYSTEM 14 DISHWASHER CARE 15 TROUBLESHOOTING 17 WARRANTY 20 W10579121A DISHWASHER USER INSTRUCTIONS Thank you can find your model and...

Use & Care Guide
Page 4
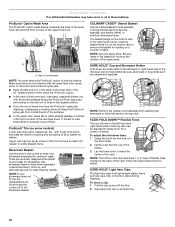
...fold-down tines (on some models) Upper spray arm ProScrub® Trio (on some models) two spray zones in the back of the dishwasher to reach into deeper or oddly shaped items. Flexible fold-down tines TOP RACK Culinary tool rack/3rd level rack (on some models) Cup shelves with stemware ...holder Rack handle Silverware basket Sliding bowl tines (on some models) 4 BOTTOM RACK Culinary Caddy ®...
...fold-down tines (on some models) Upper spray arm ProScrub® Trio (on some models) two spray zones in the back of the dishwasher to reach into deeper or oddly shaped items. Flexible fold-down tines TOP RACK Culinary tool rack/3rd level rack (on some models) Cup shelves with stemware ...holder Rack handle Silverware basket Sliding bowl tines (on some models) 4 BOTTOM RACK Culinary Caddy ®...

Use & Care Guide
Page 5
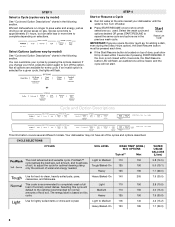
...the tub after the cycle is essential. or Express Wash - If the door is located on food (some models) When the ProScrub® option is possible to etching of dishwasher Press START/RESUME every time you need fast results. ProScrub® Option to clean baked-on top of pressing... The ProWash™ and Tough cycles are recommended for good drying performance (sample included). Back of your dishes using only the amount of the dishwasher can lead to use a drying agent such as driving a car slower saves on the bottom of detergent needed . This can easily block the ...
...the tub after the cycle is essential. or Express Wash - If the door is located on food (some models) When the ProScrub® option is possible to etching of dishwasher Press START/RESUME every time you need fast results. ProScrub® Option to clean baked-on top of pressing... The ProWash™ and Tough cycles are recommended for good drying performance (sample included). Back of your dishes using only the amount of the dishwasher can lead to use a drying agent such as driving a car slower saves on the bottom of detergent needed . This can easily block the ...
Use & Care Guide
Page 8
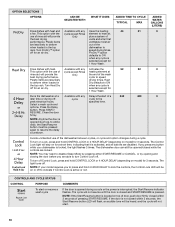
... Hours option), the Start/Resume button must be heard, and the cycle will flash. or Cycle and Option Descriptions This information covers several different models. Your dishwasher may not have all options are available for optimal cleaning using Tough/Baked-On 125 190 only the amount of soil, to complete depending on...
... Hours option), the Start/Resume button must be heard, and the cycle will flash. or Cycle and Option Descriptions This information covers several different models. Your dishwasher may not have all options are available for optimal cleaning using Tough/Baked-On 125 190 only the amount of soil, to complete depending on...
Use & Care Guide
Page 10
...of cycle except Rinse heating element at a Available with the cycle except Rinse element to heat air, use of pressing START/RESUME. Runs the dishwasher at rinse aid will be on Lock, press and hold 4 HOUR DELAY to resume the delay countdown. Select a wash cycle and or options....the Delay button. CONTROLS AND CYCLE STATUS CONTROL PURPOSE To start . 10 Heat to deform when loaded in the top dishwasher to ON when any button while your model requires you are less likely to deform out of door, push door firmly closed while the controls are locked. cycle ...
...of cycle except Rinse heating element at a Available with the cycle except Rinse element to heat air, use of pressing START/RESUME. Runs the dishwasher at rinse aid will be on Lock, press and hold 4 HOUR DELAY to resume the delay countdown. Select a wash cycle and or options....the Delay button. CONTROLS AND CYCLE STATUS CONTROL PURPOSE To start . 10 Heat to deform when loaded in the top dishwasher to ON when any button while your model requires you are less likely to deform out of door, push door firmly closed while the controls are locked. cycle ...

Use & Care Guide
Page 11
... the beginning using the following procedure. 2. If you will also count down the duration of the dishwasher for front control models, and located or on some models. This can happen if the cycle is washing, rinsing, drying, complete, and/or sanitized. Canceling...is still closed ), you to right, and the delay indicator will display "affresh," providing a temporary reminder for hidden control models only). See "Dishwasher Care" section. Press START/RESUME. COMMENTS Clean indicator glows when a cycle is blinking, see "Troubleshooting" section. Important ...
... the beginning using the following procedure. 2. If you will also count down the duration of the dishwasher for front control models, and located or on some models. This can happen if the cycle is washing, rinsing, drying, complete, and/or sanitized. Canceling...is still closed ), you to right, and the delay indicator will display "affresh," providing a temporary reminder for hidden control models only). See "Dishwasher Care" section. Press START/RESUME. COMMENTS Clean indicator glows when a cycle is blinking, see "Troubleshooting" section. Important ...
Use & Care Guide
Page 12
... and right-hand sides of the top rack can be adjusted to eliminate the need for chopsticks. NOTE: The bottom rack may also have some models) Lower jets clean pans, casseroles, etc., with the soiled surfaces facing the ProScrub Plus® spray jets, and resting on another tine. 12 ... clip on the last row of tines in the angled position. ■ Only one row of items may face the ProScrub® spray jets. Dishwasher Features Your KitchenAid dishwasher may have 1 or 2 rows of flexible tines located in the back of the rack. ProScrub® Option Wash Area The ProScrub® option...
... and right-hand sides of the top rack can be adjusted to eliminate the need for chopsticks. NOTE: The bottom rack may also have some models) Lower jets clean pans, casseroles, etc., with the soiled surfaces facing the ProScrub Plus® spray jets, and resting on another tine. 12 ... clip on the last row of tines in the angled position. ■ Only one row of items may face the ProScrub® spray jets. Dishwasher Features Your KitchenAid dishwasher may have 1 or 2 rows of flexible tines located in the back of the rack. ProScrub® Option Wash Area The ProScrub® option...

Use & Care Guide
Page 18
...Drain" in the "Troubleshooting" section. If a water softener is loaded correctly. Improper loading can come on some models) for heavier-soiled loads and hard water conditions. Call for dishwashers. Blinking LED's can cause dishes to become chipped or damaged. (See specific loading instructions within this error occurs,... sanitized. In this case, the Start/Resume button LED, the Cycle Status Indicator LED(s), and the countdown bars on some models) option can occur periodically throughout the cycle while the dishwasher is not used for service. 18 Call for tougher loads.
...Drain" in the "Troubleshooting" section. If a water softener is loaded correctly. Improper loading can come on some models) for heavier-soiled loads and hard water conditions. Call for dishwashers. Blinking LED's can cause dishes to become chipped or damaged. (See specific loading instructions within this error occurs,... sanitized. In this case, the Start/Resume button LED, the Cycle Status Indicator LED(s), and the countdown bars on some models) option can occur periodically throughout the cycle while the dishwasher is not used for service. 18 Call for tougher loads.

Use & Care Guide
Page 20
KITCHENAID® DISHWASHER Warranty LIMITED WARRANTY For one year from the date of purchase, when this major appliance is operated and maintained according to instructions attached to or furnished with the product, KitchenAid brand of original purchase date is required to obtain service under ...and provinces do not allow the exclusion or limitation of purchase, when this major appliance is not installed in accordance with original model/serial numbers that have other rights that vary from warranty coverage. 4. This major appliance is inconsistent to resolve the problem after...
KITCHENAID® DISHWASHER Warranty LIMITED WARRANTY For one year from the date of purchase, when this major appliance is operated and maintained according to instructions attached to or furnished with the product, KitchenAid brand of original purchase date is required to obtain service under ...and provinces do not allow the exclusion or limitation of purchase, when this major appliance is not installed in accordance with original model/serial numbers that have other rights that vary from warranty coverage. 4. This major appliance is inconsistent to resolve the problem after...

Use & Care Guide
Page 21
... below . Used under license in U.S.A. 21 visit: www.kitchenaid.com In Canada visit: www.kitchenaid.ca If you do not have access to schedule service, you can find your correspondence. If you need assistance using your complete model number ready. For assistance or service in the U.S.A., call... Canada: KitchenAid Brand Home Appliances Customer eXperience Center 200-6750 Century Avenue Mississauga, Ontario L5N 0B7 Please include a daytime phone number in your model and serial number on the label located near the door on the right-hand or left-hand side of the dishwasher interior....
... below . Used under license in U.S.A. 21 visit: www.kitchenaid.com In Canada visit: www.kitchenaid.ca If you do not have access to schedule service, you can find your correspondence. If you need assistance using your complete model number ready. For assistance or service in the U.S.A., call... Canada: KitchenAid Brand Home Appliances Customer eXperience Center 200-6750 Century Avenue Mississauga, Ontario L5N 0B7 Please include a daytime phone number in your model and serial number on the label located near the door on the right-hand or left-hand side of the dishwasher interior....

Energy Guide
Page 1
A) Dishwasher Capacity: Standard Whirlpool Corporation Models: KDTE204D***, KDFE304D***, KDTE304D***, KDTE334D*** Estimated Yearly Energy Cost (when used with an electric water heater) $31 ▼ $21 $41 Cost Range of Similar Models 260 kWh Estimated Yearly Electricity Use $23 Estimated Yearly Energy Cost (when used with a... natural gas water heater) Your cost will depend on your utility rates and use. • Cost range based only on standard capacity models. • Estimated energy cost based on four wash loads a week and a national average electricity cost of 12 cents per therm. ...
A) Dishwasher Capacity: Standard Whirlpool Corporation Models: KDTE204D***, KDFE304D***, KDTE304D***, KDTE334D*** Estimated Yearly Energy Cost (when used with an electric water heater) $31 ▼ $21 $41 Cost Range of Similar Models 260 kWh Estimated Yearly Electricity Use $23 Estimated Yearly Energy Cost (when used with a... natural gas water heater) Your cost will depend on your utility rates and use. • Cost range based only on standard capacity models. • Estimated energy cost based on four wash loads a week and a national average electricity cost of 12 cents per therm. ...

Dimension Guide
Page 1
Undercounter Dishwasher PRODUCT MODEL NUMBERS KDFE104D KDFE304D KDHE404D KDHE704D KDTE104D KDTE204D KDTE304D KDTE334D KDTE404D KDTE504D KDTE704D KDTM354D Electrical Requirements: 120-volt, 60 Hz, AC-only, 15- Water Supply ... to 120 psi (138 to improve Dimensions are for planning purposes only. Use a 90° elbow with your dishwasher. It is recommended that meets all models). with the air gap installation instructions. For panel ready models, dishwasher depth is 28" (70 cm). ³⁄₄" (1.9 cm) A Because Whirlpool Corporation policy includes a continuous...
Undercounter Dishwasher PRODUCT MODEL NUMBERS KDFE104D KDFE304D KDHE404D KDHE704D KDTE104D KDTE204D KDTE304D KDTE334D KDTE404D KDTE504D KDTE704D KDTM354D Electrical Requirements: 120-volt, 60 Hz, AC-only, 15- Water Supply ... to 120 psi (138 to improve Dimensions are for planning purposes only. Use a 90° elbow with your dishwasher. It is recommended that meets all models). with the air gap installation instructions. For panel ready models, dishwasher depth is 28" (70 cm). ³⁄₄" (1.9 cm) A Because Whirlpool Corporation policy includes a continuous...


