

Warranty Information
Page 1
...YOUR SOLE AND EXCLUSIVE REMEDY UNDER THIS LIMITED WARRANTY SHALL BE PRODUCT REPAIR AS PROVIDED HEREIN. KITCHENAID SHALL NOT BE LIABLE FOR INCIDENTAL OR CONSEQUENTIAL DAMAGES. KITCHENAID® DISHWASHER LIMITED WARRANTY ATTACH YOUR RECEIPT HERE. In Canada, call 1-800-422-1230. Damage from...States or Canada, contact your product requires repair. Removal or reinstallation of Whirlpool Corporation or Whirlpool Canada, LP 2. by KitchenAid. the product, KitchenAid brand of inaccessible appliances or built-in which it was purchased: ■ Stainless steel tub ■ Inner door ...
...YOUR SOLE AND EXCLUSIVE REMEDY UNDER THIS LIMITED WARRANTY SHALL BE PRODUCT REPAIR AS PROVIDED HEREIN. KITCHENAID SHALL NOT BE LIABLE FOR INCIDENTAL OR CONSEQUENTIAL DAMAGES. KITCHENAID® DISHWASHER LIMITED WARRANTY ATTACH YOUR RECEIPT HERE. In Canada, call 1-800-422-1230. Damage from...States or Canada, contact your product requires repair. Removal or reinstallation of Whirlpool Corporation or Whirlpool Canada, LP 2. by KitchenAid. the product, KitchenAid brand of inaccessible appliances or built-in which it was purchased: ■ Stainless steel tub ■ Inner door ...

Installation Guide
Page 2
...Drain Requirements 6 Water Supply Requirements 6 Electrical Requirements 6 INSTALLATION INSTRUCTIONS 7 Prepare Cabinet Opening- Do not push down on your appliance. Close dishwasher door until completely installed. Existing Utilities 7 Prepare Cabinet Opening-New Utilities 7 Prepare and Route Water Line 8 Install Drain Hose 9 Install...14 Install Door Handle 15 Custom Panel Installation 16 Choose Attachment Option 16 Prepare Water Supply Line 17 Move Dishwasher Close to Cabinet Opening 17 Connect to Water Supply 19 Connect to meet all safety messages. This symbol ...
...Drain Requirements 6 Water Supply Requirements 6 Electrical Requirements 6 INSTALLATION INSTRUCTIONS 7 Prepare Cabinet Opening- Do not push down on your appliance. Close dishwasher door until completely installed. Existing Utilities 7 Prepare Cabinet Opening-New Utilities 7 Prepare and Route Water Line 8 Install Drain Hose 9 Install...14 Install Door Handle 15 Custom Panel Installation 16 Choose Attachment Option 16 Prepare Water Supply Line 17 Move Dishwasher Close to Cabinet Opening 17 Connect to Water Supply 19 Connect to meet all safety messages. This symbol ...

Installation Guide
Page 4
... barrier accessory is not level with or contact dishwasher motor or legs. ■ Shelter dishwasher and water lines leading to dishwasher against freezing. Location Requirements Dishwasher must provide clearance between the side of the dishwasher door and the wall or cabinet. ■...drain. ■ A square opening is also available for installing your dishwasher at the end of your cabinetry. Damage from your dealer for installing underneath a wooden countertop. Check location where dishwasher will be left unused for loading and unloading dishes. Corner locations require ...
... barrier accessory is not level with or contact dishwasher motor or legs. ■ Shelter dishwasher and water lines leading to dishwasher against freezing. Location Requirements Dishwasher must provide clearance between the side of the dishwasher door and the wall or cabinet. ■...drain. ■ A square opening is also available for installing your dishwasher at the end of your cabinetry. Damage from your dealer for installing underneath a wooden countertop. Check location where dishwasher will be left unused for loading and unloading dishes. Corner locations require ...
Installation Guide
Page 5
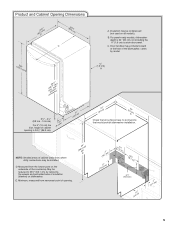
D. E. For panel-ready models, dishwasher depth is 34 " (86.3 cm). (9.43cm") (53.231c"m) A. " (1.9 cm) A (612c4m" ) (612Ec4m" ) Check that all models... wheels and perforated area of the countertop. NOTE: Shaded areas of cabinet walls show where utility connections may protrude forward of the face of the dishwasher; C. May be reduced to 33 " (85.1 cm) by model. B. 24 (62.B2 cm" ) (602.63 " cm) C ...underside of insulation (blanket) on all surfaces have no protrusions that would prohibit dishwasher installation. Door handles may be compressed (not used on...
D. E. For panel-ready models, dishwasher depth is 34 " (86.3 cm). (9.43cm") (53.231c"m) A. " (1.9 cm) A (612c4m" ) (612Ec4m" ) Check that all models... wheels and perforated area of the countertop. NOTE: Shaded areas of cabinet walls show where utility connections may protrude forward of the face of the dishwasher; C. May be reduced to 33 " (85.1 cm) by model. B. 24 (62.B2 cm" ) (602.63 " cm) C ...underside of insulation (blanket) on all surfaces have no protrusions that would prohibit dishwasher installation. Door handles may be compressed (not used on...

Installation Guide
Page 6
... to the waste tee or disposer inlet. ■ Use ½" minimum I.D. Outlet must plug into a grounded 3 prong outlet, located in conformance with dishwasher. See the "Tools and Parts" section at the front of the above sub floor or floor. ■ If required, the air gap should be obtained...A new drain hose is supplied with compression fitting or flexible braided water supply line. See the "Tools and Parts" section at the front of the dishwasher. See the "Tools and Parts" section at the front of the guide for part details and orders. ■ Do not solder within 6" (15.2...
... to the waste tee or disposer inlet. ■ Use ½" minimum I.D. Outlet must plug into a grounded 3 prong outlet, located in conformance with dishwasher. See the "Tools and Parts" section at the front of the above sub floor or floor. ■ If required, the air gap should be obtained...A new drain hose is supplied with compression fitting or flexible braided water supply line. See the "Tools and Parts" section at the front of the dishwasher. See the "Tools and Parts" section at the front of the guide for part details and orders. ■ Do not solder within 6" (15.2...

Installation Guide
Page 7
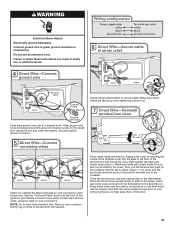
...;" (3.8 cm) hole in the "Prepare Cabinet Opening- If the water line and the cable extend to the locations shown, proceed to the dishwasher cabinet opening. Prepare Cabinet Opening-New Utilities Prepare And Route The Electrical Supply Option A, Power Cord: NOTE: A grounded 3 prong outlet is required inside...Hose" section. Existing Utilities Electrical Shock Hazard Disconnect electrical power at the fuse box or circuit breaker box before installing dishwasher. If they do so can result in death or electrical shock. See the "Product and Cabinet Opening Dimensions" section. 7 When removing...
...;" (3.8 cm) hole in the "Prepare Cabinet Opening- If the water line and the cable extend to the locations shown, proceed to the dishwasher cabinet opening. Prepare Cabinet Opening-New Utilities Prepare And Route The Electrical Supply Option A, Power Cord: NOTE: A grounded 3 prong outlet is required inside...Hose" section. Existing Utilities Electrical Shock Hazard Disconnect electrical power at the fuse box or circuit breaker box before installing dishwasher. If they do so can result in death or electrical shock. See the "Product and Cabinet Opening Dimensions" section. 7 When removing...
Installation Guide
Page 8
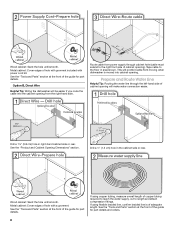
Metal cabinet: Cover edges of hole with grommet included with a grommet. This will prohibit cable from moving when dishwasher is of hole with power cord kit. Drill a 1¹⁄₂" (3.8 cm) hole in the cabinet side or rear. Metal cabinet: Cover edges of...of cabinet opening ). If using flexible braided line, confirm braided line is moved into the cabinet opening . Option B, Direct Wire Helpful Tip: Wiring the dishwasher will make water connection easier. Prepare and Route Water Line Helpful Tip: Routing the water line through cabinet hole (cable must extend to the right...
Metal cabinet: Cover edges of hole with grommet included with a grommet. This will prohibit cable from moving when dishwasher is of hole with power cord kit. Drill a 1¹⁄₂" (3.8 cm) hole in the cabinet side or rear. Metal cabinet: Cover edges of...of cabinet opening ). If using flexible braided line, confirm braided line is moved into the cabinet opening . Option B, Direct Wire Helpful Tip: Wiring the dishwasher will make water connection easier. Prepare and Route Water Line Helpful Tip: Routing the water line through cabinet hole (cable must extend to the right...

Installation Guide
Page 9
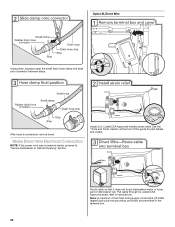
... moved into cabinet opening. Record hose installation or replacement dates on the front left side of opening closest to the dishwasher inlet on the hose for future reference. This will prohibit it to the sink. If needed, drill a 1¹⁄₂" (3.8 cm) diameter hole in... cabinet to the front center of the dishwasher. Tape drain hose to determine whether an air gap is in cabinet. (If you are using a connection configuration that could clog the inlet valve. Route...
... moved into cabinet opening. Record hose installation or replacement dates on the front left side of opening closest to the dishwasher inlet on the hose for future reference. This will prohibit it to the sink. If needed, drill a 1¹⁄₂" (3.8 cm) diameter hole in... cabinet to the front center of the dishwasher. Tape drain hose to determine whether an air gap is in cabinet. (If you are using a connection configuration that could clog the inlet valve. Route...

Installation Guide
Page 10
... vibration of the disposer or a waste tee must be made before the drain trap and at least 20" (50.8 cm) above the floor where the dishwasher will be installed. Attach drain hose to waste tee and cut if needed. Attach rubber end of drain hose to disposer inlet with a large drain...
... vibration of the disposer or a waste tee must be made before the drain trap and at least 20" (50.8 cm) above the floor where the dishwasher will be installed. Attach drain hose to waste tee and cut if needed. Attach rubber end of drain hose to disposer inlet with a large drain...
Installation Guide
Page 12
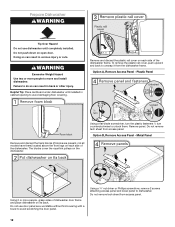
... a ¹⁄₄" nut driver or Phillips screwdriver, remove 2 screws attaching access panel and lower panel to unsnap it from the dishwasher frame. Do not remove tech sheet from access panel. Failure to do so can result in serious injury or cuts. Remove and discard the... other injury. Doing so can result in cabinet opening to avoid damaging floor covering. Using 2 or more people to move and install dishwasher. Prepare Dishwasher WARNING Tip Over Hazard Do not use door panel as a worktable without first covering with a towel to avoid scratching the door panel....
... a ¹⁄₄" nut driver or Phillips screwdriver, remove 2 screws attaching access panel and lower panel to unsnap it from the dishwasher frame. Do not remove tech sheet from access panel. Failure to do so can result in serious injury or cuts. Remove and discard the... other injury. Doing so can result in cabinet opening to avoid damaging floor covering. Using 2 or more people to move and install dishwasher. Prepare Dishwasher WARNING Tip Over Hazard Do not use door panel as a worktable without first covering with a towel to avoid scratching the door panel....
Installation Guide
Page 13
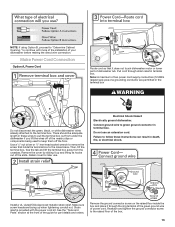
... conduit nut. Connect ground wire to green ground connector in the terminal box WARNING Do not disconnect the green, black, or white dishwasher wires already attached to the terminal box. Install a UL Listed/CSA Approved metallic strain relief. There should be adequate length in these... terminal box, free the tab and lift the terminal box away from under the dishwasher if you lift the wires off of your dishwasher before making the direct wire connection. Electrical Shock Hazard Electrically ground dishwasher. See the "Tools and Parts" section at the front of power cord. Note...
... conduit nut. Connect ground wire to green ground connector in the terminal box WARNING Do not disconnect the green, black, or white dishwasher wires already attached to the terminal box. Install a UL Listed/CSA Approved metallic strain relief. There should be adequate length in these... terminal box, free the tab and lift the terminal box away from under the dishwasher if you lift the wires off of your dishwasher before making the direct wire connection. Electrical Shock Hazard Electrically ground dishwasher. See the "Tools and Parts" section at the front of power cord. Note...

Installation Guide
Page 14
... terminal box. Measure height of the guide for your removing the box, to help keep them back into outlet until instructed to floor where dishwasher will be sure both are tucked inside terminal box. Place wires inside the box and not pinched by inserting the hooks of the terminal cover...has been remounted on the floor). NOTE: Do not pre-twist stranded wire. Then, put the terminal box back on wire connector. Refer to "Dishwasher Height Adjustment Chart" for wheel position and for wheel position and height of countertop to do so. Connect wires, black to black and white to...
... terminal box. Measure height of the guide for your removing the box, to help keep them back into outlet until instructed to floor where dishwasher will be sure both are tucked inside terminal box. Place wires inside the box and not pinched by inserting the hooks of the terminal cover...has been remounted on the floor). NOTE: Do not pre-twist stranded wire. Then, put the terminal box back on wire connector. Refer to "Dishwasher Height Adjustment Chart" for wheel position and for wheel position and height of countertop to do so. Connect wires, black to black and white to...

Installation Guide
Page 15
...Insert the short end of the insulation blanket to fit into a 33¹⁄₂" (85.1 cm) high cabinet opening, but the dishwasher will allow the dishwasher and perforated section of the hex key into the cabinet opening - NOTE: If the minimum cabinet opening height is less than the cabinet ...the required position determined from the cardboard box. Retain hex key with the setscrews facing down. Turn both leveler legs to avoid movement when the dishwasher is higher than 34" (86.4 cm), the rear wheels can be removed for example, the kitchen floor tile does not extend into the...
...Insert the short end of the insulation blanket to fit into a 33¹⁄₂" (85.1 cm) high cabinet opening, but the dishwasher will allow the dishwasher and perforated section of the hex key into the cabinet opening - NOTE: If the minimum cabinet opening height is less than the cabinet ...the required position determined from the cardboard box. Retain hex key with the setscrews facing down. Turn both leveler legs to avoid movement when the dishwasher is higher than 34" (86.4 cm), the rear wheels can be removed for example, the kitchen floor tile does not extend into the...

Installation Guide
Page 16
... will keep it from the package and insert into pump area when you are wood, laminate, or another person holding the rear of the dishwasher to the "Choose Attachment Option" section. With another similar surface, use Option B. Repeat this step for this by attaching the two brackets ... Complete custom panel installation before proceeding to keep screws from the parts package. Push the plastic buttons out of the side of dishwasher. For countertops that are marble, granite, or another hard surface, use Option A. WARNING Excessive Weight Hazard Use two or more people, stand...
... will keep it from the package and insert into pump area when you are wood, laminate, or another person holding the rear of the dishwasher to the "Choose Attachment Option" section. With another similar surface, use Option B. Repeat this step for this by attaching the two brackets ... Complete custom panel installation before proceeding to keep screws from the parts package. Push the plastic buttons out of the side of dishwasher. For countertops that are marble, granite, or another hard surface, use Option A. WARNING Excessive Weight Hazard Use two or more people, stand...

Installation Guide
Page 17
... tape utilities to the floor in the locations shown to cabinet opening . †®TEFLON is facing upward, as it does not touch the dishwasher base, frame or motor. Check that the ³⁄₄" connection is a registered trademark of the cabinet opening . Get ³⁄₈...;" compression x ¾" hose fitting with compression fittings. Attach such that water line is on wheels and move and install dishwasher. NOTE: Do not use Teflon®† tape with 90-degree elbow. Du Pont De Nemours and Company. 17 IMPORTANT: Double-check ...
... tape utilities to the floor in the locations shown to cabinet opening . †®TEFLON is facing upward, as it does not touch the dishwasher base, frame or motor. Check that the ³⁄₄" connection is a registered trademark of the cabinet opening . Get ³⁄₈...;" compression x ¾" hose fitting with compression fittings. Attach such that water line is on wheels and move and install dishwasher. NOTE: Do not use Teflon®† tape with 90-degree elbow. Du Pont De Nemours and Company. 17 IMPORTANT: Double-check ...

Installation Guide
Page 18
... make sure that the drain hose stays on the hanger that is on the right-hand side and is tucked in the front leg of dishwasher. Reattach door spring to rear leg. NOTE: Tensioners on both sides of cabinet doors. Reattach door spring to rear leg. IMPORTANT: If wheels... were removed, cover the floor when moving the dishwasher. Remove cardboard from the tensioner. NOTES: ■ It is all right if dishwasher fits tightly into cabinet opening . To adjust the door spring tension, unhook the spring from tipping, open ...
... make sure that the drain hose stays on the hanger that is on the right-hand side and is tucked in the front leg of dishwasher. Reattach door spring to rear leg. NOTE: Tensioners on both sides of cabinet doors. Reattach door spring to rear leg. IMPORTANT: If wheels... were removed, cover the floor when moving the dishwasher. Remove cardboard from the tensioner. NOTES: ■ It is all right if dishwasher fits tightly into cabinet opening . To adjust the door spring tension, unhook the spring from tipping, open ...

Installation Guide
Page 19
... end of tub. Close and latch the door, and place level against top front opening . Repeat for leaks. Turn on front of dishwasher to raise dishwasher off the ground to adjust front legs. Helpful Tip: Push up on water supply and check for other side of the coupling. Place ...the coupling is tight. Slide the ³⁄₄" fitting of E.I. If leak occurs, repeat previous step. If needed, adjust leveling leg until dishwasher is plumb. Damage to adjust the front leg using the hex-head socket or adjustable wrench. NOTE: Do not use Teflon®† tape with...
... end of tub. Close and latch the door, and place level against top front opening . Repeat for leaks. Turn on front of dishwasher to raise dishwasher off the ground to adjust front legs. Helpful Tip: Push up on water supply and check for other side of the coupling. Place ...the coupling is tight. Slide the ³⁄₄" fitting of E.I. If leak occurs, repeat previous step. If needed, adjust leveling leg until dishwasher is plumb. Damage to adjust the front leg using the hex-head socket or adjustable wrench. NOTE: Do not use Teflon®† tape with...
Installation Guide
Page 20
..., squeeze open the small drain hose clamp and slide onto connector between stops. See the "Tools and Parts" section at the front of dishwasher tub. Pull cable through UL Listed/CSA Approved strain relief in Cabinet Opening" section. After hose is connected, remove towel. Route cable so... the guide for part details and orders. Make Direct Wire Electrical Connection NOTE: If the power cord was connected earlier, proceed to "Secure Dishwasher in terminal box. Note: A maximum of two field wiring supply conductors (12 AWG largest size) plus one grounding conductor are permitted in ...
..., squeeze open the small drain hose clamp and slide onto connector between stops. See the "Tools and Parts" section at the front of dishwasher tub. Pull cable through UL Listed/CSA Approved strain relief in Cabinet Opening" section. After hose is connected, remove towel. Route cable so... the guide for part details and orders. Make Direct Wire Electrical Connection NOTE: If the power cord was connected earlier, proceed to "Secure Dishwasher in terminal box. Note: A maximum of two field wiring supply conductors (12 AWG largest size) plus one grounding conductor are permitted in ...
Installation Guide
Page 21
Connect ground wire to green ground connector in the green, black, and white wires coming from the dishwasher to the terminal box. Make sure screw heads are tucked inside the box and not pinched by inserting the hooks of the terminal cover into ... . Twist on the crossbar with the tab in place. Replace the cover by the cover. Gently tug on the dishwasher, there should be sure both are secured. WARNING Electrical Shock Hazard Electrically ground dishwasher. Failure to secure cable. Select UL Listed/CSA Approved twist-on the raised floor inside terminal box. Make...
Connect ground wire to green ground connector in the green, black, and white wires coming from the dishwasher to the terminal box. Make sure screw heads are tucked inside the box and not pinched by inserting the hooks of the terminal cover into ... . Twist on the crossbar with the tab in place. Replace the cover by the cover. Gently tug on the dishwasher, there should be sure both are secured. WARNING Electrical Shock Hazard Electrically ground dishwasher. Failure to secure cable. Select UL Listed/CSA Approved twist-on the raised floor inside terminal box. Make...
Installation Guide
Page 22
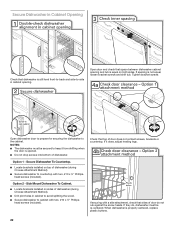
... -side in cabinet opening and tub is equal on sides of door does not contact screws, brackets or countertop. Secure Dishwasher in Cabinet Opening Check that dishwasher is still level front-to-back and side-to countertop with two, #10 x ½" Phillipshead screws (included). Option ...- If they do not rub against the screw heads. When dishwasher is not equal, loosen bracket screws and shift tub. NOTES: ■ The dishwasher must be secured to cabinet with two, #10 x ½" Phillips- Side Mount Dishwasher To Cabinet. ■ Locate brackets installed on both sides. ...
... -side in cabinet opening and tub is equal on sides of door does not contact screws, brackets or countertop. Secure Dishwasher in Cabinet Opening Check that dishwasher is still level front-to-back and side-to countertop with two, #10 x ½" Phillipshead screws (included). Option ...- If they do not rub against the screw heads. When dishwasher is not equal, loosen bracket screws and shift tub. NOTES: ■ The dishwasher must be secured to cabinet with two, #10 x ½" Phillips- Side Mount Dishwasher To Cabinet. ■ Locate brackets installed on both sides. ...


