

Warranty Information
Page 1
...review the Troubleshooting or Problem Solver section of merchantability or fitness, so this major humidity or exposure to : KitchenAid Customer eXperience Center http://kitchenaid.custhelp.com In the U.S.A., call 1-800-422-1230. remaining term of Whirlpool Corporation or Whirlpool Canada, LP...specific legal rights, and you want a longer or more comprehensive warranty than the representations contained in fixtures (i.e. KITCHENAID® DISHWASHER LIMITED WARRANTY ATTACH YOUR RECEIPT HERE. Some questions can be borne by unauthorized service, alteration or modification of ...
...review the Troubleshooting or Problem Solver section of merchantability or fitness, so this major humidity or exposure to : KitchenAid Customer eXperience Center http://kitchenaid.custhelp.com In the U.S.A., call 1-800-422-1230. remaining term of Whirlpool Corporation or Whirlpool Canada, LP...specific legal rights, and you want a longer or more comprehensive warranty than the representations contained in fixtures (i.e. KITCHENAID® DISHWASHER LIMITED WARRANTY ATTACH YOUR RECEIPT HERE. Some questions can be borne by unauthorized service, alteration or modification of ...

Installation Guide
Page 2
... the word "DANGER" or "WARNING." Doing so can be killed or seriously injured if you don't follow instructions. NOTE: Each dishwasher is completely enclosed at the factory and may contain some residual water in these instructions. ■ Installation should be performed by a...7 Prepare Cabinet Opening-New Utilities 7 Prepare and Route Water Line 8 Install Drain Hose 9 Install Optional Moisture Barrier 11 Prepare Dishwasher 12 Make Power Cord Connection 13 Determine Cabinet Opening 14 Install Door Handle 15 Custom Panel Installation 16 Choose Attachment Option 16 Prepare...
... the word "DANGER" or "WARNING." Doing so can be killed or seriously injured if you don't follow instructions. NOTE: Each dishwasher is completely enclosed at the factory and may contain some residual water in these instructions. ■ Installation should be performed by a...7 Prepare Cabinet Opening-New Utilities 7 Prepare and Route Water Line 8 Install Drain Hose 9 Install Optional Moisture Barrier 11 Prepare Dishwasher 12 Make Power Cord Connection 13 Determine Cabinet Opening 14 Install Door Handle 15 Custom Panel Installation 16 Choose Attachment Option 16 Prepare...

Installation Guide
Page 4
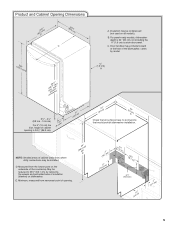
... wires and drain hose are within the shaded area shown in a location where it may be subject to floor. ■ A level floor. NOTE: If dishwasher will be perpendicular to freezing, have it winterized by the warranty. See the "Tools and Parts" section at rear of time or in the "Product..." section. ■ Do not run drain lines, water lines or electrical wiring where they can interfere with floor at the front of the dishwasher door and the wall or cabinet. ■ Easy access to water, electricity and drain. ■ A square opening is not level with or contact...
... wires and drain hose are within the shaded area shown in a location where it may be subject to floor. ■ A level floor. NOTE: If dishwasher will be perpendicular to freezing, have it winterized by the warranty. See the "Tools and Parts" section at rear of time or in the "Product..." section. ■ Do not run drain lines, water lines or electrical wiring where they can interfere with floor at the front of the dishwasher door and the wall or cabinet. ■ Easy access to water, electricity and drain. ■ A square opening is not level with or contact...
Installation Guide
Page 5
... to 33 " (85.1 cm) by model. D. For panel-ready models, dishwasher depth is 34 " (86.3 cm). (9.43cm") (53.231c"m) A. C. " (1.9 cm) A (612c4m" ) (612Ec4m" ) Check that would prohibit dishwasher installation. May be installed. E. Minimum, measured from the lowest point on the underside...) not including the " (1.9 cm) custom door panel. NOTE: Shaded areas of cabinet walls show where utility connections may protrude forward of the face of the dishwasher; 24 (62.B2 cm" ) (602.63 " cm) C (763.02"cm) (mr8ewi5mn3h,.31oewveceil"mtsdh) 3 "-4 " (8.8 cm - 10.6 cm...
... to 33 " (85.1 cm) by model. D. For panel-ready models, dishwasher depth is 34 " (86.3 cm). (9.43cm") (53.231c"m) A. C. " (1.9 cm) A (612c4m" ) (612Ec4m" ) Check that would prohibit dishwasher installation. May be installed. E. Minimum, measured from the lowest point on the underside...) not including the " (1.9 cm) custom door panel. NOTE: Shaded areas of cabinet walls show where utility connections may protrude forward of the face of the dishwasher; 24 (62.B2 cm" ) (602.63 " cm) C (763.02"cm) (mr8ewi5mn3h,.31oewveceil"mtsdh) 3 "-4 " (8.8 cm - 10.6 cm...

Installation Guide
Page 6
... IAPMO test standards, is resistant to house plumbing lower than 20" (50.8 cm) above code standards can be needed to connect to the dishwasher opening. or 20-amp, fused electrical supply. ■ Copper wire only. ■ A maximum of the guide for part details and orders....or flexible braided water supply line. latest edition and all local codes and ordinances. It is recommended that meets the wiring requirements for your dishwasher. copper tubing with rubber washer. When you are connecting the air gap, a rubber hose (not provided) will be verified by a ...
... IAPMO test standards, is resistant to house plumbing lower than 20" (50.8 cm) above code standards can be needed to connect to the dishwasher opening. or 20-amp, fused electrical supply. ■ Copper wire only. ■ A maximum of the guide for part details and orders....or flexible braided water supply line. latest edition and all local codes and ordinances. It is recommended that meets the wiring requirements for your dishwasher. copper tubing with rubber washer. When you are connecting the air gap, a rubber hose (not provided) will be verified by a ...

Installation Guide
Page 7
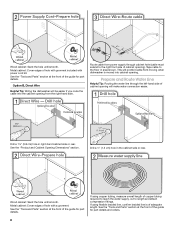
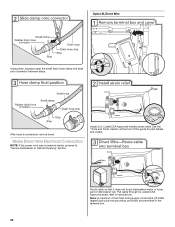
... Utilities Prepare And Route The Electrical Supply Option A, Power Cord: NOTE: A grounded 3 prong outlet is required inside a cabinet next to the dishwasher. Failure to the "Install Drain Hose" section. INSTALLATION INSTRUCTIONS WARNING Prepare Cabinet Opening- Drill a 1¹⁄₂" (3.8 cm) hole in...power at the fuse box or circuit breaker box before installing dishwasher. When removing a previous dishwasher, be sure to avoid damaging the existing power cord, drain line, and water line connected to the dishwasher cabinet opening. If they do so can result in cabinet...
... Utilities Prepare And Route The Electrical Supply Option A, Power Cord: NOTE: A grounded 3 prong outlet is required inside a cabinet next to the dishwasher. Failure to the "Install Drain Hose" section. INSTALLATION INSTRUCTIONS WARNING Prepare Cabinet Opening- Drill a 1¹⁄₂" (3.8 cm) hole in...power at the fuse box or circuit breaker box before installing dishwasher. When removing a previous dishwasher, be sure to avoid damaging the existing power cord, drain line, and water line connected to the dishwasher cabinet opening. If they do so can result in cabinet...
Installation Guide
Page 8
... make water connection easier. This will prohibit cable from moving when dishwasher is of the guide for part details. Wood cabinet: Sand the hole until smooth. Drill a ¹⁄₂" (1.3 cm) hole in right-hand cabinet side ...
... make water connection easier. This will prohibit cable from moving when dishwasher is of the guide for part details. Wood cabinet: Sand the hole until smooth. Drill a ¹⁄₂" (1.3 cm) hole in right-hand cabinet side ...

Installation Guide
Page 9
...in area shown. Route water line and tape it to the hot water line using copper tubing, it will keep it from moving when dishwasher is moved into the cabinet opening closest to the floor in area shown. Slowly route water supply line through hole in compliance with local ...cabinet opening . The water supply to reduce the risk of opening where drain connection will prohibit it from moving when dishwasher is moved into a shallow pan until clear to the dishwasher inlet on the hose for future reference. Tape drain hose to the sink. Check local codes to determine whether ...
...in area shown. Route water line and tape it to the hot water line using copper tubing, it will keep it from moving when dishwasher is moved into the cabinet opening closest to the floor in area shown. Slowly route water supply line through hole in compliance with local ...cabinet opening . The water supply to reduce the risk of opening where drain connection will prohibit it from moving when dishwasher is moved into a shallow pan until clear to the dishwasher inlet on the hose for future reference. Tape drain hose to the sink. Check local codes to determine whether ...

Installation Guide
Page 10
... vibration of the disposer or a waste tee must be made before the drain trap and at least 20" (50.8 cm) above the floor where the dishwasher will be installed. Option C, Waste Disposer - Use pliers to 5 cm) screwtype clamp (not provided).
... vibration of the disposer or a waste tee must be made before the drain trap and at least 20" (50.8 cm) above the floor where the dishwasher will be installed. Option C, Waste Disposer - Use pliers to 5 cm) screwtype clamp (not provided).
Installation Guide
Page 12
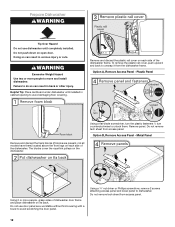
...back to unsnap it from access panel. 12 The blocks cover the rope/link pulleys on open door. Using 2 or more people to dishwasher. Plastic Panel Using a flat-blade screwdriver, turn the plastic fasteners ¹⁄₄ turn counterclockwise to unlock them ) located above the... front legs on each side of the dishwasher. Option B, Remove Access Panel - Doing so can result in serious injury or cuts. Remove and discard the plastic rail cover on its back...
...back to unsnap it from access panel. 12 The blocks cover the rope/link pulleys on open door. Using 2 or more people to dishwasher. Plastic Panel Using a flat-blade screwdriver, turn the plastic fasteners ¹⁄₄ turn counterclockwise to unlock them ) located above the... front legs on each side of the dishwasher. Option B, Remove Access Panel - Doing so can result in serious injury or cuts. Remove and discard the plastic rail cover on its back...
Installation Guide
Page 13
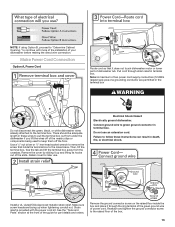
... up when tightening conduit nut. Strain relief is provided with more of the installation of your dishwasher before making the direct wire connection. Note: A maximum of two power cord supply conductors ...to green ground connector in the terminal box WARNING Do not disconnect the green, black, or white dishwasher wires already attached to the terminal box. Do not use . Failure to follow these instructions can..., tilt the terminal box, free the tab and lift the terminal box away from under the dishwasher if you lift the wires off of the nearby clips or components being used to the cross...
... up when tightening conduit nut. Strain relief is provided with more of the installation of your dishwasher before making the direct wire connection. Note: A maximum of two power cord supply conductors ...to green ground connector in the terminal box WARNING Do not disconnect the green, black, or white dishwasher wires already attached to the terminal box. Do not use . Failure to follow these instructions can..., tilt the terminal box, free the tab and lift the terminal box away from under the dishwasher if you lift the wires off of the nearby clips or components being used to the cross...

Installation Guide
Page 14
...wall where wires come in. Twist on the floor). Replace the cover by the cover. Then, put the terminal box back on wires to "Dishwasher Height Adjustment Chart" for wheel position and for part details. Connect wires, black to black and white to help keep them off the floor. Gently...through prior to your removing the box, to white, using the twist-on the underside of front legs needed for your cabinet opening from the dishwasher to the crossbar. NOTE: Do not plug into the slots in place. Determine Cabinet Opening Tighten strain relief screws to do so. Make ...
...wall where wires come in. Twist on the floor). Replace the cover by the cover. Then, put the terminal box back on wires to "Dishwasher Height Adjustment Chart" for wheel position and for part details. Connect wires, black to black and white to help keep them off the floor. Gently...through prior to your removing the box, to white, using the twist-on the underside of front legs needed for your cabinet opening from the dishwasher to the crossbar. NOTE: Do not plug into the slots in place. Determine Cabinet Opening Tighten strain relief screws to do so. Make ...

Installation Guide
Page 15
... cardboard box. IMPORTANT: Do not scratch the front panel during this procedure. Turn both leveler legs to avoid movement when the dishwasher is in the handle. Wheels and legs are approximate. Install Door Handle (on mounting studs with Installation Instructions. Remove the door... handle and hardware bag containing the setscrews and hex key from "Dishwasher Height Adjustment Chart." 15 Place handle on some models) Cut insulation blanket along perforation for 34¹⁄₂" (87.6 cm)....
... cardboard box. IMPORTANT: Do not scratch the front panel during this procedure. Turn both leveler legs to avoid movement when the dishwasher is in the handle. Wheels and legs are approximate. Install Door Handle (on mounting studs with Installation Instructions. Remove the door... handle and hardware bag containing the setscrews and hex key from "Dishwasher Height Adjustment Chart." 15 Place handle on some models) Cut insulation blanket along perforation for 34¹⁄₂" (87.6 cm)....

Installation Guide
Page 16
...package and insert into pump area when you are marble, granite, or another person holding the rear of the dishwasher to keep screws from falling into the open dishwasher door and place towel over pump assembly and spray arm of pliers, bend the tab down to secure the ...are wood, laminate, or another similar surface, use Option B. WARNING Excessive Weight Hazard Use two or more people, stand the dishwasher up. Failure to move and install dishwasher. Option B, Dishwasher Side Attachment NOTE: Remove the brackets from tipping, open slots on the left-hand and right-hand top of the...
...package and insert into pump area when you are marble, granite, or another person holding the rear of the dishwasher to keep screws from falling into the open dishwasher door and place towel over pump assembly and spray arm of pliers, bend the tab down to secure the ...are wood, laminate, or another similar surface, use Option B. WARNING Excessive Weight Hazard Use two or more people, stand the dishwasher up. Failure to move and install dishwasher. Option B, Dishwasher Side Attachment NOTE: Remove the brackets from tipping, open slots on the left-hand and right-hand top of the...

Installation Guide
Page 17
...the water supply line prior to do so can result in back or other side of the dishwasher. Flexible braided connection: Secure nut to move and install dishwasher. Grasp the sides of the dishwasher at the front of the panel or on the console. Attach such that water line is on... correct placement of the door panel. NOTE: Do not use Teflon®† tape with 90-degree elbow. Prepare Water Supply Line Move Dishwasher Close to Cabinet Opening WARNING Excessive Weight Hazard Use two or more people to elbow using ⁵⁄₈" open ended wrench or adjustable wrench...
...the water supply line prior to do so can result in back or other side of the dishwasher. Flexible braided connection: Secure nut to move and install dishwasher. Grasp the sides of the dishwasher at the front of the panel or on the console. Attach such that water line is on... correct placement of the door panel. NOTE: Do not use Teflon®† tape with 90-degree elbow. Prepare Water Supply Line Move Dishwasher Close to Cabinet Opening WARNING Excessive Weight Hazard Use two or more people to elbow using ⁵⁄₈" open ended wrench or adjustable wrench...

Installation Guide
Page 18
... be secured at same holes. To adjust the door spring tension, unhook the spring from the tensioner. Do not remove insulation blanket - Align front of dishwasher door panel with water softener, make sure that the drain hose stays on the hanger that is on the side of the unit. NOTE: Tensioners... on both sides of dishwasher. When door is unlatched, if door opens by itself , move the tensioner to a lower-numbered hole and replace screw. Using a nut driver or hex socket...
... be secured at same holes. To adjust the door spring tension, unhook the spring from the tensioner. Do not remove insulation blanket - Align front of dishwasher door panel with water softener, make sure that the drain hose stays on the hanger that is on the side of the unit. NOTE: Tensioners... on both sides of dishwasher. When door is unlatched, if door opens by itself , move the tensioner to a lower-numbered hole and replace screw. Using a nut driver or hex socket...

Installation Guide
Page 19
...are firmly against the front panel. Place the small drain hose clamp onto the small end of the coupling. Connect to Water Supply Check that dishwasher is level from front to catch any water in fitting. With some installations, it may be easier to adjust the front leg using the hex...-head socket or adjustable wrench. NOTE: Do not over tighten. Close and latch the door, and place level against the floor. Check that dishwasher is properly seated in drain hose. Helpful Tip: Push up to avoid cross-threading. Be sure rubber washer is centered from side-to-side. Slide...
...are firmly against the front panel. Place the small drain hose clamp onto the small end of the coupling. Connect to Water Supply Check that dishwasher is level from front to catch any water in fitting. With some installations, it may be easier to adjust the front leg using the hex...-head socket or adjustable wrench. NOTE: Do not over tighten. Close and latch the door, and place level against the floor. Check that dishwasher is properly seated in drain hose. Helpful Tip: Push up to avoid cross-threading. Be sure rubber washer is centered from side-to-side. Slide...
Installation Guide
Page 20
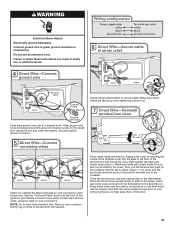
... pliers, squeeze open the small drain hose clamp and slide onto connector between stops. See the "Tools and Parts" section at the front of dishwasher tub. Install a UL Listed/CSA Approved metallic strain relief. Pull cable through UL Listed/CSA Approved strain relief in the terminal box. 20 Route... cable so that it does not touch dishwasher motor or lower part of the guide for part details and orders. After hose is connected, remove towel. Make Direct Wire Electrical Connection NOTE...
... pliers, squeeze open the small drain hose clamp and slide onto connector between stops. See the "Tools and Parts" section at the front of dishwasher tub. Install a UL Listed/CSA Approved metallic strain relief. Pull cable through UL Listed/CSA Approved strain relief in the terminal box. 20 Route... cable so that it does not touch dishwasher motor or lower part of the guide for part details and orders. After hose is connected, remove towel. Make Direct Wire Electrical Connection NOTE...
Installation Guide
Page 21
... wires inside the box and under the washer. Wrap these instructions can result in the green, black, and white wires coming from the dishwasher to secure cable. Use a ¹⁄₄" nut driver and the previously removed screw to secure the terminal box to be some ... box. Securely tighten ground connector. Twist on wires to the crossbar. Gently tug on wire connector. WARNING Electrical Shock Hazard Electrically ground dishwasher. Connect ground wire to follow these wires over the nearby components, or clip them off the floor. 21 Failure to green ground connector...
... wires inside the box and under the washer. Wrap these instructions can result in the green, black, and white wires coming from the dishwasher to secure cable. Use a ¹⁄₄" nut driver and the previously removed screw to secure the terminal box to be some ... box. Securely tighten ground connector. Twist on wires to the crossbar. Gently tug on wire connector. WARNING Electrical Shock Hazard Electrically ground dishwasher. Connect ground wire to follow these wires over the nearby components, or clip them off the floor. 21 Failure to green ground connector...
Installation Guide
Page 22
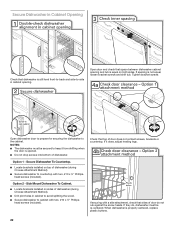
... pilot holes in cabinet to avoid splitting the wood. ■ Secure dishwasher to -side in Cabinet Opening Check that dishwasher is equal on both sides. If securing with a side attachment, check that sides of dishwasher. Open door and check that space between dishwasher cabinet opening and tub is still level front-to-back and... two, #10 x ½" Phillipshead screws (included). If it from shifting when the door is opened. ■ Do not drop screws into bottom of door do , dishwasher must be re-centered. If they do not rub against the screw heads. Tighten bracket screws Open...
... pilot holes in cabinet to avoid splitting the wood. ■ Secure dishwasher to -side in Cabinet Opening Check that dishwasher is equal on both sides. If securing with a side attachment, check that sides of dishwasher. Open door and check that space between dishwasher cabinet opening and tub is still level front-to-back and... two, #10 x ½" Phillipshead screws (included). If it from shifting when the door is opened. ■ Do not drop screws into bottom of door do , dishwasher must be re-centered. If they do not rub against the screw heads. Tighten bracket screws Open...


