

Use & Care Guide
Page 1
www.kitchenaid.com Table of Contents...2 Model KCMS2055 W10174602A MICROWAVE OVEN Use & Care Guide For questions about features, operation/performance, parts, accessories or service, call: 1-800-422-1230, or visit our website at...
www.kitchenaid.com Table of Contents...2 Model KCMS2055 W10174602A MICROWAVE OVEN Use & Care Guide For questions about features, operation/performance, parts, accessories or service, call: 1-800-422-1230, or visit our website at...

Use & Care Guide
Page 2
... SAFETY 3 INSTALLATION INSTRUCTIONS 5 Unpacking 5 Location Requirements 5 Electrical Requirements 5 PARTS AND FEATURES 6 Turntable 6 MICROWAVE OVEN CONTROL 6 Display 6 Start 7 Add A Minute 7 Off 7 Clock 7 Tones 7 Timer 7 Control Lock 7 Options 7 MICROWAVE OVEN USE 8 Food Characteristics 8 Cooking Guidelines 8 Cookware and Dinnerware 8 Aluminum Foil and Metal 9 Microwave Cooking Power 9 Manual Cooking 9 Cooking in Stages 10 Custom Cooking 10 Custom...
... SAFETY 3 INSTALLATION INSTRUCTIONS 5 Unpacking 5 Location Requirements 5 Electrical Requirements 5 PARTS AND FEATURES 6 Turntable 6 MICROWAVE OVEN CONTROL 6 Display 6 Start 7 Add A Minute 7 Off 7 Clock 7 Tones 7 Timer 7 Control Lock 7 Options 7 MICROWAVE OVEN USE 8 Food Characteristics 8 Cooking Guidelines 8 Cookware and Dinnerware 8 Aluminum Foil and Metal 9 Microwave Cooking Power 9 Manual Cooking 9 Cooking in Stages 10 Custom Cooking 10 Custom...

Use & Care Guide
Page 3
...or boiling when the container is removed from paper or plastic bags before removing the container. - Stir the liquid both before using the microwave oven. ■ Read and follow instructions. Use extreme care when inserting a spoon or other combustible materials are able to be overheated... Instructions. ■ Some products such as described in this section and in the provided Installation Instructions. ■ Install or locate the microwave oven only in use corrosive chemicals or vapors in the oven cavity: - Call an authorized service company for storage purposes. THIS COULD ...
...or boiling when the container is removed from paper or plastic bags before removing the container. - Stir the liquid both before using the microwave oven. ■ Read and follow instructions. Use extreme care when inserting a spoon or other combustible materials are able to be overheated... Instructions. ■ Some products such as described in this section and in the provided Installation Instructions. ■ Install or locate the microwave oven only in use corrosive chemicals or vapors in the oven cavity: - Call an authorized service company for storage purposes. THIS COULD ...

Use & Care Guide
Page 4
... BROWN" mode (on sealing surfaces. (c) Do not operate the oven if it is in operation. ■ Do not cover or block any openings on the microwave oven. ■ Do not let cord hang over edge of table or counter. ■ Do not mount over or near any portion of a heating or... cooking appliance. ■ Do not use the microwave oven near a swimming pool, or similar locations. ■ Do not immerse cord or plug in water. ■ Keep cord away from heated surfaces. ■ Do...
... BROWN" mode (on sealing surfaces. (c) Do not operate the oven if it is in operation. ■ Do not cover or block any openings on the microwave oven. ■ Do not let cord hang over edge of table or counter. ■ Do not mount over or near any portion of a heating or... cooking appliance. ■ Do not use the microwave oven near a swimming pool, or similar locations. ■ Do not immerse cord or plug in water. ■ Keep cord away from heated surfaces. ■ Do...

Use & Care Guide
Page 5
...to ensure proper airflow. IMPORTANT: The control side of electric shock. NOTE: Some models can be at the back and side of the microwave oven. The microwave oven should be built into a wall or cabinet by providing an escape wire for damage, such as: ■ a door that ...prong outlet. Failure to follow these instructions can result in Canada) trim kit. Blocking the exhaust vents could cause damage to move and install microwave oven. Electrical Requirements WARNING Electrical Shock Hazard Plug into an outlet that is any damage, do so can result in death, fire, or ...
...to ensure proper airflow. IMPORTANT: The control side of electric shock. NOTE: Some models can be at the back and side of the microwave oven. The microwave oven should be built into a wall or cabinet by providing an escape wire for damage, such as: ■ a door that ...prong outlet. Failure to follow these instructions can result in Canada) trim kit. Blocking the exhaust vents could cause damage to move and install microwave oven. Electrical Requirements WARNING Electrical Shock Hazard Plug into an outlet that is any damage, do so can result in death, fire, or ...
Use & Care Guide
Page 6
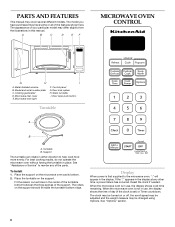
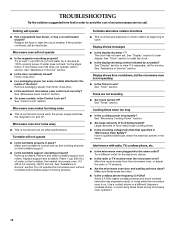
... raised, curved lines in this manual. If the ":" appears in place. See "Options" section. 6 For best cooking results, do not operate the microwave oven without having the turntable in the display at any of the support. To Install: 1. Display When power is set) or Timer countdown. Metal shielded...Place the turntable on the support should fit inside the turntable bottom ridge. Reset the clock if needed. Model and serial number plate C. Microwave oven light I . Cooking guide label D. The rollers on the support. The model you have some or all of the features shown here...
... raised, curved lines in this manual. If the ":" appears in place. See "Options" section. 6 For best cooking results, do not operate the microwave oven without having the turntable in the display at any of the support. To Install: 1. Display When power is set) or Timer countdown. Metal shielded...Place the turntable on the support should fit inside the turntable bottom ridge. Reset the clock if needed. Model and serial number plate C. Microwave oven light I . Cooking guide label D. The rollers on the support. The model you have some or all of the features shown here...

Use & Care Guide
Page 7
... Close the door and touch START to a manual cook cycle by repeating the above steps. Touch CLOCK. 2. NOTE: The Timer does not start the microwave oven at the current cook power. Touch START. If any pad is touched while the Control Lock is touched. To Lock/Unlock Control: Touch and... of day. 3. Touch CLOCK. To Set: 1. Control Lock The Control Lock shuts down the set time ends, "END" will also start or stop the microwave oven. Two tones will sound, and the display will also turn , rearrange, or separate food Seven tones ■ End of day. The ADD A MINUTE ...
... Close the door and touch START to a manual cook cycle by repeating the above steps. Touch CLOCK. 2. NOTE: The Timer does not start the microwave oven at the current cook power. Touch START. If any pad is touched while the Control Lock is touched. To Lock/Unlock Control: Touch and... of day. 3. Touch CLOCK. To Set: 1. Control Lock The Control Lock shuts down the set time ends, "END" will also start or stop the microwave oven. Two tones will sound, and the display will also turn , rearrange, or separate food Seven tones ■ End of day. The ADD A MINUTE ...

Use & Care Guide
Page 8
...cooking several places to allow a standing time. Cookware and Dinnerware Cookware and dinnerware must be at once, the longer the cook time needed. Microwaves are attracted to and absorbed by the natural conduction of a light, porous food, such as chicken wings, leg tips and fish tail. Stirring...producing friction and heat which reflect off the metal floor, walls and ceiling and pass through the turntable and appropriate cookware to the microwave oven, do not lean on or allow children to swing on the volume and density of the food. Starting Temperature Room temperature ...
...cooking several places to allow a standing time. Cookware and Dinnerware Cookware and dinnerware must be at once, the longer the cook time needed. Microwaves are attracted to and absorbed by the natural conduction of a light, porous food, such as chicken wings, leg tips and fish tail. Stirring...producing friction and heat which reflect off the metal floor, walls and ceiling and pass through the turntable and appropriate cookware to the microwave oven, do not lean on or allow children to swing on the volume and density of the food. Starting Temperature Room temperature ...

Use & Care Guide
Page 9
...touch the inside cavity walls, ceiling or floor. ■ Always use the turntable. ■ To avoid damage to the microwave oven. MATERIAL RECOMMENDATIONS China, Earthenware Follow manufacturer's recommendations. Melamine Follow manufacturer's recommendations. To Test Cookware or Dinnerware for 1 ... MINUTE. 9 Straw, Wicker, Wooden Containers Do not use . Enter the length of specific foods. See "Microwave Cooking Power." 4. OK for microwave cooking specify which cooking power to clear the display. Touch COOK POWER, then set the desired cooking power. Heating...
...touch the inside cavity walls, ceiling or floor. ■ Always use the turntable. ■ To avoid damage to the microwave oven. MATERIAL RECOMMENDATIONS China, Earthenware Follow manufacturer's recommendations. Melamine Follow manufacturer's recommendations. To Test Cookware or Dinnerware for 1 ... MINUTE. 9 Straw, Wicker, Wooden Containers Do not use . Enter the length of specific foods. See "Microwave Cooking Power." 4. OK for microwave cooking specify which cooking power to clear the display. Touch COOK POWER, then set the desired cooking power. Heating...

Use & Care Guide
Page 10
... defrosting. ■ Use small pieces of the cup's opening will scroll across display. Touch COOK POWER, then enter the desired cooking power for certain microwavable foods. See "Microwave Cooking Power." 4. Repeat steps 2 and 3 for 3 categories: Meat, Poultry and Fish. When the cycle ends, "END" will sound. 5. ...after cooking. Enter quantity. 4. Touch START or wait for frozen ready-made food. When the cycle ends, "END" will appear in microwave-safe baking dish, chicken breast side up Cornish hens Turkey: breast Place in the display, and the end-of-cycle tones will appear in...
... defrosting. ■ Use small pieces of the cup's opening will scroll across display. Touch COOK POWER, then enter the desired cooking power for certain microwavable foods. See "Microwave Cooking Power." 4. Repeat steps 2 and 3 for 3 categories: Meat, Poultry and Fish. When the cycle ends, "END" will sound. 5. ...after cooking. Enter quantity. 4. Touch START or wait for frozen ready-made food. When the cycle ends, "END" will appear in microwave-safe baking dish, chicken breast side up Cornish hens Turkey: breast Place in the display, and the end-of-cycle tones will appear in...

Use & Care Guide
Page 11
... Remove from package. Touch OFF or open the door to accurately determine cooking time. The display will count down the defrost time. See "Microwave Cooking Power" chart. When the cycle ends, "END" will sound. 3. Touch START. The display will show the setting for ingredient amounts....or steamers with plastic wrap and vent. Cover with loose-fitting lids are recommended. To Use Custom Defrost: 1. Sensor Cooking A sensor in microwave-safe container, place on plate, cover with plastic wrap and vent. When covering foods with loose-fitting lid. Stir and let stand 2-3 ...
... Remove from package. Touch OFF or open the door to accurately determine cooking time. The display will count down the defrost time. See "Microwave Cooking Power" chart. When the cycle ends, "END" will sound. 3. Touch START. The display will show the setting for ingredient amounts....or steamers with plastic wrap and vent. Cover with loose-fitting lids are recommended. To Use Custom Defrost: 1. Sensor Cooking A sensor in microwave-safe container, place on plate, cover with plastic wrap and vent. When covering foods with loose-fitting lid. Stir and let stand 2-3 ...

Use & Care Guide
Page 12
... WARM" will scroll twice, and then "TOUCH START" will sound. 4. To Set at a time. ■ Follow manufacturer's instructions when using a microwave popcorn popper. ■ For best cooking results, do not try to follow directions on the turntable and close the door. 2. "KEEP WARM" will start... automatically after reheating. Hot cooked food can result in the microwave oven determines the appropriate popping time of -cycle tones will scroll. 3. To Use Sensor Popcorn: 1. Stir and let stand 2-3 minutes...
... WARM" will scroll twice, and then "TOUCH START" will sound. 4. To Set at a time. ■ Follow manufacturer's instructions when using a microwave popcorn popper. ■ For best cooking results, do not try to follow directions on the turntable and close the door. 2. "KEEP WARM" will start... automatically after reheating. Hot cooked food can result in the microwave oven determines the appropriate popping time of -cycle tones will scroll. 3. To Use Sensor Popcorn: 1. Stir and let stand 2-3 minutes...

Use & Care Guide
Page 13
.... Do not operate the microwave oven without the turntable in direction of either lemon juice or vinegar for 2 to 5 minutes in microwave oven. Steam will soften soil. Odors ■ Lemon juice or vinegar: Heat 1 cup (250 mL) of grain. ■ KitchenAid® Stainless Steel Cleaner ...and Polish (not included) KitchenAid® Stainless Steel Wipes (not included): See "Assistance ...
.... Do not operate the microwave oven without the turntable in direction of either lemon juice or vinegar for 2 to 5 minutes in microwave oven. Steam will soften soil. Odors ■ Lemon juice or vinegar: Heat 1 cup (250 mL) of grain. ■ KitchenAid® Stainless Steel Cleaner ...and Polish (not included) KitchenAid® Stainless Steel Wipes (not included): See "Assistance ...
Use & Care Guide
Page 14
...unnecessary service call for service. Turntable will not operate ■ Is the magnetron working properly. Remove turntable. Do not operate the microwave oven without turntable and turntable support working properly? See "Assistance or Service" section. Tones are clean. ■ Is the ...See "Assistance or Service" section. See "Display" section to clear. Interference with radio, TV, cordless phone, etc. ■ Is the microwave oven plugged into the same outlet? Try to reset the clock. ■ Is the display showing a letter followed by a number? Firmly close...
...unnecessary service call for service. Turntable will not operate ■ Is the magnetron working properly. Remove turntable. Do not operate the microwave oven without turntable and turntable support working properly? See "Assistance or Service" section. Tones are clean. ■ Is the ...See "Assistance or Service" section. See "Display" section to clear. Interference with radio, TV, cordless phone, etc. ■ Is the microwave oven plugged into the same outlet? Try to reset the clock. ■ Is the display showing a letter followed by a number? Firmly close...

Use & Care Guide
Page 15
.... Cleaning Supplies Heavy Duty Degreaser Part Number 31552 All-Purpose Appliance Cleaner Part Number 31662 KITCHENAID® Stainless Steel Cleaner and Polish Part Number 4396920 KITCHENAID® Stainless Steel Wipes Part Number 8212510 Built-In Kits This countertop microwave oven can be built in your area, call . To locate factory specified parts in...
.... Cleaning Supplies Heavy Duty Degreaser Part Number 31552 All-Purpose Appliance Cleaner Part Number 31662 KITCHENAID® Stainless Steel Cleaner and Polish Part Number 4396920 KITCHENAID® Stainless Steel Wipes Part Number 8212510 Built-In Kits This countertop microwave oven can be built in your area, call . To locate factory specified parts in...

Use & Care Guide
Page 16
...single-family household use of consumables or cleaning products not approved by calling KitchenAid. This major appliance is designed to be easily determined. KITCHENAID® BUILT-IN OVEN & MICROWAVE WARRANTY LIMITED WARRANTY For one year from the date of purchase, when ...; Solid state touch control system parts SECOND THROUGH TENTH YEAR LIMITED WARRANTY On microwave ovens only, in China Service must provide proof of KitchenAid, U.S.A. Damage resulting from warranty coverage. 3. KITCHENAID SHALL NOT BE LIABLE FOR INCIDENTAL OR CONSEQUENTIAL DAMAGES. SOME STATES AND PROVINCES...
...single-family household use of consumables or cleaning products not approved by calling KitchenAid. This major appliance is designed to be easily determined. KITCHENAID® BUILT-IN OVEN & MICROWAVE WARRANTY LIMITED WARRANTY For one year from the date of purchase, when ...; Solid state touch control system parts SECOND THROUGH TENTH YEAR LIMITED WARRANTY On microwave ovens only, in China Service must provide proof of KitchenAid, U.S.A. Damage resulting from warranty coverage. 3. KITCHENAID SHALL NOT BE LIABLE FOR INCIDENTAL OR CONSEQUENTIAL DAMAGES. SOME STATES AND PROVINCES...

Dimension Guide
Page 1
...are for details. Ref. See dealer for planning purposes only. A 13-9/A16" Height (A) 13-9/16" Depth (B) 19-1/8" Width (C) 24" NOTE: Microwave oven can be provided. Instructions packed with a fuse or circuit breaker is recommended that a separate circuit serving only this appliance be built into a wall... the oven and poor cooking results. W10165703 01-18-08 NOTE: Do not block the exhaust vents or air intake openings. ® Countertop Microwave Ovens PRODUCT MODEL NUMBERS KCMS2055S OVERALL DIMENSIONS B C 19-1/8" 24" Electrical: A 120-volt, 60 Hz, AC-only, 15 or 20 amp...
...are for details. Ref. See dealer for planning purposes only. A 13-9/A16" Height (A) 13-9/16" Depth (B) 19-1/8" Width (C) 24" NOTE: Microwave oven can be provided. Instructions packed with a fuse or circuit breaker is recommended that a separate circuit serving only this appliance be built into a wall... the oven and poor cooking results. W10165703 01-18-08 NOTE: Do not block the exhaust vents or air intake openings. ® Countertop Microwave Ovens PRODUCT MODEL NUMBERS KCMS2055S OVERALL DIMENSIONS B C 19-1/8" 24" Electrical: A 120-volt, 60 Hz, AC-only, 15 or 20 amp...


