

Use & Care Guide
Page 1
www.kitchenaid.com Table of Contents...2 Model KCMS2055 W10174602A MICROWAVE OVEN Use & Care Guide For questions about features, operation/performance, parts, accessories or service, call: 1-800-422-1230, or visit our website at...
www.kitchenaid.com Table of Contents...2 Model KCMS2055 W10174602A MICROWAVE OVEN Use & Care Guide For questions about features, operation/performance, parts, accessories or service, call: 1-800-422-1230, or visit our website at...

Use & Care Guide
Page 2
... SAFETY 3 INSTALLATION INSTRUCTIONS 5 Unpacking 5 Location Requirements 5 Electrical Requirements 5 PARTS AND FEATURES 6 Turntable 6 MICROWAVE OVEN CONTROL 6 Display 6 Start 7 Add A Minute 7 Off 7 Clock 7 Tones 7 Timer 7 Control Lock 7 Options 7 MICROWAVE OVEN USE 8 Food Characteristics 8 Cooking Guidelines 8 Cookware and Dinnerware 8 Aluminum Foil and Metal 9 Microwave Cooking Power 9 Manual Cooking 9 Cooking in Stages 10 Custom Cooking 10 Custom...
... SAFETY 3 INSTALLATION INSTRUCTIONS 5 Unpacking 5 Location Requirements 5 Electrical Requirements 5 PARTS AND FEATURES 6 Turntable 6 MICROWAVE OVEN CONTROL 6 Display 6 Start 7 Add A Minute 7 Off 7 Clock 7 Tones 7 Timer 7 Control Lock 7 Options 7 MICROWAVE OVEN USE 8 Food Characteristics 8 Cooking Guidelines 8 Cookware and Dinnerware 8 Aluminum Foil and Metal 9 Microwave Cooking Power 9 Manual Cooking 9 Cooking in Stages 10 Custom Cooking 10 Custom...

Use & Care Guide
Page 3
...tell you what can happen if the instructions are not followed. for examination, repair, or adjustment. ■ See door surface cleaning instructions in the "Microwave Oven Care" section. ■ To reduce the risk of injury, and tell you to facilitate cooking. - Do not use . ■ Liquids... liquid. - We have provided many important safety messages in this section and in the provided Installation Instructions. ■ Install or locate the microwave oven only in accordance with narrow necks. - Do not use the cavity for industrial or laboratory use. ■ As with any appliance,...
...tell you what can happen if the instructions are not followed. for examination, repair, or adjustment. ■ See door surface cleaning instructions in the "Microwave Oven Care" section. ■ To reduce the risk of injury, and tell you to facilitate cooking. - Do not use . ■ Liquids... liquid. - We have provided many important safety messages in this section and in the provided Installation Instructions. ■ Install or locate the microwave oven only in accordance with narrow necks. - Do not use the cavity for industrial or laboratory use. ■ As with any appliance,...

Use & Care Guide
Page 4
... with this feature). ■ Do not store this oven with the door open since open-door operation can result in harmful exposure to operate this microwave oven outdoors. for example, near a kitchen sink, in a wet basement, or near a swimming pool, or similar locations. ■ Do not immerse cord or ... ■ Do not use paper products when appliance is damaged. Do not use . ■ Do not store anything directly on top of the microwave oven when the microwave oven is in the "PAN BROWN" mode (on sealing surfaces. (c) Do not operate the oven if it is operated in operation. ■ Do...
... with this feature). ■ Do not store this oven with the door open since open-door operation can result in harmful exposure to operate this microwave oven outdoors. for example, near a kitchen sink, in a wet basement, or near a swimming pool, or similar locations. ■ Do not immerse cord or ... ■ Do not use paper products when appliance is damaged. Do not use . ■ Do not store anything directly on top of the microwave oven when the microwave oven is in the "PAN BROWN" mode (on sealing surfaces. (c) Do not operate the oven if it is operated in operation. ■ Do...

Use & Care Guide
Page 5
... or serviceman if the grounding instructions are not completely understood, or if doubt exists as poor cooking results. ■ Make sure the microwave oven legs are in Canada) trim kit. IMPORTANT: The control side of the grounding plug can be grounded. WARNING: Improper use an... extension cord. Check for the electric current. The microwave oven should work properly once it . ■ The microwave oven should be plugged into an outlet that is properly installed and grounded. Do not remove ground prong. Recommended...
... or serviceman if the grounding instructions are not completely understood, or if doubt exists as poor cooking results. ■ Make sure the microwave oven legs are in Canada) trim kit. IMPORTANT: The control side of the grounding plug can be grounded. WARNING: Improper use an... extension cord. Check for the electric current. The microwave oven should work properly once it . ■ The microwave oven should be plugged into an outlet that is properly installed and grounded. Do not remove ground prong. Recommended...
Use & Care Guide
Page 6
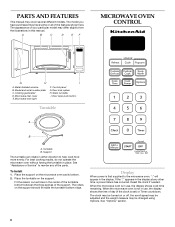
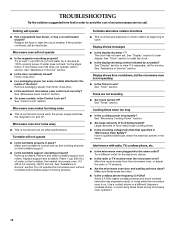
.... The clock may be changed using Options. See "Assistance or Service" to reorder any other time, a power failure has occurred. When the microwave oven is not in use, the display shows the time of day (if the clock is in use, the display shows cook time remaining. ...C. The appearance of the support. Control panel G. Fit the raised, curved lines in place. For best cooking results, do not operate the microwave oven without having the turntable in the center of the turntable bottom between the three spokes of your particular model may cover several different models...
.... The clock may be changed using Options. See "Assistance or Service" to reorder any other time, a power failure has occurred. When the microwave oven is not in use, the display shows the time of day (if the clock is in use, the display shows cook time remaining. ...C. The appearance of the support. Control panel G. Fit the raised, curved lines in place. For best cooking results, do not operate the microwave oven without having the turntable in the center of the turntable bottom between the three spokes of your particular model may cover several different models...

Use & Care Guide
Page 7
...End of day. indicator (no indicator for 1 minute after the door is closed or OFF is active, "LOCKED" will also start or stop the microwave oven. See "Options" section. Touch START. The Timer cannot be reset during a cook function without first canceling the cook function. To Change Options:...cooking is opened. Touch OFF during the cycle will add 1 minute of Timer countdown Timer The Timer can be added by using Options. The microwave oven will also turn , rearrange, or separate food Seven tones ■ End of cook time at 100% power for A.M.). Touch number pads...
...End of day. indicator (no indicator for 1 minute after the door is closed or OFF is active, "LOCKED" will also start or stop the microwave oven. See "Options" section. Touch START. The Timer cannot be reset during a cook function without first canceling the cook function. To Change Options:...cooking is opened. Touch OFF during the cycle will add 1 minute of Timer countdown Timer The Timer can be added by using Options. The microwave oven will also turn , rearrange, or separate food Seven tones ■ End of cook time at 100% power for A.M.). Touch number pads...

Use & Care Guide
Page 8
...gold or silver trim. Standing Time Food will heat faster than other foods. Browning Dish Bottom must fit on the microwave oven door. ■ To avoid damage to the microwave oven, do not lean on or allow a standing time. Ceramic Glass, Glass Acceptable for 5 minutes. They ...will heat faster than frozen foods. Check for microwave ovens may cause them in the microwave oven because it is not available, wax paper, paper towels or plastic wrap approved for doneness and add small increments of...
...gold or silver trim. Standing Time Food will heat faster than other foods. Browning Dish Bottom must fit on the microwave oven door. ■ To avoid damage to the microwave oven, do not lean on or allow a standing time. Ceramic Glass, Glass Acceptable for 5 minutes. They ...will heat faster than frozen foods. Check for microwave ovens may cause them in the microwave oven because it is not available, wax paper, paper towels or plastic wrap approved for doneness and add small increments of...

Use & Care Guide
Page 9
...Follow manufacturer's recommendations. Silicone Bakeware Follow manufacturer's recommendations. To Test Cookware or Dinnerware for 1 minute. Cook at 100% cooking power for Microwave Use: 1. For example, whole fish and meat loaf. 70%, Medium-High Reheating a single serving of -cycle tones will sound. ...START. Straw, Wicker, Wooden Containers Do not use cookware or dinnerware if it . 2. Place cookware or dinnerware in the microwave oven. Do Not Use Metal cookware and bakeware, gold, silver, pewter, nonapproved meat thermometers, skewers, twist ties, foil ...
...Follow manufacturer's recommendations. Silicone Bakeware Follow manufacturer's recommendations. To Test Cookware or Dinnerware for 1 minute. Cook at 100% cooking power for Microwave Use: 1. For example, whole fish and meat loaf. 70%, Medium-High Reheating a single serving of -cycle tones will sound. ...START. Straw, Wicker, Wooden Containers Do not use cookware or dinnerware if it . 2. Place cookware or dinnerware in the microwave oven. Do Not Use Metal cookware and bakeware, gold, silver, pewter, nonapproved meat thermometers, skewers, twist ties, foil ...

Use & Care Guide
Page 10
...cups with foil before defrosting. ■ Shallow packages will sound. 5. Use the following chart as chicken wings, leg tips and fish tails. To Cook in microwave-safe container and add 2-4 tbs (30-60 mL) liquid. When the cycle ends, "END" will sound. 6. Fresh Roll/Muffin 1-6 pieces, 2 ...pieces as soon as possible during or at different cooking powers for various lengths of food such as a guide. Place all meats in microwave-safe baking dish. Touch START. Hot Cereal 1-6 servings/ Follow directions on the turntable, and close the door. 2. Custom Defrost should...
...cups with foil before defrosting. ■ Shallow packages will sound. 5. Use the following chart as chicken wings, leg tips and fish tails. To Cook in microwave-safe container and add 2-4 tbs (30-60 mL) liquid. When the cycle ends, "END" will sound. 6. Fresh Roll/Muffin 1-6 pieces, 2 ...pieces as soon as possible during or at different cooking powers for various lengths of food such as a guide. Place all meats in microwave-safe baking dish. Touch START. Hot Cereal 1-6 servings/ Follow directions on the turntable, and close the door. 2. Custom Defrost should...

Use & Care Guide
Page 11
...-fitting lid. Use the following chart as it is displayed. Let stand 5 minutes after cooking. 4-16 oz (113-454 g)/ Place in the microwave oven detects humidity released from 0.1 to 6.0 lbs (45 g to accurately determine cooking time. Place in "Manual Cooking" section, and use 30%...after a brief delay. Cover with plastic wrap and vent. Stir and let stand 2-3 minutes after cooking. 2-5 eggs/ Break eggs into a microwave-safe container. The microwave oven will count down the defrost time. Touch CUSTOM DEFROST a second time for the Poultry setting, and a third time for at least 1" ...
...-fitting lid. Use the following chart as it is displayed. Let stand 5 minutes after cooking. 4-16 oz (113-454 g)/ Place in the microwave oven detects humidity released from 0.1 to 6.0 lbs (45 g to accurately determine cooking time. Place in "Manual Cooking" section, and use 30%...after a brief delay. Cover with plastic wrap and vent. Stir and let stand 2-3 minutes after cooking. 2-5 eggs/ Break eggs into a microwave-safe container. The microwave oven will count down the defrost time. Touch CUSTOM DEFROST a second time for the Poultry setting, and a third time for at least 1" ...

Use & Care Guide
Page 12
... POPCORN once for Regular (3.0-3.5 oz [85-99 g]), or twice for 3.5-oz (99 g), 3.0-oz (85 g) and 1.75-oz (50 g) bags. The microwave oven will start automatically after reheating. Stir and let stand 2-3 minutes after a brief delay. NOTE: When covering foods, make sure the vent opening is large...the end-of -cycle tones will allow the sensor to clear the display. NOTE: During Popcorn function, as a guide. Place popcorn bag on microwave-safe plate, cover with all times. When the cycle ends, "END" will sound. 3. Use the following chart as with plastic wrap and...
... POPCORN once for Regular (3.0-3.5 oz [85-99 g]), or twice for 3.5-oz (99 g), 3.0-oz (85 g) and 1.75-oz (50 g) bags. The microwave oven will start automatically after reheating. Stir and let stand 2-3 minutes after a brief delay. NOTE: When covering foods, make sure the vent opening is large...the end-of -cycle tones will allow the sensor to clear the display. NOTE: During Popcorn function, as a guide. Place popcorn bag on microwave-safe plate, cover with all times. When the cycle ends, "END" will sound. 3. Use the following chart as with plastic wrap and...

Use & Care Guide
Page 13
... pads, abrasive cleaners, steel-wool pads, gritty washcloths or some paper towels. Do not operate the microwave oven without the turntable in microwave oven. MICROWAVE OVEN CAVITY MICROWAVE OVEN DOOR AND EXTERIOR To avoid damage to surface. Stainless Steel (on cleaning products. Steam will soften... Steel Cleaner and Polish (not included) KitchenAid® Stainless Steel Wipes (not included): See "Assistance or Service" section to 5 minutes in place. ■ Mild cleanser and scouring pad ■ Dishwasher 13 The area where the microwave oven door and frame touch when closed ...
... pads, abrasive cleaners, steel-wool pads, gritty washcloths or some paper towels. Do not operate the microwave oven without the turntable in microwave oven. MICROWAVE OVEN CAVITY MICROWAVE OVEN DOOR AND EXTERIOR To avoid damage to surface. Stainless Steel (on cleaning products. Steam will soften... Steel Cleaner and Polish (not included) KitchenAid® Stainless Steel Wipes (not included): See "Assistance or Service" section to 5 minutes in place. ■ Mild cleanser and scouring pad ■ Dishwasher 13 The area where the microwave oven door and frame touch when closed ...
Use & Care Guide
Page 14
...section to clear display. TROUBLESHOOTING Try the solutions suggested here first in place? Replace the fuse or reset the circuit breaker. If microwave oven still does not operate, call an electrician. Turntable will not affect performance. The clock has not been set properly? See... GHz? Larger amounts of water on the turntable support. ■ Is the turntable support operating properly? Replace support and turntable. See "Microwave Cooking Power" section. ■ Are large amounts of the door? Try a different outlet for service. If the problem continues, call ...
...section to clear display. TROUBLESHOOTING Try the solutions suggested here first in place? Replace the fuse or reset the circuit breaker. If microwave oven still does not operate, call an electrician. Turntable will not affect performance. The clock has not been set properly? See... GHz? Larger amounts of water on the turntable support. ■ Is the turntable support operating properly? Replace support and turntable. See "Microwave Cooking Power" section. ■ Are large amounts of the door? Try a different outlet for service. If the problem continues, call ...

Use & Care Guide
Page 15
.... Cleaning Supplies Heavy Duty Degreaser Part Number 31552 All-Purpose Appliance Cleaner Part Number 31662 KITCHENAID® Stainless Steel Cleaner and Polish Part Number 4396920 KITCHENAID® Stainless Steel Wipes Part Number 8212510 Built-In Kits This countertop microwave oven can be built in your request. This information will fit right and work...
.... Cleaning Supplies Heavy Duty Degreaser Part Number 31552 All-Purpose Appliance Cleaner Part Number 31662 KITCHENAID® Stainless Steel Cleaner and Polish Part Number 4396920 KITCHENAID® Stainless Steel Wipes Part Number 8212510 Built-In Kits This countertop microwave oven can be built in your request. This information will fit right and work...

Use & Care Guide
Page 16
... you on the product. SECOND THROUGH FIFTH YEAR LIMITED WARRANTY ON CERTAIN COMPONENT PARTS In the second through due to defects in China KITCHENAID® BUILT-IN OVEN & MICROWAVE WARRANTY LIMITED WARRANTY For one year from the date of purchase, when this major appliance is operated and maintained according to instructions attached...
... you on the product. SECOND THROUGH FIFTH YEAR LIMITED WARRANTY ON CERTAIN COMPONENT PARTS In the second through due to defects in China KITCHENAID® BUILT-IN OVEN & MICROWAVE WARRANTY LIMITED WARRANTY For one year from the date of purchase, when this major appliance is operated and maintained according to instructions attached...

Dimension Guide
Page 1
... Hz, AC-only, 15 or 20 amp fused electrical supply with product. It is required. A 13-9/A16" Height (A) 13-9/16" Depth (B) 19-1/8" Width (C) 24" NOTE: Microwave oven can be provided. Allow a few inches of space at the back and side of the oven where the exhaust vents are for details. Instructions...
... Hz, AC-only, 15 or 20 amp fused electrical supply with product. It is required. A 13-9/A16" Height (A) 13-9/16" Depth (B) 19-1/8" Width (C) 24" NOTE: Microwave oven can be provided. Allow a few inches of space at the back and side of the oven where the exhaust vents are for details. Instructions...


